2023 TOYOTA RAV4 PRIME charging
[x] Cancel search: chargingPage 126 of 662

1262-2. Charging
1Unlock the doors to unlock
the charging connector.
( P.106)
The charging co nnector will be
unlocked and the AC charging inlet
light will illuminate when the doors
are unlocked.
2 Pull the charging connector
towards you while pressing
the latch release button.
If the latch release button is
pressed during charging (while the
charging indicator is illuminated),
charging will be interrupted.
3Attach the charging connec-
tor cap.
4 Attach the AC charging inlet
cap and close the charging
port lid.
Lock the doors to lock the charging
port lid. ( P.106)
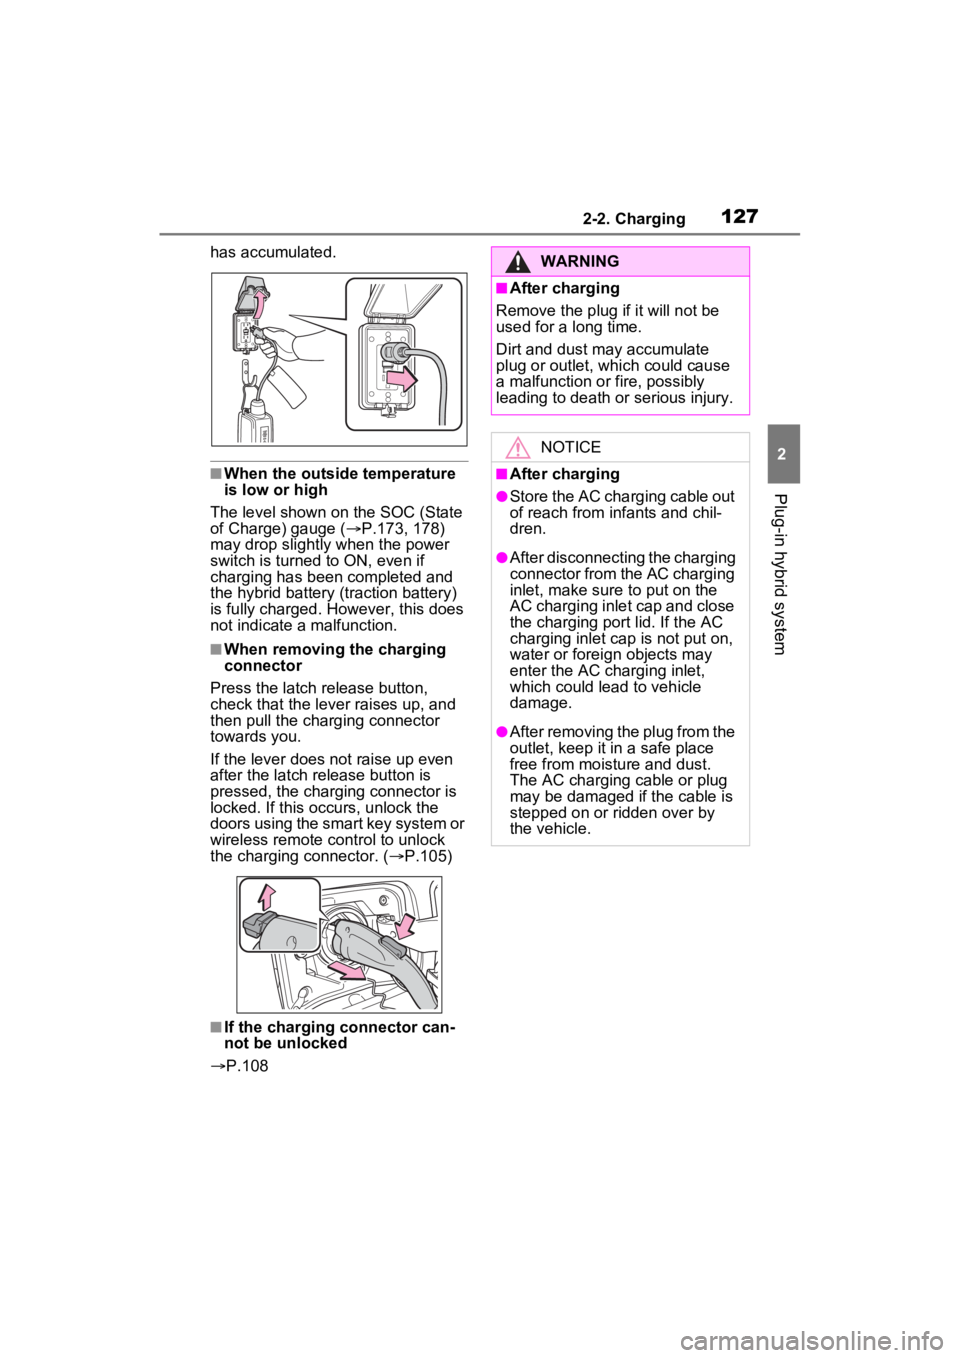
5 Remove the plug from the
outlet when the charging
equipment will not be used
for a prolonged period of
time.
Hold the body of the plug when
removing.
Make sure to put the cable away
immediately after disconnecting.
( P.127)
When leaving the plug inserted,
inspect the plug and connector
once a month to check if dirt or dust
NOTICE
●Do not block the air intake vent
with seat covers or luggage
●If the air intake vent is clogged
with dust, clean it with a vacuum
cleaner
●Do not allow water or foreign
matter to enter t he air intake
vent
●Do not spill large amounts of
water near the air intake vent
If water is spilled, have the vehi-
cle inspected by your Toyota
dealer and do not charge the
hybrid battery (traction battery)
before the inspection.
After charging
Page 127 of 662

1272-2. Charging
2
Plug-in hybrid system
has accumulated.
■When the outside temperature
is low or high
The level shown on the SOC (State
of Charge) gauge ( P.173, 178)
may drop slightly when the power
switch is turned to ON, even if
charging has bee n completed and
the hybrid battery (traction battery)
is fully charged. However, this does
not indicate a malfunction.
■When removing the charging
connector
Press the latch release button,
check that the lever raises up, and
then pull the charging connector
towards you.
If the lever does not raise up even
after the latch release button is
pressed, the charging connector is
locked. If this occurs, unlock the
doors using the smart key system or
wireless remote control to unlock
the charging connector. ( P.105)
■If the charging connector can-
not be unlocked
P.108
WARNING
■After charging
Remove the plug if it will not be
used for a long time.
Dirt and dust may accumulate
plug or outlet, which could cause
a malfunction or fire, possibly
leading to death or serious injury.
NOTICE
■After charging
●Store the AC charging cable out
of reach from infants and chil-
dren.
●After disconnecting the charging
connector from the AC charging
inlet, make sure to put on the
AC charging inlet cap and close
the charging port lid. If the AC
charging inlet cap is not put on,
water or foreign objects may
enter the AC cha rging inlet,
which could lead to vehicle
damage.
●After removing the plug from the
outlet, keep it in a safe place
free from moisture and dust.
The AC charging cable or plug
may be damaged if the cable is
stepped on or ridden over by
the vehicle.
Page 128 of 662

1282-2. Charging
■Calendar settings
The current date an d time is auto-
matically set using GPS. However, if
the automatic setti ng of the clock is
turned off on the Multimedia Dis-
play, it is necessary to set the calen-
dar on the multi-information display
( P.191, 203). For details, refer to
the “MULTIMEDIA OWNER’S MAN-
UAL”.
If the calendar settings check
screen is displayed when an
attempt is made to register a
charging schedule, make sure that
the calendar settings are correctly. If
the calendar is not set correctly, the
charging schedule function will not
operate properly.
When registering the charging
schedule, the following settings
can be changed.
■Select the charging mode
One of the two following
charging modes can be
selected.
“Start” or “Start at set time”
Starts charging at the set time
*1,
2
and finishes charging when
fully charged.
“Departure” or “Departure
time”
Starts charging to finish at the
set time.
*3, 4
When this setting is selected,
the air conditioning-linked func-
tion can be used.
*1: There might be a slight error in the timing when charging starts
due to the state of the hybrid bat-
tery (traction battery).
*2: Charging schedule function is performed in accordance with
the clock. Before registering the
charging schedule, check and
set the clock to t he proper time.
*3: If the system de termines that
charging cannot be completed
by the set depart ure time, it will
start charging. Check the
charging schedule.
*4: If the outside temperature changes suddenly o r the state of
the power source being used is
changed during charging, the
system may not complete the
charging as estimated.
■Repeated setting
The periodic charging schedule
can be set by selecting your
desired day of the week. (If no
days are selected, charging is
only carried out once.)
Using the charging
schedule function
Charging can be carried out
at the desired time by regis-
tering the charging sched-
ule. Also, it is possible to
set the charging schedule to
one’s preferences, such as
having charging complete
by a certain departure time
or be carried out at the
same time on certain days.
Settings of the charging
schedule function
Page 129 of 662

1292-2. Charging
2
Plug-in hybrid system
■Air conditioning-linked set-
ting (“Climate Prep” or “Cli-
mate preparation”)
When the charging mode is set
to “Departure” or “Departure
time”, the vehicle air condition-
ing system ( P.422) can be set
to automatically operate
*
according to the set time.
By adjusting the cabin temperature
in advance, passengers can enjoy
a pleasant interior immediately after
entering the vehicle.
*: Operation starts approximately 20 minutes before the set depar-
ture time.
■Turning “Charge Now” on
and off
If even one charging schedule is
registered, charging does not
start until the set time, even if
the AC charging cable is con-
nected to the vehicle. To start
charging without changing the
charging schedule setting, turn
“Charge Now” on to temporarily
cancel the charging schedule
and enable charging after con-
necting the AC charging cable.
*
*: If the charging connector is removed during charging while
the charging schedule is regis-
tered and “Charge Now” is on,
“Charge Now” turns off.
■Changing “Next Event”*1, 2
It is possible to temporarily set
the time of the next charging
schedule without changing the registered repeated setting.
*3
*1: The “Next Event” refers to the
closest charging schedule from
the current time among the regis-
tered charging schedules.
Charging schedule is performed
based on the “Next Event”.
*2: “Next Event” can not be changed on the Multimedia Display.
*3: When “Next Event” is changed, the current charging schedule
will be temporarily ignored and
charging will not be carried out
until the time specified by “Next
Event”. (For example, when
“Next Event” is set for 2 days
later, even if items are registered
on the charging schedule,
charging will not be carried out
until the time specified by “Next
Event”.)
The charging schedule can be
registered on the multi-informa-
tion display or Multimedia Dis-
play
7-inch multi-information dis-
play operation (if equipped):
P.131
12.3-inch multi-information
display operation (if
equipped): P.137
Multimedia Display opera-
tion: P.143
Registering the charging
schedule
Page 130 of 662

1302-2. Charging
■Charging schedule
●The charging schedule cannot be
set while driving.
●A maximum of 15 charging sched-
ules can be registered.
■To make sure that the charging
schedule function operates cor-
rectly
Check the following items.
●The clock is adjusted to the proper
time
●The calendar is set to the correct
date
●Check that the power switch is
turned off
●After registering the charging
schedule, connect the AC
charging cable
The charging sta rt time is deter-
mined based on the charging
schedule at the time that the AC
charging cable was connected.
●After connecting the AC charging
cable, check that the charging
indicator of the charging port
flashes ( P.98)
●Do not use an ou tlet that has a
power cut off function (including a
timer function)
Use an outlet that constantly sup-
plies electricity. For outlets where
the power is cut off due to a timer
function, etc., charging may not be
carried out according to plan if the
power is cut off during the set
time.
●The automatic ad justment of the clock by GPS is set to on.
For details regarding setting clock,
refer to the “MULTIMEDIA
OWNER’S MANUAL”.
■When the AC charging cable
remains connected to the vehi-
cle
Even if multiple consecutive
charging schedules are registered,
the next charge will not be carried
out according to the charging
schedule until the AC charging
cable is removed and reconnected
after charging co mpletes. Also,
when the hybrid battery (traction
battery) is fully charged, charging
according to the charging schedule
will not be carried out.
■“Climate Prep” or “Climate
preparation”
●When the air conditioning-linked
setting is turned on, the air condi-
tioning operates until the set
departure time. Therefore, the air
conditioning will co nsume electric-
ity and charging may not complete
by the set departure time.
●If the hybrid batte ry (traction bat-
tery) is fully charged, charging will
not be carried o ut, even if the
charging schedule is set. How-
ever, if “Climate Prep” or “Climate
preparation” is turned on, the air
conditioning will operate only once
when it nears the time set in
“Departure” or “Departure time”. If
this occurs, the air conditioning
will consume electricity and the
remaining charge of the hybrid
battery (traction battery) when
departing may be decreased.
●When the doors are unlocked, the
air conditioning system does not
operate.
■Smartphone-linked operation (if
equipped)
After applying to Toyota Apps, it is
possible to use the smartphone
application to change charging
Page 131 of 662

1312-2. Charging
2
Plug-in hybrid system
schedule settings.
For details about Toyota Apps, refer
to http://www.toyota.com/
connectedservices in the United
States and
http://www.toyota.ca/connected
in
Canada.
■When charging schedules are
ignored
When the following operations are
performed while the charging
schedule is on standby, charging
schedule is temporarily canceled
and charging is started.
●When the Remote Air Condition-
ing System ( P.431) is operated
●When turning “My Room Mode”
on ( P.148)
●When turning “Charge Now” on
( P.135, 141, 147)
●When an operation that temporar-
ily cancels charg ing using the
charging schedule is performed
( P.123)
■Effects of outside temperature
When the charging mode is set to
“Departure” or “Departure time”,
charging schedule may be ignored
due to the outside temperature and
charging may start.
■“Battery Heater” ( P.113) /
“Battery Cooler” ( P.114)
When charging is c arried out using
the charging schedule, the hybrid
battery (traction battery) heating or
cooling function may operate
according to the te mperature of the
hybrid battery (traction battery).
●When the charging mode is set to
“Start” or “Start at set time”, the
function starts at the set charging
start time.
●“Battery Heater”: When the
charging mode is set to “Depar-
ture” or “Departure time”, the func-
tion starts automatically to
complete heating by the desired
departure time.
●“Battery Cooler”: When the
charging mode is set to “Depar-
ture” or “Departu re time”, cooling
starts approximately 30 minutes
before the charg ing start time.
However, if there i s no time to fin-
ish charging by the charging
schedule, the hybrid battery (trac-
tion battery) cooling time may be
shortened and “Battery Cooler”
may not operate.
When operating charging
schedule, use the meter control
switches.
Meter control switches
( P.185)
Multi-information display
■Registering the charging
schedule
1 Press or of the meter
control switches to select .
2 Press or of the meter
control switches to select
“Vehicle Settings”, and then
press and hold .
Setting operations on 7-
inch multi-information
display (if equipped)
A
B
Page 132 of 662

1322-2. Charging
3Press or of the meter
control switches to select
“Charging Settings”, and then
press .
The “Charging Settings” screen will
be displayed.
4Press or of the meter
control switches to select
“Charging Schedule”, and
then press .
The “Charging Schedule” screen
will be displayed.
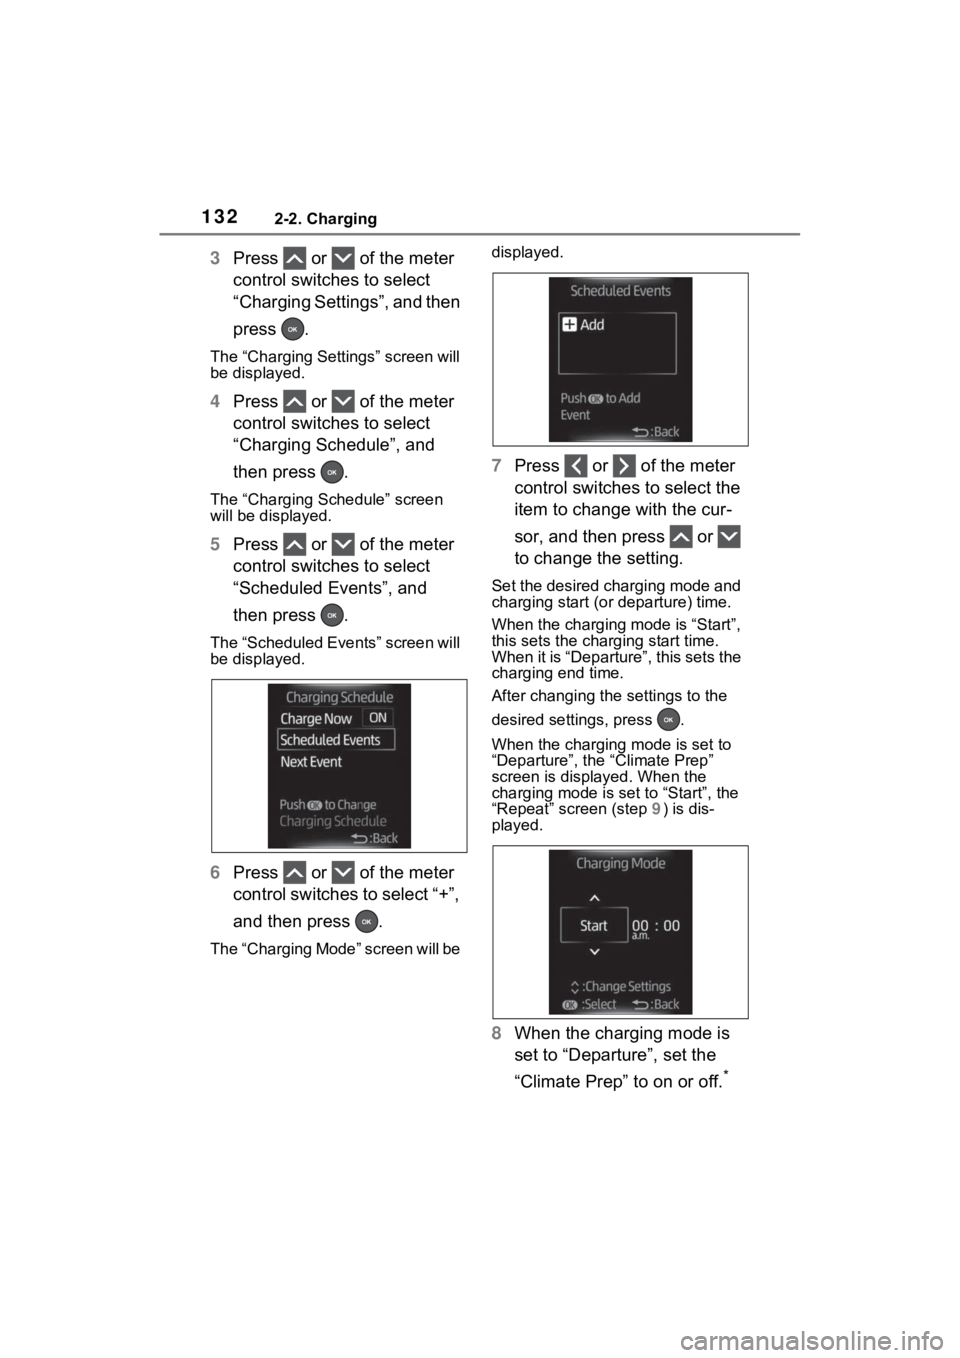
5Press or of the meter
control switches to select
“Scheduled Events”, and
then press .
The “Scheduled Events” screen will
be displayed.
6Press or of the meter
control switches to select “+”,
and then press .
The “Charging Mode” screen will be displayed.
7
Press or of the meter
control switches to select the
item to change with the cur-
sor, and then press or
to change the setting.
Set the desired charging mode and
charging start (or departure) time.
When the charging mode is “Start”,
this sets the charging start time.
When it is “Departure”, this sets the
charging end time.
After changing the settings to the
desired settings, press .
When the charging mode is set to
“Departure”, the “Climate Prep”
screen is displayed. When the
charging mode is set to “Start”, the
“Repeat” screen (step 9) is dis-
played.
8 When the charging mode is
set to “Departure”, set the
“Climate Prep” to on or off.
*
Page 133 of 662

1332-2. Charging
2
Plug-in hybrid system
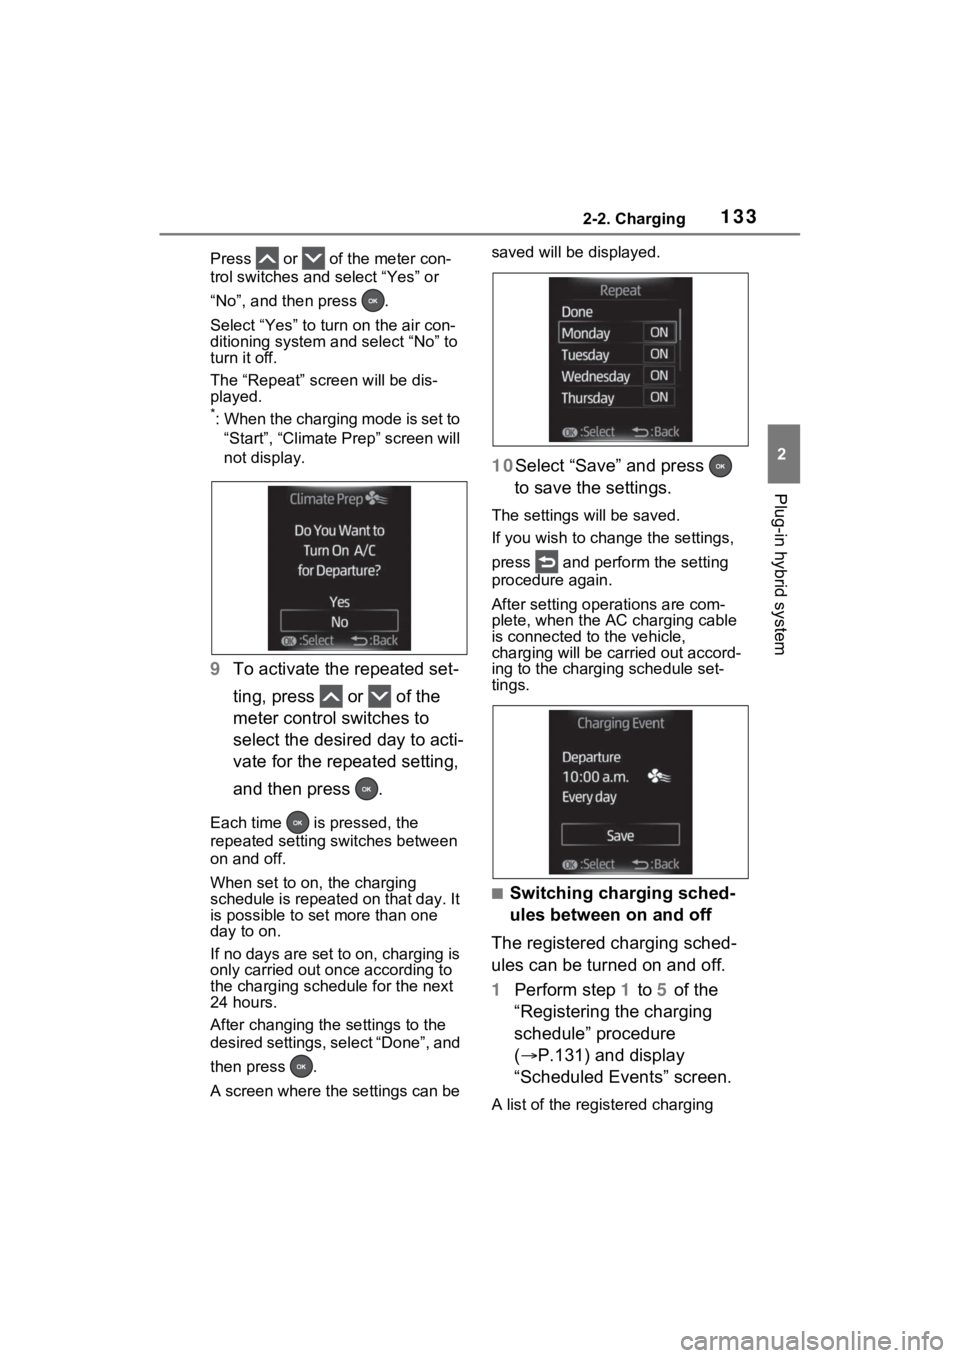
Press or of the meter con-
trol switches and select “Yes” or
“No”, and then press .
Select “Yes” to turn on the air con-
ditioning system and select “No” to
turn it off.
The “Repeat” screen will be dis-
played.
*: When the charging mode is set to
“Start”, “Climate Prep” screen will
not display.
9 To activate the repeated set-
ting, press or of the
meter control switches to
select the desired day to acti-
vate for the repeated setting,
and then press .
Each time is pressed, the
repeated setting switches between
on and off.
When set to on, the charging
schedule is repeated on that day. It
is possible to set more than one
day to on.
If no days are set to on, charging is
only carried out on ce according to
the charging sche dule for the next
24 hours.
After changing the settings to the
desired settings, select “Done”, and
then press .
A screen where the settings can be saved will be displayed.
10Select “Save” and press
to save the settings.
The settings will be saved.
If you wish to change the settings,
press and perform the setting
procedure again.
After setting ope rations are com-
plete, when the AC charging cable
is connected to the vehicle,
charging will be carried out accord-
ing to the charging schedule set-
tings.
■Switching charging sched-
ules between on and off
The registered charging sched-
ules can be turned on and off.
1 Perform step 1 to 5 of the
“Registering the charging
schedule” procedure
( P.131) and display
“Scheduled Events” screen.
A list of the registered charging