2023 TOYOTA RAV4 HYBRID seats
[x] Cancel search: seatsPage 166 of 586
1643-3. Adjusting the seats
ten.
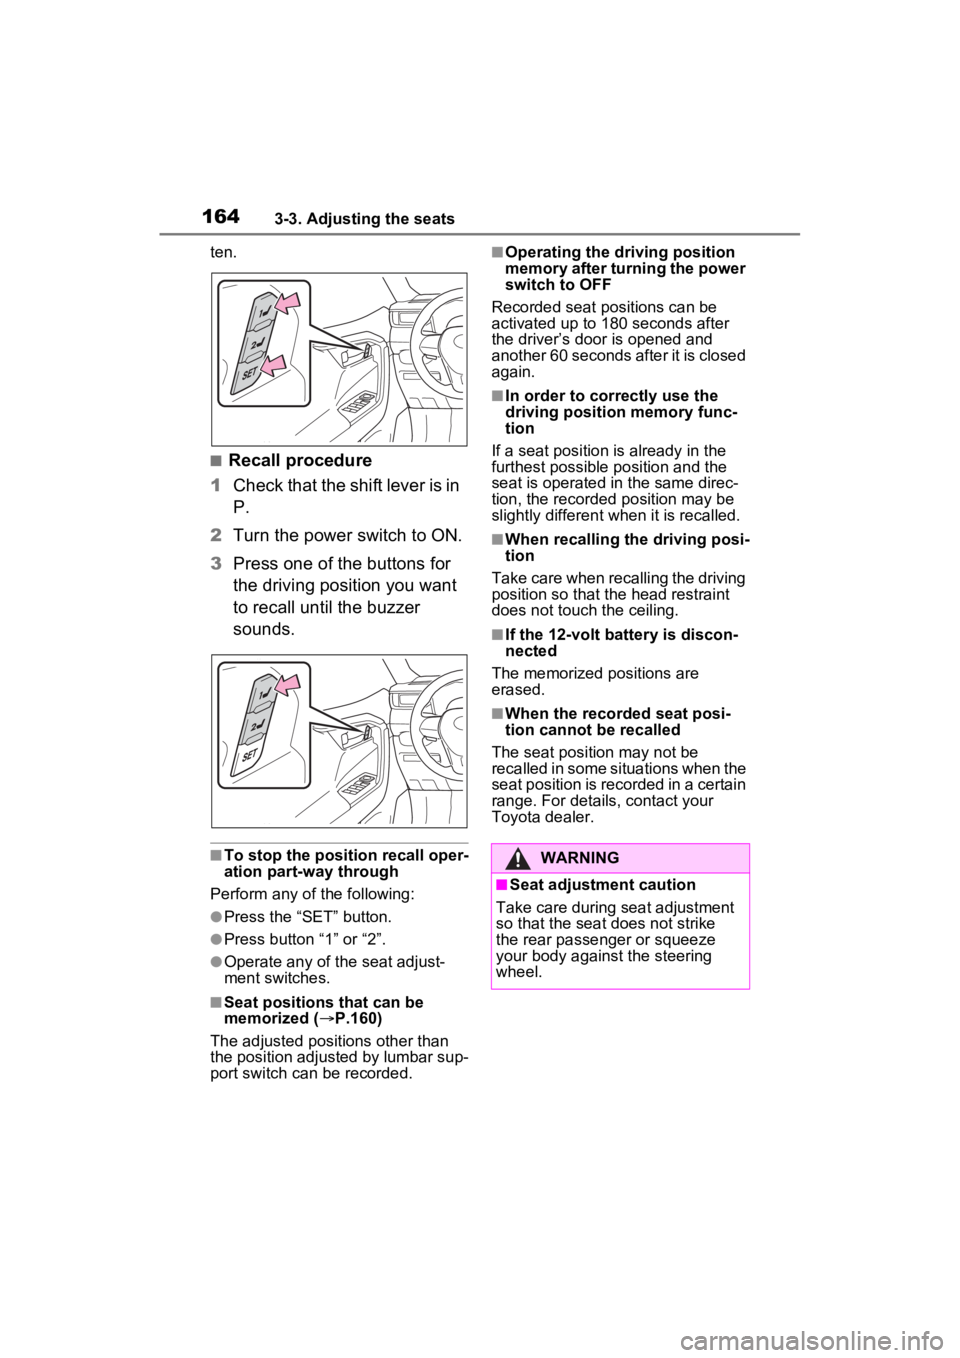
■Recall procedure
1 Check that the shift lever is in
P.
2 Turn the power switch to ON.
3 Press one of the buttons for
the driving position you want
to recall until the buzzer
sounds.
■To stop the position recall oper-
ation part-way through
Perform any of the following:
●Press the “SET” button.
●Press button “1” or “2”.
●Operate any of the seat adjust-
ment switches.
■Seat positions that can be
memorized ( P.160)
The adjusted positions other than
the position adjusted by lumbar sup-
port switch can be recorded.
■Operating the driving position
memory after turning the power
switch to OFF
Recorded seat positions can be
activated up to 180 seconds after
the driver’s door is opened and
another 60 seconds after it is closed
again.
■In order to correctly use the
driving position memory func-
tion
If a seat position is already in the
furthest possible position and the
seat is operated in the same direc-
tion, the recorded position may be
slightly different w hen it is recalled.
■When recalling the driving posi-
tion
Take care when recalling the driving
position so that the head restraint
does not touch the ceiling.
■If the 12-volt b attery is discon-
nected
The memorized positions are
erased.
■When the recorded seat posi-
tion cannot be recalled
The seat position may not be
recalled in some situations when the
seat position is recorded in a certain
range. For details, contact your
Toyota dealer.
WARNING
■Seat adjustment caution
Take care during seat adjustment
so that the seat does not strike
the rear passenger or squeeze
your body against the steering
wheel.
Page 167 of 586
1653-3. Adjusting the seats
3
Before driving
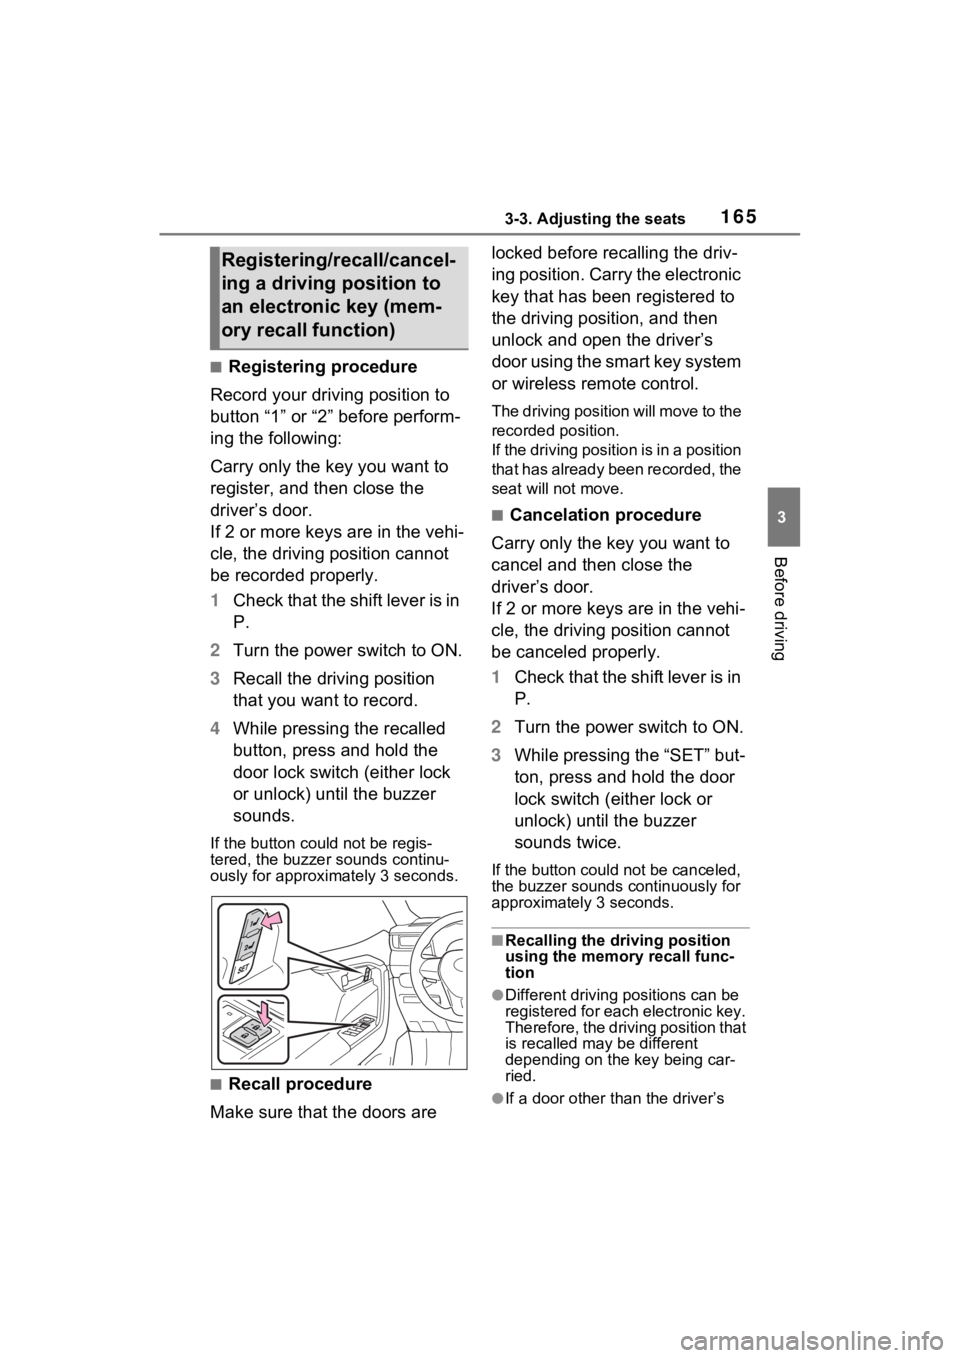
■Registering procedure
Record your driving position to
button “1” or “2” before perform-
ing the following:
Carry only the key you want to
register, and then close the
driver’s door.
If 2 or more keys are in the vehi-
cle, the driving position cannot
be recorded properly.
1 Check that the shift lever is in
P.
2 Turn the power switch to ON.
3 Recall the driving position
that you want to record.
4 While pressing the recalled
button, press and hold the
door lock switch (either lock
or unlock) until the buzzer
sounds.
If the button could not be regis-
tered, the buzzer sounds continu-
ously for approximately 3 seconds.
■Recall procedure
Make sure that the doors are locked before recalling the driv-
ing position. Carry the electronic
key that has been registered to
the driving position, and then
unlock and open the driver’s
door using the smart key system
or wireless remote control.
The driving position will move to the
recorded position.
If the driving position is in a position
that has already been recorded, the
seat will not move.
■Cancelation procedure
Carry only the key you want to
cancel and then close the
driver’s door.
If 2 or more keys are in the vehi-
cle, the driving position cannot
be canceled properly.
1 Check that the shift lever is in
P.
2 Turn the power switch to ON.
3 While pressing the “SET” but-
ton, press and hold the door
lock switch (either lock or
unlock) until the buzzer
sounds twice.
If the button could not be canceled,
the buzzer sounds c ontinuously for
approximately 3 seconds.
■Recalling the driving position
using the memory recall func-
tion
●Different driving p ositions can be
registered for each electronic key.
Therefore, the driving position that
is recalled may be different
depending on the key being car-
ried.
●If a door other than the driver’s
Registering/recall/cancel-
ing a driving position to
an electronic key (mem-
ory recall function)
Page 168 of 586
1663-3. Adjusting the seats
door is unlocked with smart key
system, the driving position can-
not be recalled. In this case, press
the driving position button which
has been set.
■Customization
Settings (e.g. the unlock door set-
tings of the memory recall function)
can be customized. (Customizable
features: P.525)
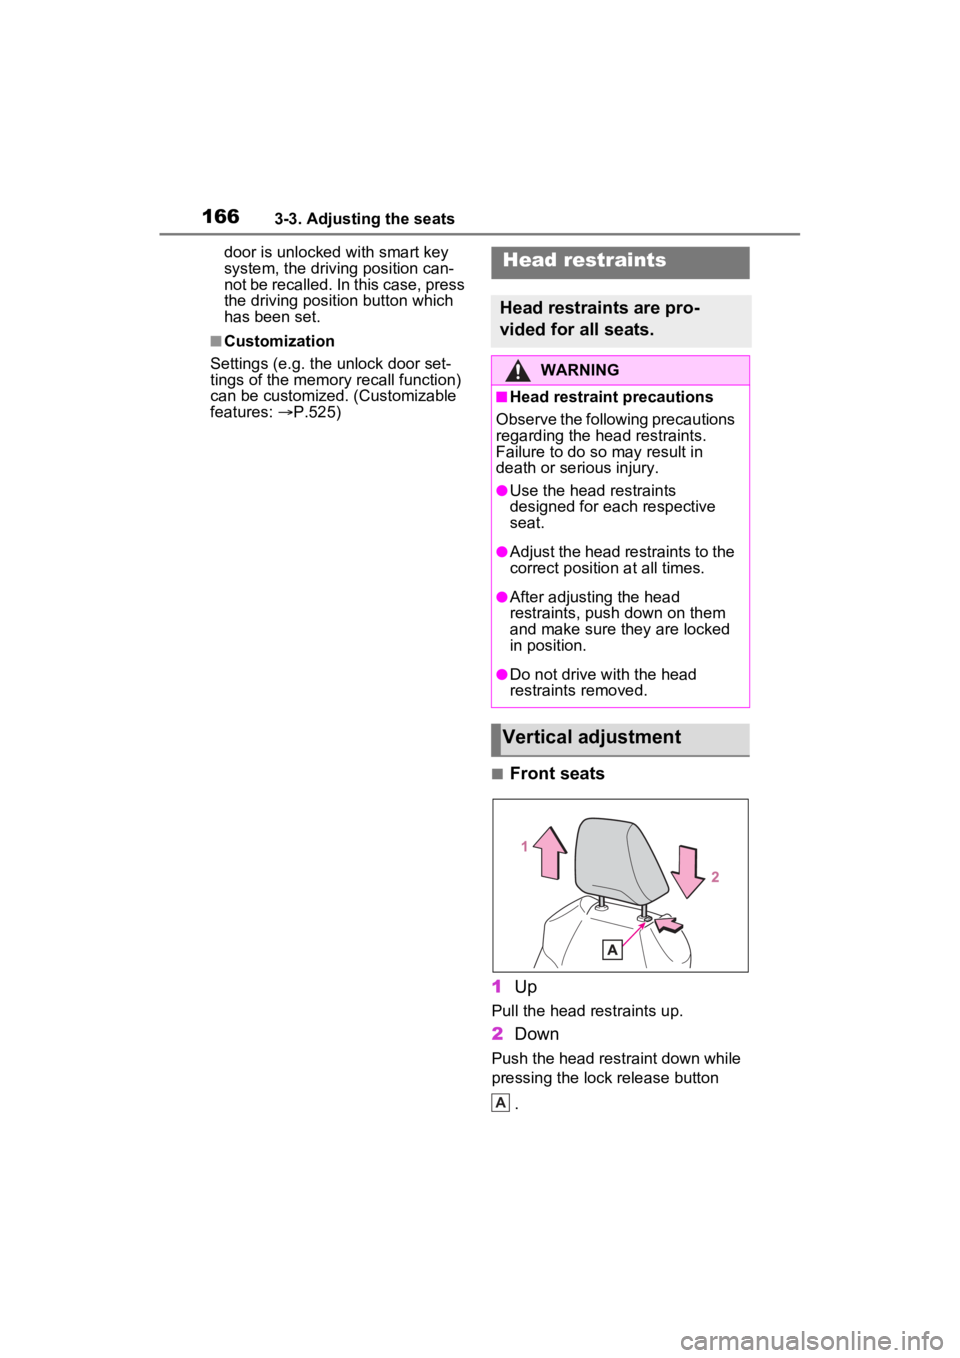
■Front seats
1 Up
Pull the head restraints up.
2Down
Push the head restraint down while
pressing the lock release button
.
Head restraints
Head restraints are pro-
vided for all seats.
WARNING
■Head restraint precautions
Observe the following precautions
regarding the head restraints.
Failure to do so may result in
death or serious injury.
●Use the head restraints
designed for each respective
seat.
●Adjust the head restraints to the
correct position at all times.
●After adjusting the head
restraints, push down on them
and make sure they are locked
in position.
●Do not drive with the head
restraints removed.
Vertical adjustment
A
Page 169 of 586
1673-3. Adjusting the seats
3
Before driving
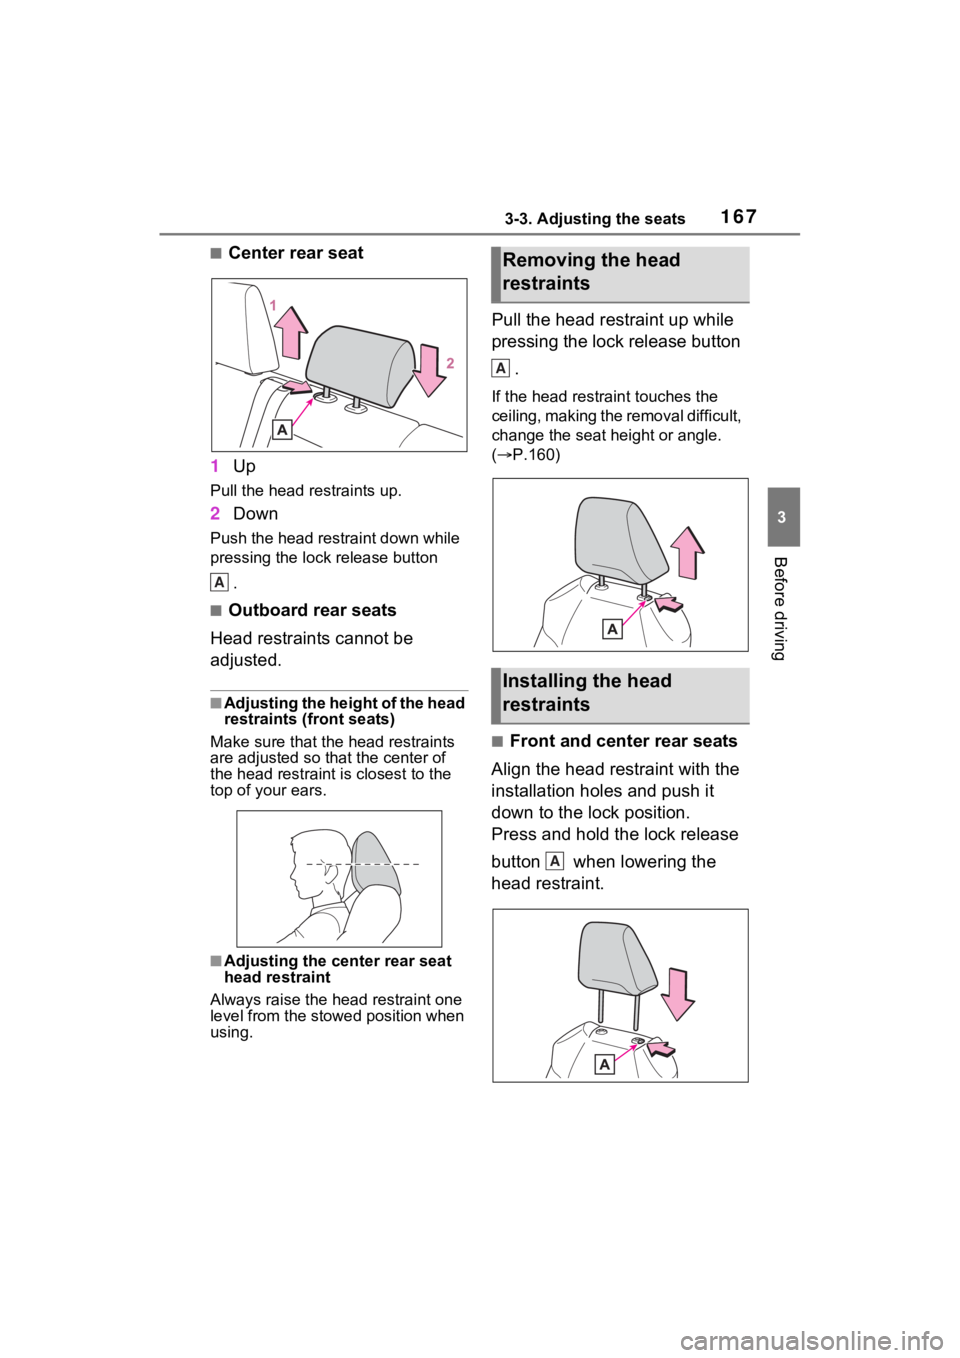
■Center rear seat
1 Up
Pull the head restraints up.
2Down
Push the head restraint down while
pressing the lock release button
.
■Outboard rear seats
Head restraints cannot be
adjusted.
■Adjusting the height of the head
restraints (front seats)
Make sure that the head restraints
are adjusted so that the center of
the head restraint is closest to the
top of your ears.
■Adjusting the center rear seat
head restraint
Always raise the head restraint one
level from the stowed position when
using.
Pull the head restraint up while
pressing the lock release button
.
If the head restrai nt touches the
ceiling, making the removal difficult,
change the seat height or angle.
( P.160)
■Front and center rear seats
Align the head restraint with the
installation holes and push it
down to the lock position.
Press and hold the lock release
button when lowering the
head restraint.
A
Removing the head
restraints
Installing the head
restraints
A
A
Page 170 of 586
1683-3. Adjusting the seats
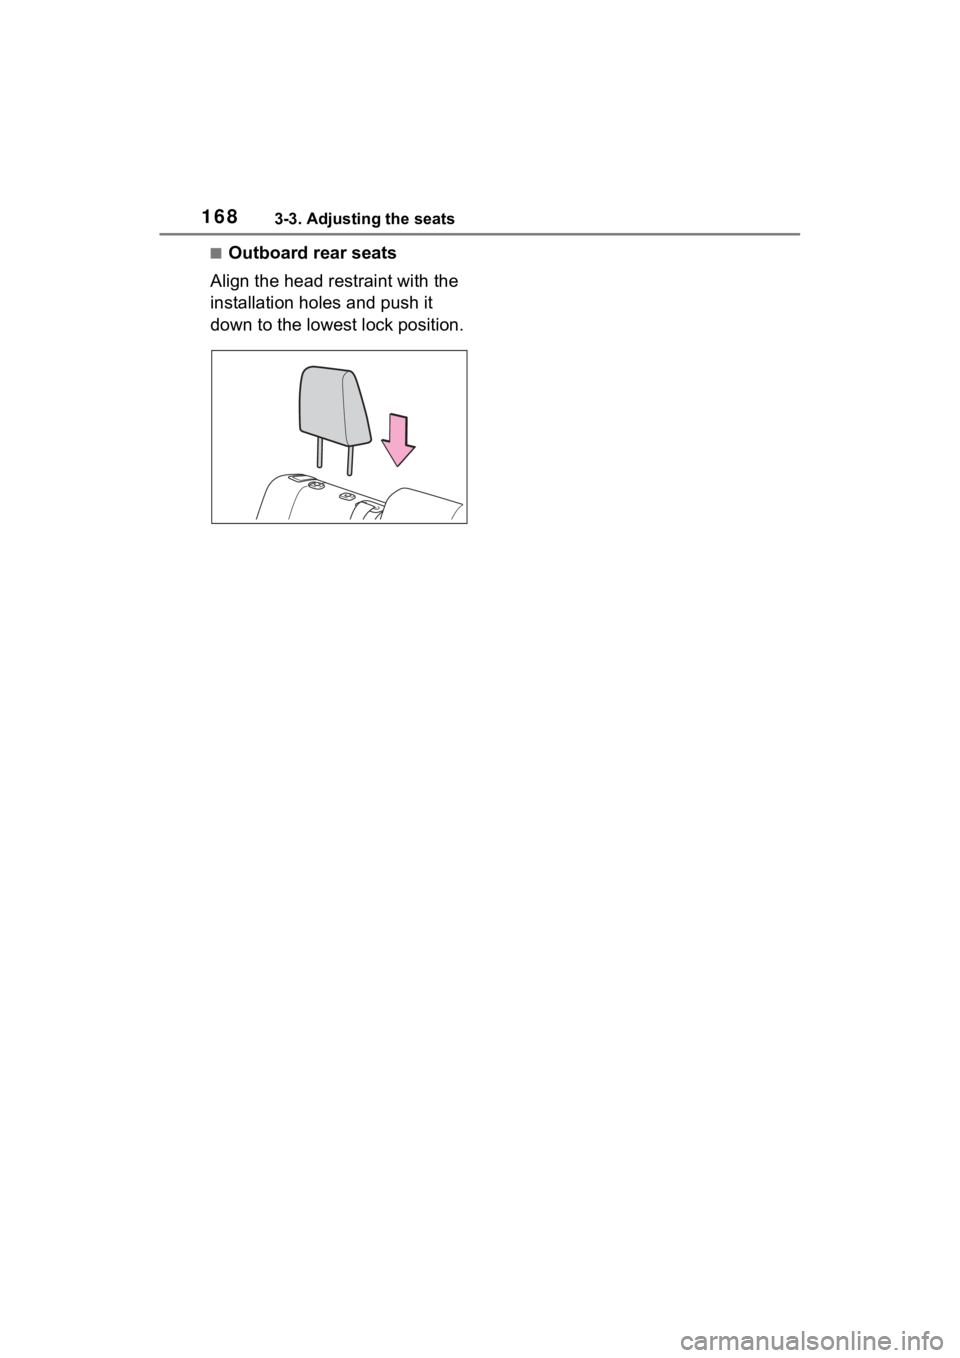
■Outboard rear seats
Align the head restraint with the
installation holes and push it
down to the lowest lock position.
Page 174 of 586
1723-4. Adjusting the steering wheel and mirrors
*: If equipped
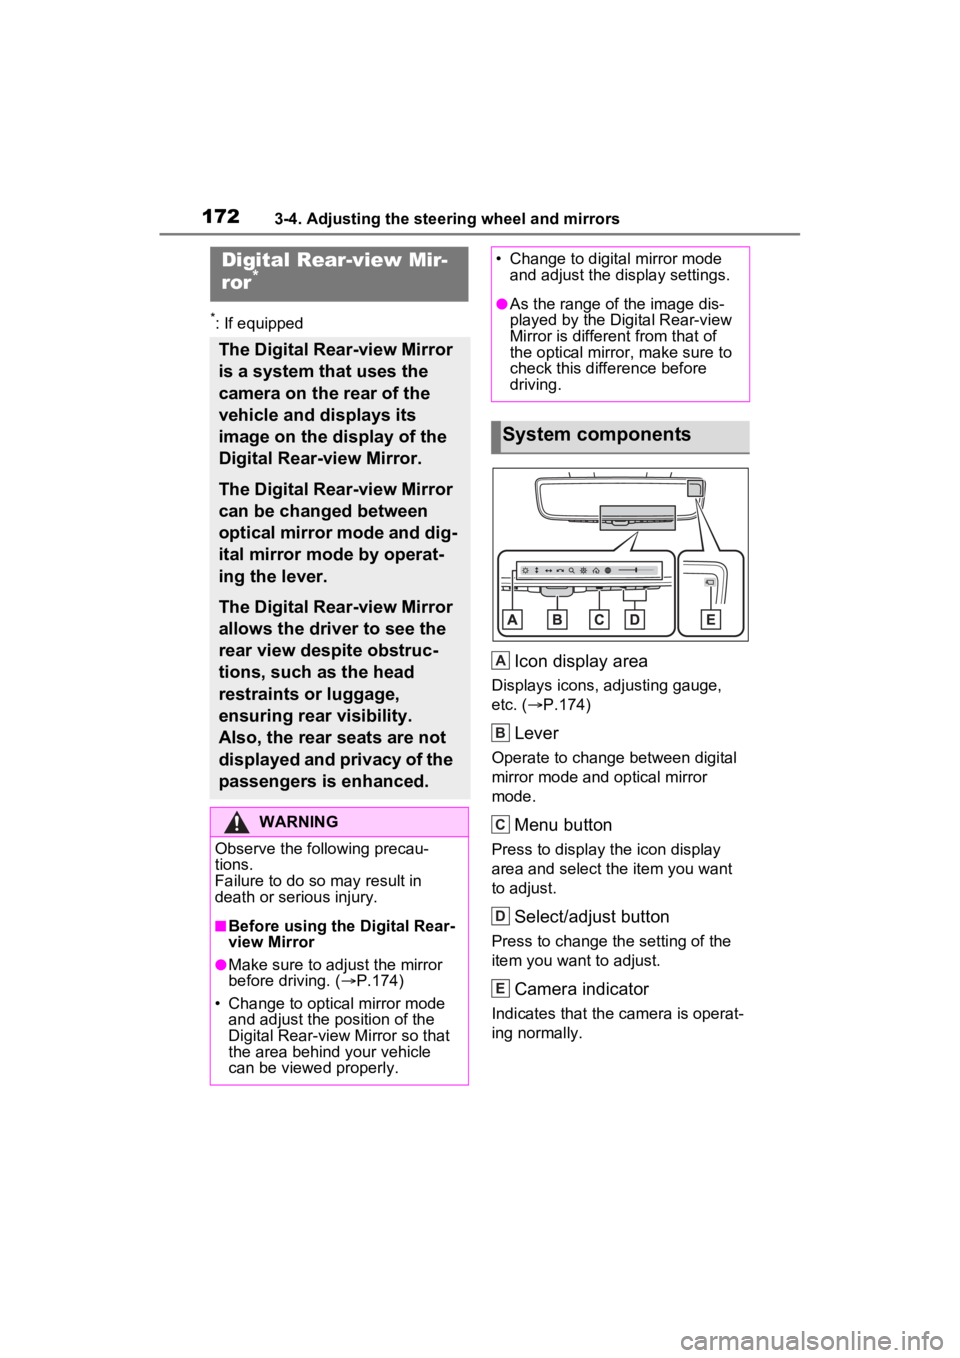
Icon display area
Displays icons, adjusting gauge,
etc. (P.174)
Lever
Operate to change between digital
mirror mode and optical mirror
mode.
Menu button
Press to display the icon display
area and select the item you want
to adjust.
Select/adjust button
Press to change the setting of the
item you want to adjust.
Camera indicator
Indicates that the camera is operat-
ing normally.
Digital Rear-view Mir-
ror*
The Digital Rear-view Mirror
is a system that uses the
camera on the rear of the
vehicle and displays its
image on the display of the
Digital Rear-view Mirror.
The Digital Rear-view Mirror
can be changed between
optical mirror mode and dig-
ital mirror mode by operat-
ing the lever.
The Digital Rear-view Mirror
allows the driver to see the
rear view despite obstruc-
tions, such as the head
restraints or luggage,
ensuring rear visibility.
Also, the rear seats are not
displayed and privacy of the
passengers is enhanced.
WARNING
Observe the following precau-
tions.
Failure to do so m ay result in
death or serious injury.
■Before using the Digital Rear-
view Mirror
●Make sure to adjust the mirror
before driving. ( P.174)
• Change to optical mirror mode and adjust the position of the
Digital Rear-view Mirror so that
the area behind your vehicle
can be viewed properly.
• Change to digital mirror mode and adjust the display settings.
●As the range of the image dis-
played by the Digital Rear-view
Mirror is different from that of
the optical mirror, make sure to
check this difference before
driving.
System components
A
B
C
D
E
Page 204 of 586
2024-1. Before driving
Cargo capacity depends on the
total weight of the occupants.
(Cargo capacity) = (Total load
capacity) - (Total weight of occu-
pants)
Steps for Determining Correct
Load Limit
(1) Locate the statement “The
combined weight of occupants
and cargo should never exceed
XXX kg or XXX lbs.” on your
vehicle’s placard.
(2) Determine the combined
weight of the driver and passen-
gers that will be riding in your
vehicle.
(3) Subtract the combined
weight of the driver and passen-
gers from XXX kg or XXX lbs.
(4) The resulting figure equals
the available amount of cargo
and luggage load capacity.
Cargo and luggage
Take notice of the following
information about storage
precautions, cargo capacity
and load.
WARNING
■Things that must not be car-
ried in the luggage compart-
ment
The following things may cause a
fire if loaded in the luggage com-
partment:
●Receptacles co ntaining gaso-
line
●Aerosol cans
■Storage precautions
Observe the following precau-
tions.
Failure to do so m ay prevent the
pedals from being depressed
properly, may bloc k the driver’s
vision, or may result in items hit-
ting the driver or passengers, pos-
sibly causing an accident.
●Stow cargo and luggage in the
luggage compartment when-
ever possible.
●Do not stack anything in the lug-
gage compartment higher than
the seatbacks.
●Do not place cargo or luggage
in or on the following locations.
• At the feet of the driver
• On the front passenger or rear seats (when stacking items)
• On the luggage cover (if equipped)
• On the instrument panel
• On the dashboard
●Secure all items in the occupant
compartment.
●When you fold down the rear
seats, long items should not be
placed directly behind the front
seats.
●Never allow anyon e to ride in
the luggage compartment. It is
not designed for passengers.
They should ride in their seats
with their seat belts properly
fastened. Otherw ise, they are
much more likely to suffer death
or serious bodily injury, in the
event of sudden braking, sud-
den swerving or an accident.
Capacity and distribution
Page 341 of 586

3394-6. Driving tips
4
Driving
WARNING
●When driving off-road or in rug-
ged terrain, do not drive at
excessive speeds, jump, make
sharp turns, strike objects, etc.
This may cause loss of control
or vehicle rollover causing
death or serious injury. You are
also risking expensive damage
to your vehicle’s suspension
and chassis.
NOTICE
■To prevent the water damage
Take all necessary safety mea-
sures to ensure that water dam-
age to the hybrid battery (traction
battery), hybrid s ystem or other
components does not occur.
●Water entering the engine com-
partment may cause severe
damage to the hybrid system.
Water entering the interior may
cause the hybrid battery (trac-
tion battery) stowed under the
rear seats to short circuit.
●Water entering t he hybrid trans-
mission will cause deterioration
in transmission quality. The
malfunction indicator may come
on, and the vehicle may not be
drivable.
●Water can wash the grease
from wheel bearings, causing
rusting and premature failure,
and may also enter the hybrid
transaxle case, reducing the
gear oil’s lubricating qualities.
■When you drive through
water
If driving through water, such as
when crossing shallow streams,
first check the depth of the water
and the bottom of the riverbed for
firmness. Drive slowly and avoid
deep water.
■Inspection after off-road driv-
ing
●Sand and mud that has accu-
mulated around brake discs
may affect braking efficiency
and may damage brake system
components.
●Always perform a maintenance
inspection after each day of off-
road driving that has taken you
through rough terrain, sand,
mud, or water. For scheduled
maintenance information, refer
to the “Scheduled Maintenance
Guide” or “Owner’s Manual
Supplement”.