2023 TOYOTA RAV4 HYBRID window
[x] Cancel search: windowPage 139 of 586

1373-2. Opening, closing and locking the doors
3
Before driving
*1: Vehicles with 7-inch multi-infor-
mation display
*2: Vehicles with 12.3-inch multi-information display
Vehicles with alarm: To prevent
unintended triggering of the alarm,
unlock the doors us ing the wireless
remote control and open and close
a door once after t he settings have
been changed. (If a door is not
opened within 60 seconds after
is pressed, the doors will be
locked again a nd the alarm will
automatically be set.)
In a case that the alarm is triggered,
immediately stop the alarm.
( P.81)
■Operation signals
Doors: A buzzer sounds and the
emergency flashers flash to indicate that the doors have been
locked/unlocked using the entry
function or wireles
s remote control.
(Locked: Once; Unlocked: Twice)
Side windows and moon roof (if
equipped) or panoramic moon roof
(if equipped): A buzzer sounds to
indicate that the side windows and
moon roof or panoramic moon roof
are operating us ing the wireless
remote control.
■Security feature
Vehicles without smart key system
If a door is not opened within
approximately 60 s econds after the
vehicle is unlocked using the wire-
less remote control, the security fea-
ture automatically locks the vehicle
again.
Vehicles with smart key system
If a door is not opened within
approximately 60 s econds after the
vehicle is unlocked using the entry
function or wireles s remote control,
the security featur e automatically
locks the vehicle again. (However,
depending on the location of the
electronic key, the key may be
detected as being in the vehicle. In
this case, vehicle may be unlocked.)
■When the door cannot be
locked by the lock sensor on
the upper part of the door han-
dle (vehicles with smart key
system)
If the door will not lock even when
the topside sensor area is touched,
try touching both the topside and
underside sensor areas at the same
time.
When gloves are being worn,
remove the gloves.
Multi-informa-
tion dis-
play/BeepUnlocking func- tion
*1
*2
Exterior: Beeps 3 times
Interior: Pings once
Holding the
driver’s door han-
dle unlocks only
the driver’s door.
Holding the pas-
senger’s door
handle or press-
ing the back door
opener switch
unlocks all the
doors.
*1
*2
Exterior: Beeps twice
Interior: Pings once
Holding a door
handle or press-
ing the back door
opener switch
unlocks all the
doors.
Page 141 of 586
1393-2. Opening, closing and locking the doors
3
Before driving
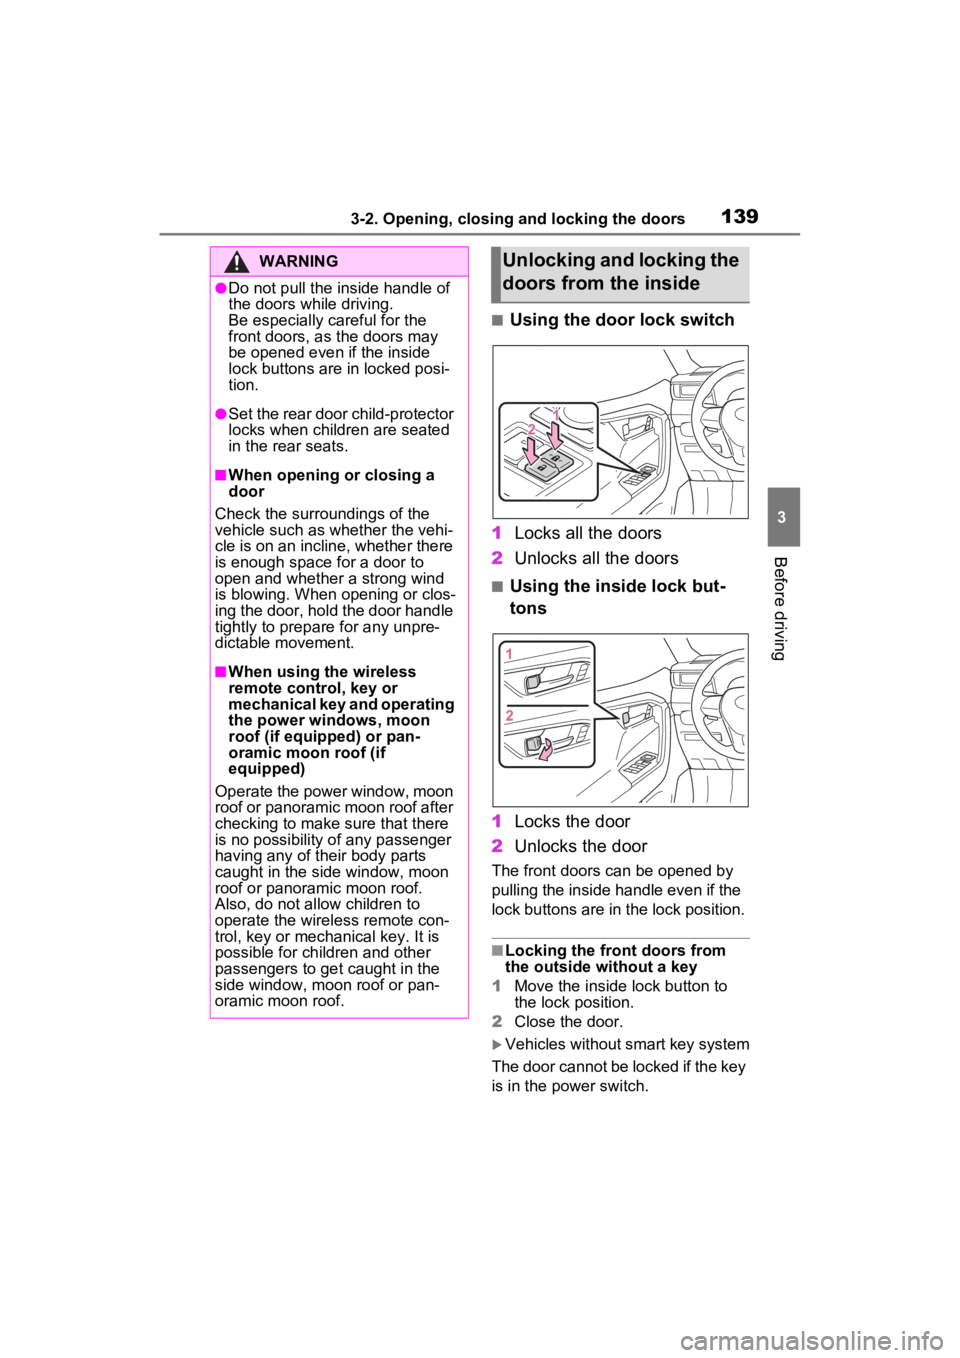
■Using the door lock switch
1 Locks all the doors
2 Unlocks all the doors
■Using the inside lock but-
tons
1 Locks the door
2 Unlocks the door
The front doors can be opened by
pulling the inside handle even if the
lock buttons are in the lock position.
■Locking the front doors from
the outside without a key
1 Move the inside lock button to
the lock position.
2 Close the door.
Vehicles without smart key system
The door cannot be locked if the key
is in the power switch.
WARNING
●Do not pull the inside handle of
the doors while driving.
Be especially careful for the
front doors, as the doors may
be opened even if the inside
lock buttons are in locked posi-
tion.
●Set the rear door child-protector
locks when children are seated
in the rear seats.
■When opening or closing a
door
Check the surroundings of the
vehicle such as whether the vehi-
cle is on an incline, whether there
is enough space for a door to
open and whether a strong wind
is blowing. When opening or clos-
ing the door, hold the door handle
tightly to prepare for any unpre-
dictable movement.
■When using the wireless
remote control, key or
mechanical key and operating
the power windows, moon
roof (if equipped) or pan-
oramic moon roof (if
equipped)
Operate the power window, moon
roof or panoramic moon roof after
checking to make sure that there
is no possibility of any passenger
having any of their body parts
caught in the side window, moon
roof or panoramic moon roof.
Also, do not allow children to
operate the wireless remote con-
trol, key or mechanical key. It is
possible for children and other
passengers to get caught in the
side window, moon roof or pan-
oramic moon roof.
Unlocking and locking the
doors from the inside
Page 159 of 586
1573-2. Opening, closing and locking the doors
3
Before driving
mechanical key, to unlock the
doors.
■Turning an electronic key to
battery-saving mode
●When battery-saving mode is set,
battery depletion is minimized by
stopping the electronic key from
receiving radio waves.
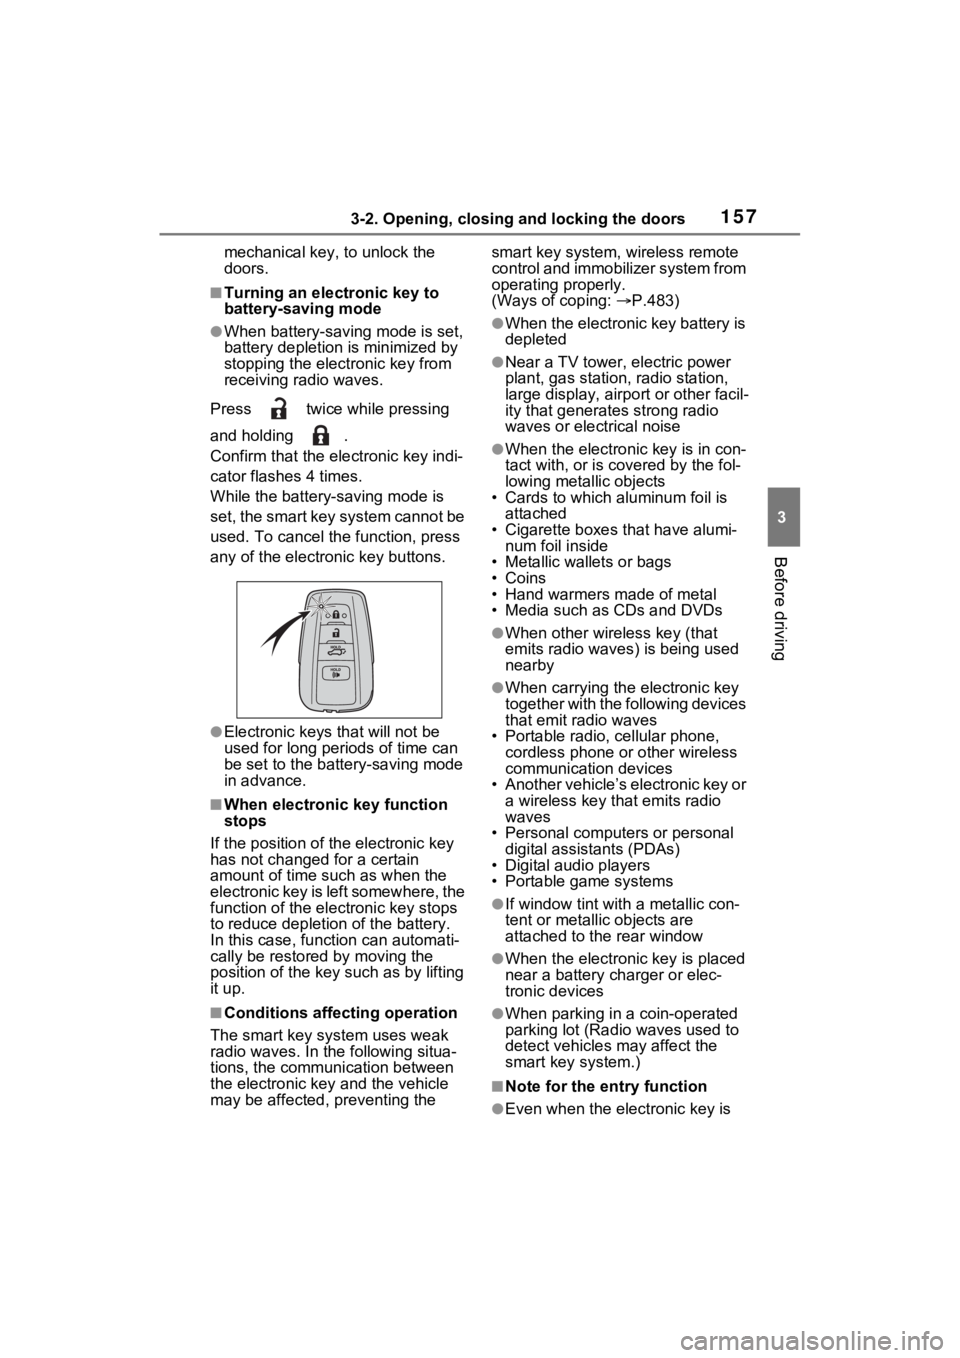
Press twice while pressing
and holding .
Confirm that the electronic key indi-
cator flashes 4 times.
While the battery-saving mode is
set, the smart key system cannot be
used. To cancel the function, press
any of the electronic key buttons.
●Electronic keys that will not be
used for long periods of time can
be set to the battery-saving mode
in advance.
■When electronic key function
stops
If the position of the electronic key
has not changed for a certain
amount of time such as when the
electronic key is left somewhere, the
function of the electronic key stops
to reduce depletio n of the battery.
In this case, function can automati-
cally be restored by moving the
position of the key such as by lifting
it up.
■Conditions affecting operation
The smart key system uses weak
radio waves. In the following situa-
tions, the communication between
the electronic key and the vehicle
may be affected, preventing the smart key system, wireless remote
control and immobilizer system from
operating properly.
(Ways of coping:
P.483)
●When the electronic key battery is
depleted
●Near a TV tower, electric power
plant, gas station, radio station,
large display, airpo rt or other facil-
ity that generates strong radio
waves or electrical noise
●When the electronic key is in con-
tact with, or is c overed by the fol-
lowing metallic objects
• Cards to which aluminum foil is
attached
• Cigarette boxes that have alumi- num foil inside
• Metallic wallets or bags
•Coins
• Hand warmers made of metal
• Media such as CDs and DVDs
●When other wireless key (that
emits radio waves) is being used
nearby
●When carrying the electronic key
together with the following devices
that emit radio waves
• Portable radio, cellular phone, cordless phone or other wireless
communication devices
• Another vehicle’s electronic key or a wireless key that emits radio
waves
• Personal computers or personal digital assistants (PDAs)
• Digital audio players
• Portable game systems
●If window tint wit h a metallic con-
tent or metallic objects are
attached to the rear window
●When the electronic key is placed
near a battery charger or elec-
tronic devices
●When parking in a coin-operated
parking lot (Radio waves used to
detect vehicles may affect the
smart key system.)
■Note for the entry function
●Even when the electronic key is
Page 160 of 586

1583-2. Opening, closing and locking the doors
within the effective range (detec-
tion areas), the system may not
operate properly in the following
cases:
• The electronic key is too close to the window or outside door han-
dle, near the ground, or in a high
place when the doors are locked
or unlocked.
• The electronic key is on the instru- ment panel, luggage cover or
floor, or in the door pockets or
glove box when the hybrid system
is started or po wer switch modes
are changed.
●Do not leave the electronic key on
top of the instrument panel or near
the door pockets when exiting the
vehicle. Depending on the radio
wave reception conditions, it may
be detected by the antenna out-
side the cabin and the door will
become lockable from the outside,
possibly trapping the electronic
key inside the vehicle.
●As long as the electronic key is
within the effective range, the
doors may be locked or unlocked
by anyone. However, only the
doors detecting the electronic key
can be used to unl ock the vehicle.
●Even if the electronic key is not
inside the vehicle, it may be possi-
ble to start the hybrid system if the
electronic key is near the window.
●The doors may unlock if a large
amount of water splashes on the
door handle, such as in the rain or
in a car wash when the electronic
key is within the effective range.
(The doors will automatically be
locked after approximately 60 sec-
onds if the doors are not opened
and closed.)
●If the wireless remote control is
used to lock the doors when the
electronic key is near the vehicle,
there is a possib ility that the door
may not be unlocke d by the entry
function. (Use the wireless remote
control to unloc k the doors.)
●Touching the door lock sensor while wearing gloves may delay or
prevent lock operation. Remove
the gloves and touch the lock sen-
sor again.
●When the lock operation is per-
formed using the lock sensor, rec-
ognition signals will be shown up
to two consecutive times. After
this, no recognition signals will be
given.
●If the door handle becomes wet
while the electronic key is within
the effective range, the door may
lock and unlock repeatedly. In that
case, follow the
following correc-
tion procedures to wash the vehi-
cle:
• Place the electronic key in a loca- tion 6 ft. (2 m) or more away from
the vehicle. (Take care to ensure
that the key is not stolen.)
• Set the electronic key to battery-
saving mode to disable the smart
key system. ( P.157)
●If the electronic key is inside the
vehicle and a door handle
becomes wet during a car wash, a
message may be shown on the
multi-information display and a
buzzer will sound outside the vehi-
cle. To turn off th e alarm, lock all
the doors.
●The lock sensor may not work
properly if it comes into contact
with ice, snow, m ud, etc. Clean
the lock sensor and attempt to
operate it again, or use the lock
sensor on the lower part of the
door handle.
●A sudden approach to the effec-
tive range or door handle may pre-
vent the doors from being
unlocked. In this case, return the
door handle to the original position
and check that t he doors unlock
before pulling the door handle
again.
●If there is another electronic key in
the detection area, it may take
slightly longer to unlock the doors
after the door handle is gripped.
Page 179 of 586
1773-4. Adjusting the steering wheel and mirrors
3
Before driving
If you notice any of the following symptoms, refer to the following
table for the likely cause and the solution.
NOTICE
■To prevent the Digital Rear-
view Mirror from malfunction-
ing
●Do not use detergents, such as
thinner, benzene, and alcohol to
clean the mirror. They may dis-
color, deteriorate or damage the
mirror surface.
●Do not smoke, use matches,
use cigarette lighters or allow
open flames near the mirror. It
may damage the mirror or
cause a fire.
●Do not remove, disassemble or
modify the mirror.
■To prevent the camera from
malfunctioning
●Observe the following precau-
tions, otherwise the Digital
Rear-view Mirror may not oper-
ate properly.
• Do not strike or hit the camera
or subject it to a strong impact,
as the camera installation posi-
tion and angle may be changed.
• Do not remove, disassemble or modify the camera.
• Do not allow an organic solvent, car wax, window cleaner or
glass coating to adhere to the
camera. If this happens, wipe it
off as soon as possible.
• When cleaning the camera lens, wipe the camera lens with a
damp soft cloth.
Do not strongly rub the camera
lens, as it may be scratched and
will not be able to transmit a
clear image.
• When applying colored film (including transparent film) to
the rear window glass, do not
apply it to the area in front of the
camera.
If film is applied to the area in
front of the camera, the image
from the camera may not dis-
play properly.
●Do not subject the camera to a
strong impact as this could
cause a malfunction.
If this happens, have the vehicle
inspected by your Toyota dealer
as soon as possible.
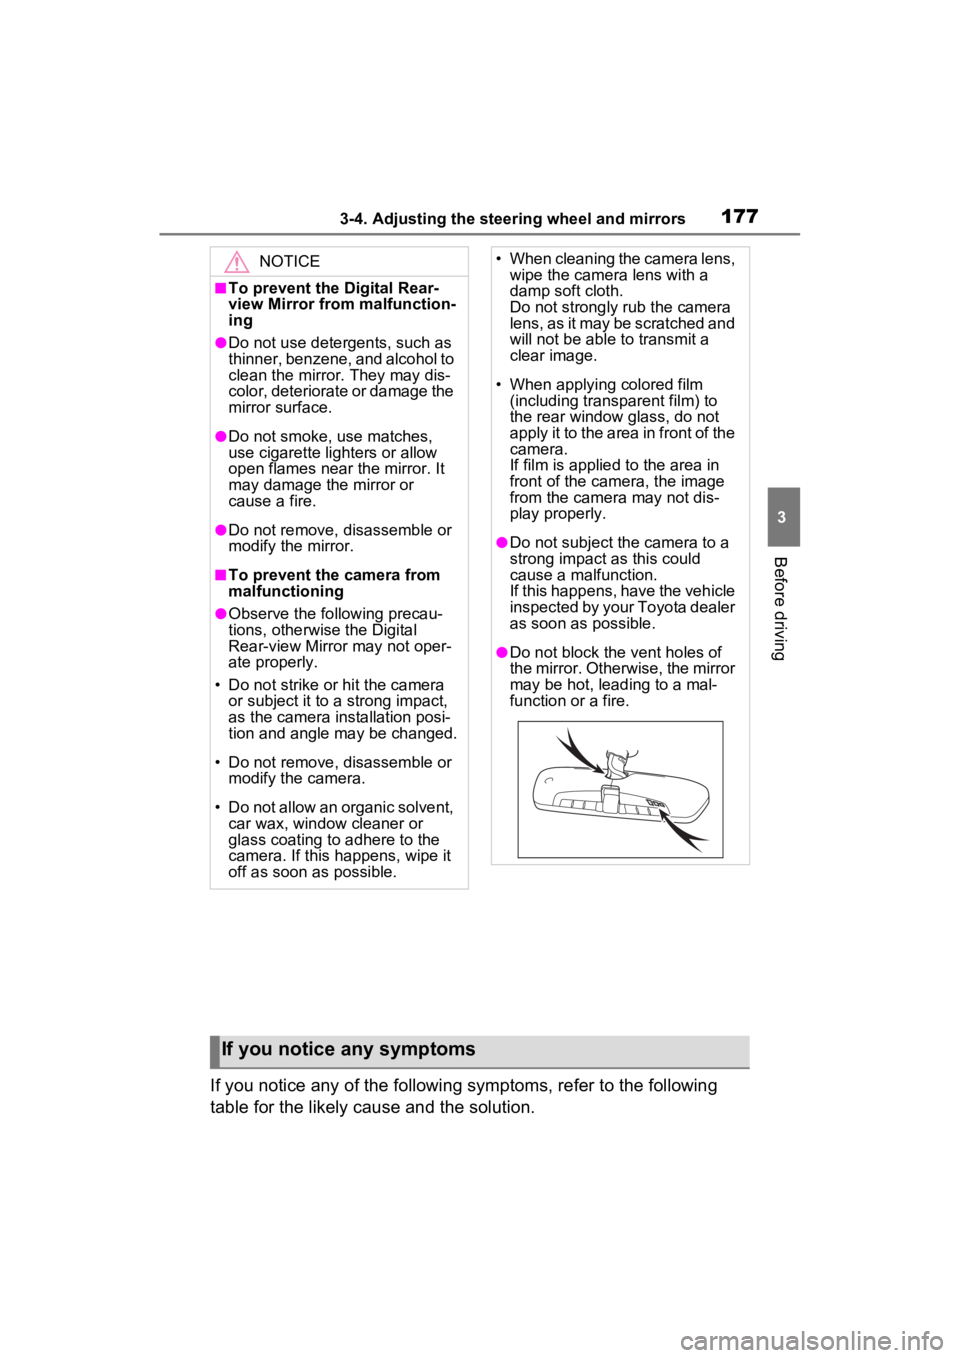
●Do not block the vent holes of
the mirror. Otherwise, the mirror
may be hot, leading to a mal-
function or a fire.
If you notice any symptoms
Page 181 of 586
1793-4. Adjusting the steering wheel and mirrors
3
Before driving
The image is
difficult to see.
The luggage in the luggage
compartment is reflected off the
rear window glass and obstruct-
ing the camera.
• Change to optical mirror mode.
• Move the luggage to a position where it does
not obstruct the cam-
era or cover it with a
black cloth to reduce
the amount it is
reflected off the rear
window glass.
The rear window glass is
fogged up.
Change to optical mirror
mode.
After defogging the rear
window using the rear
window defogger
( P.344), use the digital
mirror mode again.
The outside of the rear window
glass is dirty.Use the rear window
wiper to remove dirt.
The inside of the rear window
glass is dirty.Wipe the inside of rear
window glass with a damp
soft cloth.
The image is
out of align-
ment.
The back door is not fully
closed.Fully close the back door.
The camera or its surrounding
area has received a strong
impact.Change to optical mirror
mode and have the vehi-
cle inspected by your
Toyota dealer.
The display is
dim and is
displayed.
The system may be malfunc-
tioning.
Change to optical mirror
mode and have the vehi-
cle inspected by your
Toyota dealer.
goes off.
SymptomLikely causeSolution
Page 183 of 586
1813-4. Adjusting the steering wheel and mirrors
3
Before driving
■When using the outside rear
view mirrors in a cold weather
When it is cold and the outside rear
view mirrors are frozen, it may not
be possible to fold /extend them or
adjust the mirror surface. Remove
the ice, snow, etc . covering the out-
side rear view mirrors.
■Defogging the mirrors (if
equipped)
The outside rear v iew mirrors can
be cleared using the mirror defog-
gers. Turn on the rear window
defogger to turn on the outside rear
view mirror defoggers.
( P.344)
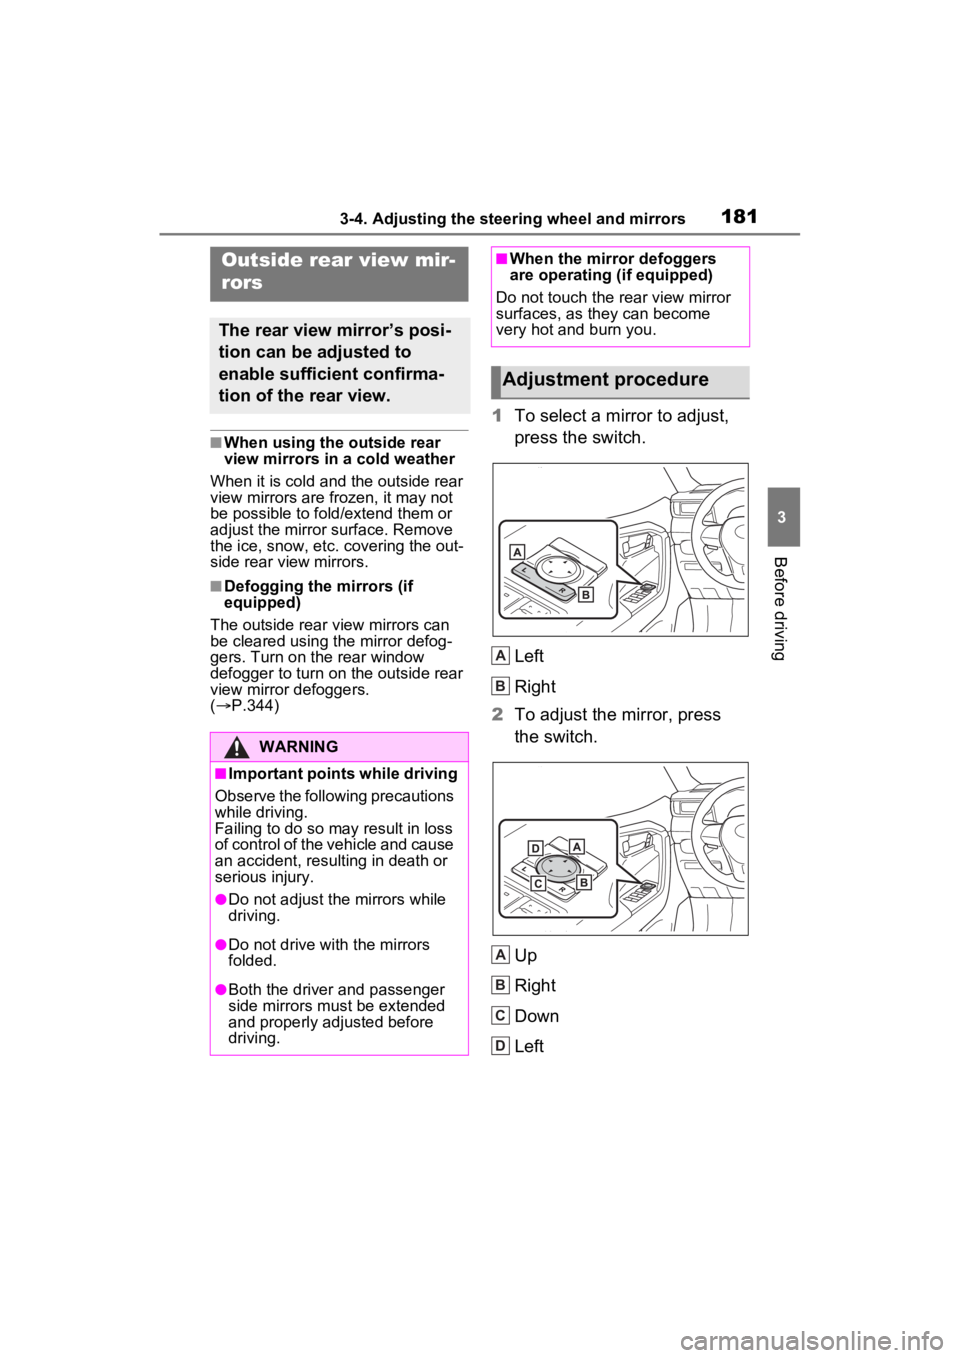
1 To select a mirror to adjust,
press the switch.
Left
Right
2 To adjust the mirror, press
the switch.
Up
Right
Down
Left
Outside rear view mir-
rors
The rear view mirror’s posi-
tion can be adjusted to
enable sufficient confirma-
tion of the rear view.
WARNING
■Important points while driving
Observe the following precautions
while driving.
Failing to do so may result in loss
of control of the vehicle and cause
an accident, resul ting in death or
serious injury.
●Do not adjust the mirrors while
driving.
●Do not drive with the mirrors
folded.
●Both the driver and passenger
side mirrors must be extended
and properly adjusted before
driving.
■When the mirror defoggers
are operating (if equipped)
Do not touch the rear view mirror
surfaces, as they can become
very hot and burn you.
Adjustment procedure
A
B
A
B
C
D
Page 185 of 586
1833-5. Opening, closing the windows and moon roof
3
Before driving
3-5.Opening, closing the windows and moon roof
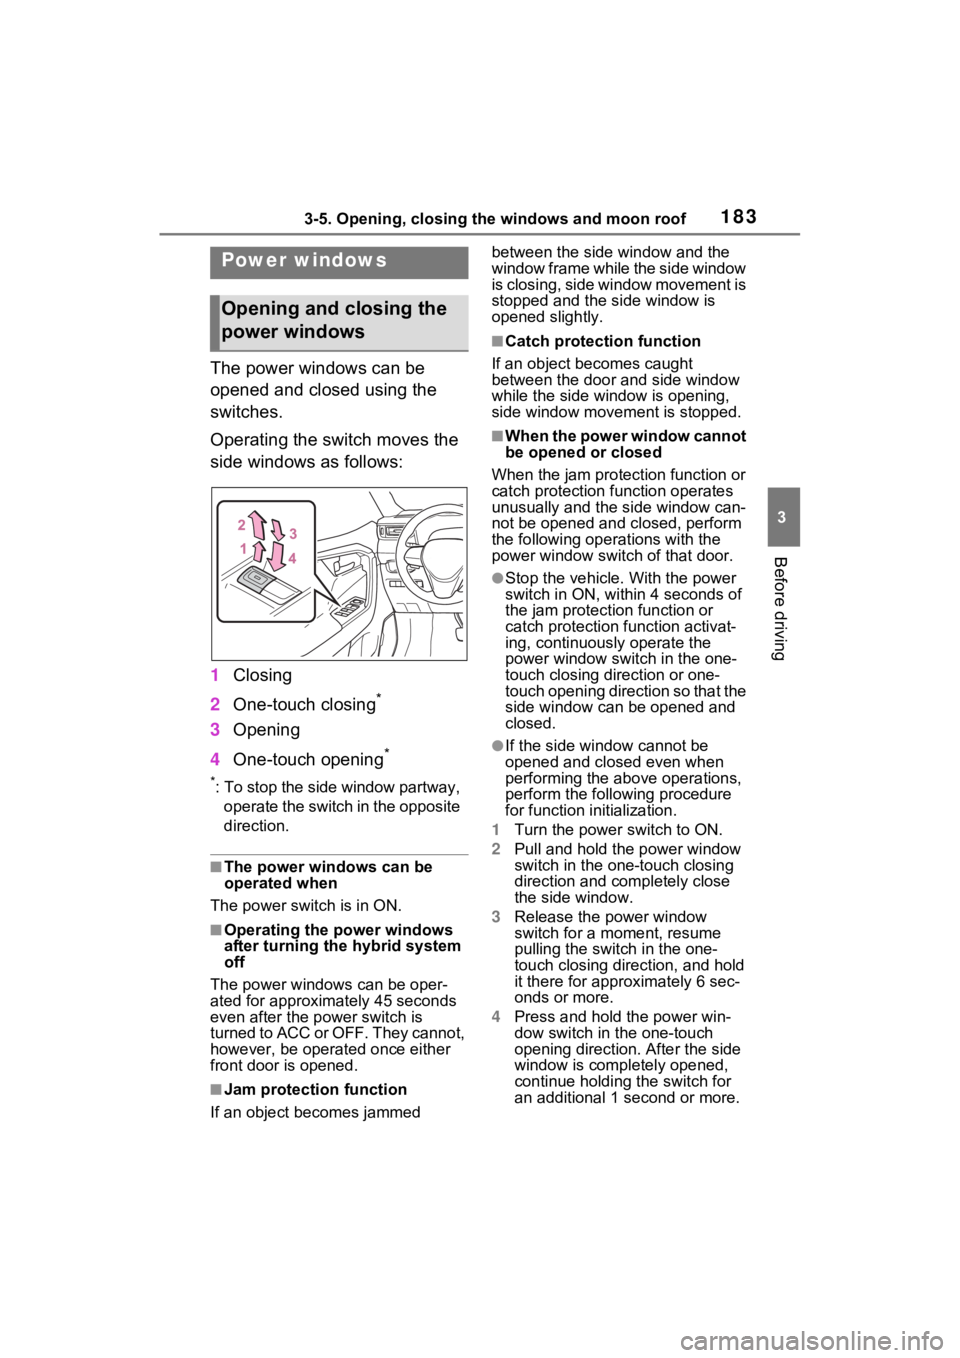
The power windows can be
opened and closed using the
switches.
Operating the switch moves the
side windows as follows:
1Closing
2 One-touch closing
*
3Opening
4 One-touch opening
*
*: To stop the side window partway,
operate the switch in the opposite
direction.
■The power windows can be
operated when
The power swit ch is in ON.
■Operating the power windows
after turning th e hybrid system
off
The power windows can be oper-
ated for approximately 45 seconds
even after the power switch is
turned to ACC or OFF. They cannot,
however, be operated once either
front door is opened.
■Jam protection function
If an object becomes jammed between the side window and the
window frame while the side window
is closing, side window movement is
stopped and the side window is
opened slightly.
■Catch protection function
If an object becomes caught
between the door and side window
while the side window is opening,
side window movement is stopped.
■When the power window cannot
be opened or closed
When the jam protection function or
catch protection function operates
unusually and the side window can-
not be opened and closed, perform
the following operations with the
power window swit ch of that door.
●Stop the vehicle. With the power
switch in ON, within 4 seconds of
the jam protection function or
catch protection f unction activat-
ing, continuously operate the
power window switch in the one-
touch closing direction or one-
touch opening direction so that the
side window can be opened and
closed.
●If the side window cannot be
opened and closed even when
performing the above operations,
perform the follo wing procedure
for function initialization.
1 Turn the power switch to ON.
2 Pull and hold the power window
switch in the on e-touch closing
direction and completely close
the side window.
3 Release the power window
switch for a m oment, resume
pulling the switch in the one-
touch closing direction, and hold
it there for approximately 6 sec-
onds or more.
4 Press and hold the power win-
dow switch in the one-touch
opening direction. After the side
window is completely opened,
continue holding the switch for
an additional 1 second or more.
Power windows
Opening and closing the
power windows