2023 TOYOTA PROACE VERSO EV wipers
[x] Cancel search: wipersPage 247 of 360
247
In the event of a breakdown
8
Access to the battery
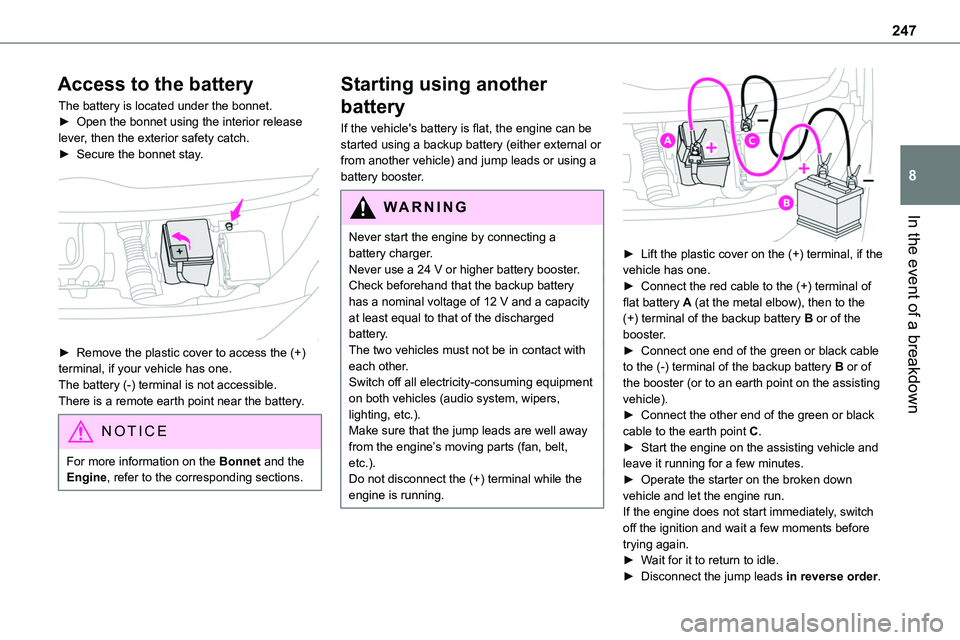
The battery is located under the bonnet.► Open the bonnet using the interior release lever, then the exterior safety catch.► Secure the bonnet stay.
► Remove the plastic cover to access the (+) terminal, if your vehicle has one.The battery (-) terminal is not accessible.There is a remote earth point near the battery.
NOTIC E
For more information on the Bonnet and the Engine, refer to the corresponding sections.
Starting using another
battery
If the vehicle's battery is flat, the engine can be started using a backup battery (either external or from another vehicle) and jump leads or using a battery booster.
WARNI NG
Never start the engine by connecting a battery charger.Never use a 24 V or higher battery booster.Check beforehand that the backup battery has a nominal voltage of 12 V and a capacity at least equal to that of the discharged battery.The two vehicles must not be in contact with each other.Switch off all electricity-consuming equipment on both vehicles (audio system, wipers, lighting, etc.).Make sure that the jump leads are well away from the engine’s moving parts (fan, belt, etc.).Do not disconnect the (+) terminal while the engine is running.
► Lift the plastic cover on the (+) terminal, if the vehicle has one.► Connect the red cable to the (+) terminal of flat battery A (at the metal elbow), then to the (+) terminal of the backup battery B or of the booster.► Connect one end of the green or black cable to the (-) terminal of the backup battery B or of the booster (or to an earth point on the assisting vehicle).► Connect the other end of the green or black
cable to the earth point C.► Start the engine on the assisting vehicle and leave it running for a few minutes.► Operate the starter on the broken down vehicle and let the engine run.If the engine does not start immediately, switch off the ignition and wait a few moments before trying again.► Wait for it to return to idle.► Disconnect the jump leads in reverse order.
Page 248 of 360
248
► Refit the plastic cover to the (+) terminal, if the vehicle has one.► Allow the engine to run for at least 30 minutes, with the vehicle stationary, so that the battery reaches an adequate state of charge.
WARNI NG
Driving immediately without having reached a sufficient level of charge may affect some of the vehicle's functionalities.
WARNI NG
To disconnect, proceed in reverse order.
WARNI NG
Automatic gearboxNever try to start the engine by pushing the vehicle.
Charging the battery using a
battery charger
For optimum service life of the battery, it is essential to maintain an adequate state of charge.In some circumstances, it may be necessary to charge the battery:– When using the vehicle mainly for short
journeys.– If the vehicle is to be taken off the road for several weeks.Consult any authorized Toyota retailer or Toyota authorized repairer, or any reliable repairer.
WARNI NG
To charge the vehicle's battery yourself, use only a charger compatible with lead-acid batteries with a nominal voltage of 12 V.
WARNI NG
Follow the instructions provided by the manufacturer of the charger.Never reverse polarities.
NOTIC E
It is not necessary to disconnect the battery.
► Switch the ignition off.
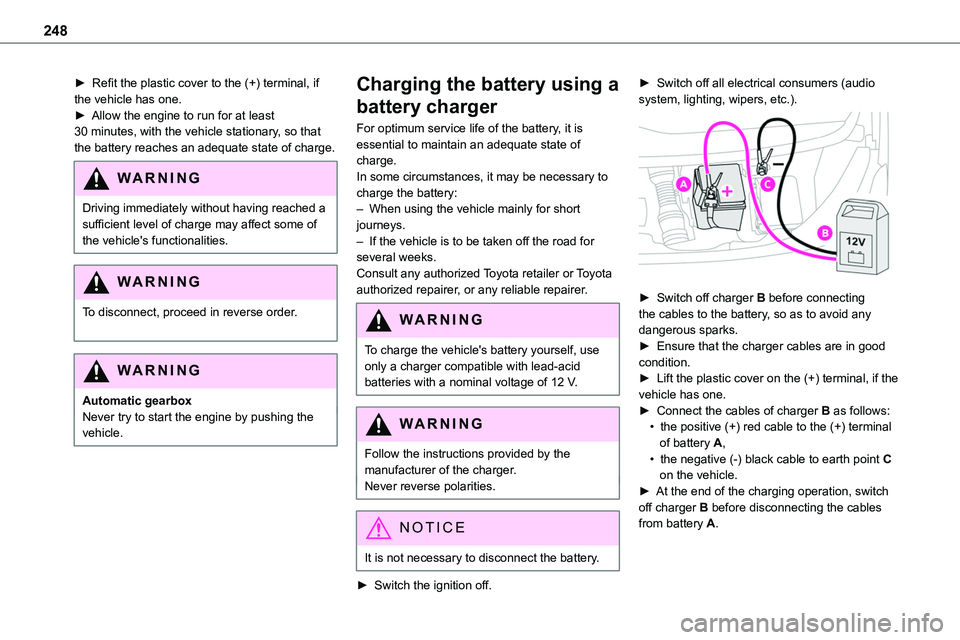
► Switch off all electrical consumers (audio system, lighting, wipers, etc.).
► Switch off charger B before connecting the cables to the battery, so as to avoid any dangerous sparks.► Ensure that the charger cables are in good condition.► Lift the plastic cover on the (+) terminal, if the vehicle has one.► Connect the cables of charger B as follows:• the positive (+) red cable to the (+) terminal of battery A,• the negative (-) black cable to earth point C on the vehicle.► At the end of the charging operation, switch off charger B before disconnecting the cables from battery A.
Page 249 of 360
249
In the event of a breakdown
8
WARNI NG
If this label is present, use only a 12 V charger to avoid causing irreversible damage to the electrical components.
24V
12V
WARNI NG
Never try to charge a frozen battery - risk of explosion!If the battery has frozen, have it checked by any authorized Toyota retailer or Toyota authorized repairer, or any reliable repairer who will verify that the internal components have not been damaged and that the case
has not cracked, which would mean a risk of toxic and corrosive acid leaking.
Disconnecting the battery
In order to maintain an adequate state of charge for starting the engine, we recommend disconnecting the battery if the vehicle is to be unused for an extended period.Before disconnecting the battery:► Close all openings (doors, tailgate, windows).► Switch off all electricity-consuming devices (audio system, wipers, lamps, etc.).
► Switch off the ignition and wait for 4 minutes.After accessing the battery, it is only necessary to disconnect the (+) terminal.
Quick-release terminal clamp
Disconnecting the (+) terminal
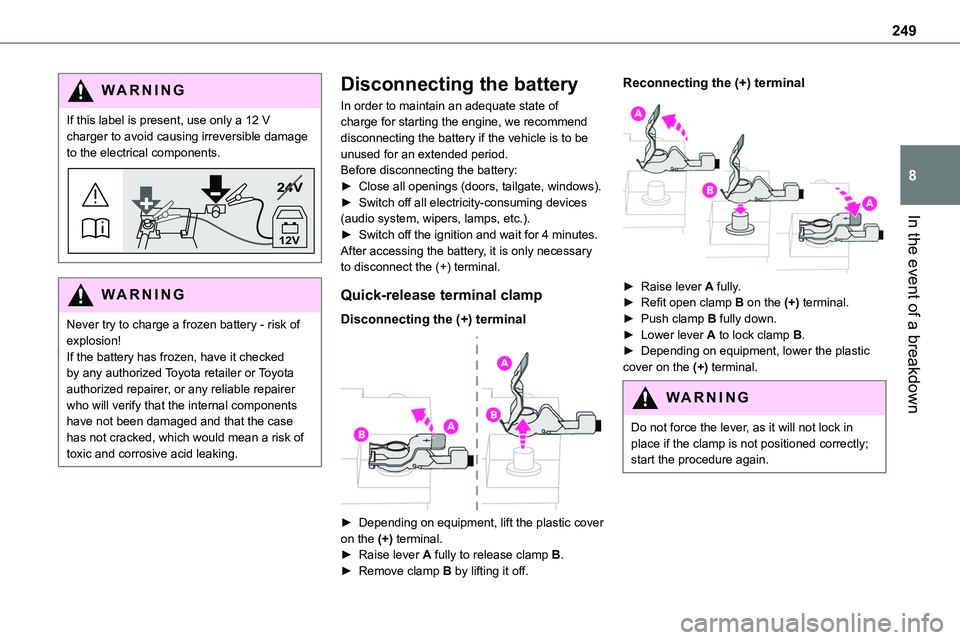
► Depending on equipment, lift the plastic cover
on the (+) terminal.► Raise lever A fully to release clamp B.► Remove clamp B by lifting it off.
Reconnecting the (+) terminal
► Raise lever A fully.► Refit open clamp B on the (+) terminal.► Push clamp B fully down.► Lower lever A to lock clamp B.► Depending on equipment, lower the plastic cover on the (+) terminal.
WARNI NG
Do not force the lever, as it will not lock in place if the clamp is not positioned correctly; start the procedure again.
Page 322 of 360
322
Changing the remote control battery 38Changing to free-wheeling 223, 250Charge level indicator (Electric) 22Charging cable 202Charging cable (Electric) 201Charging connector (Electric) 200, 206–207, 209Charging flap (Electric) 200, 206–207, 209
Charging system (Electric) 5, 9, 27, 198, 215Charging the traction battery (Electric) 22, 198, 206–207, 209Checking the engine oil level 19–20Checking the levels 215–217Checking tyre pressures (using the kit) 229–232Checks 214, 217–220Checks, routine 217–219Child lock 146–147Child lock on rear windows 147Children 11 9, 127, 133–134, 142, 142–143, 142–143Children (safety) 146Child seats 11 9, 123–124, 126–130, 143Child seats, conventional 126–130Child seats, i-Size 143Child seats, ISOFIX 133–134, 142, 142–143, 142–143Cleaning (advice) 199, 224–226Closing the boot 47Closing the doors 30, 34–35, 46–47Collision Risk Alert 184–185Compressor, tyre inflation 229
Configuration, vehicle 26–27Connected applications 304Connection, Bluetooth 271, 285–286, 305, 310–3 11Connection, Wi-Fi network 305–306Connectivity 304Consumption figures 27Container, AdBlue® 221
Control, emergency boot release 38Control, emergency door 31, 36–37Control, heated seats 55Control stalk, lighting 99Control stalk, wipers 105–107Control unit 201–202Courtesy lamp 96Courtesy lamp, front 96–98, 242Courtesy lamp, rear 96–98, 242Courtesy lamps 96–98, 242Cover, load space 78Crew cab, fixed 72–73Crew cab, folding 73Cruise control 172, 174–175, 177–180Cruise control, adaptive 175, 180, 182–184Cruise control by speed limit recognition 174–175Cruise control, dynamic with Stop function 174–175Cup holder 74
D
DAB (Digital Audio Broadcasting) - Digital radio 267, 282, 308Date (setting) 29, 288, 314Daytime running lamps 101, 238–240Deactivating the passenger airbag 120, 125Deactivation of DSC (ESC) 11 3
Deadlocking 35–36Deferred charging 28, 208Deferred charging (Electric) 27–28, 200, 206Defrosting 57, 91Demisting 91Demisting, rear 91Demisting, rear screen 91Dimensions 260Dipstick 19–20, 215Direction indicators 100, 238–239, 241, 243Display, head-up 171–172Domestic charging 202Domestic charging (Electric) 207, 209, 258Door pockets 75Doors, rear 46–47Doors, side 42Doors, side-hinged 34–36, 46–47, 241Driver’s attention warning 188Drive selector (Electric) 164, 219Driving 148–149Driving aids camera (warnings) 170Driving aids (recommendations) 169Driving economically 8Driving modes 165
Page 327 of 360
327
Alphabetical index
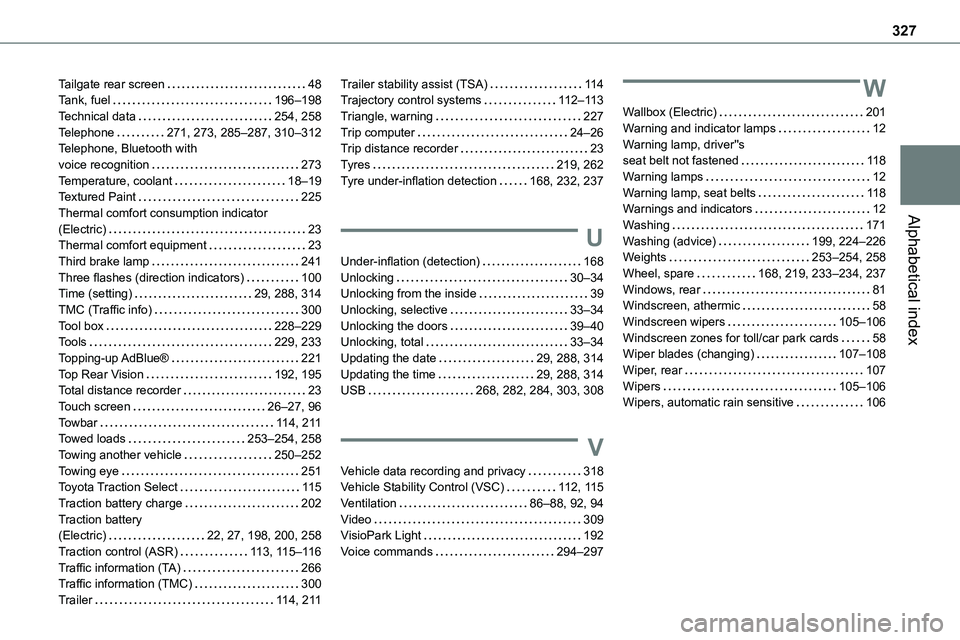
Tailgate rear screen 48Tank, fuel 196–198Technical data 254, 258Telephone 271, 273, 285–287, 310–312Telephone, Bluetooth with voice recognition 273Temperature, coolant 18–19Textured Paint 225Thermal comfort consumption indicator (Electric) 23Thermal comfort equipment 23Third brake lamp 241Three flashes (direction indicators) 100Time (setting) 29, 288, 314TMC (Traffic info) 300Tool box 228–229Tools 229, 233Topping-up AdBlue® 221Top Rear Vision 192, 195Total distance recorder 23Touch screen 26–27, 96Towbar 11 4, 2 11Towed loads 253–254, 258Towing another vehicle 250–252Towing eye 251Toyota Traction Select 11 5Traction battery charge 202Traction battery (Electric) 22, 27, 198, 200, 258Traction control (ASR) 11 3, 11 5–11 6Traffic information (TA) 266Traffic information (TMC) 300
Trailer 11 4, 2 11
Trailer stability assist (TSA) 11 4Trajectory control systems 11 2–11 3Triangle, warning 227Trip computer 24–26Trip distance recorder 23Tyres 219, 262Tyre under-inflation detection 168, 232, 237
U
Under-inflation (detection) 168Unlocking 30–34Unlocking from the inside 39Unlocking, selective 33–34Unlocking the doors 39–40Unlocking, total 33–34Updating the date 29, 288, 314Updating the time 29, 288, 314USB 268, 282, 284, 303, 308
V
Vehicle data recording and privacy 318Vehicle Stability Control (VSC) 11 2, 11 5Ventilation 86–88, 92, 94Video 309VisioPark Light 192Voice commands 294–297
W
Wallbox (Electric) 201Warning and indicator lamps 12Warning lamp, driver''s seat belt not fastened 11 8Warning lamps 12Warning lamp, seat belts 11 8Warnings and indicators 12Washing 171Washing (advice) 199, 224–226Weights 253–254, 258Wheel, spare 168, 219, 233–234, 237Windows, rear 81Windscreen, athermic 58Windscreen wipers 105–106Windscreen zones for toll/car park cards 58Wiper blades (changing) 107–108Wiper, rear 107Wipers 105–106Wipers, automatic rain sensitive 106