2023 TOYOTA PROACE door lock
[x] Cancel search: door lockPage 56 of 360

56
This function provides lumbar massage; it only operates when the engine is running as well as in STOP mode of the Stop & Start system.
Activation/Deactivation
► Press this button to activate/deactivate the function.Upon activation, the indicator lamp comes on. The massage function is activated for a period
of one hour.During this time, massage is performed in 6 cycles of 10 minutes (6 minutes of massage followed by a 4-minute break).After one hour, the function is deactivated; the indicator lamp goes off.
Adjustment of intensity
Press this button to adjust the intensity of the massage.Two levels of massage are available.
Steering wheel
adjustment
► When stationary, lower the control lever to release the steering wheel.► Adjust the height and reach.► Pull the control lever to lock the steering wheel.
WARNI NG
As a safety precaution, these operations must only be carried out while the vehicle is stationary.
Mirrors
Door mirrors
WARNI NG
As a safety measure, the mirrors should be adjusted to reduce the "blind spots".The objects that you see in the mirrors are
in fact closer than they appear. Take this into account in order to correctly judge the distance of vehicles approaching from behind.
► Move control A to the right or to the left to select the corresponding mirror.► Move control B in any of the four directions to adjust.
► Return control A to its central position.
Page 57 of 360

57
Ease of use and comfort
3
Manual folding
The mirrors can be folded manually (parking obstruction, narrow garage, etc.).► Turn the mirror towards the vehicle.
Electric folding
Depending on equipment, the mirrors can be folded electrically, when the vehicle is parked.
► From the inside, with the ignition on, place control A in the central position.► Pull control A backwards.
► Lock the vehicle from the outside.
Electric unfolding
The door mirrors are unfolded electrically when the vehicle is unlocked using the remote control or key. Unless folding was selected with control A, pull the control in the central position towards the rear again.
NOTIC E
Folding/unfolding when locking/unlocking the vehicle can be deactivated. Contact any authorized Toyota retailer or Toyota authorized repairer, or any reliable repairer.If necessary, the mirrors can be folded manually.
Heated mirrors
► Press this button.
NOTIC E
For more information on Rear screen demisting/defrosting, refer to the corresponding section.
Interior rear view mirror
Equipped with an anti-dazzle system, which darkens the mirror glass and reduces the nuisance to the driver caused by the sun, headlamps of other vehicles, etc.
Manual model
Day/night position
► Pull the lever to change to the anti-dazzle "night” position.► Push the lever to change to the normal "day" position.Adjustment► Set the mirror to the normal “day” position.
Automatic "electrochrome" model
This system automatically and gradually transitions between day and night use, with the aid of a sensor that measures the light arriving from the rear of the vehicle.
NOTIC E
To ensure optimum visibility while manoeuvring, the mirror lightens automatically when reverse gear is engaged.
Page 66 of 360

66
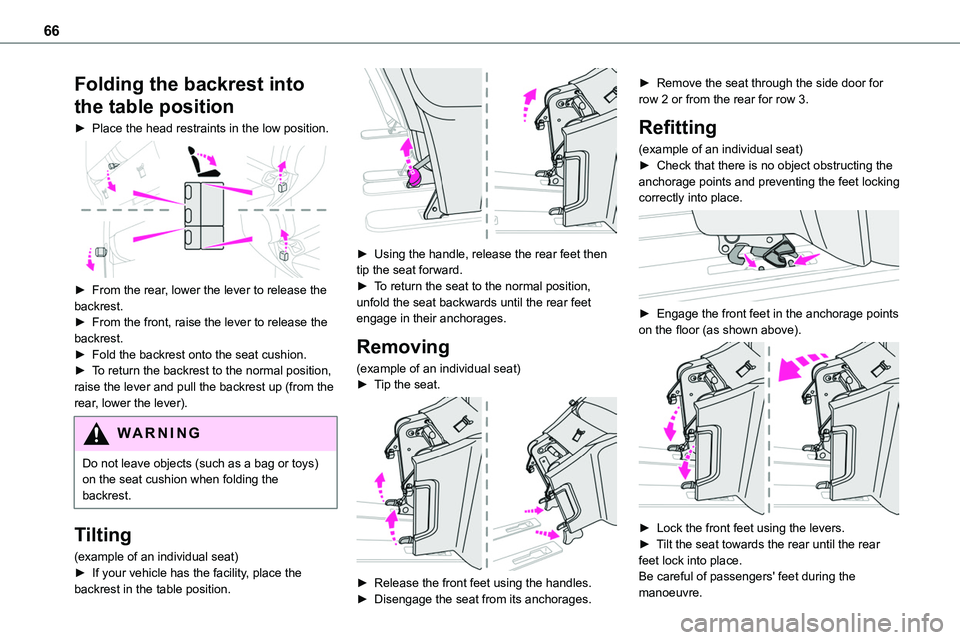
Folding the backrest into
the table position
► Place the head restraints in the low position.
► From the rear, lower the lever to release the backrest.► From the front, raise the lever to release the backrest.► Fold the backrest onto the seat cushion.► To return the backrest to the normal position, raise the lever and pull the backrest up (from the rear, lower the lever).
WARNI NG
Do not leave objects (such as a bag or toys) on the seat cushion when folding the backrest.
Tilting
(example of an individual seat)► If your vehicle has the facility, place the backrest in the table position.
► Using the handle, release the rear feet then tip the seat forward.► To return the seat to the normal position, unfold the seat backwards until the rear feet engage in their anchorages.
Removing
(example of an individual seat)► Tip the seat.
► Release the front feet using the handles.
► Disengage the seat from its anchorages.
► Remove the seat through the side door for row 2 or from the rear for row 3.
Refitting
(example of an individual seat)► Check that there is no object obstructing the anchorage points and preventing the feet locking correctly into place.
► Engage the front feet in the anchorage points on the floor (as shown above).
► Lock the front feet using the levers.► Tilt the seat towards the rear until the rear feet lock into place.Be careful of passengers' feet during the manoeuvre.
Page 84 of 360

84
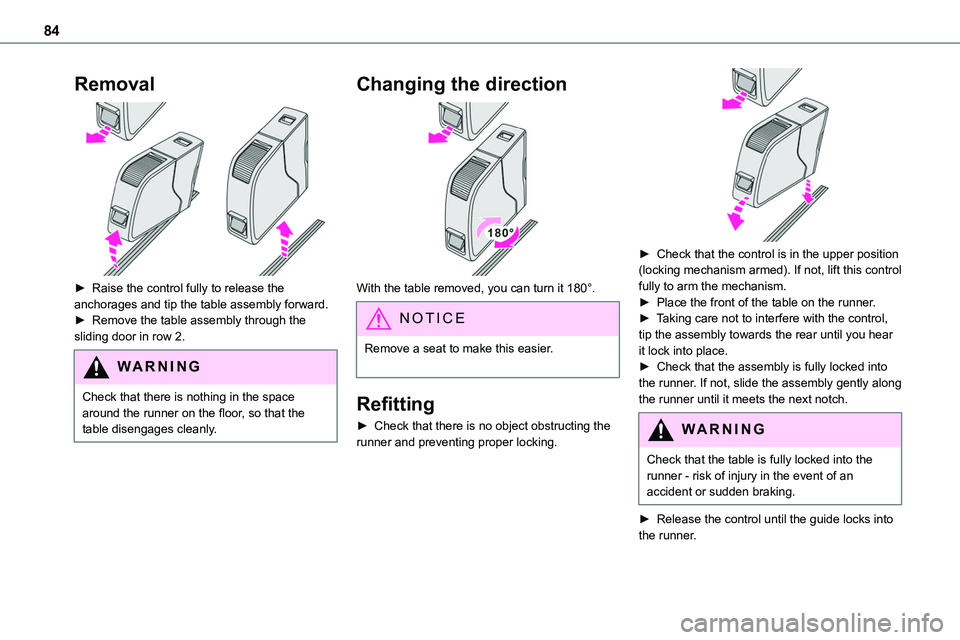
Removal
► Raise the control fully to release the anchorages and tip the table assembly forward. ► Remove the table assembly through the sliding door in row 2.
WARNI NG
Check that there is nothing in the space around the runner on the floor, so that the table disengages cleanly.
Changing the direction
With the table removed, you can turn it 180°.
NOTIC E
Remove a seat to make this easier.
Refitting
► Check that there is no object obstructing the runner and preventing proper locking.
► Check that the control is in the upper position (locking mechanism armed). If not, lift this control fully to arm the mechanism.► Place the front of the table on the runner.► Taking care not to interfere with the control, tip the assembly towards the rear until you hear it lock into place.► Check that the assembly is fully locked into the runner. If not, slide the assembly gently along the runner until it meets the next notch.
WARNI NG
Check that the table is fully locked into the runner - risk of injury in the event of an accident or sudden braking.
► Release the control until the guide locks into the runner.
Page 96 of 360

96
A/C preconditioning
(Electric)
This function allows you to programme the temperature in the passenger compartment to reach a pre-defined, non-modifiable temperature (approx. 21°C) before you enter the vehicle, on the days and at the times of your choice.This function is available when the vehicle is
connected or not connected.
Programming
With Bluetooth® audio system
Temperature pre-conditioning is not available with the Bluetooth® audio system.
With TOYOTA Pro Touch or TOYOTA Pro Touch with navigation system
Programming can be carried out from a smartphone using the MyToyota application (Available soon).For more information on the Remotely-operable functions, refer to the corresponding section.
With TOYOTA Pro Touch with navigation system
In the Applications menu:
Press "Car Apps" to display the applications home page.Select Temperature conditioning.
► Press + to add a programme.
► Select the time of entry into the vehicle and the desired days. Press OK.► Press ON to activate this programme.The temperature pre-conditioning sequence begins approximately 45 minutes before the programmed time when the vehicle is connected (20 minutes when it is not connected) and is maintained for 10 minutes after.
NOTIC E
You can set multiple programmes.Each one is saved in the system.To optimise the driving range, we recommend starting a programme while the vehicle is connected.
NOTIC E
The fan noise that occurs during temperature pre-conditioning is perfectly normal.
Operating conditions
– The function is only activated when the ignition is switched off and the vehicle locked.– When the vehicle is not connected, the function is only activated if the battery charge level is greater than 50%.– When the vehicle is not connected and a recurring programme is active (e.g. from Monday
to Friday), if two temperature pre-conditioning sequences are run without the vehicle being used, the programme will be deactivated.
Courtesy lamp(s)
Front: comes on when one of the front or rear doors is opened (sliding side door and depending on equipment, left-hand side-hinged door or tailgate).Rear or row 2 and row 3: comes on when one of the rear doors is opened (sliding side door and depending on equipment, left-hand side-hinged door or tailgate).Always lit, ignition on.
Always off.
Page 97 of 360

97
Ease of use and comfort
3
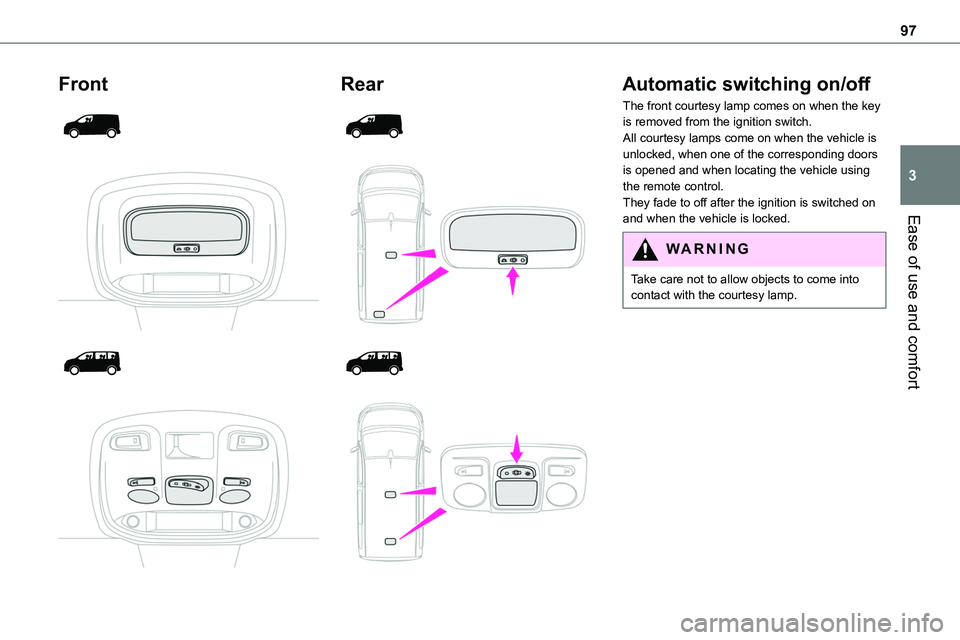
Front
Rear
Automatic switching on/off
The front courtesy lamp comes on when the key is removed from the ignition switch.All courtesy lamps come on when the vehicle is unlocked, when one of the corresponding doors is opened and when locating the vehicle using the remote control. They fade to off after the ignition is switched on and when the vehicle is locked.
WARNI NG
Take care not to allow objects to come into contact with the courtesy lamp.
Page 102 of 360

102
Exterior welcome lighting
The remote operation of the lighting makes your approach to the vehicle easier in poor light. It is activated when the lighting control is in the "AUTO" position and the level of light detected by the sunshine sensor is low.
Switching on
Press this button on the remote control or
on one of the front door handles with the "Smart Entry & Start" system.The dipped beam headlamps and sidelamps come on; your vehicle is also unlocked.
Switching off
The exterior welcome lighting switches off automatically after a set time, when the ignition is switched on or on locking the vehicle.
Programming
With audio system or touch screen
The activation, deactivation and duration of the welcome lighting can be set via the vehicle configuration menu.
Automatic lighting
systems - General
recommendations
The automatic lighting systems use a detection camera, located at the top of the windscreen.
NOTIC E
Operating limitsThe system may be disrupted or not work correctly:– When visibility conditions are poor (e.g. snowfall, heavy rain).– If the windscreen is dirty, misted-up or masked (e.g. sticker) in front of the camera.– If the vehicle is facing highly reflective signs or safety barrier reflectors.The system is not able to detect:– Road users that do not have their own lighting, such as pedestrians.– Vehicles with hidden lighting (e.g. travelling behind a safety barrier on the motorway).– Vehicles at the top or bottom of a steep slope, on winding roads, on crossroads.
WARNI NG
MaintenanceClean the windscreen regularly, particularly the area in front of the camera.The internal surface of the windscreen can also become misted around the camera. In humid and cold weather, demist the windscreen regularly.
Do not allow snow to accumulate on the bonnet or roof of the vehicle as this could obstruct the camera.
Page 124 of 360

124
WARNI NG
Additional protectionsTo prevent accidental opening of the doors and rear windows, use the "Child lock".Take care not to open the rear windows by more than one third.To protect young children from the rays of the sun, fit side blinds on the rear windows.
As a safety precaution, do not leave:– a child alone and unattended in a vehicle,– a child or an animal in a vehicle which is exposed to the sun, with the windows closed,– the keys within reach of children inside the vehicle.
Child seat at the rear
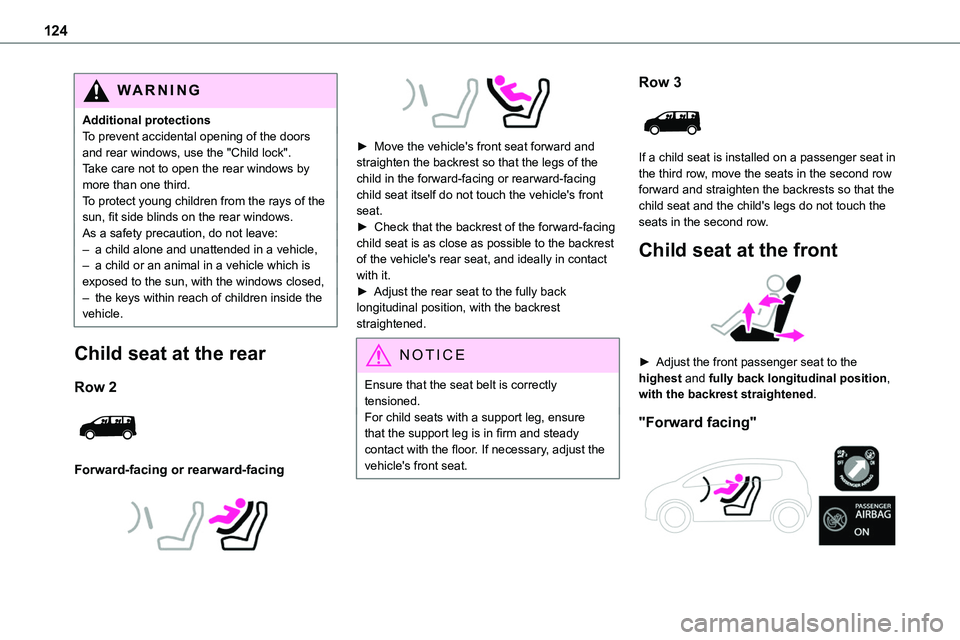
Row 2
Forward-facing or rearward-facing
► Move the vehicle's front seat forward and straighten the backrest so that the legs of the child in the forward-facing or rearward-facing child seat itself do not touch the vehicle's front seat.► Check that the backrest of the forward-facing child seat is as close as possible to the backrest of the vehicle's rear seat, and ideally in contact with it.► Adjust the rear seat to the fully back longitudinal position, with the backrest straightened.
NOTIC E
Ensure that the seat belt is correctly tensioned.For child seats with a support leg, ensure
that the support leg is in firm and steady contact with the floor. If necessary, adjust the vehicle's front seat.
Row 3
If a child seat is installed on a passenger seat in the third row, move the seats in the second row forward and straighten the backrests so that the child seat and the child's legs do not touch the seats in the second row.
Child seat at the front
► Adjust the front passenger seat to the highest and fully back longitudinal position, with the backrest straightened.
"Forward facing"