2023 TOYOTA PROACE tow
[x] Cancel search: towPage 74 of 360

74
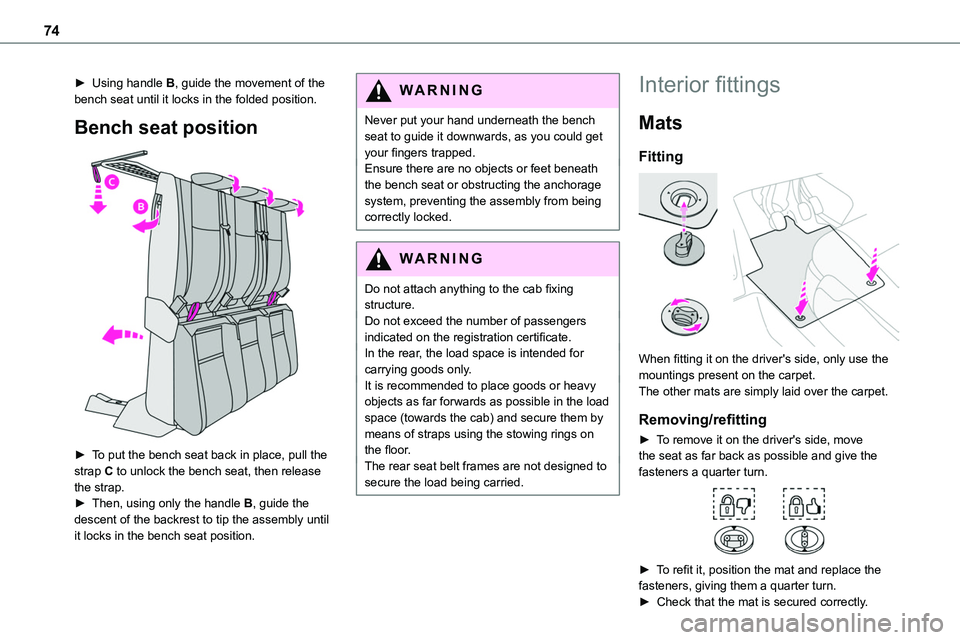
► Using handle B, guide the movement of the bench seat until it locks in the folded position.
Bench seat position
► To put the bench seat back in place, pull the strap C to unlock the bench seat, then release the strap.► Then, using only the handle B, guide the descent of the backrest to tip the assembly until
it locks in the bench seat position.
WARNI NG
Never put your hand underneath the bench seat to guide it downwards, as you could get your fingers trapped.Ensure there are no objects or feet beneath the bench seat or obstructing the anchorage system, preventing the assembly from being correctly locked.
WARNI NG
Do not attach anything to the cab fixing structure.Do not exceed the number of passengers indicated on the registration certificate.In the rear, the load space is intended for carrying goods only.It is recommended to place goods or heavy objects as far forwards as possible in the load space (towards the cab) and secure them by means of straps using the stowing rings on the floor.The rear seat belt frames are not designed to secure the load being carried.
Interior fittings
Mats
Fitting
When fitting it on the driver's side, only use the mountings present on the carpet.The other mats are simply laid over the carpet.
Removing/refitting
► To remove it on the driver's side, move the seat as far back as possible and give the fasteners a quarter turn.
► To refit it, position the mat and replace the
fasteners, giving them a quarter turn.► Check that the mat is secured correctly.
Page 76 of 360

76
Upper glove box
This is located in the dashboard, behind the steering wheel.
Press the control to open the lid (depending on version) then guide it to its fully open position.To close it, guide the lid then press the centre gently.
WARNI NG
Any liquid which could spill risks causing an electrical short circuit and therefore a potential fire.
"Aircraft" type tables
Fitted to the back of each front seat.
► To use the table, lower it fully until it locks in the low position.► To stow it, raise the table to the high position, passing the point of resistance.
WARNI NG
On the passenger side, do not forget to fold the table up before placing the seat in the "table" position.Do not place hard or heavy objects on the table. They could become dangerous projectiles in the event of emergency braking or impact.
NOTIC E
For more information on the Front seats, and in particular placing the backrest in the "table" position, refer to the corresponding section.
12 V socket(s)
Depending on version.
Page 78 of 360

78
► Lift the cover.► Check that the indicator lamp is on green.► Connect your multimedia or other electrical device (telephone charger, laptop computer, CD-DVD player, bottle warmer, etc.).In the event of a malfunction, the green indicator lamp flashes.Have it checked by any authorized Toyota retailer or Toyota authorized repairer, or any reliable repairer.
WARNI NG
Connect only one device to the socket at a time (do not use an extension lead or multi-socket) and only connect devices with Class II insulation (indicated on the device).Do not use devices with metallic cases.
NOTIC E
If the power consumption becomes too high and when required by the vehicle's electrical system (particular weather conditions, electrical overload, etc.), the power supply to the socket will be cut off; the green indicator lamp goes off
Load space cover
► To remove it, lift it up.► To install it, insert the guides into their housings.
WARNI NG
In the event of sudden deceleration, objects placed on the load space cover can turn into projectiles.
Loading area fittings
Stowing rings
Page 79 of 360

79
Ease of use and comfort
3
Use the stowing rings on the rear floor to secure loads.As a safety precaution in case of sharp braking, we recommend placing heavy objects as far forwards as possible (i.e. near the cab).We recommend using the stowing rings on the floor to firmly secure the load.
Load retaining partition
On the floor, behind the front seats, a vertical partition protects the driver and front passengers against the risk of load movement.
Steel or glazed partitions separate the loading area from the cab.
Recommendations on
loading
WARNI NG
The weight of the load must comply with the
Gross Train Weight (GTW).For more information on Engine technical data and towed loads, refer to the corresponding section.
WARNI NG
If you are using a carrying system (roof bars/roof rack), comply with the maximum loads associated with this system.For more information on Roof bars/Roof rack, refer to the corresponding section.
WARNI NG
Make sure that the size, shape and volume of the loads carried are compatible with the highway code and safety regulations and do not impair the driver’s field of vision.
WARNI NG
The load must be evenly distributed in the loading area so as not to interfere with driving the vehicle.Place the load close to the side panels, or even push it against the side panels between the wheel arches.However, it is recommended that heavy
objects are placed as close to the cab as possible as a precaution in case of sharp braking.
WARNI NG
Firmly secure all parts of the load using the stowing rings on the floor of the loading area.For more information on the Interior fittings and in particular on the stowing rings, refer to the corresponding section.
Page 81 of 360

81
Ease of use and comfort
3
Lower fixings (behind row 2)
► Use the stowing rings.
Fit the net
Unclip the upper fixing covers and secure the lower fixings (as previously described).► Fold (table position) the seats and bench seats in rows 2 and 3 (according to equipment).► Close the rear heating and air conditioning vents (depending on the equipment you have).► Unroll the high load retaining net.► Position the net upper fixings in the corresponding anchorages in the roof (first one side, then the other).► Fully extend the straps.► On each side, attach the bottom fixings of the net to the lower anchorages (behind row 1) or in
the stowing rings (behind row 2).► Tension the straps to extend the net.► Check that the net is attached securely and properly extended.
WARNI NG
Never use the ISOFIX ring provided for fixing the strap of a child seat with Top Tether.
Rear windows in row 2
If fitted to your vehicle, the side windows in row 2 can be opened.
While driving, the windows must be closed or secured at one of the notches.► Squeeze the two controls then move the window sideways.
NOTIC E
For more information on the Child lock on rear windows, refer to the corresponding section.
Side blinds
Fitted to the windows in row 2, these protect the passenger compartment from the sun's rays.
► Pull the tab A and attach the blind to the hook B.
NOTIC E
Always guide the blind slowly, using the tab, when raising or lowering it.
Page 83 of 360

83
Ease of use and comfort
3
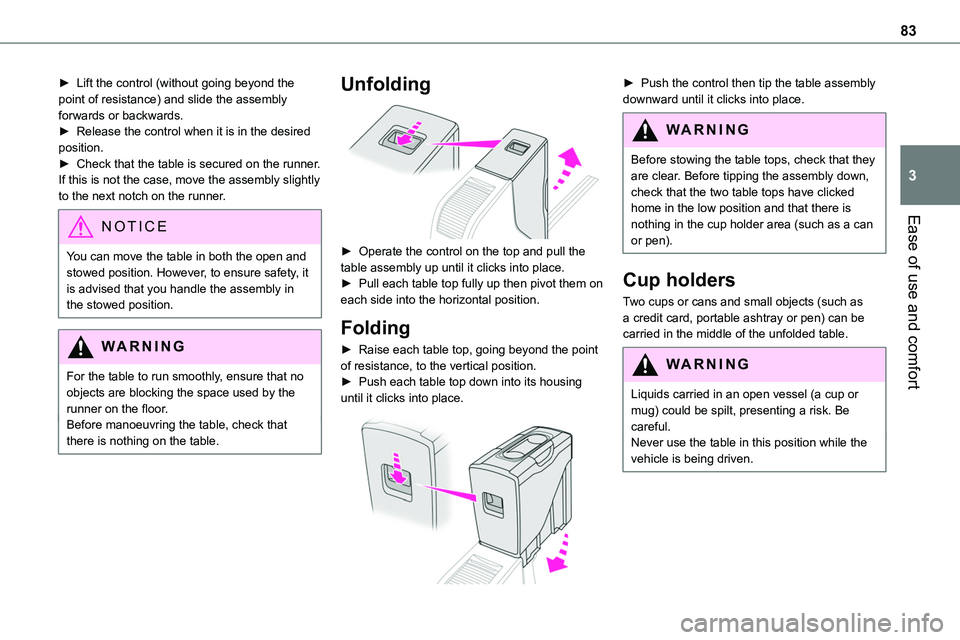
► Lift the control (without going beyond the point of resistance) and slide the assembly forwards or backwards.► Release the control when it is in the desired position.► Check that the table is secured on the runner. If this is not the case, move the assembly slightly to the next notch on the runner.
NOTIC E
You can move the table in both the open and stowed position. However, to ensure safety, it is advised that you handle the assembly in the stowed position.
WARNI NG
For the table to run smoothly, ensure that no objects are blocking the space used by the runner on the floor.Before manoeuvring the table, check that there is nothing on the table.
Unfolding
► Operate the control on the top and pull the table assembly up until it clicks into place.► Pull each table top fully up then pivot them on each side into the horizontal position.
Folding
► Raise each table top, going beyond the point of resistance, to the vertical position.► Push each table top down into its housing until it clicks into place.
► Push the control then tip the table assembly downward until it clicks into place.
WARNI NG
Before stowing the table tops, check that they are clear. Before tipping the assembly down, check that the two table tops have clicked home in the low position and that there is nothing in the cup holder area (such as a can or pen).
Cup holders
Two cups or cans and small objects (such as a credit card, portable ashtray or pen) can be carried in the middle of the unfolded table.
WARNI NG
Liquids carried in an open vessel (a cup or mug) could be spilt, presenting a risk. Be careful.Never use the table in this position while the vehicle is being driven.
Page 84 of 360

84
Removal
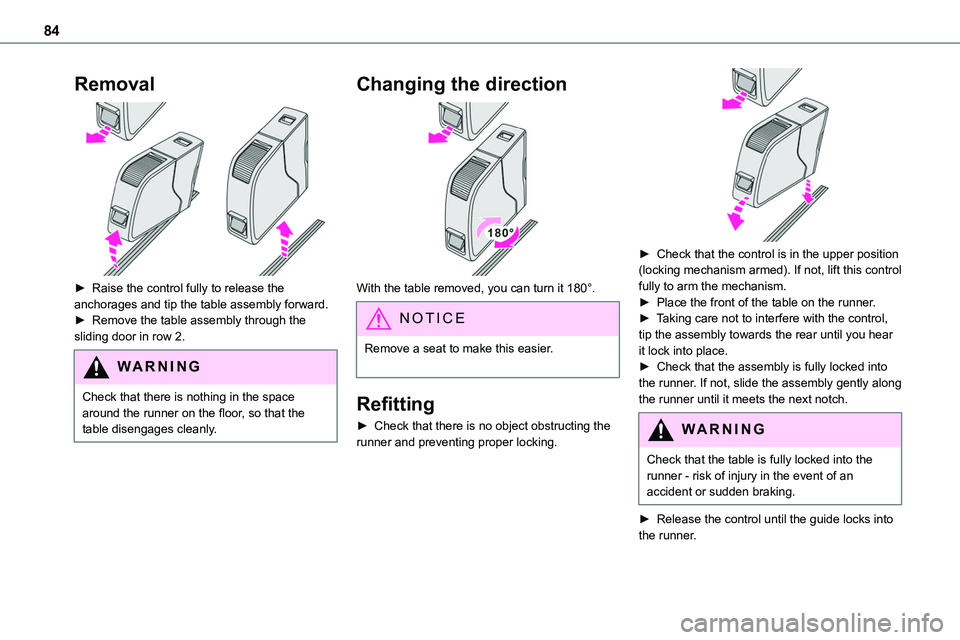
► Raise the control fully to release the anchorages and tip the table assembly forward. ► Remove the table assembly through the sliding door in row 2.
WARNI NG
Check that there is nothing in the space around the runner on the floor, so that the table disengages cleanly.
Changing the direction
With the table removed, you can turn it 180°.
NOTIC E
Remove a seat to make this easier.
Refitting
► Check that there is no object obstructing the runner and preventing proper locking.
► Check that the control is in the upper position (locking mechanism armed). If not, lift this control fully to arm the mechanism.► Place the front of the table on the runner.► Taking care not to interfere with the control, tip the assembly towards the rear until you hear it lock into place.► Check that the assembly is fully locked into the runner. If not, slide the assembly gently along the runner until it meets the next notch.
WARNI NG
Check that the table is fully locked into the runner - risk of injury in the event of an accident or sudden braking.
► Release the control until the guide locks into the runner.
Page 85 of 360

85
Ease of use and comfort
3
WARNI NG
Be careful of passengers' feet when manoeuvring the assembly.
Storage off the runner
WARNI NG
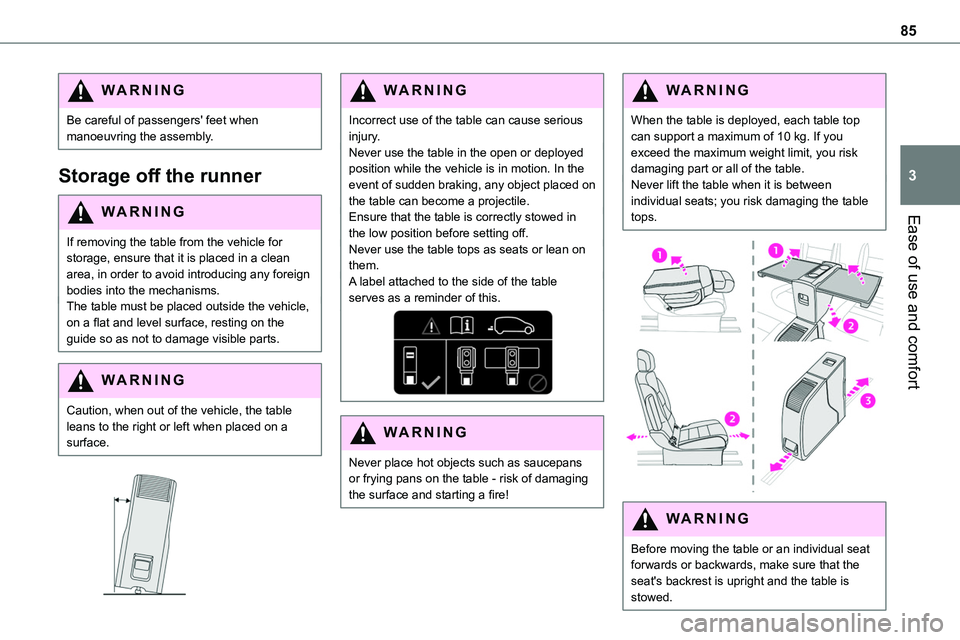
If removing the table from the vehicle for storage, ensure that it is placed in a clean area, in order to avoid introducing any foreign bodies into the mechanisms.The table must be placed outside the vehicle, on a flat and level surface, resting on the guide so as not to damage visible parts.
WARNI NG
Caution, when out of the vehicle, the table leans to the right or left when placed on a surface.
WARNI NG
Incorrect use of the table can cause serious injury.Never use the table in the open or deployed position while the vehicle is in motion. In the event of sudden braking, any object placed on the table can become a projectile.Ensure that the table is correctly stowed in
the low position before setting off.Never use the table tops as seats or lean on them.A label attached to the side of the table serves as a reminder of this.
WARNI NG
Never place hot objects such as saucepans or frying pans on the table - risk of damaging the surface and starting a fire!
WARNI NG
When the table is deployed, each table top can support a maximum of 10 kg. If you exceed the maximum weight limit, you risk damaging part or all of the table.Never lift the table when it is between individual seats; you risk damaging the table tops.
WARNI NG
Before moving the table or an individual seat forwards or backwards, make sure that the seat's backrest is upright and the table is stowed.