2023 TOYOTA PROACE height
[x] Cancel search: heightPage 129 of 360

129
Safety
5
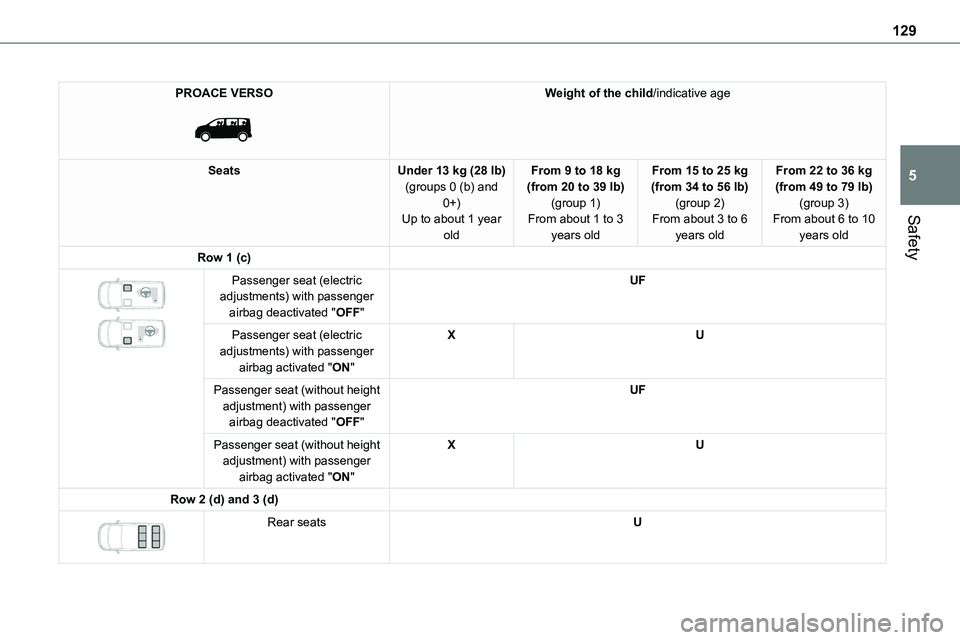
PROACE VERSO
Weight of the child/indicative age
SeatsUnder 13 kg (28 lb)(groups 0 (b) and 0+)Up to about 1 year
old
From 9 to 18 kg (from 20 to 39 lb)(group 1)From about 1 to 3
years old
From 15 to 25 kg (from 34 to 56 lb)(group 2)From about 3 to 6
years old
From 22 to 36 kg (from 49 to 79 lb)(group 3)From about 6 to 10
years old
Row 1 (c)
Passenger seat (electric adjustments) with passenger airbag deactivated "OFF"
UF
Passenger seat (electric adjustments) with passenger airbag activated "ON"
XU
Passenger seat (without height adjustment) with passenger airbag deactivated "OFF"
UF
Passenger seat (without height adjustment) with passenger airbag activated "ON"
XU
Row 2 (d) and 3 (d)
Rear seatsU
Page 132 of 360

132
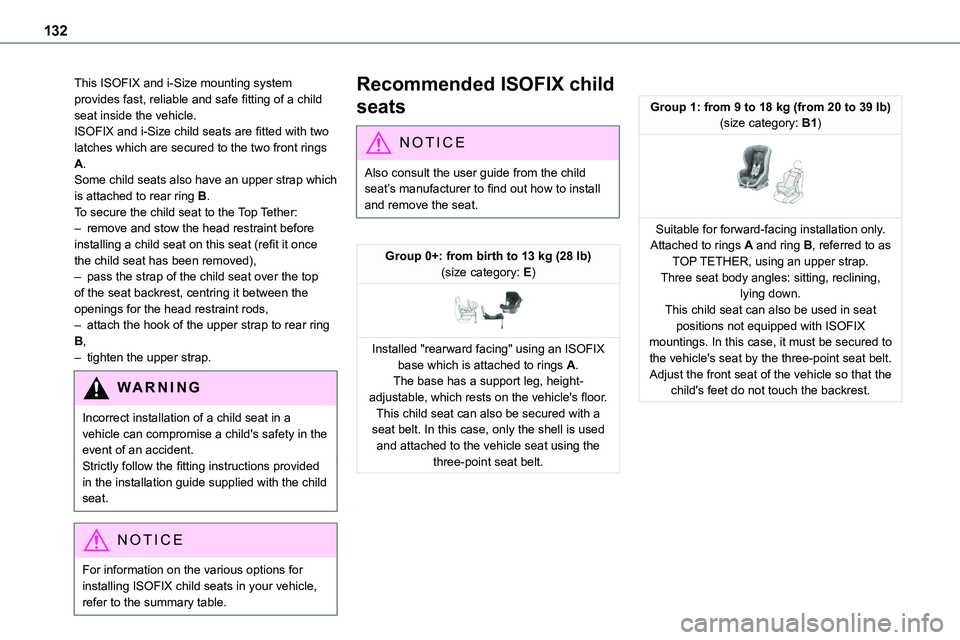
This ISOFIX and i-Size mounting system provides fast, reliable and safe fitting of a child seat inside the vehicle.ISOFIX and i-Size child seats are fitted with two latches which are secured to the two front rings A.Some child seats also have an upper strap which is attached to rear ring B.To secure the child seat to the Top Tether:
– remove and stow the head restraint before installing a child seat on this seat (refit it once the child seat has been removed),– pass the strap of the child seat over the top of the seat backrest, centring it between the openings for the head restraint rods,– attach the hook of the upper strap to rear ring B,– tighten the upper strap.
WARNI NG
Incorrect installation of a child seat in a vehicle can compromise a child's safety in the event of an accident.Strictly follow the fitting instructions provided in the installation guide supplied with the child seat.
NOTIC E
For information on the various options for
installing ISOFIX child seats in your vehicle, refer to the summary table.
Recommended ISOFIX child
seats
NOTIC E
Also consult the user guide from the child seat’s manufacturer to find out how to install and remove the seat.
Group 0+: from birth to 13 kg (28 lb)(size category: E)
Installed "rearward facing" using an ISOFIX base which is attached to rings A.The base has a support leg, height-adjustable, which rests on the vehicle's floor.This child seat can also be secured with a seat belt. In this case, only the shell is used
and attached to the vehicle seat using the three-point seat belt.
Group 1: from 9 to 18 kg (from 20 to 39 lb)(size category: B1)
Suitable for forward-facing installation only.Attached to rings A and ring B, referred to as TOP TETHER, using an upper strap.Three seat body angles: sitting, reclining, lying down.This child seat can also be used in seat positions not equipped with ISOFIX mountings. In this case, it must be secured to the vehicle's seat by the three-point seat belt. Adjust the front seat of the vehicle so that the child's feet do not touch the backrest.
Page 148 of 360

148
Driving recommendations
► Observe the driving regulations and remain vigilant whatever the traffic conditions.► Monitor your environment and keep your hands on the wheel to be able to react to anything that may happen any time.► Drive smoothly, anticipate the need for braking and maintain a longer safety distance,
especially in bad weather.► Stop the vehicle to carry out operations that require close attention (such as adjustments).► During long trips, take a break every two hours.To ensure the durability of the vehicle and for safety reasons, remember that certain precautionary measures must be taken when driving the vehicle:
Manoeuvre cautiously, at low speed
Manoeuvre slowly.Before turning, check that there are no obstacles at mid-height along the sides.Before reversing, check that there are no obstacles, particularly at high level behind the vehicle.Be aware of the external dimensions, if ladders are fitted.
Drive the vehicle carefully
Take corners gently.Anticipate the need to brake as the stopping distance is increased, particularly on wet or icy roads.
Be aware of the effect of side winds on the vehicle.
Maintenance
Inflate to the minimum pressure indicated on the label, or even over-inflate by 0.2 to 0.3 bar for long journeys.
Important!
WARNI NG
Never leave the engine running in a closed space without sufficient ventilation. Internal combustion engines emit toxic exhaust gases such as carbon monoxide. Danger of poisoning and death!
WARNI NG
In very severe wintry conditions (temperature below -23°C), let the engine run for 4 minutes before moving off, to ensure the correct operation and durability of the mechanical components of your vehicle (engine and gearbox).
WARNI NG
Never drive with the parking brake applied. Risk of overheating and damaging the braking system!
WARNI NG
Do not park the vehicle or leave the engine running on a flammable surface (e.g. dry grass, dead leaves).The vehicle exhaust system is very hot, even several minutes after the engine stops. Risk of fire!
WARNI NG
Never drive on surfaces covered with vegetation (tall grass, accumulation of dead leaves, crops, debris) such as a field, a country lane overgrown with bushes or a grassy verge.This vegetation could come into contact with the vehicle's exhaust system or other systems which are very hot. Risk of fire!
WARNI NG
Make sure you do not leave any item in the passenger compartment which could act like a magnifying glass under the effect of the sun's rays and cause a fire - risk of fire or damage to interior surface!
Page 150 of 360

150
Before setting off
Nose weight
► Distribute the load in the trailer so that the heaviest items are as close as possible to the axle and the nose weight (at the point where it joins your vehicle) approaches the maximum permitted without exceeding it.
Tyres
► Check the tyre pressures of the towing vehicle and of the trailer, observing the recommended pressures.
Lighting
► Check the electrical signalling on the trailer and the headlamp beam height of your vehicle.
NOTIC E
If a genuine TOYOTA towing device is used, the rear parking sensors will be deactivated automatically to avoid the audible signal.
When driving
Cooling
Towing a trailer uphill causes the coolant temperature to increase. The maximum towable load depends on the gradient and the exterior
temperature. The fan’s cooling capacity does not increase with engine speed.► Reduce speed and lower the engine speed to limit the amount of heating produced.
In all cases, pay attention to the coolant temperature.If this warning lamp and the STOP warning lamp come on, stop the vehicle and switch off the engine as soon as possible.
Brakes
Braking distances are increased when towing a trailer. To avoid overheating the brakes, the use
of engine braking is recommended.
Side wind
Bear in mind that the vehicle will be more susceptible to wind when towing.
Anti-theft protection
Electronic immobiliser
The remote control contains an electronic chip which has a special code. When the ignition is switched on, this code must be recognised in order for starting to be possible.A few seconds after switching off the ignition, this system locks the engine control system, therefore preventing the engine from being started in the event of a break-in.In the event of a fault, you are informed by illumination of this warning lamp, an audible signal and a message on the screen.The vehicle will not start; contact any authorized Toyota retailer or Toyota authorized repairer, or any reliable repairer as soon as possible.
Starting/switching off the
engine
Starting
The parking brake must be applied.
► With a manual gearbox, place the gear lever in neutral, fully depress the clutch pedal and
keep the pedal down until the engine starts.► With an automatic gearbox, place the selector in position P then depress the brake pedal.
With the conventional key / With the
remote control key
1.Stop position.
2.Ignition on position.
3.Starting position.
► Insert the key into the ignition switch. The system recognises the starting code.
Page 171 of 360

171
Driving
6
NOTIC E
MaintenanceClean the bumpers and door mirrors and the field of vision of the cameras regularly.When washing your vehicle at high pressure, direct the spray from at least 30 cm away from the radar, sensors and cameras.
WARNI NG
MatsThe use of mats not approved by TOYOTA may interfere with the operation of the speed limiter or cruise control.To avoid any risk of jamming the pedals:– Ensure that the mat is secured correctly.– Never fit one mat on top of another.
NOTIC E
Units of speedEnsure that the units of speed displayed on the instrument panel (km/h or mph) are those for the country you are driving in.If this is not the case, when the vehicle is stationary, set the display to the required units of speed so that it complies with what is authorised locally.In case of doubt, contact any authorized Toyota retailer or Toyota authorized repairer, or any reliable repairer.
Head-up display
This system projects various information onto a smoked projection blade situated in the driver's field of vision, enabling them to drive without taking their eyes off the road.
Information displayed
during operation
Once the system has been activated, the following information is grouped together in the head-up display:
A.The speed of your vehicle.
B.Cruise control/speed limiter information.
C.If your vehicle is suitably equipped, distances between vehicles, automatic emergency braking alerts and navigation instructions.
D.If your vehicle is suitably equipped, speed limit information.
NOTIC E
For more information on Navigation, refer to the section Audio equipment and telematics.
Selector
1.On.
2.Off (long press).
3.Brightness adjustment.
4.Display height adjustment.
Page 172 of 360

172
Activation/Deactivation
► With the engine running, press button 1 to activate the system and deploy the projection blade.
► Press and hold button 2 to deactivate the system and retract the projection blade.The state of the system is saved when the engine is switched off and restored on restarting.
Height adjustment
► With the engine running, adjust the display to the desired height using the buttons 4:• up to move the display up,• down to move the display down.
Brightness adjustment
► With the engine running, adjust the
brightness of the information display using the buttons 3:• on the "sun" to increase the brightness,• on the "moon" to decrease the brightness.
W ARNI NG
When stationary or while driving, no objects should be placed around the projection blade (or in its recess) so as not to impede its movement and correct operation.
NOTIC E
In certain extreme weather conditions (rain and/or snow, bright sunshine, etc.), the head-up display may not be legible or may suffer temporary interference.Some sunglasses may hamper reading of the information.To clean the projection blade, use a clean, soft cloth (such as a spectacles cloth or microfibre cloth). Do not use a dry or abrasive cloth, or detergent or solvent products, due to the risk of scratching the projection blade or damaging the non-reflective coating.
NOTIC E
This system operates when the engine is running, and the settings are saved when the ignition is switched off.
Memorising speeds
This function allows you to save speed settings which are then used to set the two systems: the speed limiter (limits the speed of the vehicle) or cruise control (vehicle cruising speed).You can save 6 speed settings for each of the two systems.
Programming
The speed thresholds can be set in the vehicle configuration menu using the touch screen.► Select the system for which you want to memorise new speed settings:– speed limiter
or– cruise control.
► Press the button corresponding to the speed setting you want to change.
Page 212 of 360

212
Roof bars / Roof rack
WARNI NG
As a safety measure and to avoid damaging the roof, it is essential to use the roof bars and racks approved for your vehicle.Observe the instructions on fitting and use contained in the guide supplied with the roof
bars and racks.
WARNI NG
RecommendationsDistribute the load uniformly, taking care to avoid overloading one of the sides.Arrange the heaviest part of the load as close as possible to the roof.Secure the load firmly.Drive gently: the vehicle will be more susceptible to the effects of side winds and its stability may be affected.Remove the roof bars once they are no longer needed.
WARNI NG
As this value may change, please verify the maximum load quoted in the guide supplied with the roof bars.If the height exceeds 40 cm, adapt the speed of the vehicle to the profile of the road to avoid damaging the roof bars and the fixings on the vehicle.
Be sure to refer to national legislation in order to comply with the regulations for transporting objects that are longer than the vehicle.
Roof bars
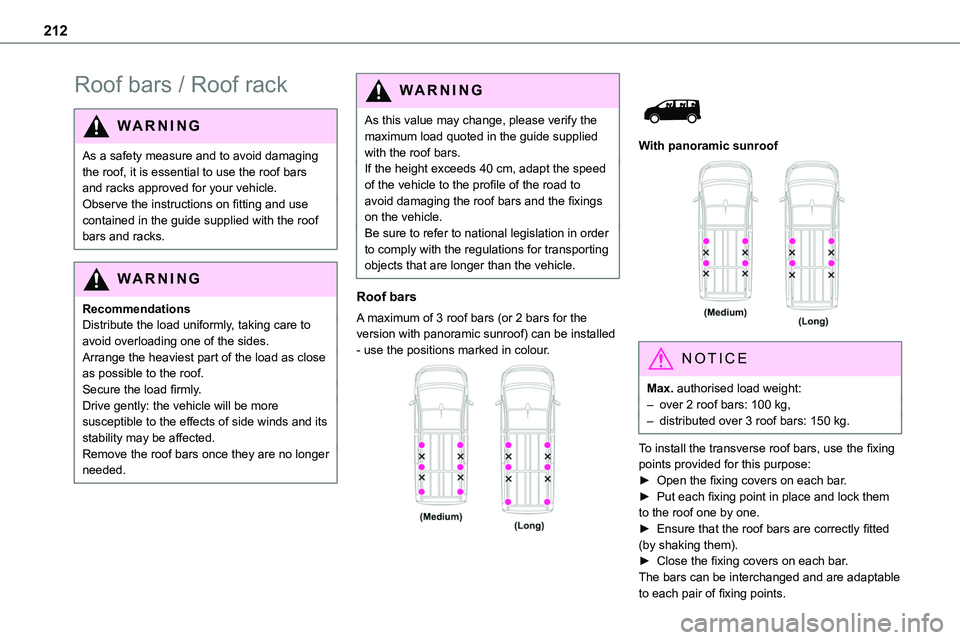
A maximum of 3 roof bars (or 2 bars for the version with panoramic sunroof) can be installed - use the positions marked in colour.
With panoramic sunroof
NOTIC E
Max. authorised load weight:– over 2 roof bars: 100 kg,– distributed over 3 roof bars: 150 kg.
To install the transverse roof bars, use the fixing points provided for this purpose:► Open the fixing covers on each bar.► Put each fixing point in place and lock them to the roof one by one.► Ensure that the roof bars are correctly fitted
(by shaking them).► Close the fixing covers on each bar.The bars can be interchanged and are adaptable to each pair of fixing points.
Page 321 of 360

321
Alphabetical index
A
ABS 11 2Accelerated charging unit (Wallbox) 201Accessories 109, 154Access to the 3rd row 63, 65Access to the spare wheel 234Active Safety Brake 184–186
AdBlue® 20, 220AdBlue® tank 221Additive, Diesel 217–218Adjusting head restraints 54Adjusting seat 52–53Adjusting the air distribution 88–89Adjusting the air flow 88–89Adjusting the date 29, 288, 314Adjusting the height and reach of the steering wheel 56Adjusting the lumbar support 52Adjusting the seat angle 52–53Adjusting the seat belt height 11 7Adjusting the temperature 88–89Adjusting the time 29, 288, 314Advice on care and maintenance 199, 224Advice on driving 8, 148–149Airbags 120, 122–123, 125Airbags, curtain 121, 123Airbags, front 120, 122, 125Airbags, lateral 121–122Air conditioning 86, 90, 92Air conditioning, digital 91Air conditioning, dual-zone automatic 88–89
Air conditioning, manual 87–88, 91Air intake 88–90Air vents 86Alarm 48–50Android Auto connection 284, 304Anti-lock braking system (ABS) 11 2–11 3Anti-pinch 82Antitheft / Immobiliser 31
Apple CarPlay connection 284, 304Applications 304Area, loading 79Armrest, front 55, 74Assistance call 11 0–111Assistance, emergency braking 11 3, 185Audible warning 11 2Audio streaming (Bluetooth) 270, 282–283, 309
B
Battery 210, 246Battery, 12 V 218, 246–249Battery, ancillaries 246Battery, charging 248–249Battery, remote control 38, 94Bench seat, one-piece, fixed 63–64Blind, panoramic roof 82Blind spot monitoring system 190Blind spot sensors 189Blinds, side 81BlueHDi 227
Bluetooth (hands-free) 271, 285–286, 310Bluetooth (telephone) 285–286, 310–3 11Bodywork 225Bonnet 213–214Boot 47Boot lid 34–36, 38, 47Bottle holder 74Brake discs 219
Brake lamps 241, 243Brakes 219Braking 164Braking assistance system 11 2–11 3Braking, automatic emergency 184–186Braking, dynamic emergency 156–158Brightness 287Bulbs 238Bulbs (changing) 238, 241
C
Capacity, fuel tank 196–198Cap, fuel filler 197–198Care of the bodywork 225CD 269, 282CD, MP3 269, 282Central locking 30, 34–35, 39Changing a bulb 238, 241, 243Changing a bulb (side-hinged doors) 241Changing a fuse 243–245Changing a wheel 233Changing a wiper blade 107–108