Page 334 of 552

3345-1. Using the air conditioning system and defogger
■Rear air conditioning con-
trol screen
To change the airflow mode,
select the airflow mode control
switch.
The air outlets used are switched
each time the switch is selected.
: Air flows to the upper body
: Air flows to the upper body and
feet
: Air flows to the feet
1Press the automatic mode
switch.
2 Adjust the temperature set-
ting.
3 To stop the operation, press
the “OFF” switch.
If the fan speed setting or air
flow modes are operated, the
automatic mode indicator goes
off. However, automatic mode
for functions other than that
operated is maintained.
■Using automatic mode
Fan speed is adjusted automati-
cally according to the temperature
setting and the ambient conditions.
Therefore, the fan may stop for a
while until warm or cool air is ready
to flow immediately after the auto-
matic mode switch is pressed.
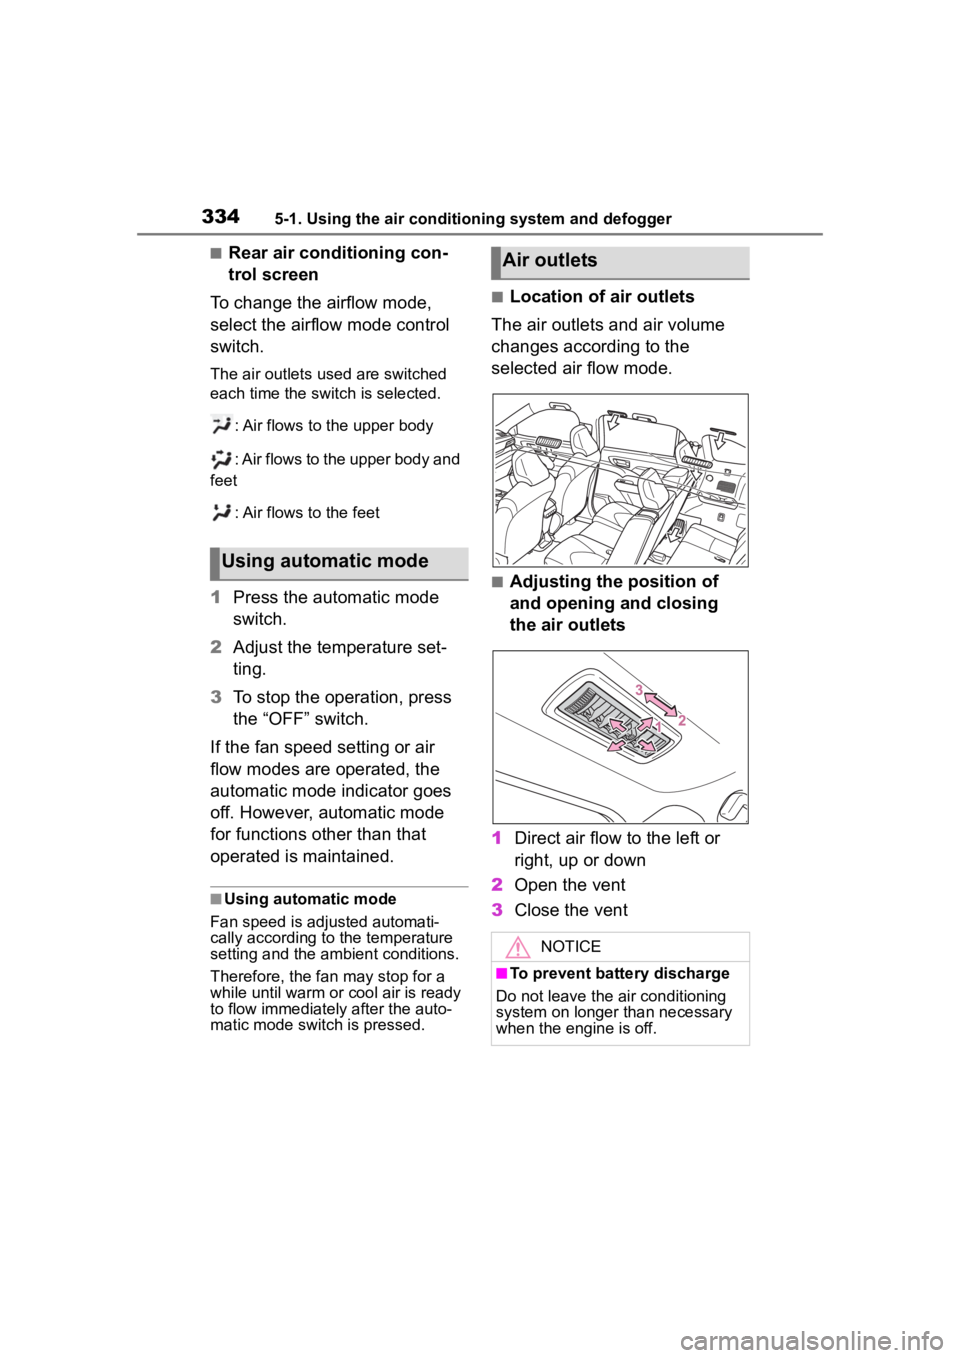
■Location of air outlets
The air outlets and air volume
changes according to the
selected air flow mode.
■Adjusting the position of
and opening and closing
the air outlets
1 Direct air flow to the left or
right, up or down
2 Open the vent
3 Close the vent
Using automatic mode
Air outlets
NOTICE
■To prevent battery discharge
Do not leave the air conditioning
system on longer than necessary
when the engine is off.
Page 335 of 552

3355-1. Using the air conditioning system and defogger
5
Interior features
*: If equipped
Turns the heated steering wheel
on/off
The indicator light comes on when
the heated steering wheel is oper-
ating.
■Operation condition
The engine switch is in ON.
■Timer function
The heated steering wheel will auto-
matically turn off after a period of
time.
■Front
Each time the switch is pressed,
the operation condition changes
as follows.
Hi (3 segments lit) Mid (2 seg-
ments lit) Lo (1 segment
lit) Off
The level indicator (amber)
lights up during operation.
Heated steering
wheel*/seat heat-
ers*/seat ventilators*
Heated steering wheel
Warms up the grip of the
steering wheel
Seat heaters
Warm up the seat upholstery
Seat ventilators
Maintain good ventilation
using a fan built into the seat
WARNING
■To prevent minor burn inju-
ries
Care should be taken if anyone in
the following categories comes in
contact with the steering wheel or
seats when the heater is on:
●Babies, small children, the
elderly, the sick and the physi-
cally challenged
●Persons with sensitive skin
●Persons who are fatigued
●Persons who have taken alco-
hol or drugs that induce sleep
(sleeping drugs, cold remedies,
etc.)
NOTICE
■To prevent damage to the
seat heaters
Do not put heavy objects that
have an uneven surface on the
seat and do not stick sharp
objects (needles, nails, etc.) into
the seat.
■To prevent battery discharge
Do not use the functions when the
engine is off.
Heated steering wheel
Seat heaters
Page 336 of 552
3365-1. Using the air conditioning system and defogger
■Rear
Each time the switch is pressed,
the operation condition changes
as follows.
Hi (3 segments lit) Mid (2 seg-
ments lit) Lo (1 segment
lit) Off
The level indica tor (amber)
lights up during operation.
■Operation condition
The engine switch is in ON.
Each time the switch is pressed,
the operation condition changes
as follows.
Hi (3 segments lit) Mid (2 seg-
ments lit) Lo (1 segment
lit) Off
The level indicato r (green) lights
up during operation.
■Operation condition
The engine switch is in ON.
WARNING
■To prevent overheating and
minor burn injuries
Observe the following precautions
when using the seat heaters.
●Do not cover the seat with a
blanket or cushion when using
the seat heater.
●Do not use seat heater more
than necessary.
Seat ventilators
Page 369 of 552
369
6
6
Maintenance and care
Maintenance and care
.6-1. Maintenance and careCleaning and protecting the vehicle exterior .......... 370
Cleaning and protecting the vehicle interior ........... 373
6-2. Maintenance Maintenance requirements.................................. 376
General maintenance.. 378
Emission inspection and maintenance (I/M) pro-
grams ........................ 380
6-3. Do-it-yourself mainte- nance
Do-it-yourself service pre- cautions ..................... 382
Hood ........................... 384
Positioning a floor jack .................................. 385
Engine compartment ... 386
Tires ............................ 393
Tire inflation pressure.. 405
Wheels ......... ...............407
Air conditioning filter .... 408
Electronic key battery.. 410
Checking and replacing fuses.......................... 412
Headlight aim .............. 414
Light bulbs................... 415
Page 372 of 552

3726-1. Maintenance and care
NOTICE
• After driving in an area contami-nated with soot, oily smoke,
mine dust, iron powder or chem-
ical substances
• If the vehicle becomes heavily soiled with dust or mud
• If liquids such as benzene and gasoline are spilled on the paint
surface
●If the paint is chipped or
scratched, have it repaired
immediately.
●To prevent the wheels from cor-
roding, remove any dirt and
store in a place with low humid-
ity when storing the wheels.
■Cleaning the exterior lights
●Wash carefully. Do not use
organic substances or scrub
with a hard brush.
This may damage the surfaces
of the lights.
●Do not apply wax to the sur-
faces of the lights.
Wax may cause damage to the
lenses.
■When using an automatic car
wash (vehicles with
rain-sensing windshield wip-
ers)
Set the wiper switch to the off
position.
If the wiper switch is in “AUTO”,
the wipers may operate and the
wiper blades may be damaged.
■When using a high pressure
car wash
●When washing the vehicle, do
not spray the came ra or its sur-
rounding area directly with a
high pressure washer. Shock
applied from high pressure
water may cause the device to
not operate normally.
●Do not spray water directly on
the radar which is equipped
behind the emblem. Otherwise
it may cause the device to be
damaged.
●Do not bring the nozzle tip close
to boots (rubber or resin manu-
factured cover), connectors or
the following parts. The parts
may be damaged if they come
into contact with high-pressure
water.
• Traction related parts
• Steering parts
• Suspension parts
• Brake parts
●Keep the cleaning nozzle at
least 11.9 in. (30 cm) away from
the vehicle body. Otherwise
resin section, s uch as moldings
and bumpers, may be deformed
and damaged.
Also, do not continuously hold the
nozzle in the same place.
●Do not spray the lower part of
the windshield continuously.
If water enters the air conditioning
system intake located near the
lower part of the windshield, the
air conditioning system may not
operate correctly.
●Do not wash the underside of
the vehicle using a high pres-
sure car washer.
Page 390 of 552

3906-3. Do-it-yourself maintenance
Check the radiator and con-
denser and clear away any for-
eign objects. If either of the
above parts is extremely dirty or
you are not sure of their condi-
tion, have your vehicle
inspected by your Toyota dealer.
■Checking fluid level
The brake fluid level should be
between the “MAX” and “MIN”
lines on the tank.
■Adding fluid
Make sure to check the fluid
type and prepare the necessary
item.
Fluid type
SAE J1703 or FMVSS No.116 DOT
3 brake fluid
SAE J1704 or FMVSS No.116 DOT
4 brake fluid
Item
Clean funnel
■Brake fluid can absorb moisture
from the air
Excess moisture in the brake fluid
can cause a dangerous loss of brak-
ing efficiency. Use only newly
opened brake fluid.
NOTICE
■When adding coolant
Coolant is neither plain water nor
straight antifreeze. The correct
mixture of water and antifreeze
must be used to provide proper
lubrication, corrosion protection
and cooling. Be sure to read the
antifreeze or coolant label.
■If you spill coolant
Be sure to wash it off with water to
prevent it from d amaging parts or
paint.
Checking the radiator and
condenser
WARNING
■When the engine is hot
Do not touch the r adiator or con-
denser as they may be hot and
cause serious injuries, such as
burns.
■When the electric cooling fan
are operating
Do not touch the engine compart-
ment. With the engine switch in
ON, the electric cooling fan may
automatically start to run if the air
conditioning is on and/or the cool-
ant temperature is high. Be sure
the engine switch is OFF when
working near the electric cooling
fan or radiator grille.
Checking and adding the
brake fluid
Page 408 of 552

4086-3. Do-it-yourself maintenance
Use only Toyota wheel nuts
and wrenches designed for
use with your aluminum
wheels.
When rotating, repairing or
changing your tires, check
that the wheel nuts are still
tight after driving 1000 miles
(1600 km).
Be careful not to damage the
aluminum wheels when using
tire chains.
Use only Toyota genuine bal-
ance weights or equivalent
and a plastic or rubber ham-
mer when balancing your
wheels. 1
Turn the engine switch off.
2 Open the glove box. Slide off
the damper.
3 Push in the glove box on the
vehicle’s outer side to discon-
nect the claws. Then pull out
the glove box and disconnect
the lower claws.
4 Unlock the filter cover ( ),
pull the filter cover out of the
NOTICE
●Ensure that only genuine Toyota
wheels are used on your vehi-
cle.
Tire pressure warning valves
and transmitters may not work
properly with non-genuine
wheels.
Aluminum wheel precau-
tions
Air conditioning filter
The air conditioning filter
must be changed regularly
to maintain air conditioning
efficiency.
Removing the air condi-
tioning filter
Page 409 of 552
4096-3. Do-it-yourself maintenance
6
Maintenance and care
claws ( ), and remove the
filter cover.
5 Remove the filter case.
6 Remove the air conditioning
filter from the filter case and
replace it with a new one.
The “ UP” marks shown on the
filter and the filter case should be
pointing up.
■Checking interval
Inspect and replace the air condi-
tioning filter according to the mainte-
nance schedule. In dusty areas or
areas with heavy traffic flow, early replacement may be required. (For
scheduled maintenance information,
please refer to the “Owner’s Manual
Supplement” or “Scheduled Mainte-
nance Guide”.)
■If air flow from the vents
decreases dramatically
The filter may be clogged. Check
the filter and rep lace if necessary.
NOTICE
■When using the air condition-
ing system
Make sure that a filter is always
installed.
Using the air conditioning system
without a filter may cause damage
to the system.