2023 TOYOTA HIGHLANDER charging
[x] Cancel search: chargingPage 19 of 552

19Pictorial index
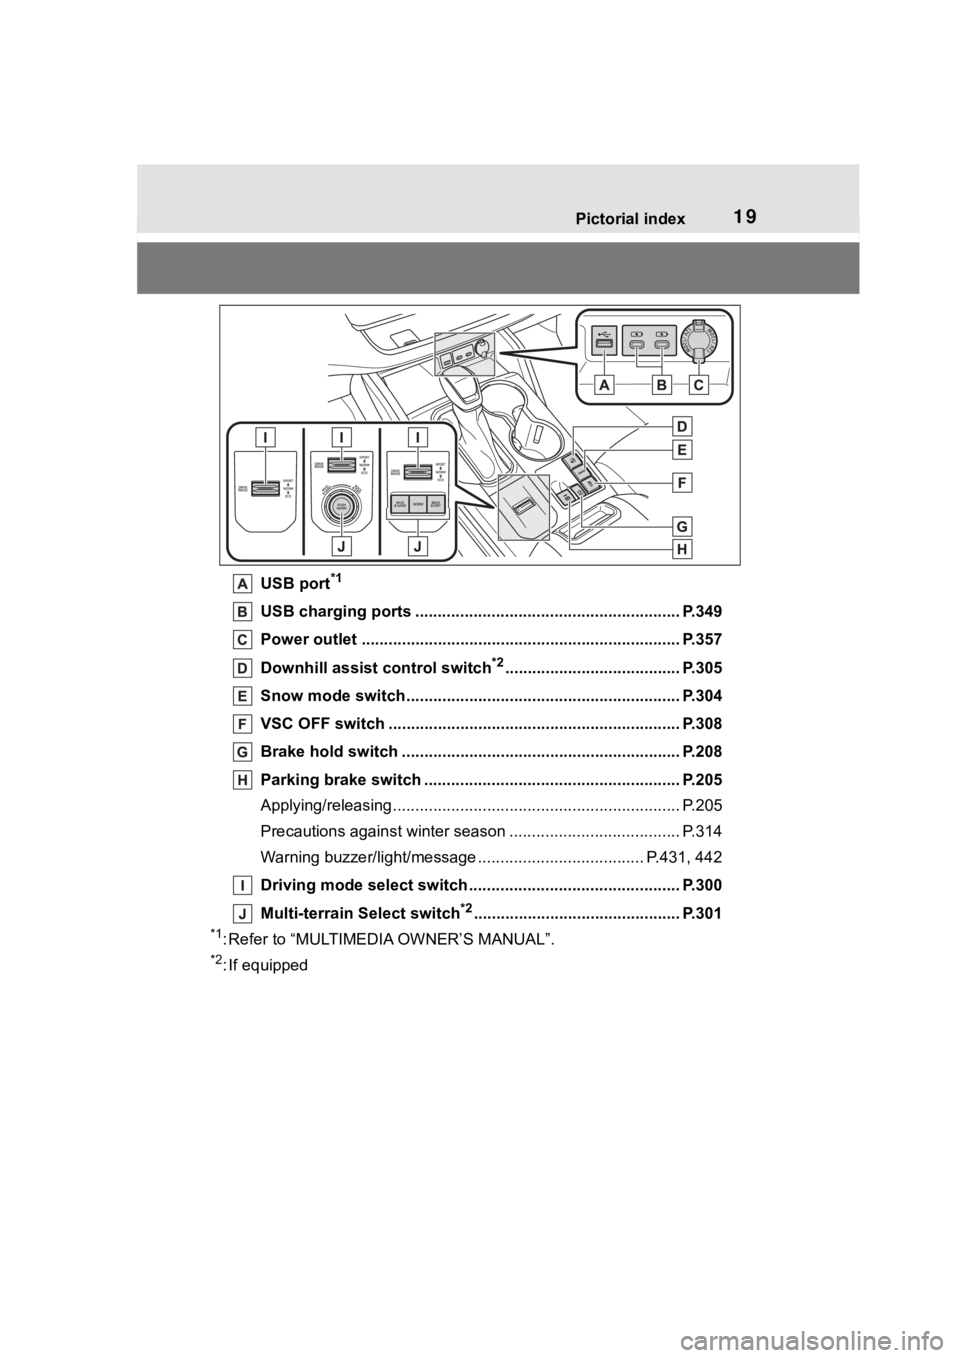
USB port*1
USB charging ports ........................................................... P.349
Power outlet ................................................... .................... P.357
Downhill assist c ontrol switch
*2....................................... P.305
Snow mode switch ............................................... .............. P.304
VSC OFF switch ................................................. ................ P.308
Brake hold switch .............................................. ................ P.208
Parking brake switch ........................................... .............. P.205
Applying/releasing............................................. ................... P.205
Precautions against winter season .............................. ........ P.314
Warning buzzer/light/message ................................... .. P.431, 442
Driving mode select switch ..................................... .......... P.300
Multi-terrain Select switch
*2.............................................. P.301
*1: Refer to “MULTIMEDIA OWNER’S MANUAL”.
*2: If equipped
Page 71 of 552

711-4. Theft deterrent system
1
For safety and security
■Triggering of the alarm
The alarm may be triggered in the
following situations:
(Stopping the alarm deactivates the
alarm system.)
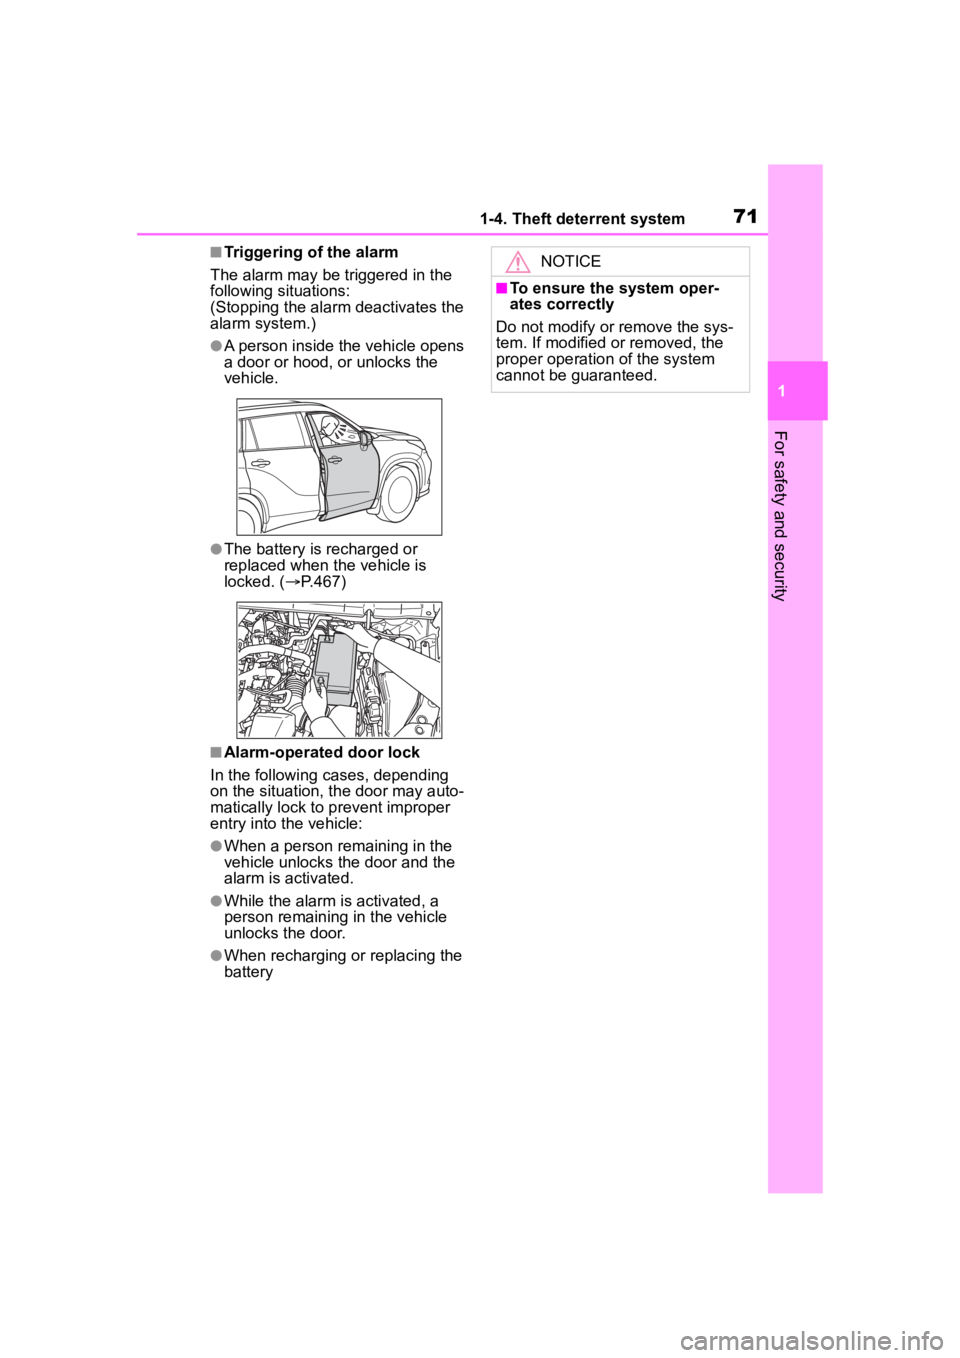
●A person inside the vehicle opens
a door or hood, or unlocks the
vehicle.
●The battery is recharged or
replaced when the vehicle is
locked. ( P.467)
■Alarm-operated door lock
In the following cases, depending
on the situation, th e door may auto-
matically lock to p revent improper
entry into the vehicle:
●When a person remaining in the
vehicle unlocks the door and the
alarm is activated.
●While the alarm is activated, a
person remaining in the vehicle
unlocks the door.
●When recharging or replacing the
battery
NOTICE
■To ensure the system oper-
ates correctly
Do not modify or remove the sys-
tem. If modified or removed, the
proper operation of the system
cannot be guaranteed.
Page 75 of 552

752-1. Instrument cluster
2
Vehicle status information and indicators
12.3-inch display
The units used on the meters and some indicators may differ
depending on the target region.
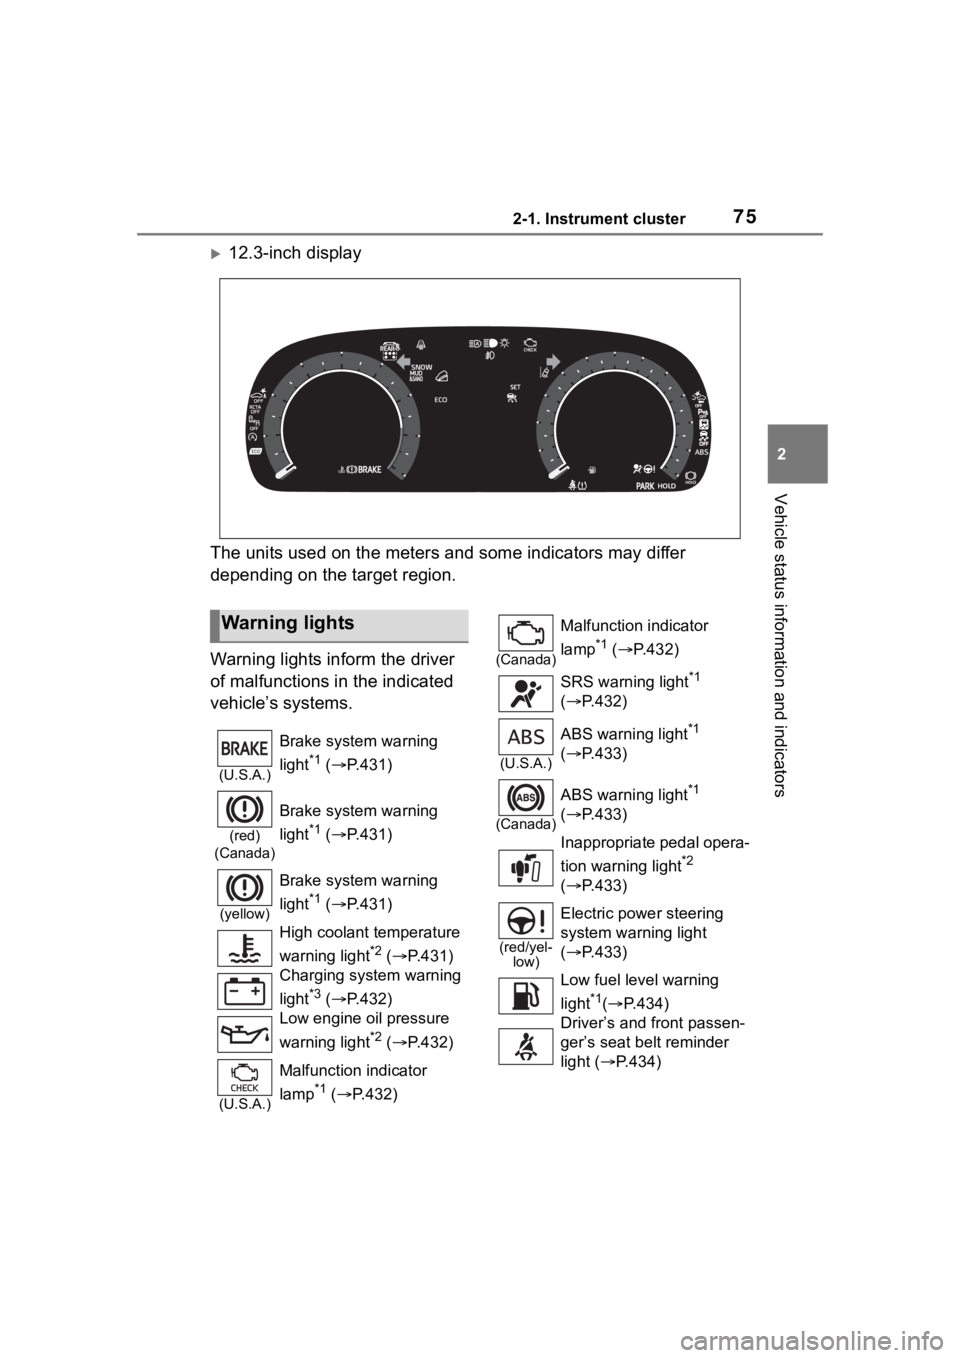
Warning lights inform the driver
of malfunctions in the indicated
vehicle’s systems.
Warning lights
(U.S.A.)
Brake system warning
light
*1 ( P.431)
(red)
(Canada)
Brake system warning
light
*1 ( P.431)
(yellow)
Brake system warning
light
*1 ( P.431)
High coolant temperature
warning light
*2 ( P.431)
Charging system warning
light
*3 ( P.432)
Low engine oil pressure
warning light
*2 ( P.432)
(U.S.A.)
Malfunction indicator
lamp
*1 ( P.432)
(Canada)
Malfunction indicator
lamp
*1 ( P.432)
SRS warning light
*1
( P.432)
(U.S.A.)
ABS warning light*1
( P.433)
(Canada)
ABS warning light*1
( P.433)
Inappropriate pedal opera-
tion warning light
*2
( P.433)
(red/yel-
low)
Electric power steering
system warning light
( P.433)
Low fuel leve l warning
light
*1( P.434)
Driver’s and front passen-
ger’s seat belt reminder
light ( P.434)
Page 112 of 552

1123-1. Key information
3-1.Key information
The following keys are provided
with the vehicle.Electronic keys
• Operating the smart key system ( P.131)
• Operating the wireless remote control function ( P. 1 1 3 )
Mechanical keys
Key number plate
■When riding in an aircraft
When bringing an electronic key
onto an aircraft, make sure you do
not press any buttons on the elec-
tronic key while inside the aircraft
cabin. If you are carrying an elec-
tronic key in your bag, etc., ensure
that the buttons are not likely to be
pressed accidentally. Pressing a
button may cause the electronic key
to emit radio waves that could inter-
fere with the oper ation of the air-
craft.
■Electronic key battery depletion
●The standard battery life is 1 to 2
years.
●If the battery becomes low, an
alarm will sound in the cabin when
the engine is stopped.
●To reduce key battery depletion when the electronic key is to not
be used for long periods of time,
set the electronic key to the bat-
tery-saving mode. (
P.133)
●As the electronic key always
receives radio waves, the battery
will become depleted even if the
electronic key is not used. The fol-
lowing symptoms indicate that the
electronic key battery may be
depleted. Replace the battery
when necessary.
• The smart key system or the wire- less remote contro l does not oper-
ate.
• The detection area becomes smaller.
• The LED indicator on the key sur- face does not turn on.
●To avoid serious deterioration, do
not leave the electronic key within
3 ft. (1 m) of the following electri-
cal appliances that produce a
magnetic field:
•TVs
• Personal computers
• Cellular phones, cordless phones and battery chargers
• Recharging cellular phones or cordless phones
• Table lamps
• Induction cookers
■Replacing the battery
P.410
■Confirmation of the registered
key number
The number of keys already regis-
tered to the vehi cle can be con-
firmed. Ask your Toyota dealer for
details.
■If “A New Key has been Regis-
tered Contact Your Dealer for
Details” is shown on the
multi-information display
This message will be displayed
each time the driver’s door is
opened when the doors are
unlocked from the outside for
approximately 10 days after a new
electronic key has been registered.
Keys
The keys
Page 194 of 552

1944-1. Before driving
requires practice. Grip the
bottom of the steering wheel
and move your hand to the
left to move the trailer to the
left. Move your hand to the
right to move the trailer to
right. (This is generally oppo-
site to reversing without a
trailer attached.) Avoid sharp
or prolonged turning. Have
someone guide you when
reversing to reduce the risk of
an accident.
As stopping distance is
increased when towing a
trailer, vehicle-to vehicle dis-
tance should be increased.
For each 10 mph (16 km/h) of
speed, allow at least one
vehicle and trailer length.
Avoid sudden braking as you
may skid, resulting in the
trailer jackknifing and a loss of
vehicle control. This is espe-
cially true on wet or slippery
surfaces.
Avoid jerky starts or sudden
acceleration.
Avoid jerky steering and
sharp turns, and slow down
before making turn.
Note that when making a turn,
the trailer wheels will be
closer than the vehicle wheels
to the inside of the turn. Com-
pensate by making a wider
than normal turning radius.
Slow down before making a turn, in cross winds, on wet or
slippery surfaces, etc.
Increasing vehicle speed can
destabilize the trailer.
Take care when passing other
vehicles. Passing requires
considerable distance. After
passing a vehicle, do not for-
get the length of your trailer,
and be sure you have plenty
of room before changing
lanes.
To maintain engine braking
efficiency and charging sys-
tem performance when using
engine braking, do not put the
transmission in D. If in the M
mode, the transmission shift
range position must be in 6 or
lower. ( P.201)
Instability happens more fre-
quently when descending
steep or long downhill grades.
Before descending, slow
down and downshift. Do not
make sudden downshifts
while descending steep or
long downhill grades.
Avoid holding the brake pedal
down too long or applying the
brakes too frequently. This
could cause the brakes to
overheat and result in
reduced braking efficiency.
Due to the added load of the
trailer, your vehicle’s engine
may overheat on hot days (at
temperatures over 85°F
[30°C]) when driving up a long
Page 211 of 552

2114-3. Operating the lights and wipers
4
Driving
■Headlight control sensor
The sensor may not function prop-
erly if an object is placed on the sen-
sor, or anything that blocks the
sensor is affixed to the windshield.
Doing so interfere s with the sensor
detecting the level of ambient light
and may cause the automatic head-
light system to malfunction.
■Automatic light off system
●When the headlights are on: The
headlights and tail lights turn off
30 seconds after a door is opened
and closed if the engine switch is
turned to ACC or OFF. (The lights
turn off immediately if on the
key is pressed afte r all the doors
are closed.)
●When only the tail lights are on:
The tail lights tu rn off automati-
cally if the engine switch is turned
to ACC or OFF an d the driver’s
door is opened.
Except for Canada: To turn the lights
on again, turn the engine switch to
ON, or turn the light switch off once
and then back to or .
For Canada: To tu rn the lights on
again, turn the engine switch to ON,
or turn the light s witch to once
and then back to or .
■Automatic headlight leveling
system (if equipped)
The level of the headlights is auto-
matically adjusted according to the
number of passengers and the load-
ing condition of the vehicle to
ensure that the headlights do not interfere with o
ther road users.
■Light reminder buzzer
A buzzer sounds when the engine
switch is turned off or turned to ACC
and the driver’s door is opened
while the lights are turned on.
■Welcome lighting
The parking lights and tail lights
automatically turn on at night when
the doors are un locked using the
entry function or wireless remote
control if the light switch is in the
position.
■Windshield wiper linked head-
light illumination
When driving during daytime with
the headlight switch turned to , if
the windshield wipers are used, the
headlights will turn o n automatically
after several se conds to help
enhance the visibility of your vehi-
cle.
■Battery-saving function
In order to prevent the battery of the
vehicle from discharging, if the
headlights and/or tail lights are on
when the engine switch is turned off
the battery saving function will oper-
ate and automatically turn off all the
lights after approximately 20 min-
utes. When the engine switch is
turned to ON, the battery-saving
function will be disabled.
When any of the following are per-
formed, the battery-saving function
is canceled once and then reacti-
vated. All the lights will turn off auto-
matically 20 minutes after the
battery-saving function has been
reactivated:
●When the headlight switch is oper-
ated
●When a door is opened or closed
■Customization
Some functions can be customized.
( P.494)
Page 267 of 552

2674-5. Using the driving support systems
4
Driving
ing system is operated (windshield
defogger switch, etc.).
• If the battery charge becomes low.
■When the hood is opened
●If the hood is opened while the
engine is stopped by the Stop &
Start system, the engine will stall
and will not be able to be restarted
by the automatic engine start
function. In this case, restart the
engine using the normal engine
starting procedure. ( P.197)
●If the hood is closed after the
engine is started with the hood
open, the Stop & Start system will
not operate. Close the hood, turn
the engine switch off, wait 30 sec-
onds or more, and then start the
engine.
■Air conditioning system opera-
tion while the engine is stopped
by the Stop & Start system
When the air conditioning is in auto-
matic mode and the engine is
stopped by the Stop & Start system,
the fan may operate at a low speed
in order to prevent the temperature
in the cabin fro m increasing or
decreasing or may be stopped.
To prioritize air conditioning system
performance when the vehicle is
stopped, disable the Stop & Start
system by pressing the Stop & Start
cancel switch.
●If the windshield is fogged up
Turn the windshield defogger on.
( P.322)
If the windshield fogs up frequently,
press the Stop & Start cancel switch
to disable the Stop & Start system.
●If an odor is emitted from the air
conditioning system
Press the Stop & Start cancel switch
to deactivate the Stop & Start sys-
tem.
■Changing the idling stop time
with the air conditioning system
on
The length of time the Stop & Start
system will operate when the air
conditioning system is on can be
changed in of th e multi-informa-
tion display ( P.92, 102). (The
length of time the Stop & Start sys-
tem will operate when the air condi-
tioning system is off cannot be
changed.)
■Displaying the Stop & Start sys-
tem status
P.92, 102
■Multi-information display mes-
sages
If the following situations, and a
message may be displayed on the
multi-information display.
●When the engine cannot be
stopped by the Stop & Start sys-
tem “Press brake mo re to activate”
• The brake pedal is not sufficiently depressed.
If the brake pedal is depressed
further, the system will operate.
“Non-Dedicated Battery”
• A battery not designed for use with a Stop & Start system may
have been installed.
Have the vehicle inspected by
your Toyota dealer.
“Battery Charging”
• The battery charge may be low.
Stopping of the engine is tempo-
rarily prohibited to prioritize charging
of the battery. Afte r the engine runs
for a certain amount of time, the sys-
tem will be enabled.
• A refresh charge may be occur- ring
Page 268 of 552

2684-5. Using the driving support systems
After a refresh charge for up to
an hour completes, the system can
be operated.
• If displayed continuously for a long time (more than an hour)
The battery may b e deteriorated.
Contact your Toyota dealer for
details.
“Stop & Start System Unavail-
able”
• The Stop & Start system is tempo- rarily disabled.
Allow the engine to run for some
time.
• The engine may have been started with the hood open.
Close the hood , turn the engine
switch off, wait for 30 seconds or
more, and then start the engine.
“In Preparation”
• The vehicle is being driven in a high altitude area.
• The brake booster vacuum is low.
When the brake booster vacuum
reaches a predetermined level, the
system will be enabled.
“For Climate Control”
• The air conditioning system is being used when the ambient
temperature is high or low.
If the difference between the set
temperature and cabin temperature
becomes small, the system will be
enabled.
• The windshield defogger is on.
●When the engine automatically
restarts while stopped by the Stop
& Start system
“In Preparation”
• The brake pedal has been depressed further or pumped.
The system will be enabled after
the engine runs and the brake
booster vacuum reaches a predeter-
mined level.
“For Climate Control”
• The air conditioning system is being used.
• The windshield defogger has been turned on.
“Battery Charging”
• The battery charge may be low.
The system will be enabled after
the engine runs to sufficiently
charge the battery.
■When the buzzer sounds
If the driver’s door is opened when
the engine is stopped by the Stop &
Start system and the shift lever is in
D, a buzzer will soun d and the Stop
& Start system indicator will flash. To
stop the buzzer, c lose the driver’s
door.
■The Stop & Start system protec-
tion function
●When the volume of the audio
system is excessively high, sound
output from the audio system may
suddenly be cut off in order to
reduce battery consumption. To
prevent the audio system from
being cut off, keep the volume of
audio system at a moderate level.
If the audio system has been cut
off, turn the engine switch off, wait
for 3 seconds or more and then
turn it to ACC or ON to re-enable
the audio system.
●The audio system may not be acti-
vated if the battery terminals are
disconnected and then recon-
nected. If this o ccurs, turn the
engine switch off and then repeat
the following oper ation twice to
activate the audio system nor-
mally.
• Turn the engine switch to ON and then to OFF.