2023 TOYOTA COROLLA light
[x] Cancel search: lightPage 374 of 468
3747-2. Steps to take in an emergency
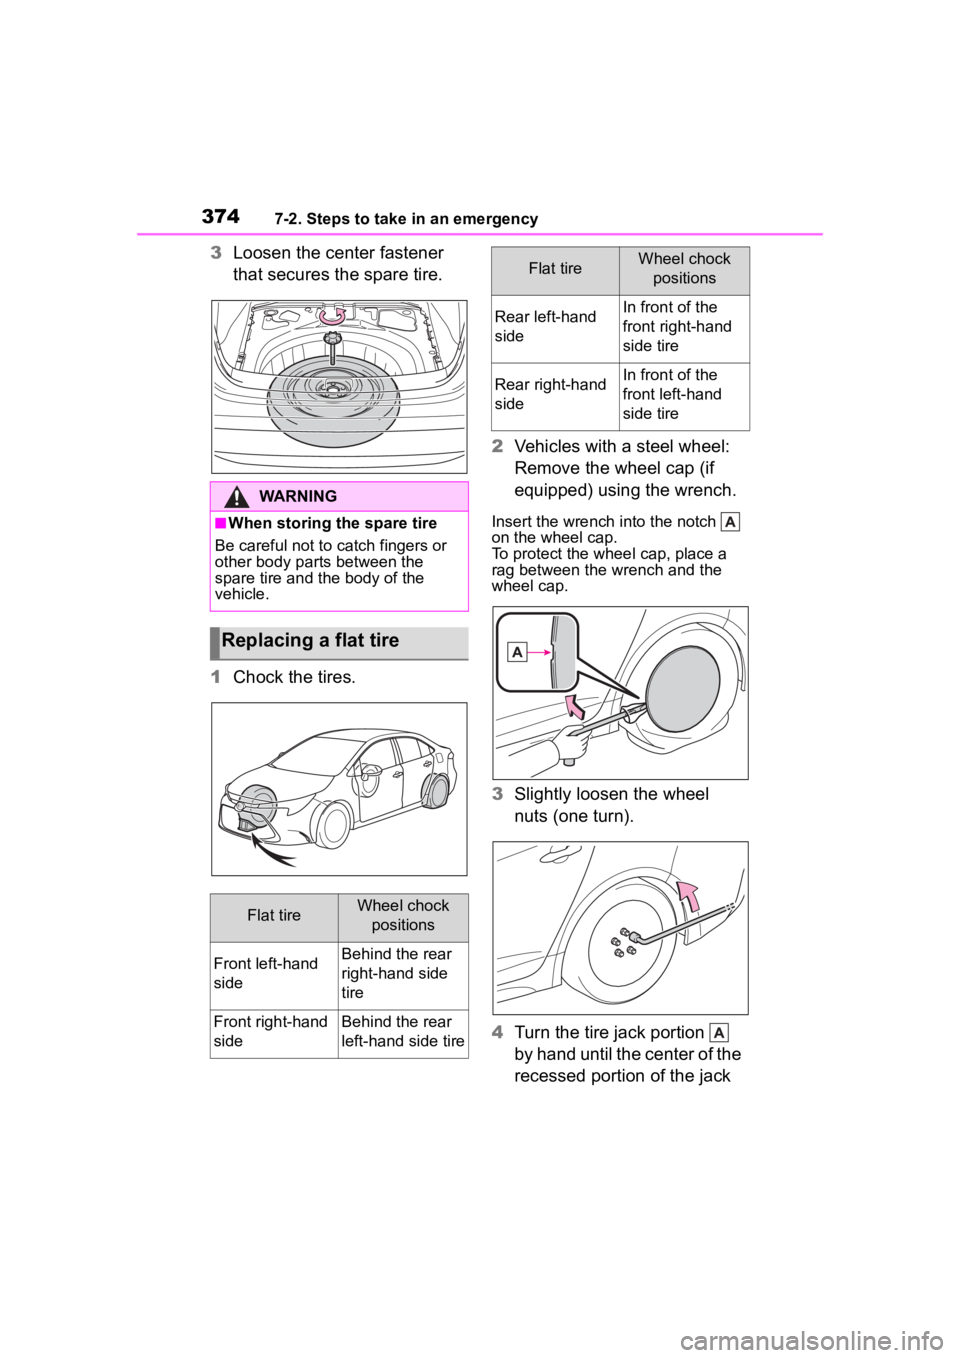
3Loosen the center fastener
that secures the spare tire.
1 Chock the tires. 2
Vehicles with a steel wheel:
Remove the wheel cap (if
equipped) using the wrench.
Insert the wrench i nto the notch
on the wheel cap.
To protect the whee l cap, place a
rag between the wrench and the
wheel cap.
3 Slightly loosen the wheel
nuts (one turn).
4 Turn the tire jack portion
by hand until the center of the
recessed portion of the jack
WARNING
■When storing the spare tire
Be careful not to catch fingers or
other body parts between the
spare tire and the body of the
vehicle.
Replacing a flat tire
Flat tireWheel chock positions
Front left-hand
sideBehind the rear
right-hand side
tire
Front right-hand
sideBehind the rear
left-hand side tire
Rear left-hand
sideIn front of the
front right-hand
side tire
Rear right-hand
sideIn front of the
front left-hand
side tire
Flat tireWheel chock positions
Page 375 of 468
3757-2. Steps to take in an emergency
7
When trouble arises
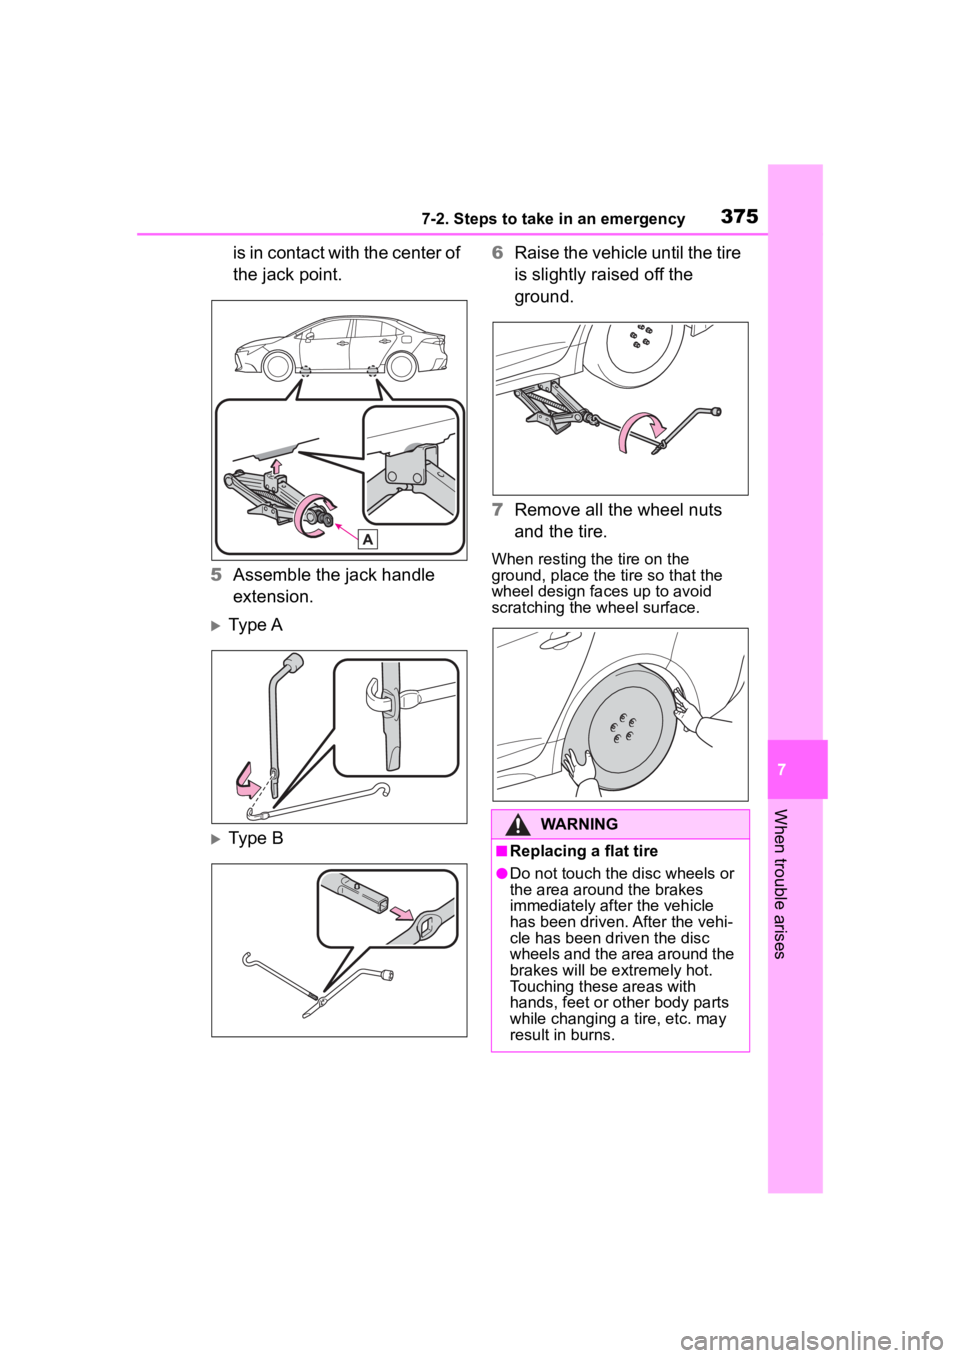
is in contact with the center of
the jack point.
5 Assemble the jack handle
extension.
Ty p e A
Type B 6
Raise the vehicle until the tire
is slightly raised off the
ground.
7 Remove all the wheel nuts
and the tire.
When resting the tire on the
ground, place the tire so that the
wheel design faces up to avoid
scratching the wheel surface.
WARNING
■Replacing a flat tire
●Do not touch the disc wheels or
the area around the brakes
immediately after the vehicle
has been driven. After the vehi-
cle has been driven the disc
wheels and the area around the
brakes will be extremely hot.
Touching these areas with
hands, feet or oth er body parts
while changing a tire, etc. may
result in burns.
Page 377 of 468
3777-2. Steps to take in an emergency
7
When trouble arises
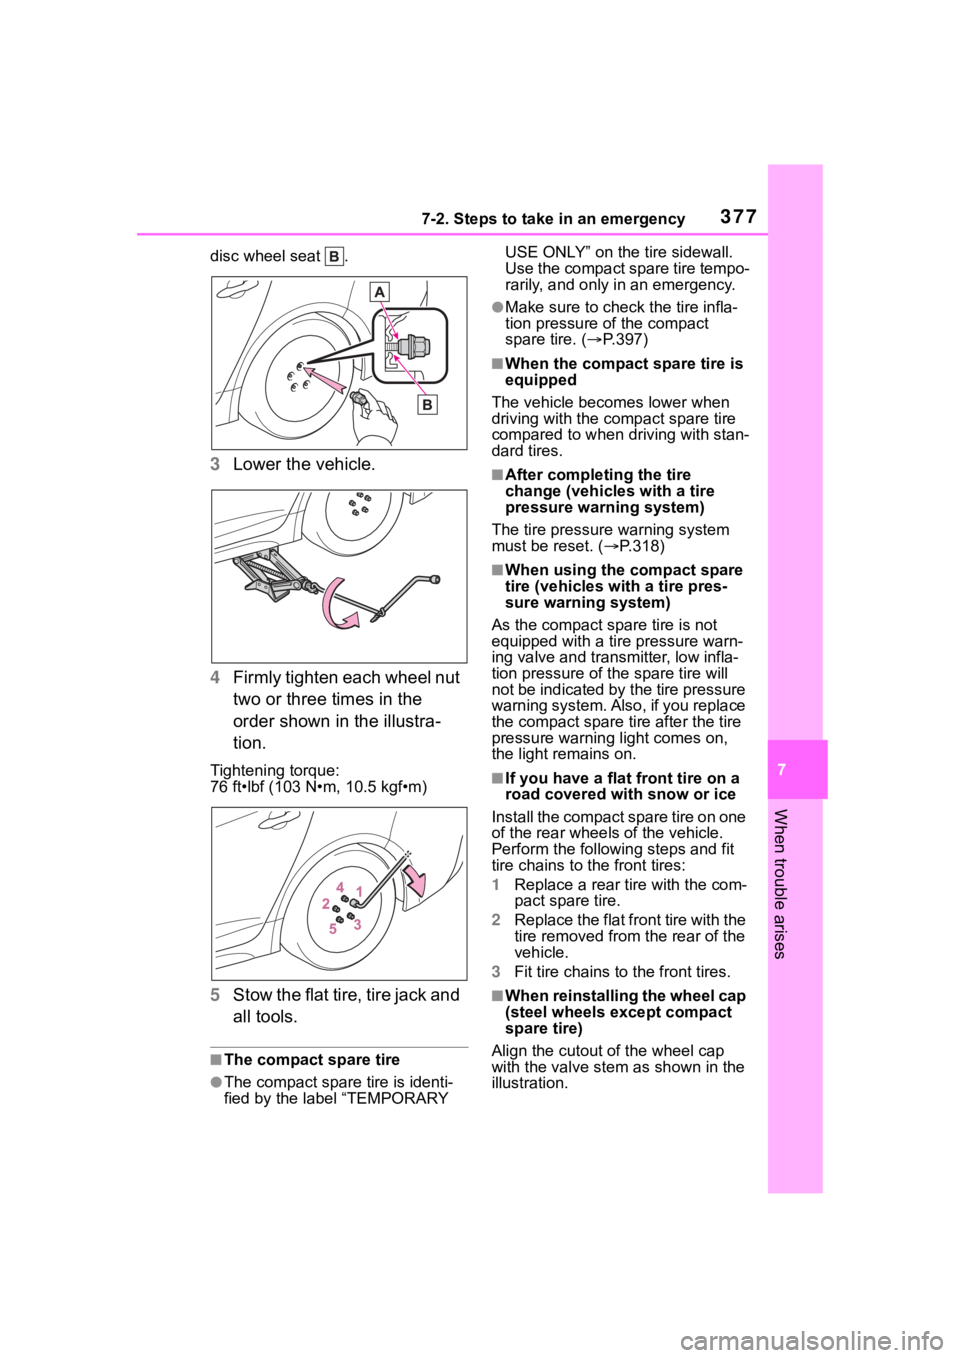
disc wheel seat .
3Lower the vehicle.
4 Firmly tighten each wheel nut
two or three times in the
order shown in the illustra-
tion.
Tightening torque:
76 ft•lbf (103 N•m, 10.5 kgf•m)
5Stow the flat tire, tire jack and
all tools.
■The compact spare tire
●The compact spare tire is identi-
fied by the label “TEMPORARY USE ONLY” on the tire sidewall.
Use the compact spare tire tempo-
rarily, and only in an emergency.
●Make sure to check the tire infla-
tion pressure of the compact
spare tire. (
P.397)
■When the compact spare tire is
equipped
The vehicle becomes lower when
driving with the compact spare tire
compared to when driving with stan-
dard tires.
■After completing the tire
change (vehicles with a tire
pressure warning system)
The tire pressure warning system
must be reset. ( P.318)
■When using the compact spare
tire (vehicles with a tire pres-
sure warning system)
As the compact spare tire is not
equipped with a tire pressure warn-
ing valve and transm itter, low infla-
tion pressure of t he spare tire will
not be indicated by the tire pressure
warning system. Also , if you replace
the compact spare ti re after the tire
pressure warning light comes on,
the light remains on.
■If you have a flat front tire on a
road covered with snow or ice
Install the compact spare tire on one
of the rear wheels of the vehicle.
Perform the following steps and fit
tire chains to the front tires:
1 Replace a rear tire with the com-
pact spare tire.
2 Replace the flat front tire with the
tire removed from the rear of the
vehicle.
3 Fit tire chains to the front tires.
■W h e n r e i n s t a l l i n g t h e w h e e l c a p
(steel wheels except compact
spare tire)
Align the cutout of the wheel cap
with the valve stem as shown in the
illustration.
Page 379 of 468
3797-2. Steps to take in an emergency
7
When trouble arises
One of the following may be the
cause of the problem:
There may not be sufficient
fuel in the vehicle’s tank.
Refuel the vehicle.
The engine may be flooded.
Try to restart the engine again
following correct starting pro-
cedures. ( P.154, 155)
There may be a malfunction
in the engine immobilizer sys-
tem. ( P.77)
One of the following may be the
cause of the problem:
The battery may be dis-
charged. ( P.383)
NOTICE
■Driving with tire chains and
the compact spare tire
Do not fit tire chains to the com-
pact spare tire. Tire chains may
damage the vehicle body and
adversely affect driving perfor-
mance.
■When replacing the tires
(vehicles with a tire pressure
warning system)
When removing or fitting the
wheels, tires or the tire pressure
warning valve and transmitter,
contact your Toyota dealer as the
tire pressure warning valve and
transmitter may be damaged if not
handled correctly.
■To avoid damage to the tire
pressure warning valves and
transmitters (vehicles with a
tire pressure warning system)
When a tire is repaired with liquid
sealants, the tire pressure warn-
ing valve and transmitter may not
operate properly. If a liquid seal-
ant is used, contact your Toyota
dealer or other qualified service
shop as soon as possible. Make
sure to replace the tire pressure
warning valve and transmitter
when replacing the tire.
If the engine will not
star t
If the engine will not start
even though correct starting
procedures are being fol-
lowed ( P.154, 155), con-
sider each of the following
points:
The engine will not start
even though the starter
motor operates normally.
The starter motor turns
over slowly, the interior
lights and headlights are
dim, or the horn does not
sound or sounds at a low
volume.
Page 380 of 468

3807-2. Steps to take in an emergency
The battery terminal connec-
tions may be loose or cor-
roded. ( P.308)
The engine starting system may
be malfunctioning due to an
electrical problem such as elec-
tronic key battery depletion or a
blown fuse. However, an interim
measure is available to start the
engine. ( P.380)
One of the following may be the
cause of the problem:
The battery may be dis-
charged. ( P.383)
One or both of the battery ter-
minals may be disconnected.
( P.308)
Vehicles without a smart key
system: There may be a mal-
function in the steering lock
system.
Contact your Toyot a dealer if the
problem cannot be repaired, or if
repair procedures are unknown.
When the engine does not start,
the following steps can be used
as an interim measure to start
the engine if the engine switch is
functioning normally.
Do not use this starting proce-
dure except in case of emer-
gency.
1 Set the parking brake.
( P.168)
2 Check that the shift lever is in
P.
3 Turn the engine switch to
ACC
*.
4 Press and hold the engine
switch for about 15 seconds
while depressing the brake
pedal firmly.
Even if the engi ne can be started
using the above steps, the system
may be malfunctioning. Have the
vehicle inspected by your Toyota
dealer.
*: ACC mode can be enabled/dis- abled on the customize menu.
( P.412)
The starter motor does
not turn over (vehicles
with a smart key system)
The starter motor does
not turn over, the interior
lights and headlights do
not turn on, or the horn
does not sound.
Emergency start function
(vehicles with a smart key
system)
Page 384 of 468
3847-2. Steps to take in an emergency
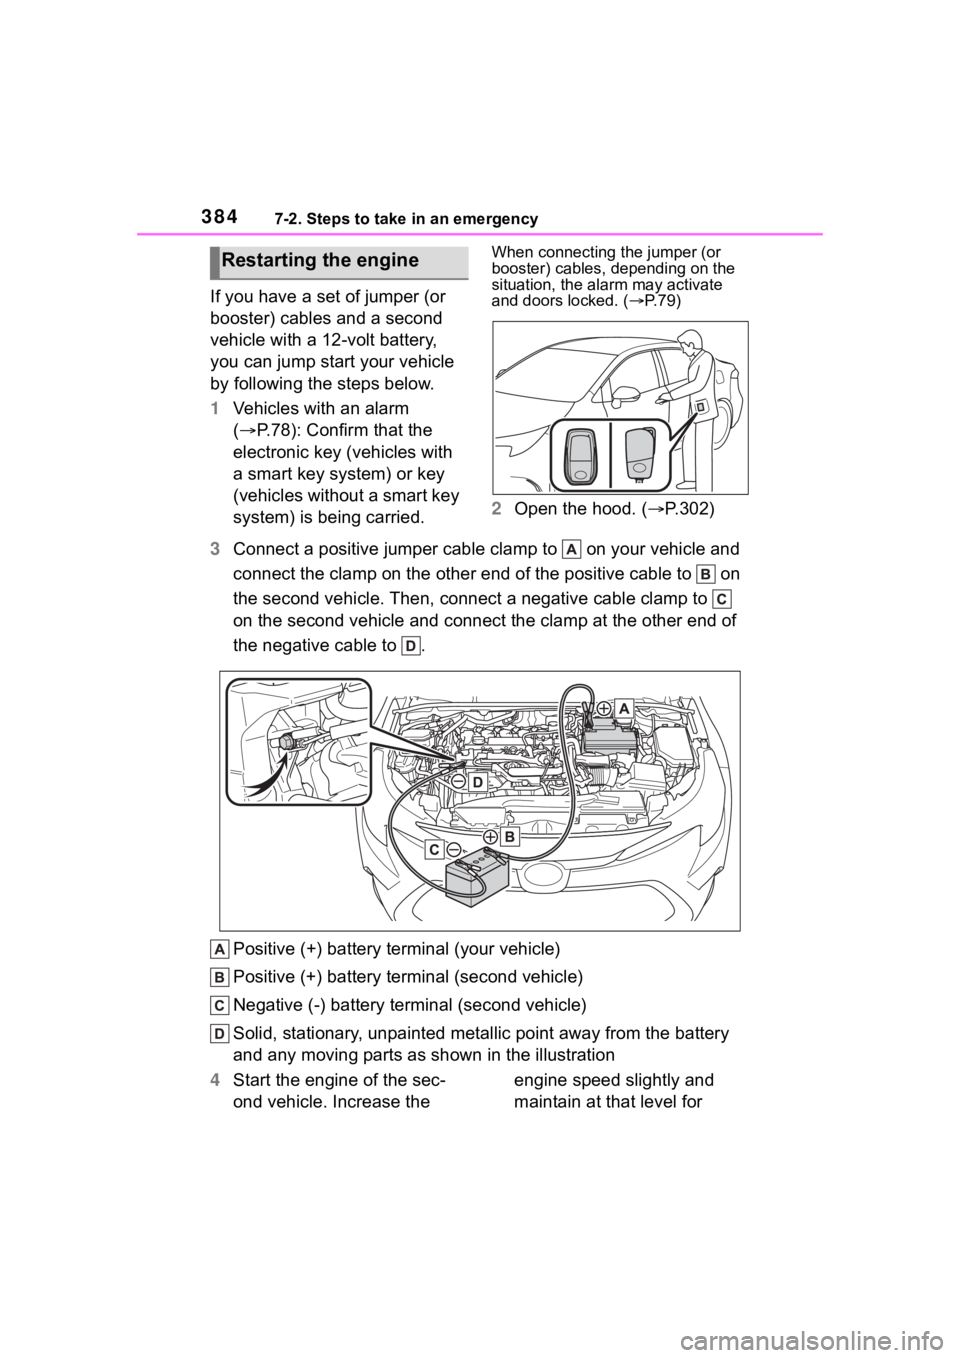
If you have a set of jumper (or
booster) cables and a second
vehicle with a 12-volt battery,
you can jump start your vehicle
by following the steps below.
1Vehicles with an alarm
( P.78): Confirm that the
electronic key (vehicles with
a smart key system) or key
(vehicles without a smart key
system) is being carried.
When connecting the jumper (or
booster) cables, depending on the
situation, the alarm may activate
and doors locked. ( P. 7 9 )
2 Open the hood. ( P.302)
3 Connect a positive jumper cable clamp to on your vehicle and
connect the clamp on the other end of the positive cable to on
the second vehicle. Then, connect a negative cable clamp to
on the second vehicle and connect the clamp at the other end of
the negative cable to .
Positive (+) battery terminal (your vehicle)
Positive (+) battery terminal (second vehicle)
Negative (-) battery term inal (second vehicle)
Solid, stationary, unpainted metallic point away from the batte ry
and any moving parts as shown in the illustration
4 Start the engine of the sec-
ond vehicle. Increase the engine speed slightly and
maintain at that level for
Restarting the engine
Page 385 of 468
3857-2. Steps to take in an emergency
7
When trouble arises
approximately 5 minutes to
recharge the battery of your
vehicle.
5 Vehicles with a smart key
system: Open and close any
of the doors of your vehicle
with the engine switch OFF.
6 Maintain the engine speed of
the second vehicle and start
the engine of your vehicle by
turning the engine switch to
ON.
7 Once the vehicle’s engine
has started, remove the
jumper cables in the exact
reverse order from which
they were connected.
Once the engine starts, have the
vehicle inspected at your Toyota
dealer as soon as possible.
■Starting the engine when the
battery is discharged
The engine cannot be started by
push-starting.
■To prevent battery discharge
●Turn off the headlights and the
audio system while the engine is
off.
●Turn off any unnecessary electri-
cal components when the vehicle
is running at a low speed for an
extended period, such as in heavy
traffic.
■When the battery is removed or
discharged
●Information stor ed in the ECU is
cleared. When the battery is
depleted, have the vehicle
inspected at you r Toyota dealer.
●Some systems may require initial-
ization. ( P.422)
■When removing the battery ter-
minals
When the battery terminals are
removed, the information stored in
the ECU is cleared. Before remov-
ing the battery term inals, contact
your Toyota dealer.
■Charging the battery
The electricity stored in the battery
will discharge grad ually even when
the vehicle is not in use, due to nat-
ural discharge and the draining
effects of certain electrical appli-
ances. If the vehicle is left for a long
time, the battery may discharge,
and the engine may be unable to
start. (The battery recharges auto-
matically during driving.)
■When recharging or replacing
the battery (vehicles with a
smart key system)
●In some cases, it may not be pos-
sible to unlock the doors using the
smart key system when the bat-
tery is discharged. Use the wire-
less remote control or the
mechanical key to lock or unlock
the doors.
●The engine may not start on the
first attempt after the battery has
recharged but will start normally
after the second attempt. This is
not a malfunction.
●The engine switch mode is memo-
rized by the vehicle. When the
battery is reconnected, the system
will return to the mode it was in
before the bat tery was dis-
charged. Before disconnecting the
battery, turn the engine switch off.
If you are unsure what mode the
engine switch wa s in before the
battery discharged, be especially
careful when reconnecting the
battery.
■When replacing the battery
●Use a battery that conforms to
European regulations.
●Use a battery that the case size is
same as the previous one (LN1),
Page 386 of 468
3867-2. Steps to take in an emergency
20 hour rate capacity (20HR) is
equivalent (45Ah) or greater, and
performance rating (CCA) is
equivalent (286A or 307A) or
greater.
• If the sizes differ, the battery can-
not be properly secured.
• If the 20 hour rate capacity is low,
even if the time period where the
vehicle is not used is a short time,
the battery may discharge and the
engine may not be able to start.
●For details, consu lt your Toyota
dealer.
WARNING
■When removing the battery
terminals
Always remove the negative (-)
terminal first. If the positive (+) ter-
minal contacts any metal in the
surrounding area when the posi-
tive (+) terminal is removed, a
spark may occur, l eading to a fire
in addition to electrical shocks
and death or serious injury.
■Avoiding battery fires or
explosions
Observe the following precautions
to prevent accidentally igniting the
flammable gas that may be emit-
ted from the battery:
●Make sure each jumper cable is
connected to the correct termi-
nal and that it is not unintention-
ally in contact with any other
than the intended terminal.
●Do not allow the other end of
the jumper cable connected to
the “+” terminal to come into
contact with any other parts or
metal surfaces in the area, such
as brackets or unpainted metal.
●Do not allow the + and - clamps
of the jumper cables to come
into contact with each other.
●Do not smoke, use matches,
cigarette lighter s or allow open
flame near the battery.
■Battery precautions
The battery contains poisonous
and corrosive acidic electrolyte,
while related parts contain lead
and lead compounds. Observe
the following precautions when
handling the battery:
●When working with the battery,
always wear safety glasses and
take care not to allow any bat-
tery fluids (acid) to come into
contact with skin, clothing or the
vehicle body.
●Do not lean over the battery.
●In the event that battery fluid
comes into contact with the skin
or eyes, immediately wash the
affected area with water and
seek medical attention. Place a
wet sponge or cloth over the
affected area until medical
attention can be received.
●Always wash your hands after
handling the battery support,
terminals, and other bat-
tery-related parts.
●Do not allow children near the
battery.
NOTICE
■When handling jumper cables
When connecting the jumper
cables, ensure that they do not
become entangled in the cooling
fan or engine drive belt.