2023 TOYOTA COROLLA seat adjustment
[x] Cancel search: seat adjustmentPage 1 of 468

1
2
3
4
5
6
7
8
9
9
COROLLA_U
Pictorial indexSearch by illustration
For safety
and securityMake sure to read through them
(Main topics: Child seat, theft deterrent system)
Vehicle status
information and
indicatorsReading driving-related information
(Main topics: Meters, multi-information display)
Before driving
Opening and closing the doors and windows,
adjustment before driving
(Main topics: Keys, doors, seats)
Driving
Operations and advice which are necessary for
driving
(Main topics: Starting engine, refueling)
Interior featuresUsage of the interior features
(Main topics: Air conditioner, storage features)
Maintenance
and careCaring for your vehicle and maintenance
procedures
(Main topics: Interior and exterior, light bulbs)
When trouble
arisesWhat to do in case of malfunction and emergency
(Main topics: Battery discharge, flat tire)
Vehicle
specificationsVehicle specifications, customizable features
(Main topics: Fuel, oil, tire inflation pressure)
For ownersReporting safety defects for U.S. owners, and seat
belt and SRS airbag instructions for Canadian
owners
IndexSearch by symptom
Search alphabetically
Page 26 of 468
261-1. For safe use
Make sure that all occupants are
wearing their seat belts before
driving the vehicle. (P.27)
Use a child restraint system
appropriate for the child until the
child becomes large enough to
properly wear the vehicle’s seat
belt. ( P.48)
Make sure that you can see
backward clearly by adjusting
the inside and outside rear view
mirrors properly. ( P.131, 132)
WARNING
■For safe driving
Observe the following precau-
tions.
Failure to do so m ay result in
death or serious injury.
●Do not adjust the position of the
driver’s seat while driving.
Doing so could cause the driver
to lose control of the vehicle.
●Do not place a cushion between
the driver or passenger and the
seatback.
A cushion may prevent correct
posture from being achieved,
and reduce the effectiveness of
the seat belt and head restraint.
●Do not place anything under the
front seats.
Objects placed under the front
seats may become jammed in
the seat tracks and stop the
seat from locking in place. This
may lead to an accident and the
adjustment mechanism may
also be damaged.
●Always observe the legal speed
limit when driving on public
roads.
●When driving over long dis-
tances, take regular breaks
before you start to feel tired.
Also, if you feel tired or sleepy
while driving, do not force your-
self to continue driving and take
a break immediately.
●Take care when adjusting the
seat position to ensure that
other passengers are not
injured by the moving seat.
●When adjusting the seat posi-
tion, do not put your hands
under the seat or near the mov-
ing parts to avoid injury. Fingers
or hands may become jammed
in the seat mechanism.
Correct use of the seat
belts
Adjusting the mirrors
Page 61 of 468
611-2. Child safety
1
For safety and security
(or the necessary information is
not in the table), refer to the
“Vehicle List” provided by the
child restraint system maker for
various possible installation
positions, or check the compati-
bility after asking the retailer of
the child seat. (P.55, 56)
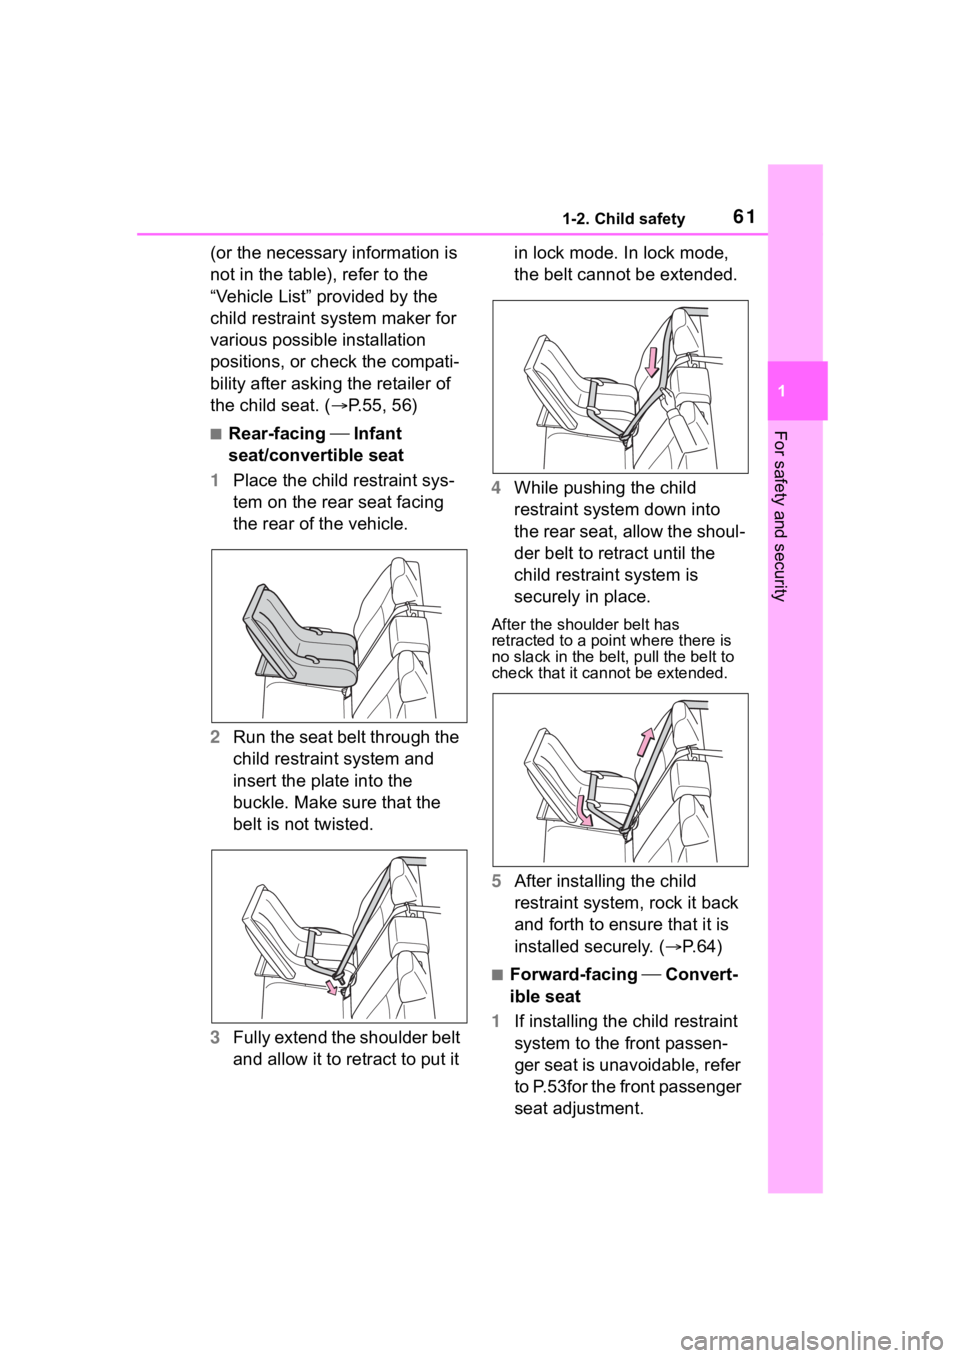
■Rear-facing Infant
seat/convertible seat
1 Place the child restraint sys-
tem on the rear seat facing
the rear of the vehicle.
2 Run the seat belt through the
child restraint system and
insert the plate into the
buckle. Make sure that the
belt is not twisted.
3 Fully extend the shoulder belt
and allow it to retract to put it in lock mode. In lock mode,
the belt cannot be extended.
4 While pushing the child
restraint system down into
the rear seat, allow the shoul-
der belt to retract until the
child restraint system is
securely in place.
After the shoulder belt has
retracted to a poi nt where there is
no slack in the belt, pull the belt to
check that it cannot be extended.
5 After installing the child
restraint system, rock it back
and forth to ensure that it is
installed securely. ( P.64)
■Forward-facing Convert-
ible seat
1 If installing the child restraint
system to the front passen-
ger seat is unavoidable, refer
to P.53for the front passenger
seat adjustment.
Page 62 of 468
621-2. Child safety
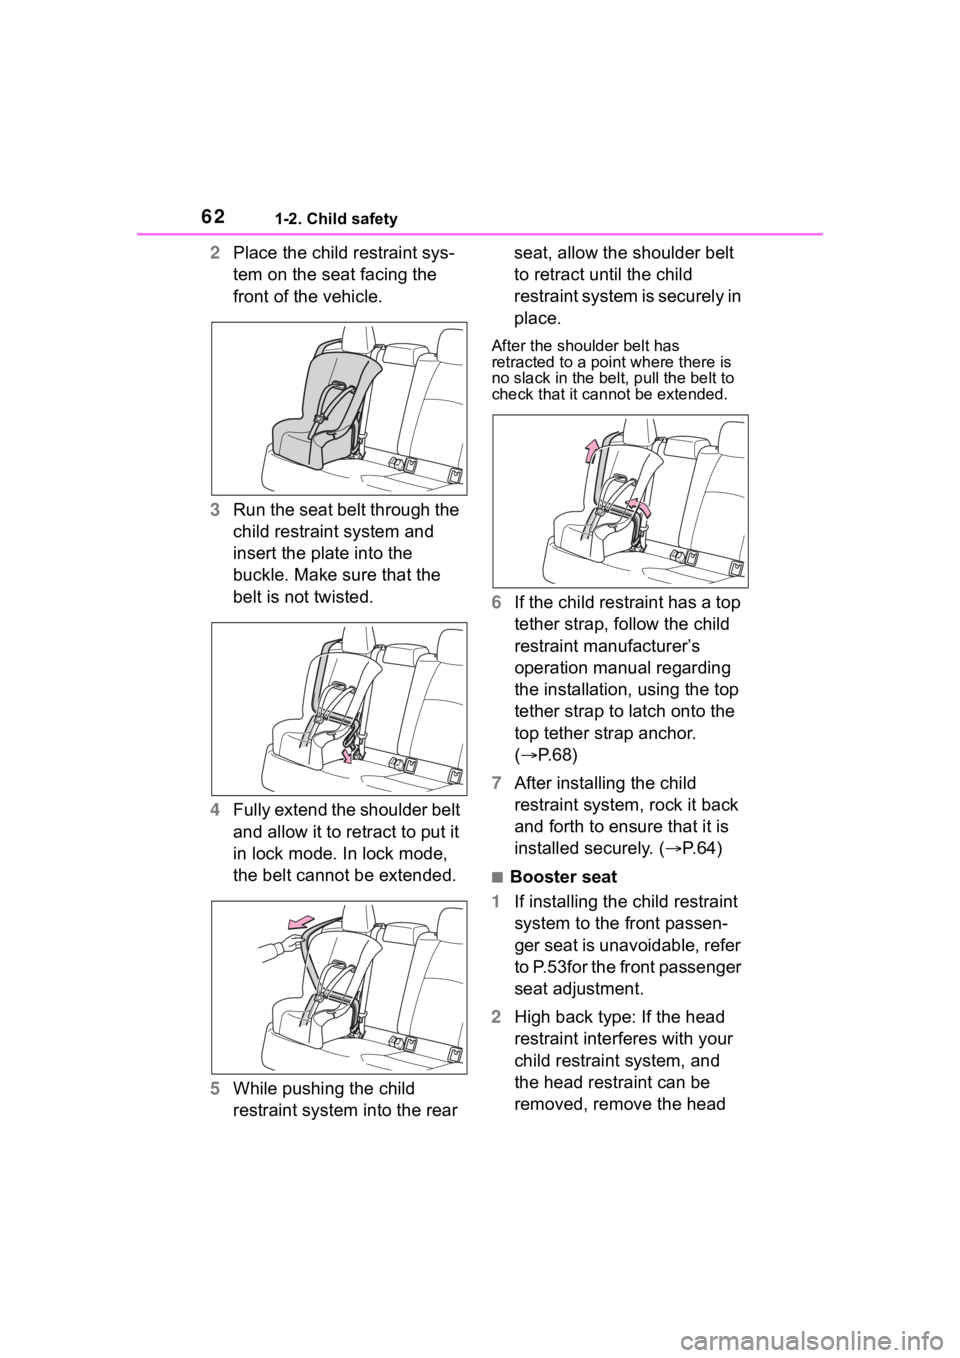
2Place the child restraint sys-
tem on the seat facing the
front of the vehicle.
3 Run the seat belt through the
child restraint system and
insert the plate into the
buckle. Make sure that the
belt is not twisted.
4 Fully extend the shoulder belt
and allow it to retract to put it
in lock mode. In lock mode,
the belt cannot be extended.
5 While pushing the child
restraint system into the rear seat, allow the shoulder belt
to retract until the child
restraint system is securely in
place.
After the shoulder belt has
retracted to a poi
nt where there is
no slack in the belt, pull the belt to
check that it cannot be extended.
6 If the child restraint has a top
tether strap, follow the child
restraint manufacturer’s
operation manual regarding
the installation, using the top
tether strap to latch onto the
top tether strap anchor.
( P.68)
7 After installing the child
restraint system, rock it back
and forth to ensure that it is
installed securely. ( P.64)
■Booster seat
1 If installing the child restraint
system to the front passen-
ger seat is unavoidable, refer
to P.53for the front passenger
seat adjustment.
2 High back type: If the head
restraint interferes with your
child restraint system, and
the head restraint can be
removed, remove the head
Page 125 of 468
1253-3. Adjusting the seats
3
Before driving
3-3.Adjusting the seats
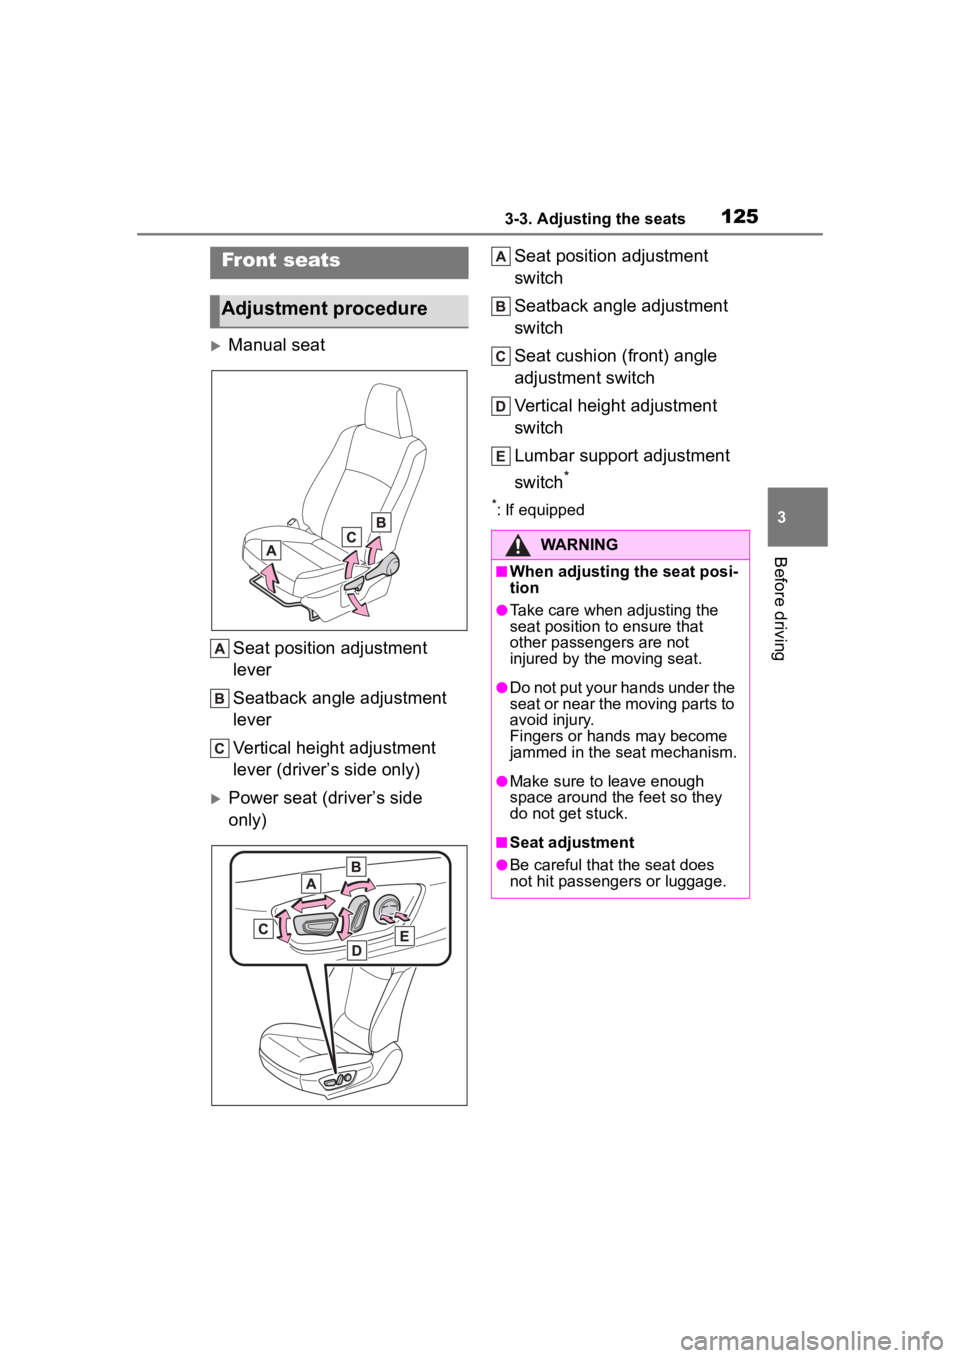
Manual seatSeat position adjustment
lever
Seatback angle adjustment
lever
Vertical height adjustment
lever (driver’s side only)
Power seat (driver’s side
only) Seat position adjustment
switch
Seatback angle adjustment
switch
Seat cushion (front) angle
adjustment switch
Vertical height adjustment
switch
Lumbar support adjustment
switch
*
*: If equipped
Front seats
Adjustment procedure
WARNING
■When adjusting the seat posi-
tion
●Take care when adjusting the
seat position to ensure that
other passengers are not
injured by the moving seat.
●Do not put your hands under the
seat or near the moving parts to
avoid injury.
Fingers or hands may become
jammed in the seat mechanism.
●Make sure to leave enough
space around the feet so they
do not get stuck.
■Seat adjustment
●Be careful that the seat does
not hit passengers or luggage.
Page 126 of 468
1263-3. Adjusting the seats
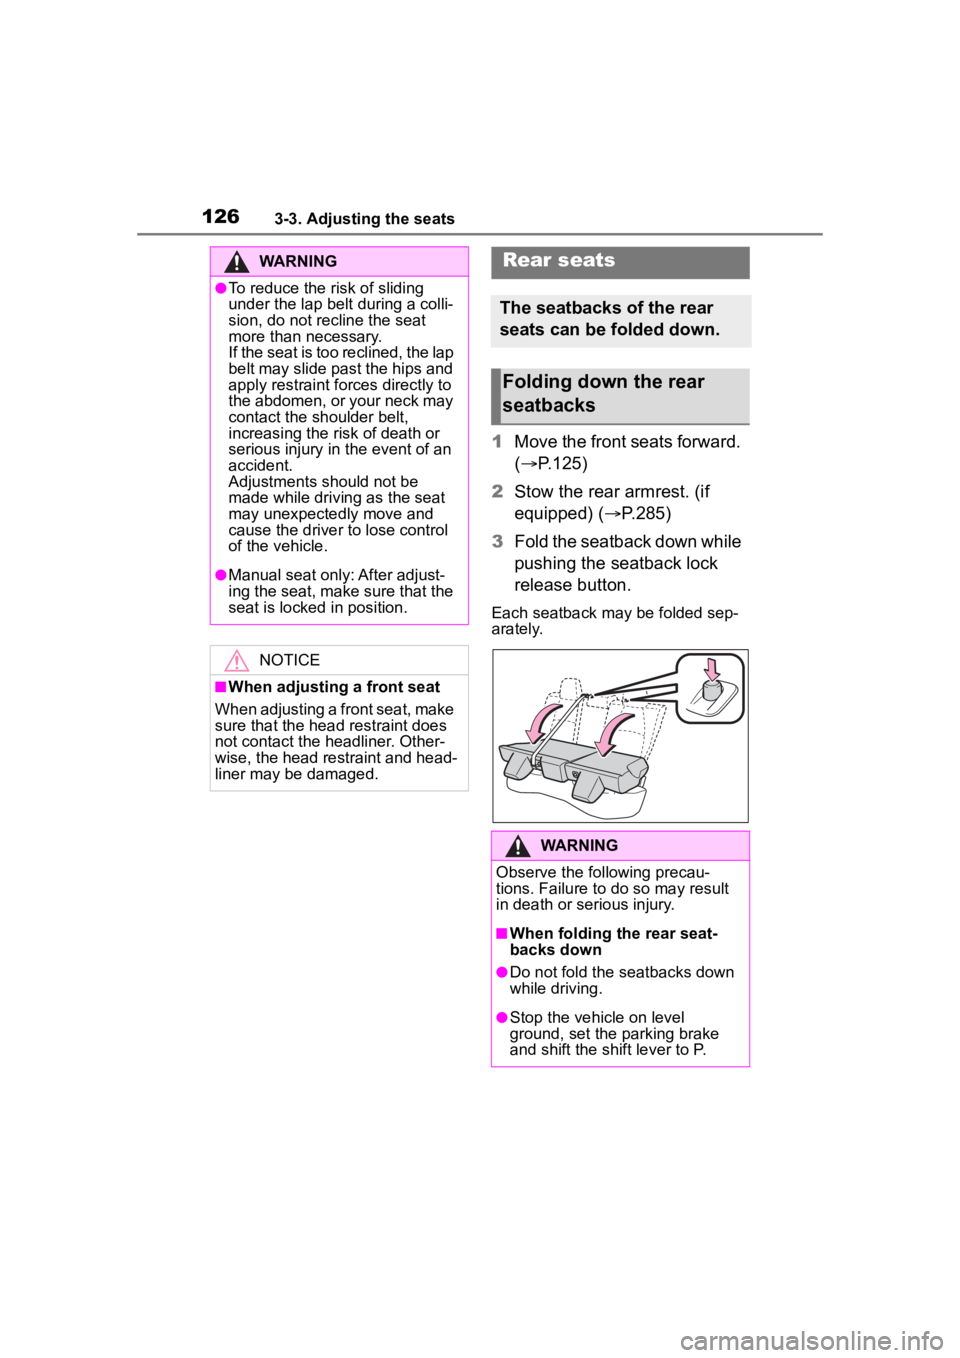
1Move the front seats forward.
( P.125)
2 Stow the rear armrest. (if
equipped) ( P.285)
3 Fold the seatback down while
pushing the seatback lock
release button.
Each seatback may be folded sep-
arately.
WARNING
●To reduce the risk of sliding
under the lap belt during a colli-
sion, do not recline the seat
more than necessary.
If the seat is too reclined, the lap
belt may slide past the hips and
apply restraint forces directly to
the abdomen, or your neck may
contact the shoulder belt,
increasing the risk of death or
serious injury in the event of an
accident.
Adjustments should not be
made while driving as the seat
may unexpectedly move and
cause the driver to lose control
of the vehicle.
●Manual seat only: After adjust-
ing the seat, make sure that the
seat is locked in position.
NOTICE
■When adjusting a front seat
When adjusting a front seat, make
sure that the head restraint does
not contact the headliner. Other-
wise, the head restraint and head-
liner may be damaged.
Rear seats
The seatbacks of the rear
seats can be folded down.
Folding down the rear
seatbacks
WARNING
Observe the following precau-
tions. Failure to do so may result
in death or serious injury.
■When folding the rear seat-
backs down
●Do not fold the seatbacks down
while driving.
●Stop the vehicle on level
ground, set the parking brake
and shift the shift lever to P.
Page 339 of 468
3396-3. Do-it-yourself maintenance
6
Maintenance and care
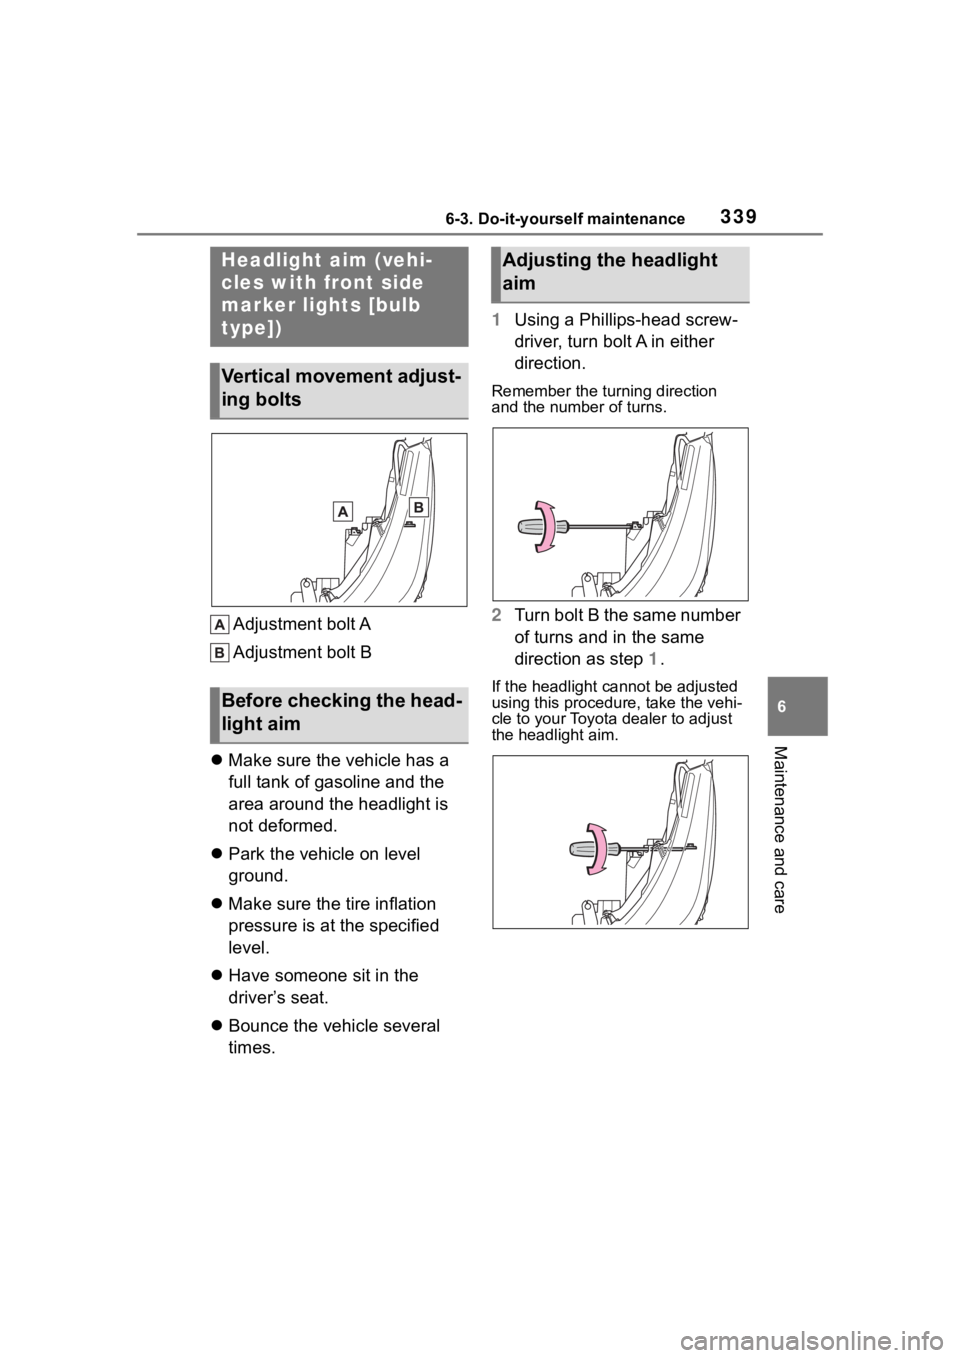
Adjustment bolt A
Adjustment bolt B
Make sure the vehicle has a
full tank of gasoline and the
area around the headlight is
not deformed.
Park the vehicle on level
ground.
Make sure the tire inflation
pressure is at the specified
level.
Have someone sit in the
driver’s seat.
Bounce the vehicle several
times. 1
Using a Phillips-head screw-
driver, turn bolt A in either
direction.
Remember the turning direction
and the number of turns.
2Turn bolt B the same number
of turns and in the same
direction as step 1.
If the headlight cannot be adjusted
using this procedu re, take the vehi-
cle to your Toyota dealer to adjust
the headlight aim.
Headlight aim (vehi-
cles with front side
marker lights [bulb
type])
Vertical movement adjust-
ing bolts
Before checking the head-
light aim
Adjusting the headlight
aim
Page 442 of 468

442Alphabetical Index
If your vehicle has to be stopped in an emergency................. 348
Ignition switch (engine switch) ................................... 154, 155
Overheating.......................... 387
Tachometer ............................ 86
Engine coolant Capacity ............................... 395
Checking .............................. 306
Preparing and c hecking before
winter.................................. 253
Engine coolant temperature gauge................................. 86, 89
Engine immobilizer system ..... 77
Engine oil Capacity ............................... 394
Checking .............................. 304
Preparing and c hecking before
winter.................................. 253
Warning light ........................ 357
Engine switch ................. 154, 155 Auto power off function ........ 159
Changing the engine switch modes ................................ 158
If your vehicle has to be stopped in an emergency................. 348
Enhanced VSC ........................ 249
EPS (Electric Power Steering) ............................................... 249Warning light ........................ 358
Event data recorder (EDR)......... 8
F
Flat tire Tire pressure warning system........................................... 313
Vehicles with a spare tire ..... 370
Floor mats ................................. 24
Fluid Brake .................................... 396
Continuously variable transmis-sion..................................... 396 Washer .................................310
Front passenger occupant clas- sification system ....................41
Front seats Adjustment ...........................125
Cleaning ...............................291
Correct driving posture ...........25
Head restraints .....................128
Seat heaters ....... ..................269
Front side marker lights Light switch...........................173
Replacing light bulbs ............342
Wattage ................................398
Front turn signal lights Replacing light bulbs ............341
Turn signal lever ...................167
Wattage ................................398
Front turn signal/parking lights Replacing light bulbs ............341
Fuel Capacity ...............................393
Fuel gauge .......................86, 89
Fuel pump shut off system ...355
Information ......... ..................399
Refueling ..............................180
Type......................................393
Warning light.........................359
Fuel consumption Average fuel economy ......93, 98
Current fuel consumption .93, 98
Fuel economy .....................93, 98
Fuel filler door Refueling ..............................180
Fuel gauge...........................86, 89
Fuel pump shut off system ....355
Fuses .......................................336
G
Gauges ................................86, 89
Glove box ................................274
Glove box light........................274