2023 TOYOTA COROLLA HYBRID Ev mode
[x] Cancel search: Ev modePage 3 of 496

3TABLE OF CONTENTS
1
2
3
4
5
6
7
8
9
10
Power (ignition) switch (vehicles with a smart key system) . 172
EV drive mode ................... 178
Hybrid transmission............ 180
Turn signal lever................. 182
Parking brake ..................... 183
Brake Hold ......................... 187
4-3. Operating the lights and wip- ers
Headlight switch ................. 189
AHB (Automatic High Beam) ......................................... 191
Windshield wipers and washer ......................................... 194
4-4. Refueling Opening the fuel tank cap .. 196
4-5. Using the driving support sys- tems
Toyota Safety Sense 3.0 soft-ware update ..................... 199
Toyota Safety Sense 3.0 .... 201
PCS (Pre-Collision System) ......................................... 207
LTA (Lane Tracing Assist)... 218
LDA (Lane Departure Alert) ......................................... 223
PDA (Proactive driving assist) ......................................... 228
RSA (Road Sign Assist) ..... 234
Dynamic radar cruise control ......................................... 236
Cruise control ..................... 244
Emergency Driving Stop System ......................................... 247
BSM (Blind Spot Monitor)... 249
RCTA (Rear Cross Traffic Alert) function ............................ 254
Safe Exit Assist .................. 260
Driving mode select switch ......................................... 264
Driving assist systems........ 2664-6. Driving tips
Hybrid vehicle driving tips .. 271
Winter driving tips .............. 273
5-1. Using the air conditioning system and defogger
Automatic air conditioning sys-
tem ................................... 278
Heated steering wheel/seat heaters ............................. 284
5-2. Using the interior lights Interior lights list ................. 286
5-3. Using the storage features List of storage features ...... 288
5-4. Other interior features Other interior features ........ 291
6-1. Maintenance and care Cleaning and protecting the vehicle exterior................. 302
Cleaning and protecting the vehicle interior.................. 305
6-2. Maintenance Maintenance requirements......................................... 308
General maintenance......... 310
Emission inspection and mainte- nance (I/M) programs
......312
6-3. Do-it-yourself maintenance Do-it-yourself service precau-tions ................................. 314
Hood .................................. 316
Positioning a floor jack ....... 317
Engine compartment .......... 318
Tires ................................... 325
Tire inflation pressure......... 342
Wheels ............................... 344
5Interior features
6Maintenance and care
Page 5 of 496
5
Please note that this manual
applies to all models and
explains all equipment, including
options. Therefore, you may find
explanations for equipment not
installed on your vehicle and the
illustrations used may differ from
your vehicle.
All specifications provided in this
manual are current at the time of
printing. Over time, your vehicle
may receive updates that modify
the vehicle and make material in
this manual incomplete and/or
inaccurate. Because of Toyota's
interest in continual product
improvement, Toyota reserves
the right to make changes to this
manual at any time without
notice.
If Toyota chooses to update the
manual, updated versions can
be viewed by selecting your
vehicle by model and year at the
following URL or on your mobile
device if you have access to the
Toyota app.
www.toyota.com/owners
Approximately five hours after
the hybrid system is turned off, you may hear sound coming
from under the vehicle for sev-
eral minutes. This is the sound
of a fuel evaporation leakage
check and, it does not indicate a
malfunction.
A wide variety of non-genuine
spare parts and accessories for
Toyota vehicles are currently
available in the market. You
should know that Toyota does
not warrant these products and
is not responsible for their per-
formance, repair, or replace-
ment, or for any damage they
may cause to, or adverse effect
they may have on, your Toyota
vehicle.
This vehicle should not be modi-
fied with non-genuine Toyota
products. Modification with
non-genuine Toyota products
could affect its performance,
safety or durability, and may
even violate governmental regu-
lations. In addition, damage or
performance problems resulting
from the modification may not
be covered under warranty.
Also, remodeling like this will
have an effect on advanced
safety equipment such as Toy-
ota Safety Sense 3.0 and there
is a danger that it will not work
For your information
Main Owner’s Manual
Noise from under vehicle
after turning off the hybrid
system
Accessories, spare parts
and modification of your
To y o t a
Page 15 of 496
15Pictorial index
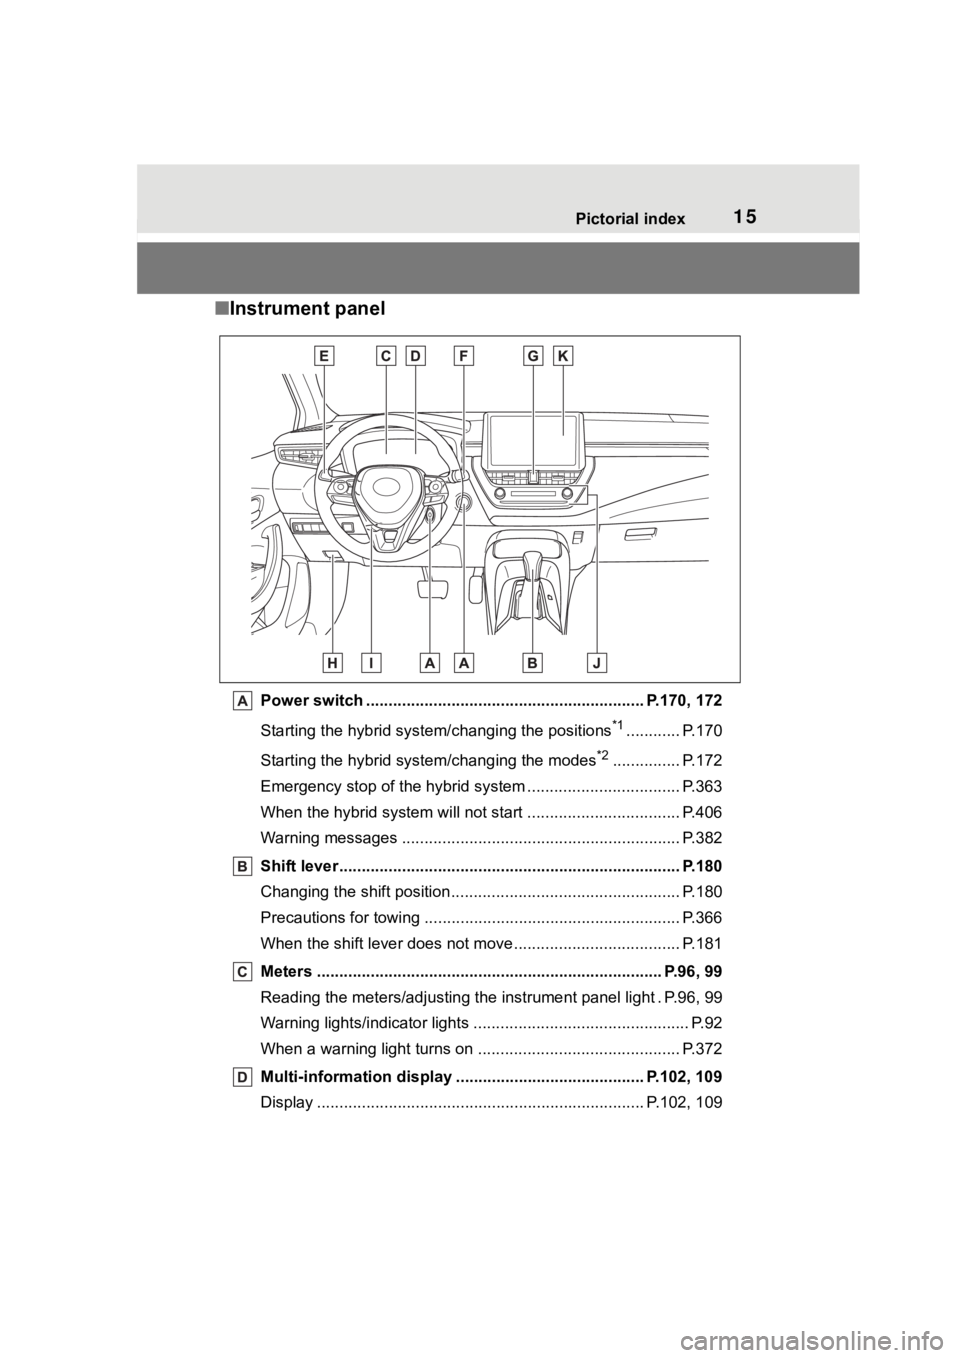
■Instrument panel
Power switch ................................................... ........... P.170, 172
Starting the hybrid syst em/changing the positions
*1............ P.170
Starting the hybrid system/changing the modes
*2............... P.172
Emergency stop of the hybrid system ............................ ...... P.363
When the hybrid system will not start .......................... ........ P.406
Warning messages ............................................... ............... P.382
Shift lever.................................................... ........................ P.180
Changing the shift position.................................... ............... P.180
Precautions for towing .. ....................................... ................ P.366
When the shift lever does not move............................. ........ P.181
Meters ............................................................................. P.96, 99
Reading the meters/adjusting the instrument panel light . P.96, 9 9
Warning lights/indicator lights ................................ ................ P.92
When a warning light turns on .................................. ........... P.372
Multi-information display . ......................................... P.102, 109
Display ........................................................ ................. P.102, 109
Page 19 of 496
19Pictorial index
Wireless charger switch*................................................... P.292
Brake hold switch .............................................. ................ P.187
Parking brake switch ........................................... .............. P.183
Applying/releasing............................................. ................... P.183
Precautions against winter season .............................. ........ P.274
Warning buzzer/me ssage ......................................... ... P.372, 382
EV drive mode switch ........................................... ............. P.178
Driving mode select switch
*.............................................. P.264
VSC OFF switch
*............................................................... .P.267
*: If equipped
Page 24 of 496
241-1. For safe use
1-1.For safe use
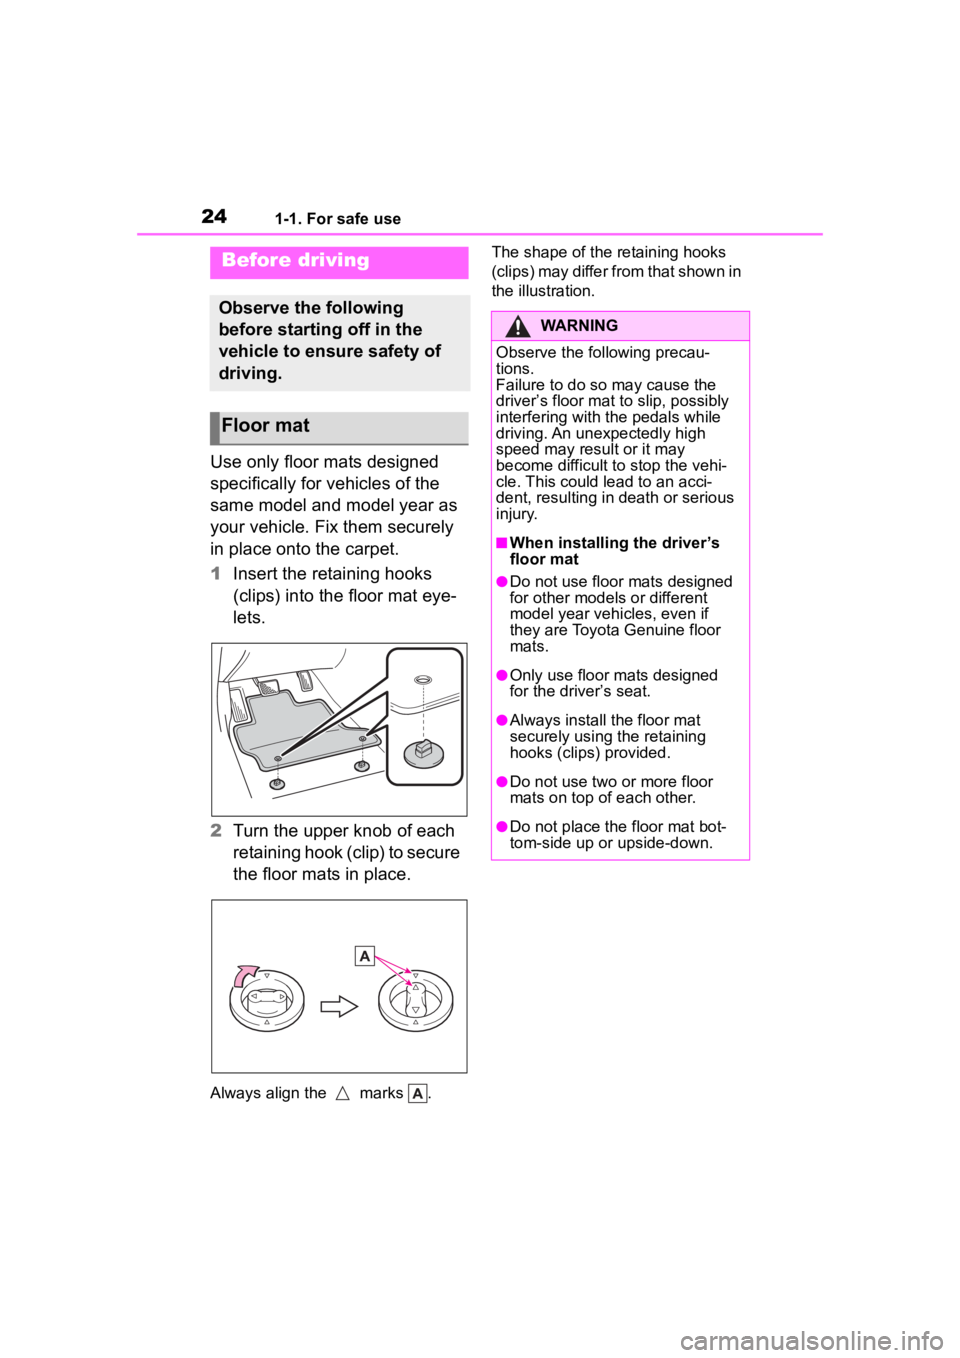
Use only floor mats designed
specifically for vehicles of the
same model and model year as
your vehicle. Fix them securely
in place onto the carpet.
1Insert the retaining hooks
(clips) into the floor mat eye-
lets.
2 Turn the upper knob of each
retaining hook (clip) to secure
the floor mats in place.
Always align the marks . The shape of the retaining hooks
(clips) may differ from that shown in
the illustration.
Before driving
Observe the following
before starting off in the
vehicle to ensure safety of
driving.
Floor mat
WARNING
Observe the following precau-
tions.
Failure to do so may cause the
driver’s floor mat to slip, possibly
interfering with t
he pedals while
driving. An unexpectedly high
speed may result or it may
become difficult to stop the vehi-
cle. This could lead to an acci-
dent, resulting in death or serious
injury.
■When installing the driver’s
floor mat
●Do not use floor mats designed
for other models or different
model year vehicles, even if
they are Toyota Genuine floor
mats.
●Only use floor mats designed
for the driver’s seat.
●Always install the floor mat
securely using the retaining
hooks (clips) provided.
●Do not use two or more floor
mats on top of each other.
●Do not place the floor mat bot-
tom-side up or upside-down.
Page 61 of 496
611-2. Child safety
1
For safety and security
(or the necessary information is
not in the table), refer to the
“Vehicle List” provided by the
child restraint system maker for
various possible installation
positions, or check the compati-
bility after asking the retailer of
the child seat. (P.55, 56)
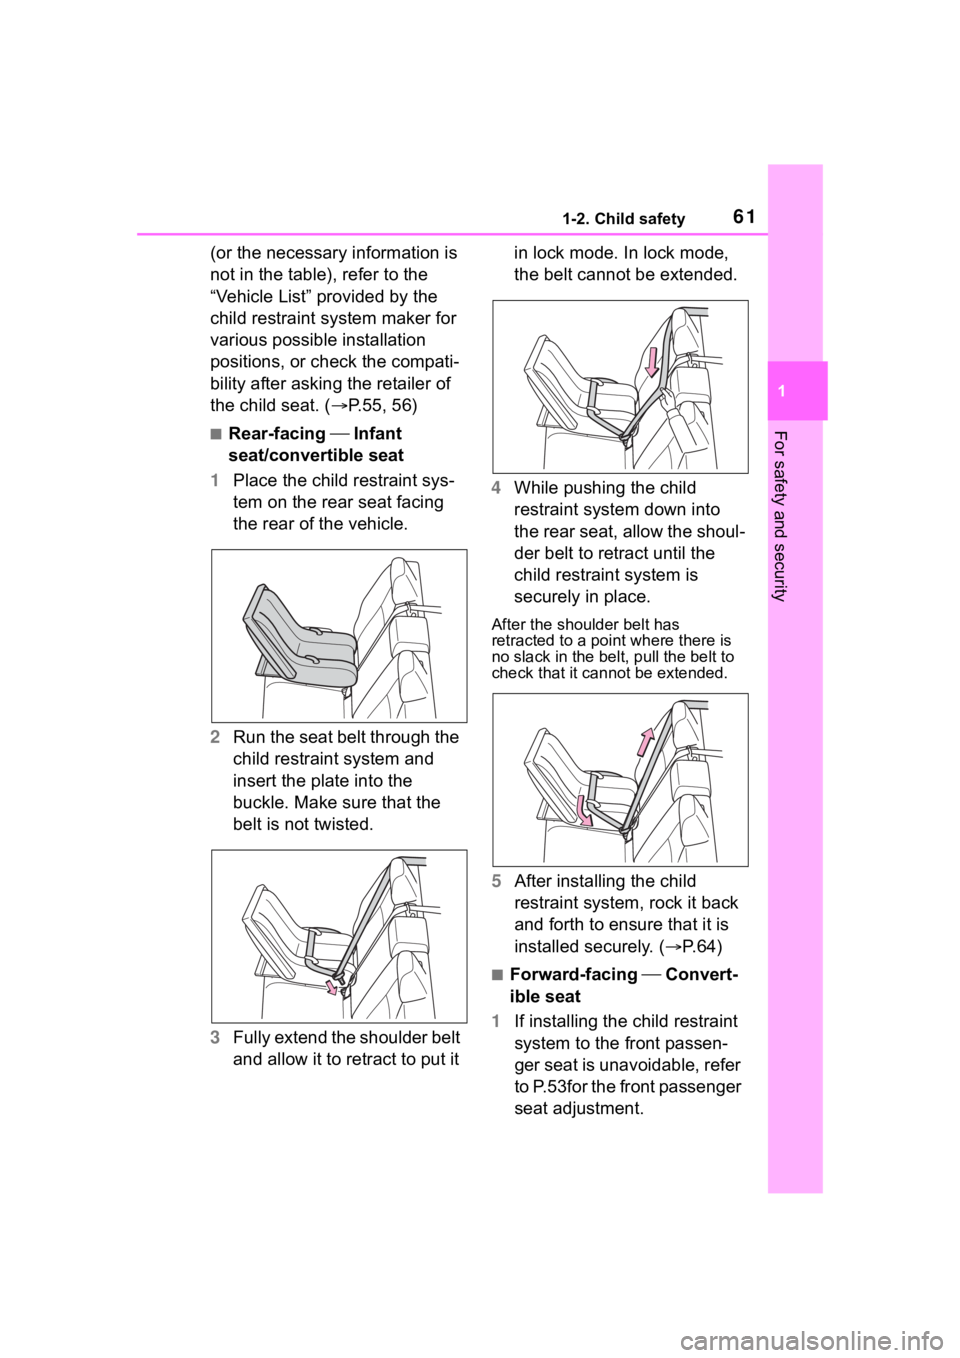
■Rear-facing Infant
seat/convertible seat
1 Place the child restraint sys-
tem on the rear seat facing
the rear of the vehicle.
2 Run the seat belt through the
child restraint system and
insert the plate into the
buckle. Make sure that the
belt is not twisted.
3 Fully extend the shoulder belt
and allow it to retract to put it in lock mode. In lock mode,
the belt cannot be extended.
4 While pushing the child
restraint system down into
the rear seat, allow the shoul-
der belt to retract until the
child restraint system is
securely in place.
After the shoulder belt has
retracted to a poi nt where there is
no slack in the belt, pull the belt to
check that it cannot be extended.
5 After installing the child
restraint system, rock it back
and forth to ensure that it is
installed securely. ( P.64)
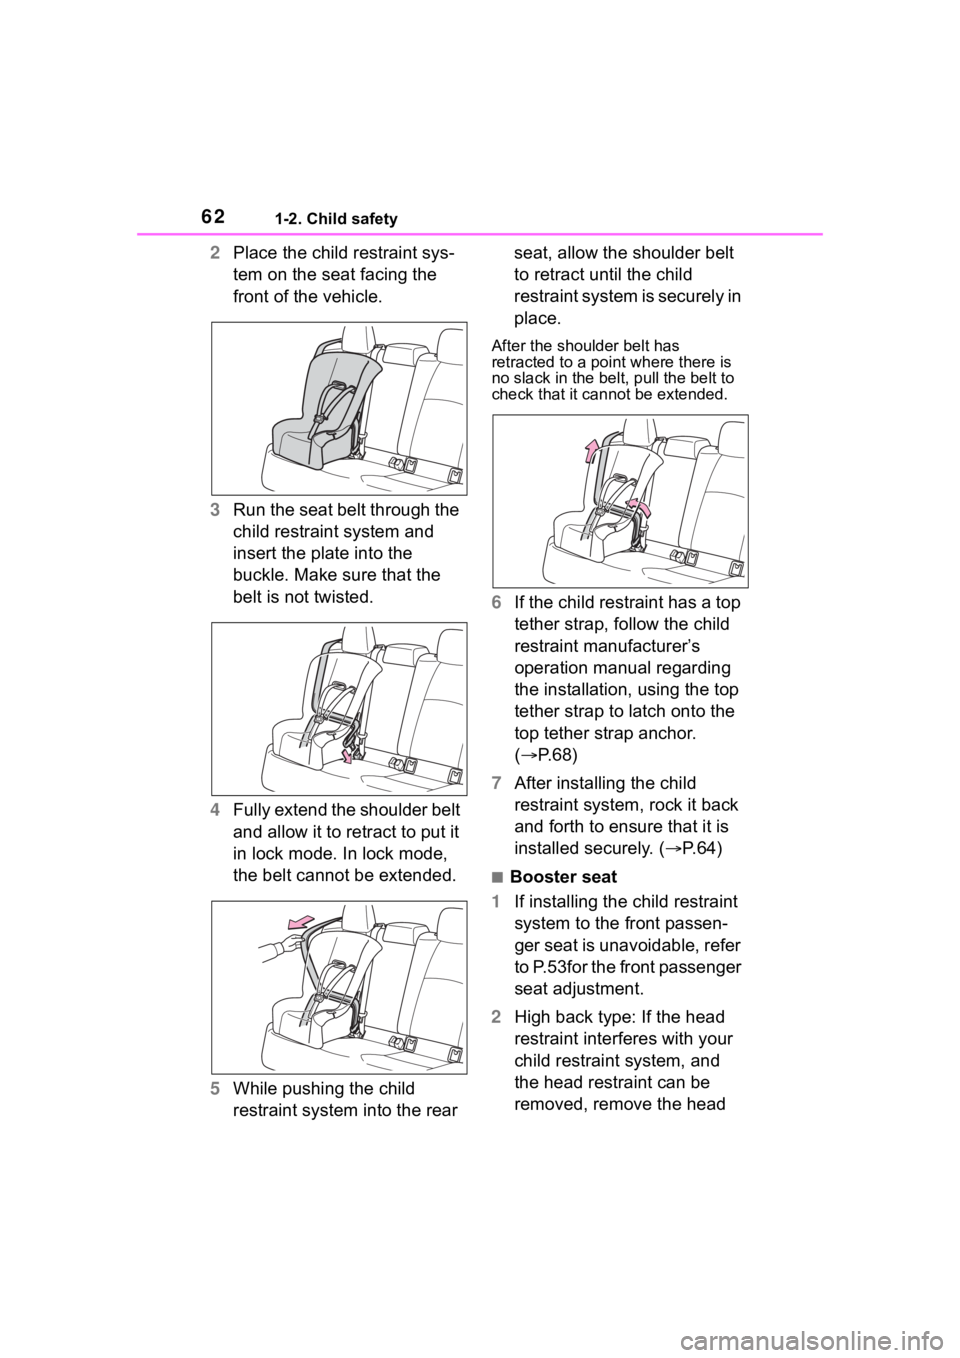
■Forward-facing Convert-
ible seat
1 If installing the child restraint
system to the front passen-
ger seat is unavoidable, refer
to P.53for the front passenger
seat adjustment.
Page 62 of 496
621-2. Child safety
2Place the child restraint sys-
tem on the seat facing the
front of the vehicle.
3 Run the seat belt through the
child restraint system and
insert the plate into the
buckle. Make sure that the
belt is not twisted.
4 Fully extend the shoulder belt
and allow it to retract to put it
in lock mode. In lock mode,
the belt cannot be extended.
5 While pushing the child
restraint system into the rear seat, allow the shoulder belt
to retract until the child
restraint system is securely in
place.
After the shoulder belt has
retracted to a poi
nt where there is
no slack in the belt, pull the belt to
check that it cannot be extended.
6 If the child restraint has a top
tether strap, follow the child
restraint manufacturer’s
operation manual regarding
the installation, using the top
tether strap to latch onto the
top tether strap anchor.
( P.68)
7 After installing the child
restraint system, rock it back
and forth to ensure that it is
installed securely. ( P.64)
■Booster seat
1 If installing the child restraint
system to the front passen-
ger seat is unavoidable, refer
to P.53for the front passenger
seat adjustment.
2 High back type: If the head
restraint interferes with your
child restraint system, and
the head restraint can be
removed, remove the head
Page 64 of 496
641-2. Child safety
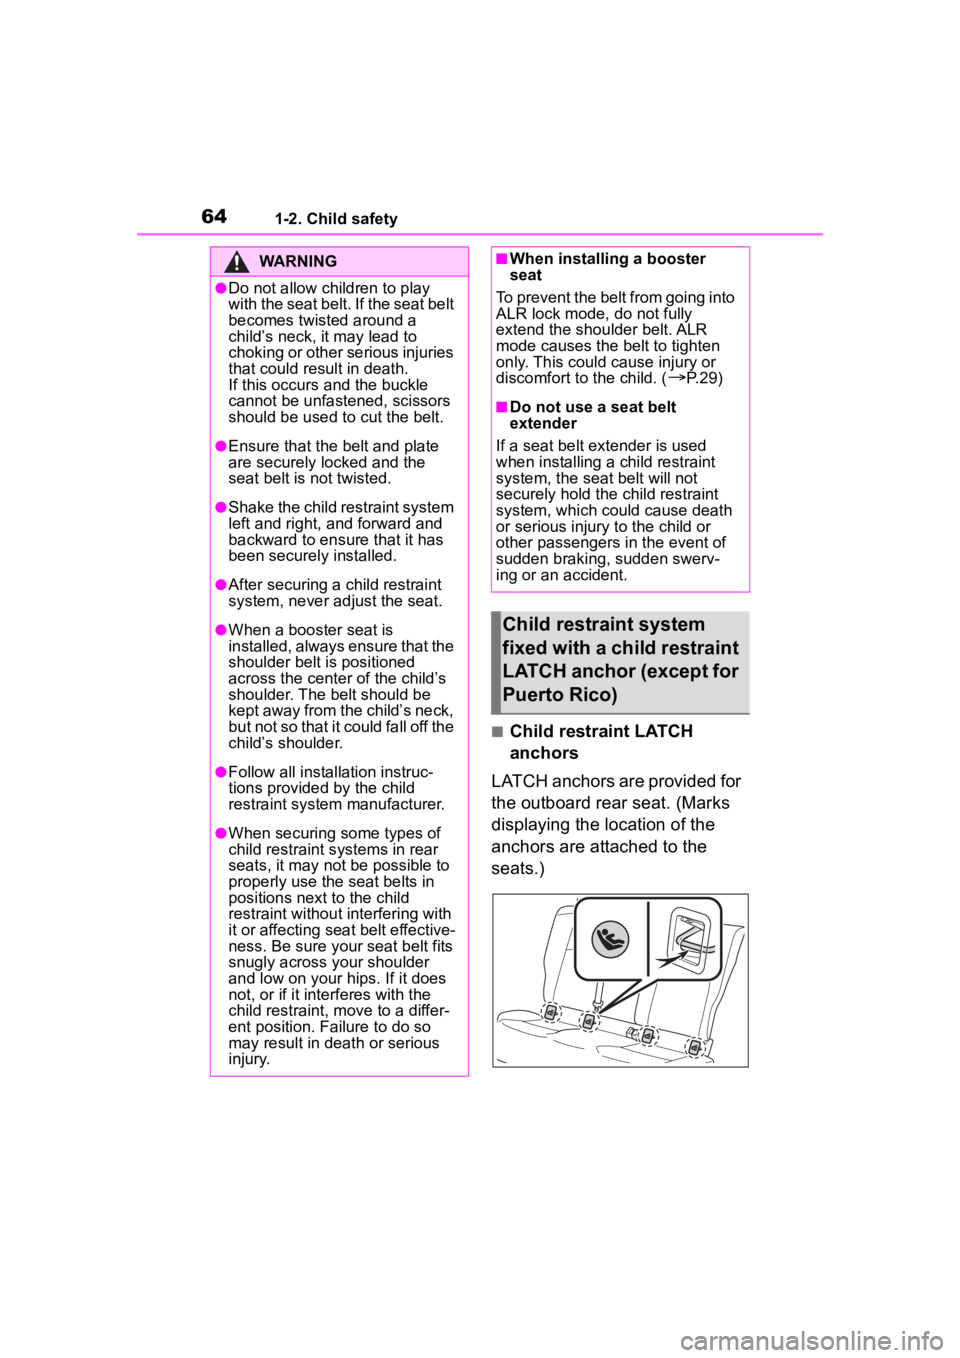
■Child restraint LATCH
anchors
LATCH anchors are provided for
the outboard rear seat. (Marks
displaying the location of the
anchors are attached to the
seats.)
WARNING
●Do not allow children to play
with the seat belt. If the seat belt
becomes twisted around a
child’s neck, it may lead to
choking or other serious injuries
that could result in death.
If this occurs and the buckle
cannot be unfastened, scissors
should be used to cut the belt.
●Ensure that the belt and plate
are securely locked and the
seat belt is not twisted.
●Shake the child restraint system
left and right, and forward and
backward to ensure that it has
been securely installed.
●After securing a child restraint
system, never adjust the seat.
●When a booster seat is
installed, always ensure that the
shoulder belt is positioned
across the center of the child’s
shoulder. The belt should be
kept away from the child’s neck,
but not so that it could fall off the
child’s shoulder.
●Follow all installation instruc-
tions provided by the child
restraint system manufacturer.
●When securing some types of
child restraint s ystems in rear
seats, it may not be possible to
properly use the seat belts in
positions next to the child
restraint without interfering with
it or affecting seat belt effective-
ness. Be sure your seat belt fits
snugly across your shoulder
and low on your hips. If it does
not, or if it interferes with the
child restraint, move to a differ-
ent position. Failure to do so
may result in death or serious
injury.
■When installing a booster
seat
To prevent the belt from going into
ALR lock mode, do not fully
extend the shoulder belt. ALR
mode causes the belt to tighten
only. This could cause injury or
discomfort to the child. (
P. 2 9 )
■Do not use a seat belt
extender
If a seat belt extender is used
when installing a child restraint
system, the seat belt will not
securely hold the child restraint
system, which could cause death
or serious injury to the child or
other passengers in the event of
sudden braking, sudden swerv-
ing or an accident.
Child restraint system
fixed with a child restraint
LATCH anchor (except for
Puerto Rico)