2023 TOYOTA COROLLA CROSS lights
[x] Cancel search: lightsPage 377 of 500
3776-3. Do-it-yourself maintenance
6
Maintenance and care
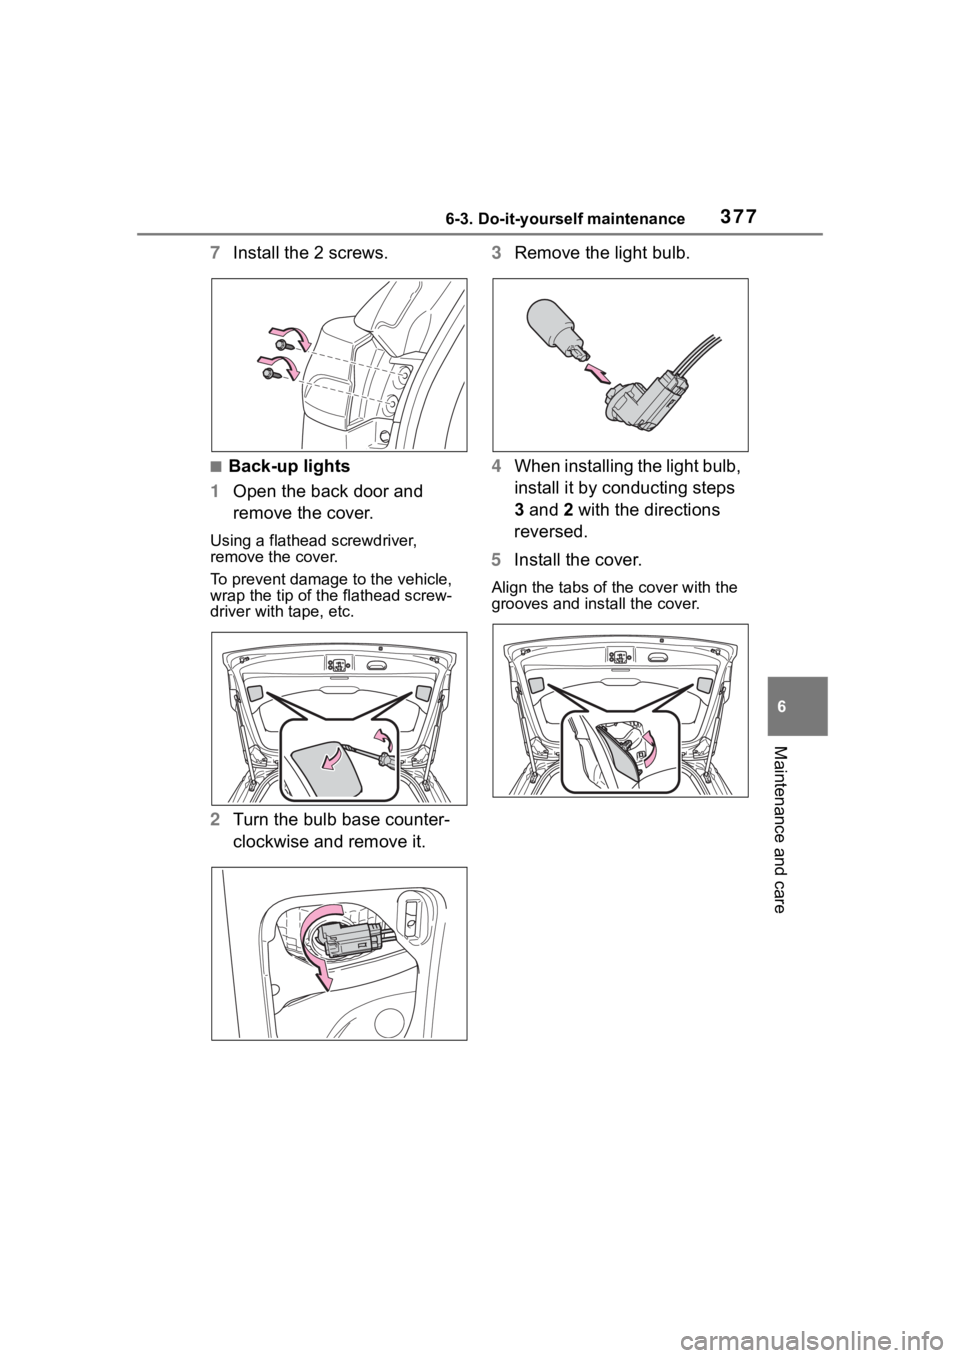
7Install the 2 screws.
■Back-up lights
1 Open the back door and
remove the cover.
Using a flathead screwdriver,
remove the cover.
To prevent damage to the vehicle,
wrap the tip of the flathead screw-
driver with tape, etc.
2Turn the bulb base counter-
clockwise and remove it. 3
Remove the light bulb.
4 When installing the light bulb,
install it by conducting steps
3 and 2 with the directions
reversed.
5 Install the cover.
Align the tabs of the cover with the
grooves and install the cover.
Page 378 of 500
3786-3. Do-it-yourself maintenance
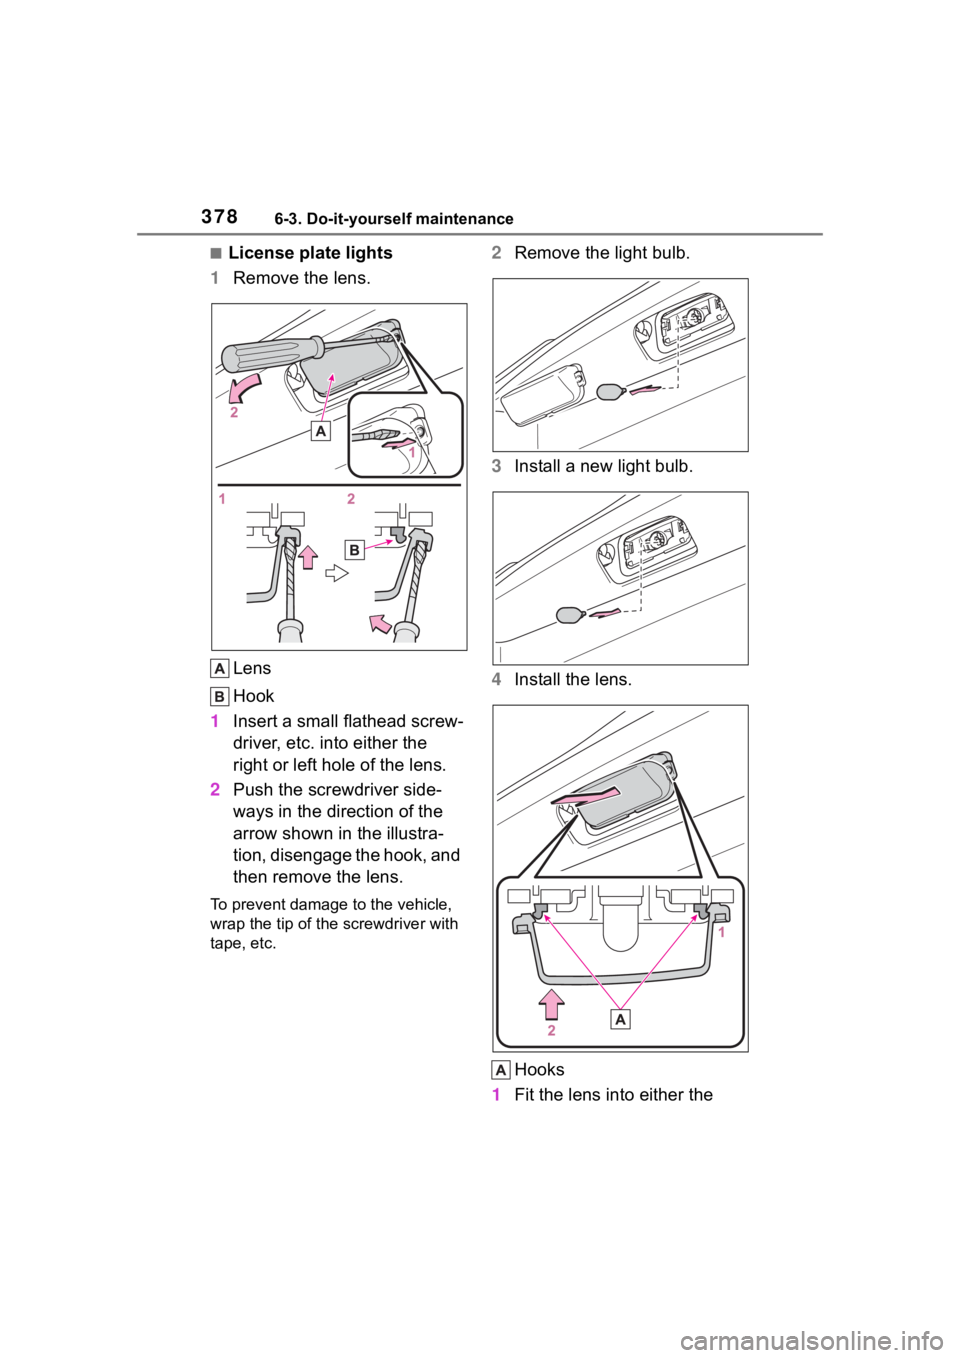
■License plate lights
1 Remove the lens.
Lens
Hook
1 Insert a small flathead screw-
driver, etc. into either the
right or left hole of the lens.
2 Push the screwdriver side-
ways in the direction of the
arrow shown in the illustra-
tion, disengage the hook, and
then remove the lens.
To prevent damage to the vehicle,
wrap the tip of the screwdriver with
tape, etc.
2Remove the light bulb.
3 Install a new light bulb.
4 Install the lens.
Hooks
1 Fit the lens into either the
Page 379 of 500
3796-3. Do-it-yourself maintenance
6
Maintenance and care
right or left hooks.
2 Push the lens into place.
After installation, confirm that the
lens is properly installed by gently
pulling it.
WARNING
■To prevent injury
Before performing any light bulb
replacement procedure, be sure
to turn the e ngine switch off. Fail-
ure to do so may result in burns
from hot compone nts or a part of
your body may get caught on an
operating component, possibly
causing serious injury.
■Replacing light bulbs
●Turn off the lights. Do not
attempt to replace the bulb
immediately after turning off the
lights. The bulbs become very
hot and may cause burns.
●Do not touch the glass portion
of the light bulb with bare
hands. When it is unavoidable
to hold the glass portion, use
and hold with a clean dry cloth
to avoid getting moisture and
oils on the bulb. Also, if the bulb
is scratched or dropped, it may
blow out or crack.
●Fully install light bulbs and any
parts used to secure them. Fail-
ure to do so may result in heat
damage, fire, or water entering
the light unit. This may damage
the lights or cause condensa-
tion to build up on the lens.
■To prevent damage or fire
●Make sure bulbs are fully
seated and locked.
●Check the wattage of the bulb
before installing to prevent heat
damage.
Page 382 of 500
3827-1. Essential information
7-1.Essential information
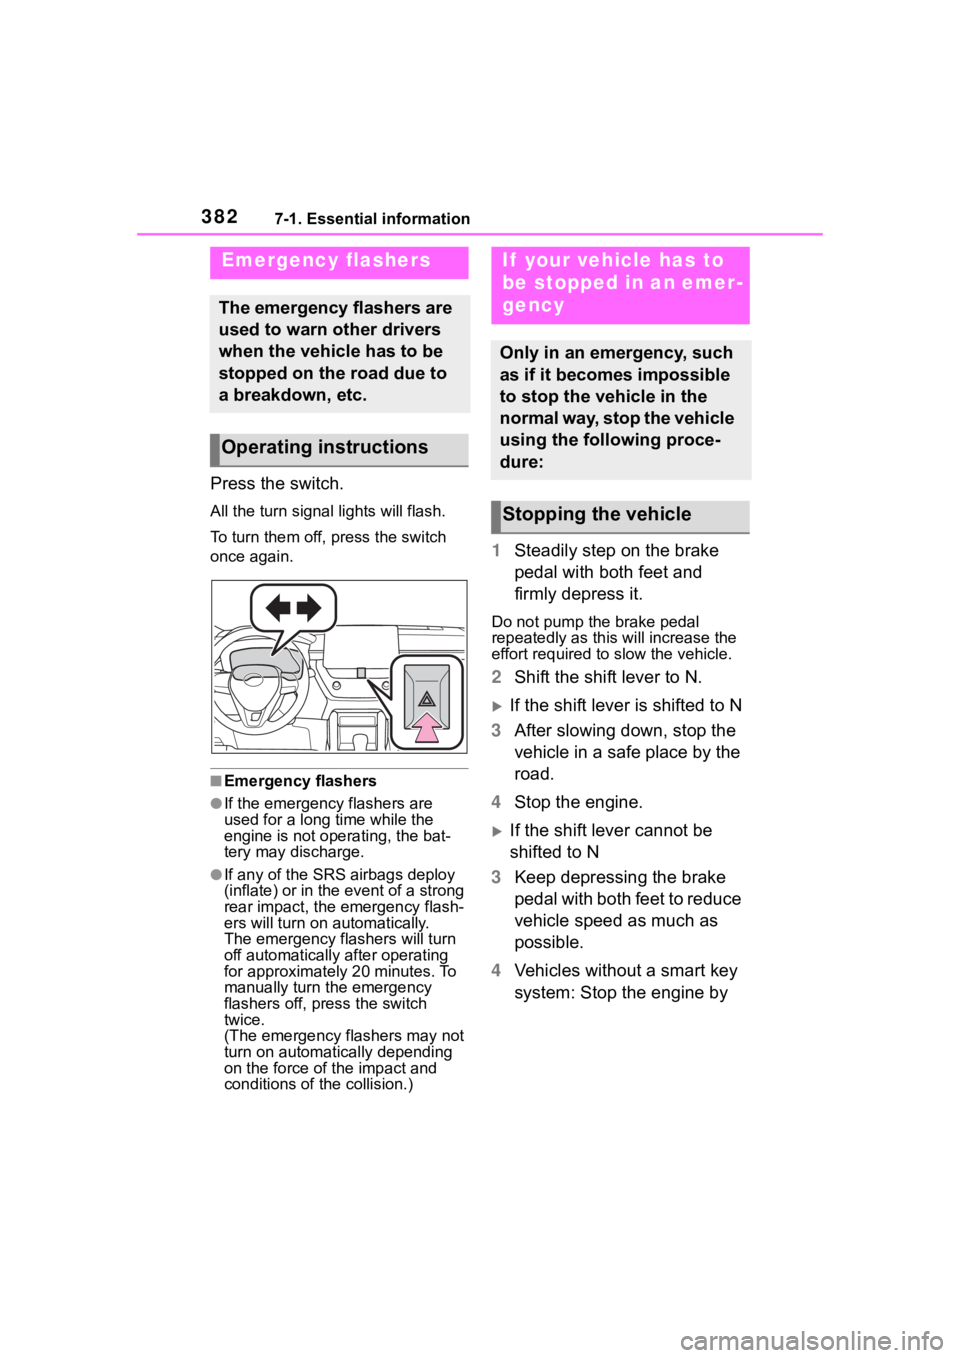
Press the switch.
All the turn signal lights will flash.
To turn them off, press the switch
once again.
■Emergency flashers
●If the emergency flashers are
used for a long time while the
engine is not operating, the bat-
tery may discharge.
●If any of the SRS airbags deploy
(inflate) or in the event of a strong
rear impact, the emergency flash-
ers will turn on automatically.
The emergency flashers will turn
off automatically after operating
for approximately 20 minutes. To
manually turn t he emergency
flashers off, press the switch
twice.
(The emergency flashers may not
turn on automatically depending
on the force of the impact and
conditions of the collision.)
1 Steadily step on the brake
pedal with both feet and
firmly depress it.
Do not pump the brake pedal
repeatedly as this will increase the
effort required to slow the vehicle.
2Shift the shift lever to N.
If the shift lever is shifted to N
3 After slowing down, stop the
vehicle in a safe place by the
road.
4 Stop the engine.
If the shift lever cannot be
shifted to N
3 Keep depressing the brake
pedal with both feet to reduce
vehicle speed as much as
possible.
4 Vehicles without a smart key
system: Stop the engine by
Emergency flashers
The emergency flashers are
used to warn other drivers
when the vehicle has to be
stopped on the road due to
a breakdown, etc.
Operating instructions
If your vehicle has to
be stopped in an emer-
gency
Only in an emergency, such
as if it becomes impossible
to stop the vehicle in the
normal way, stop the vehicle
using the following proce-
dure:
Stopping the vehicle
Page 391 of 500
3917-2. Steps to take in an emergency
7
When trouble arises
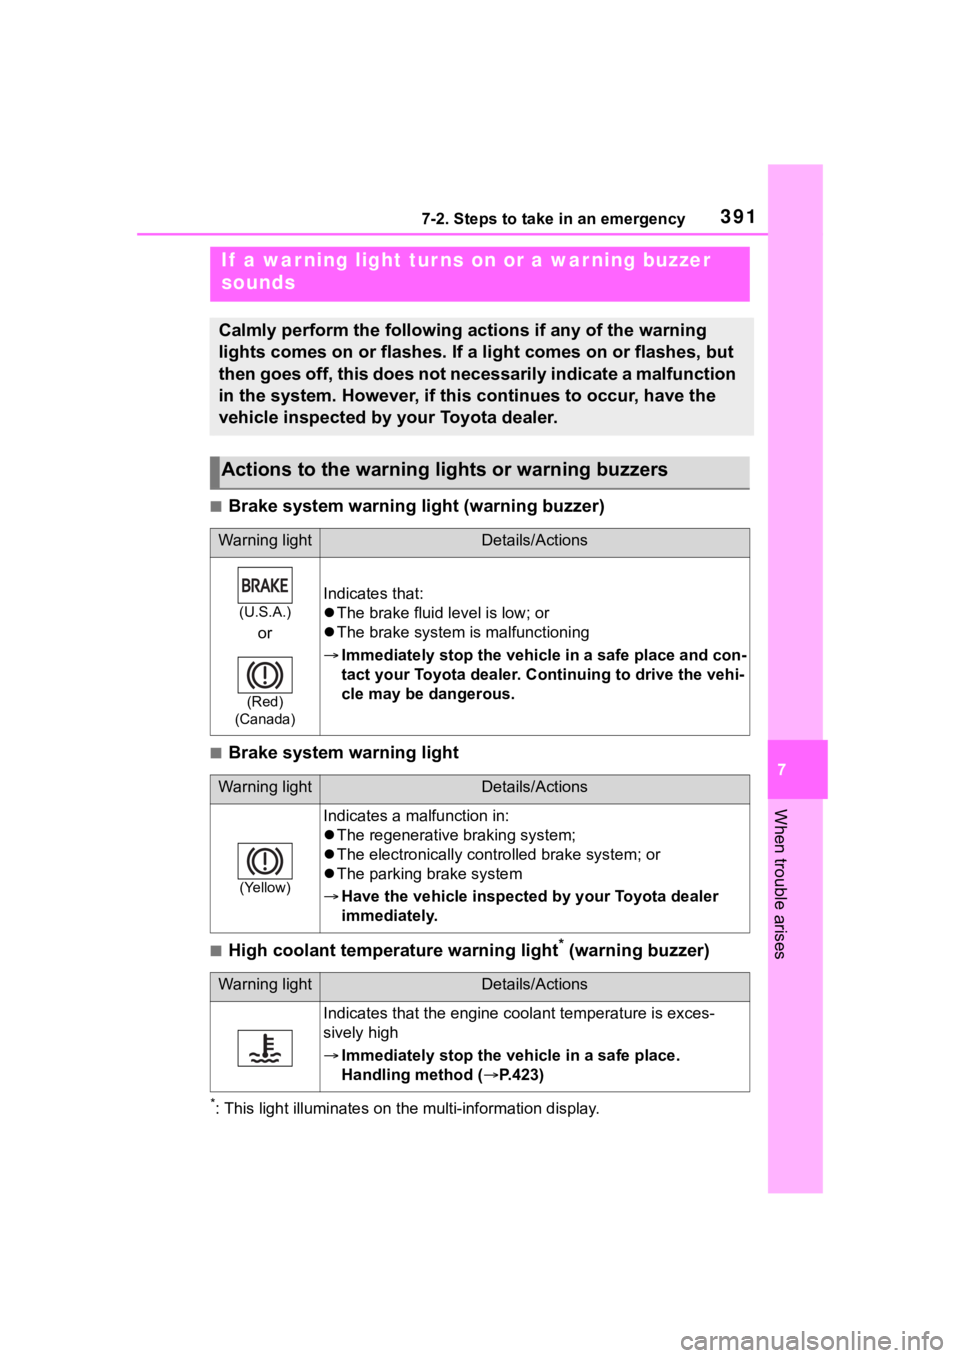
■Brake system warning light (warning buzzer)
■Brake system warning light
■High coolant temperature warning light* (warning buzzer)
*: This light illuminat es on the multi-information display.
If a war ning light tur ns on or a war ning buzzer
sounds
Calmly perform the following actions if any of the warning
lights comes on or flashes. If a light comes on or flashes, but
then goes off, this does not necessarily indicate a malfunction
in the system. However, if this continues to occur, have the
vehicle inspected by your Toyota dealer.
Actions to the warning lights or warning buzzers
Warning lightDetails/Actions
(U.S.A.)
or
(Red)
(Canada)
Indicates that:
The brake fluid level is low; or
The brake system is malfunctioning
Immediately stop the vehicle in a safe place and con-
tact your Toyota dealer. Continuing to drive the vehi-
cle may be dangerous.
Warning lightDetails/Actions
(Yellow)
Indicates a malfunction in:
The regenerative braking system;
The electronically contr olled brake system; or
The parking brake system
Have the vehicle inspected by your Toyota dealer
immediately.
Warning lightDetails/Actions
Indicates that the engine c oolant temperature is exces-
sively high
Immediately stop the vehicle in a safe place.
Handling method ( P.423)
Page 395 of 500
3957-2. Steps to take in an emergency
7
When trouble arises
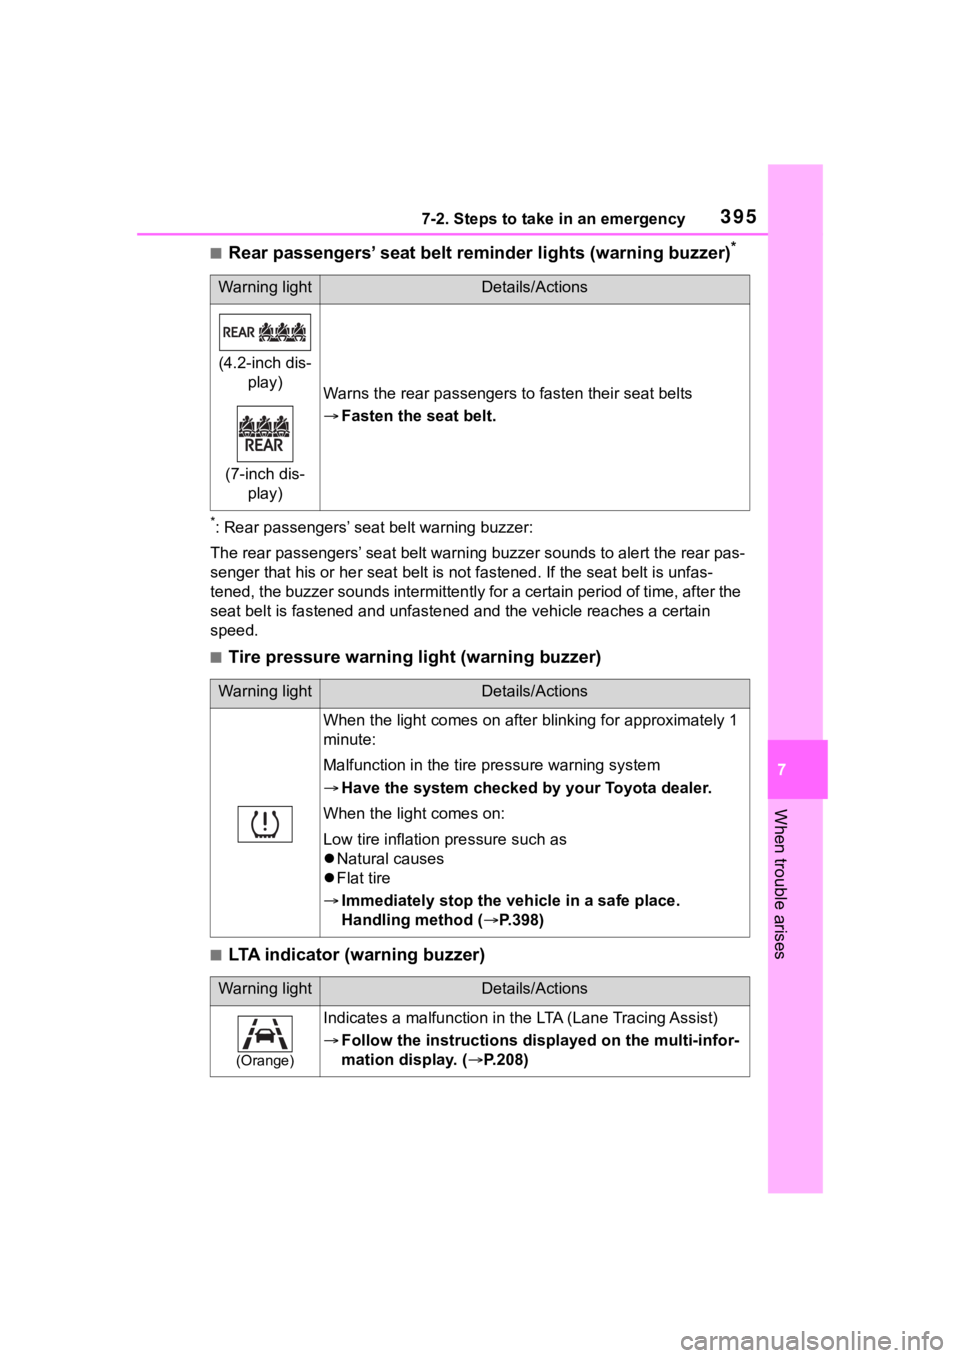
■Rear passengers’ seat belt reminder lights (warning buzzer)*
*: Rear passengers’ seat belt warning buzzer:
The rear passengers’ seat belt warning buzzer sounds to alert t he rear pas-
senger that his or he r seat belt is not fastened. If the seat b elt is unfas-
tened, the buzzer sounds intermittently for a certain period of time, after the
seat belt is fastened and unfast ened and the vehicle reaches a certain
speed.
■Tire pressure warning light (warning buzzer)
■LTA indicator (warning buzzer)
Warning lightDetails/Actions
(4.2-inch dis- play)
(7-inch dis- play)
Warns the rear passengers to fasten their seat belts
Fasten the seat belt.
Warning lightDetails/Actions
When the light comes on after blinking for approximately 1
minute:
Malfunction in the tire pressure warning system
Have the system checked by your Toyota dealer.
When the light comes on:
Low tire inflation pressure such as
Natural causes
Flat tire
Immediately stop the vehicle in a safe place.
Handling method ( P.398)
Warning lightDetails/Actions
(Orange)
Indicates a malfunction in the LTA (Lane Tracing Assist)
Follow the instructions di splayed on the multi-infor-
mation display. ( P.208)
Page 399 of 500
3997-2. Steps to take in an emergency
7
When trouble arises
it to ON. Check if the tire pressure
warning light comes on or blinks.
If the tire pressure warning light
blinks for approximately 1 minute
then stays on
There may be a malfunction in the
tire pressure warning system. Have
the vehicle inspected by your Toyota
dealer immediately.
If the tire pressure warning light
comes on
1 After the temperature of the tires
has lowered sufficiently, check
the inflation pressure of each tire
and adjust them to the specified
level.
2 If the warning light does not turn
off even after several minutes
have elapsed, check that the
inflation pressure of each tire is
at the specified level and perform
initialization. ( P.356)
■The tire pressure warning light
may come on due to natural
causes
The tire pressure warning light may
come on due to natural causes such
as natural air leaks and tire inflation
pressure changes caused by tem-
perature. In this case, adjusting the
tire inflation pressure will turn off the
warning light (after a few minutes).
■When a tire is replaced with a
spare tire
The compact spare tire is not
equipped with a tire pressure warn-
ing valve and transmitter. If a tire
goes flat, the tire pressure warning
light will not turn off even though the
flat tire has been replaced with the
spare tire. Replace the spare tire
with the repaired tire and adjust the
tire inflation pressure. The tire pres-
sure warning light will go off after a
few minutes.
■Conditions that the tire pres-
sure warning system may not
function properly
P. 3 5 4
WARNING
■If both the ABS and the brake
system warning lights remain
on
Stop your vehicle in a safe place
immediately and contact your Toy-
ota dealer.
The vehicle will become
extremely unstable during brak-
ing, and the ABS system may fail,
which could cause an accident
resulting in death o r serious injury.
■When the electric power
steering system warning light
comes on
When the light comes on yellow,
the assist to the power steering is
restricted. When the light comes
on red, the assis t to the power
steering is lost and handling oper-
ations of the steering wheel
become extremely heavy.
When steering wheel operations
are heavier than usual, grip the
steering wheel firmly and operate
it using more fo rce than usual.
■If the tire pressure warning
light comes on
Be sure to observe the following
precautions.
Failure to do so could cause a
loss of vehicle control and result
in death or serious injury.
●Stop your vehicle in a safe place
as soon as possible. Adjust the
tire inflation pressure immedi-
ately.
●If the tire pressure warning light
comes on even after tire infla-
tion pressure adjustment, it is
probable that you have a flat
tire. Check the tires. If a tire is
flat, change it with the spare tire
and have the flat tire repaired by
the nearest Toyota dealer.
Page 415 of 500
4157-2. Steps to take in an emergency
7
When trouble arises
One of the following may be the
cause of the problem:
There may not be sufficient
fuel in the vehicle’s tank.
Refuel the vehicle.
The engine may be flooded.
Try to restart the engine again
following correct starting pro-
cedures. ( P.162, 163)
There may be a malfunction
in the engine immobilizer sys-
tem. ( P.68)
One of the following may be the
cause of the problem:
The battery may be dis-
charged. ( P.419)
NOTICE
■When replacing the tires
When removing or fitting the
wheels, tires or the tire pressure
warning valve and transmitter,
contact your Toyota dealer as the
tire pressure warning valve and
transmitter may be damaged if not
handled correctly.
■To avoid damage to the tire
pressure warning valves and
transmitters
When a tire is repaired with liquid
sealants, the tire pressure warn-
ing valve and transmitter may not
operate properly. If a liquid seal-
ant is used, contact your Toyota
dealer or other qualified service
shop as soon as possible. Make
sure to replace the tire pressure
warning valve and transmitter
when replacing the tire.
If the engine will not
star t
If the engine will not start
even though correct starting
procedures are being fol-
lowed ( P.162, 163), con-
sider each of the following
points:
The engine will not start
even though the starter
motor operates normally.
The starter motor turns
over slowly, the interior
lights and headlights are
dim, or the horn does not
sound or sounds at a low
volume.