Page 482 of 624
4826-3. Do-it-yourself maintenance
Remove the light bulb.
Install a new light bulb and
then install the bulb base to
the light unit by inserting it
and turning it clockwise.
Connect the connector.
(When replacing right side
bulb only.)
Reinstall the trunk lid cover
with the clips.5
6
7
8
Page 484 of 624
4846-3. Do-it-yourself maintenance
Remove the light unit.Attach a long piece of
packing tape to the light
unit and fold the excess in
half.
Hold the folded portion
and pull it toward the rear
of the vehicle to remove
the light unit.
Turn the bulb base counterclockwise.
Remove the light bulb.4
1
2
5
Rear turn signal lightsRear side ma rker lights
6
Rear turn signal lightsRear side marker lights
Page 485 of 624
4856-3. Do-it-yourself maintenance
6
Maintenance and care
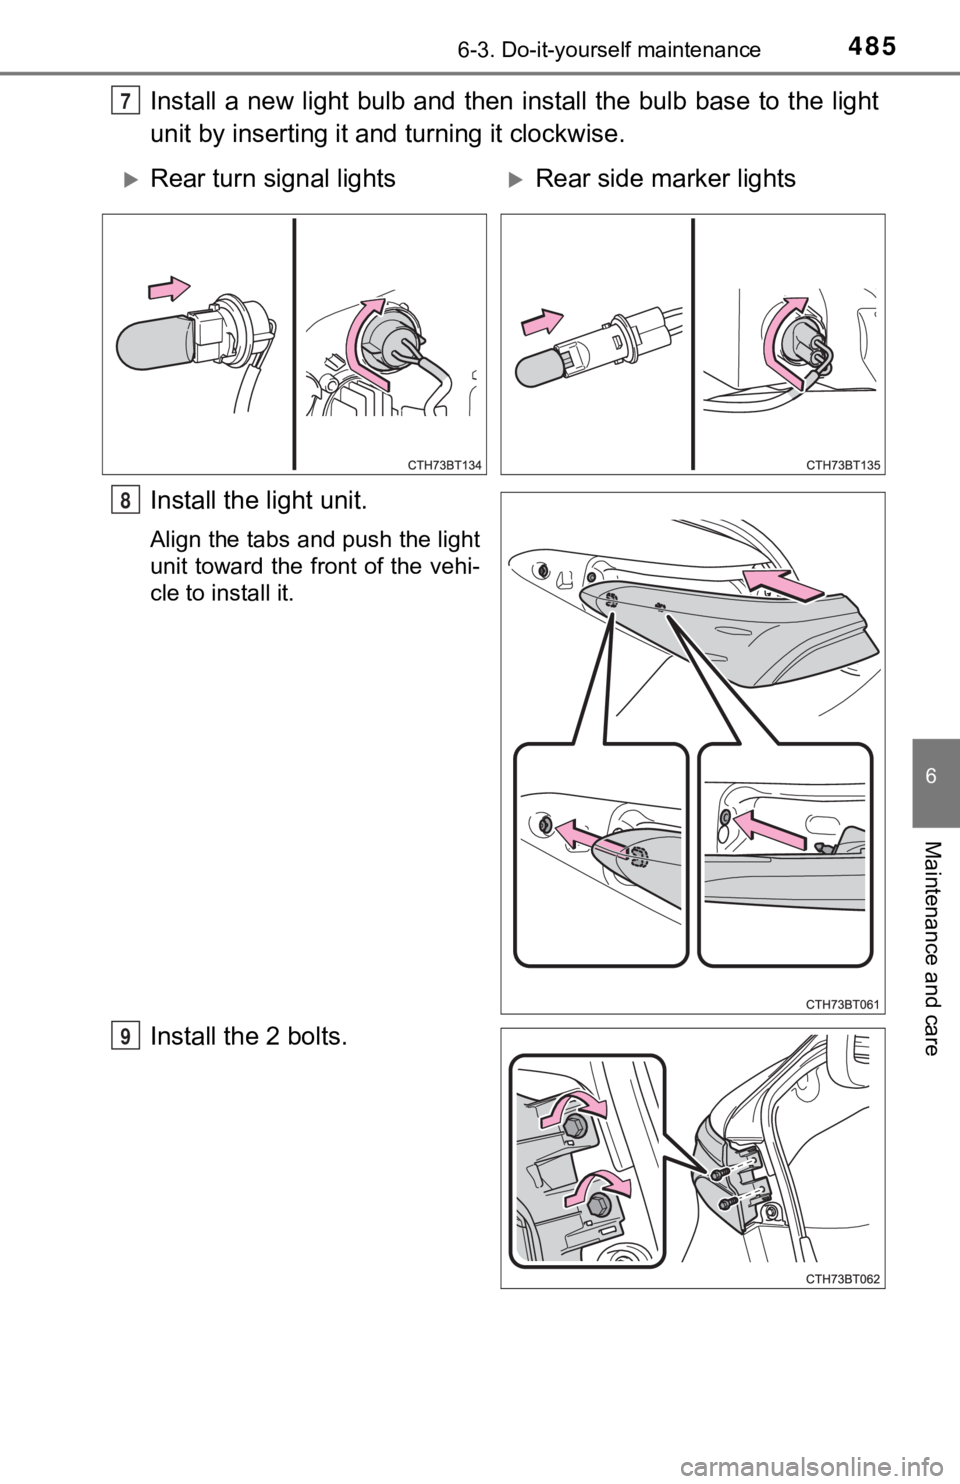
Install a new light bulb and then install the bulb base to the light
unit by inserting it and turning it clockwise.
Install the light unit.
Align the tabs and push the light
unit toward the front of the vehi-
cle to install it.
Install the 2 bolts.
7
Rear turn signal lightsRear side ma rker lights
8
9
Page 528 of 624
5287-2. Steps to take in an emergency
■Tr u n k
Turn the mechanical key clock-
wise to open.
Ensure that the shift lever is in P and firmly depress the brake
pedal.
Touch the Toyota emblem side
of the electronic key to the
power switch.
When the electronic key is
detected, a buzzer sounds and the
power switch will turn to ON mode.
When the smart key system is
deactivated in customization set-
ting, the power switch will turn to
ACCESSORY mode.
Firmly depress the brake pedal and check that is displayed
on the multi-information display.
Press the power switc h shortly and firmly.
In the event that the power swi tch still cannot be started, contact your
Toyota dealer.
Starting the hybrid system
1
2
3
4
Page 599 of 624
599Alphabetical index
CareExterior ................................. 412
Interior................................... 416
Seat belts .............................. 417
Wheels and wheel ornaments .......................... 413
Cargo capacity ......................... 203
CD player
*
Chains....................................... 361
Child restraint system ............... 54
Booster seats installation ........ 64
Convertible seats installation ............................ 62
Front passenger occupant classification syst em............. 47
Infant seats definition .............. 61
Infant seats installation ........... 56
Installing CRS with LATCH anchors ............ 67
Installing CRS with seat belts....................... 61
Installing CRS
with top tether strap .............. 70
LATCH anchors ...................... 67 Child safety ................................ 53
12-volt battery precautions................. 442, 535
Airbag precautions.................. 37
Battery precautions....... 442, 535
Child restraint system ............. 54
How your child should wear the seat belt.......................... 30
Installing child restraints ......... 54
Moon roof precautions .......... 189
Power window lock switch .... 183
Power window precautions ... 185
Rear door child-protectors .... 157
Removed electronic key battery precautions............. 471
Seat belt extender
precautions........................... 33
Seat belt precautions .............. 32
Seat heater precautions ....... 375
Trunk precautions ................. 162
Child-protectors ...................... 157
Cleaning ........................... 412, 416 Exterior ................................. 412
Interior .................................. 416
Seat belts.............................. 417
Wheels and wheel ornaments .......................... 413
Clock................................. 104, 117
Coat hooks ............................... 402
Condenser................................ 437
Connected Services
*
Console box ............................. 382
Consumption screen ............................ 145, 146
C
*: Refer to the “NAVIGATION AND MULTIMEDIA SYSTEM OWNER’S MANUAL”.