2023 TOYOTA 86 airbag
[x] Cancel search: airbagPage 86 of 449
862-1. Instrument cluster
Drive mode indicators
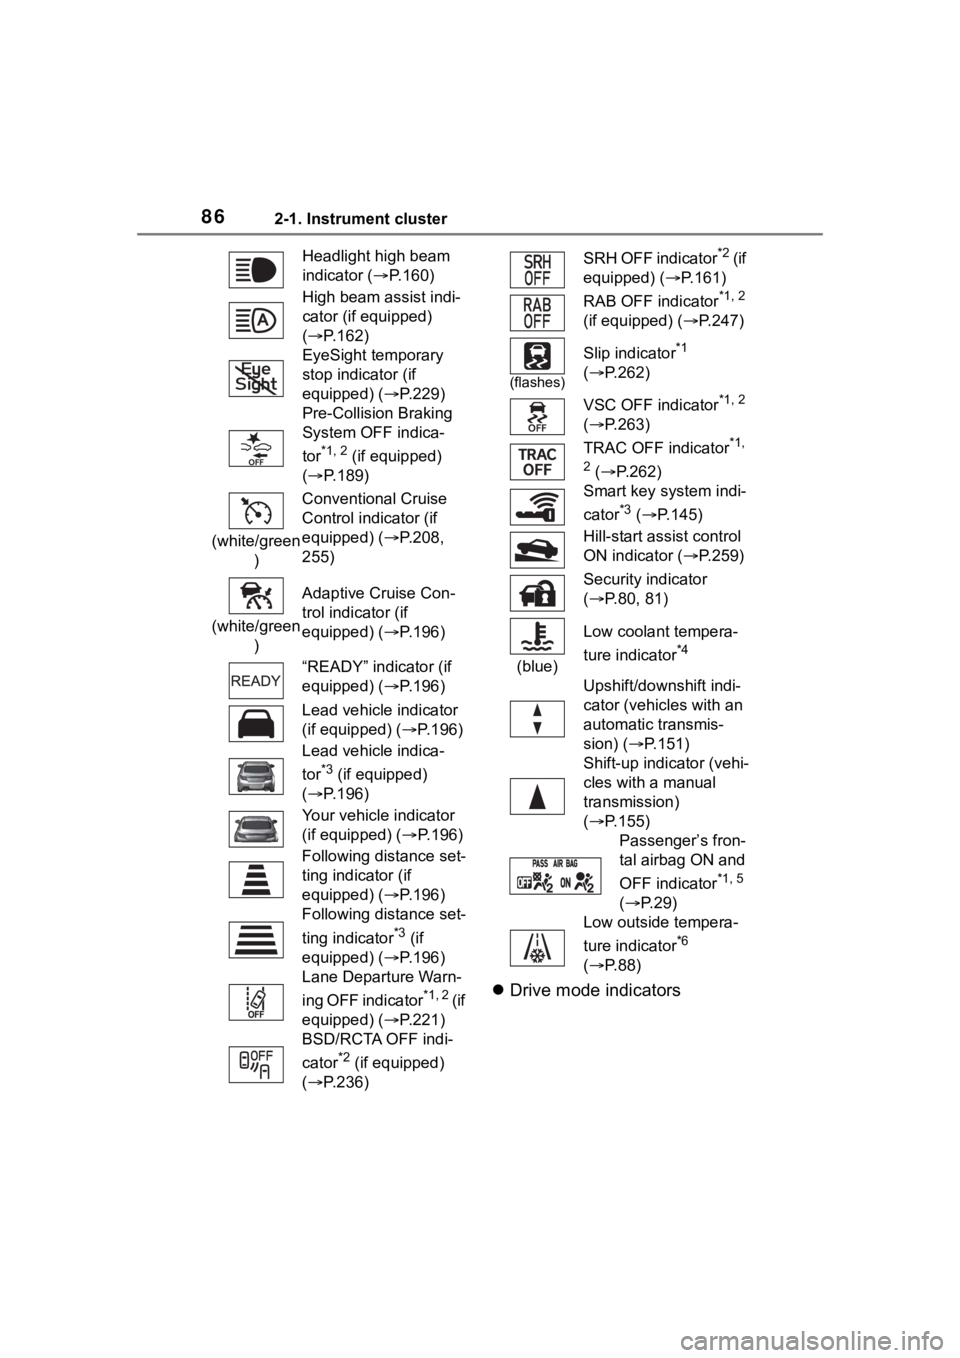
Headlight high beam
indicator ( P.160)
High beam assist indi-
cator (if equipped)
( P.162)
EyeSight temporary
stop indicator (if
equipped) (P.229)
Pre-Collision Braking
System OFF indica-
tor
*1, 2 (if equipped)
( P.189)
(white/green ) Conventional Cruise
Control indicator (if
equipped) (P.208,
255)
(white/green ) Adaptive Cruise Con-
trol indicator (if
equipped) (P.196)
“READY” indicator (if
equipped) (P.196)
Lead vehicle indicator
(if equipped) (
P.196)
Lead vehicle indica-
tor
*3 (if equipped)
( P.196)
Your vehicle indicator
(if equipped) ( P.196)
Following distance set-
ting indicator (if
equipped) (P.196)
Following distance set-
ting indicator
*3 (if
equipped) (P.196)
Lane Departure Warn-
ing OFF indicator
*1, 2 ( i f
equipped) (P.221)
BSD/RCTA OFF indi-
cator
*2 (if equipped)
( P.236)
SRH OFF indicator*2 ( i f
equipped) ( P.161)
RAB OFF indicator
*1, 2
(if equipped) ( P.247)
(flashes)
Slip indicator*1
( P.262)
VSC OFF indicator
*1, 2
( P.263)
TRAC OFF indicator
*1,
2
( P.262)
Smart key system indi-
cator
*3 ( P.145)
Hill-start assist control
ON indicator ( P.259)
Security indicator
( P.80, 81)
(blue) Low coolant tempera-
ture indicator
*4
Upshift/downshift indi-
cator (vehicles with an
automatic transmis-
sion) (
P.151)
Shift-up indicator (vehi-
cles with a manual
transmission)
( P.155)
Passenger’s fron-
tal airbag ON and
OFF indicator
*1, 5
( P. 2 9 )
Low outside tempera-
ture indicator
*6
( P. 8 8 )
Page 291 of 449
2916-1. Maintenance and care
6
Maintenance and care
Remove dirt and dust using a
vacuum cleaner. Wipe dirty
surfaces with a cloth damp-
ened with lukewarm water.
If dirt cannot be removed,
wipe it off with a soft cloth
dampened with neutral deter-
gent diluted to approximately
1%.
Wring out any excess water from
the cloth and thoroughly wipe off
remaining traces o f detergent and
water.
■Shampooing the carpets
There are several commercial foam-
ing-type cleaners available. Use a
sponge or brush to apply the foam.
Rub in overlapping circles. Do not
use water. Wipe dirty surfaces and
let them dry. Excellent results are
obtained by keeping the carpet as
dry as possible.
■Handling the seat belts
Clean with mild soap and lukewarm
water using a cloth or sponge. Also
check the belts periodically for
excessive wear, fraying or cuts.
■Meter visor
Do not place anything on top of
meter visor. The color of the meter
visor may transfer.
Cleaning and protect-
ing the vehicle interior
Perform cleaning in a man-
ner appropriate to each
component and its material.
Protecting the vehicle
interior
WARNING
■Water in the vehicle
●Do not splash or spill liquid in
the vehicle.
Doing so may cause electrical
components, etc. to malfunction
or catch fire.
●Do not get any of the SRS com-
ponents or wiring in the vehicle
interior wet. ( P. 2 9 )
An electrical malfunction may
cause the airbags to deploy or not
function properly, resulting in
death or serious injury.
■Cleaning the interior (espe-
cially instrument panel)
Do not use polish wax or polish
cleaner. The instrument panel
may reflect off the windshield,
obstructing the driver’s view and
leading to an accident, resulting in
death or serious injury.
NOTICE
■Cleaning detergents
●Do not use the following types
of detergent, as they may dis-
color the vehicle interior or
cause streaks or damage to
painted surfaces:
• Non-seat portions: Organic sub- stances such as benzene or
gasoline, alkaline or acidic solu-
tions, dye, and bleach
• Seats: Alkaline or acidic solu- tions, such as th inner, benzene,
and alcohol
●Do not use polish wax or polish
cleaner. The instrument panel’s
or other interior part’s painted
surface may be damaged.
Page 342 of 449

3427-2. Steps to take in an emergency
The following may indicate a
problem with your transmission.
Contact your Toyota dealer or
commercial towing service
before towing.
The engine is running but the
vehicle does not move.
The vehicle makes an abnor-
mal sound.
From the front
Use a towing dolly under the
rear wheels.
From the rear
WARNING
■After towing
Make sure to remove the towing
eyelet.
If not removed, the SRS airbags
may not deploy correctly if the
vehicle is involved in a frontal col-
lision, or the fuel pump shutoff
system may not operate correctly
if involved in a rear collision.
NOTICE
■To prevent damage to the
vehicle when towing using a
wheel-lift type truck
●Do not tow the vehicle from the
rear when the engine switch is
off. The steering lock mecha-
nism is not strong enough to
hold the front wheels straight.
●When raising the vehicle,
ensure adequate ground clear-
ance for towing at the opposite
end of the raised vehicle. With-
out adequate clearance, the
vehicle could be damaged while
being towed.
■To prevent damage to the
vehicle when towing with a
sling-type truck
Do not tow with a sling-type truck,
either from the front or rear.
■To prevent damage to the
vehicle during emergency
towing
Do not secure cables or chains to
the suspension components.
■When towing down a long
slope
Use a wheel lift-type or flat bed
truck.
If a wheel lift-type or flat bed truck
is not used, the brakes may over-
heat, leading to poor brake perfor-
mance.
Situations when it is nec-
essary to contact dealers
before towing
Towing with a wheel-lift
type truck
Page 349 of 449
3497-2. Steps to take in an emergency
7
When trouble arises
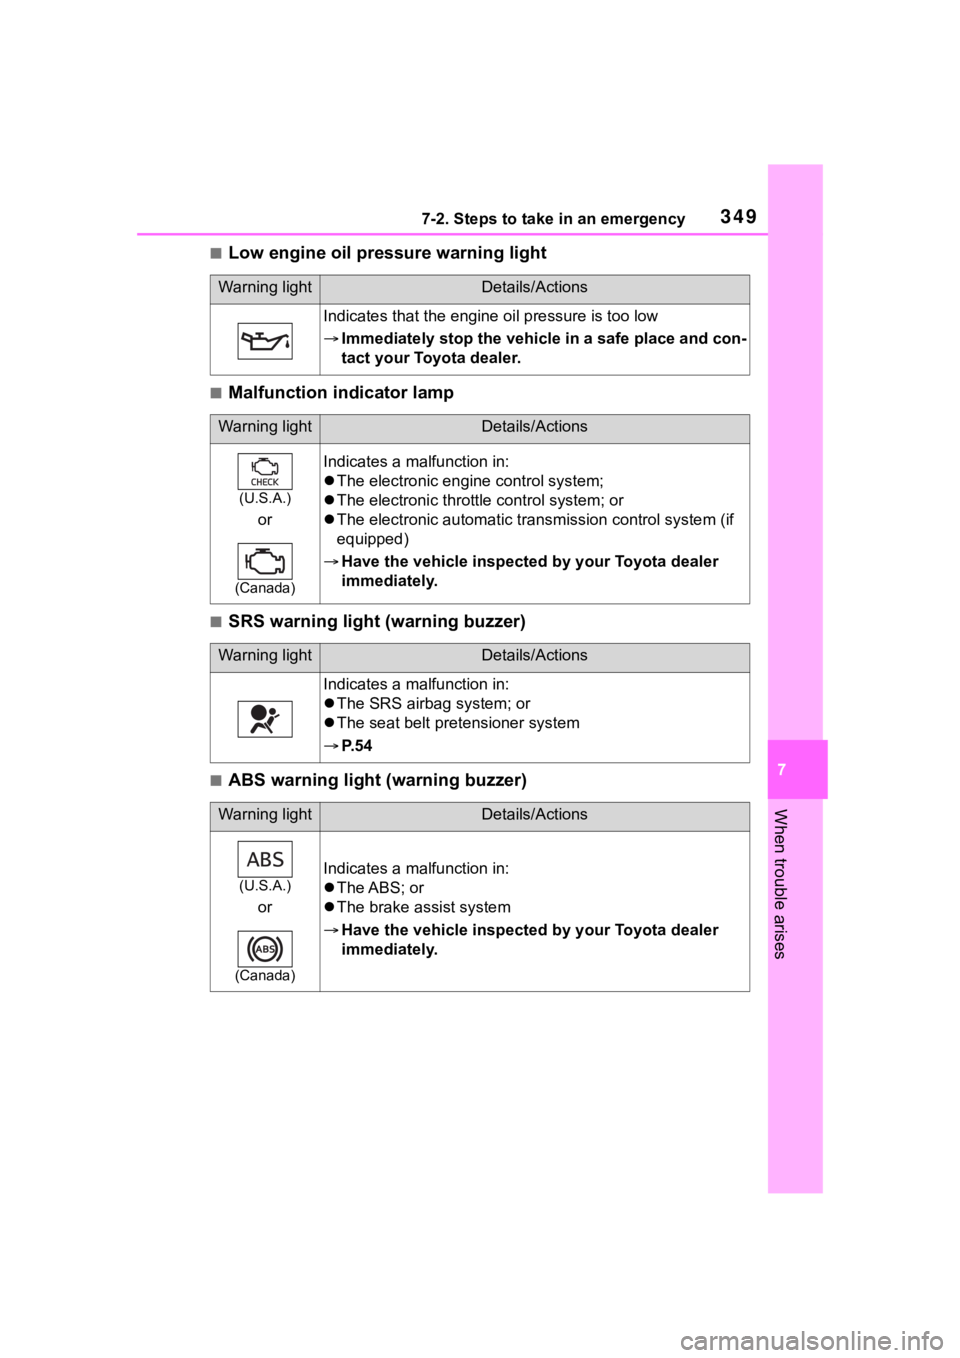
■Low engine oil pressure warning light
■Malfunction indicator lamp
■SRS warning light (warning buzzer)
■ABS warning light (warning buzzer)
Warning lightDetails/Actions
Indicates that the engine oil pressure is too low
Immediately stop the vehicle in a safe place and con-
tact your Toyota dealer.
Warning lightDetails/Actions
(U.S.A.)
or
(Canada)
Indicates a malfunction in:
The electronic engine control system;
The electronic throttle control system; or
The electronic automatic transmission control system (if
equipped)
Have the vehicle inspected by your Toyota dealer
immediately.
Warning lightDetails/Actions
Indicates a malfunction in:
The SRS airbag system; or
The seat belt pretensioner system
P. 5 4
Warning lightDetails/Actions
(U.S.A.)
or
(Canada)
Indicates a malfunction in:
The ABS; or
The brake assist system
Have the vehicle inspected by your Toyota dealer
immediately.
Page 357 of 449
3577-2. Steps to take in an emergency
7
When trouble arises
■Warning messages
The warning messages explained
below may differ from the actual
messages according to operation
conditions and vehicle specifica-
tions.
■Warning buzzer
In some cases, the buzzer may not
be heard due to being in a noisy
location or audio sound.
■If “Check Owner’s Manual” is
displayed
●If the following messages are
shown, following the instructions,
accordingly.
• “High Coolant Temperature” ( P.375)
• “Transmission Oil Temperature” ( P.149)
●If any of the following messages
are shown on the multi-informa-
tion display, it may indicate a mal-
function. Have the vehicle
inspected by your Toyota dealer
immediately.
• “EyeSight OFF”
• “Headlights Disabled”
• “ABS”
• “Steering System”
• “Vehicle Stability Control”
• “Transmission”
• “Low Tire Pressure”
• “RAB Disabled”
• “BSD/RCTA Disabled”
• “Keyless Access System Dis- abled”
• “Auto Headlight Leveler Disabled”
• “SRH Disabled”
●If any of the following messages
are shown on the multi-informa-
tion display, it may indicate a mal-
function. Immediately stop the
vehicle and contact your Toyota
dealer.
• “Brake System”
• “Check Engine”
• “SRS Airbag System”
If a war ning message
is displayed
The multi-information dis-
play shows warnings of sys-
tem malfunctions,
incorrectly performed oper-
ations, and messages that
indicate a need for mainte-
nance. When a message is
shown, perform the correc-
tion procedure appropriate
to the message.
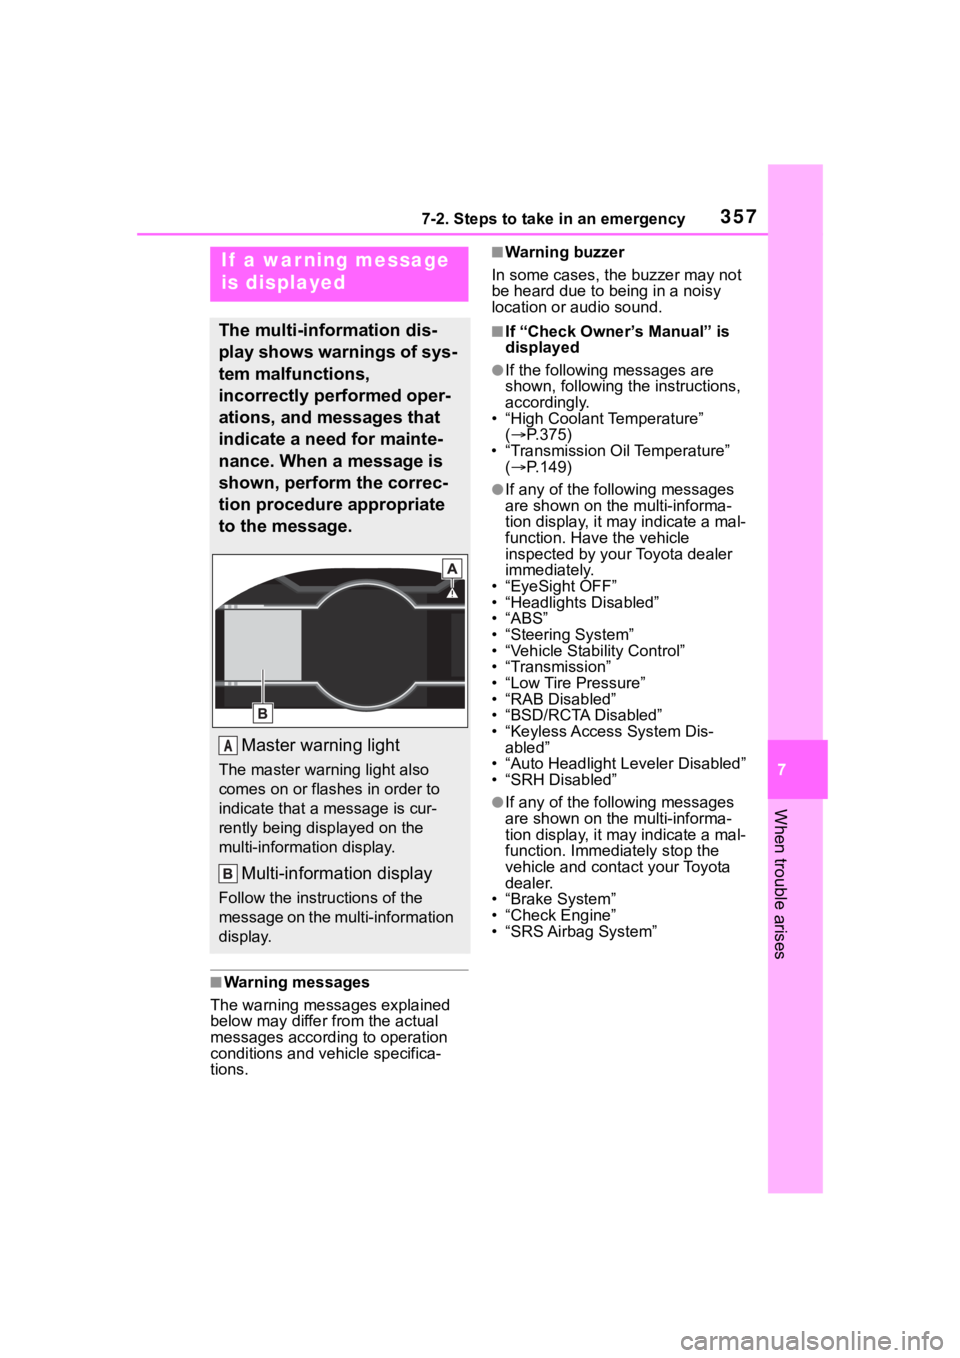
Master warning light
The master warning light also
comes on or flashes in order to
indicate that a message is cur-
rently being displayed on the
multi-information display.
Multi-information display
Follow the instru ctions of the
message on the multi-information
display.
A
Page 366 of 449
3667-2. Steps to take in an emergency
WARNING
●Connect the valve and hose
securely with the tire installed
on the vehicle.
●If the hose is not properly con-
nected to the valve, air leakage
may occur or sealant may be
sprayed out.
●If the hose comes off the valve
while inflating the tire, there is a
risk that the hose will move
abruptly due to air pressure.
●After inflation of the tire has
completed, the sealant may
splatter when the hose is dis-
connected or some air is let out
of the tire.
●Follow the operation procedure
to repair the tire. If the proce-
dure is not followed, the sealant
may spray out.
●Keep back from the tire while it
is being repaired, as there is a
chance of it bursting while the
repair operation is being per-
formed. If you notice any cracks
or deformation of the tire, turn
off the compressor switch and
stop the repair operation imme-
diately.
●The kit may overheat if operated
for a long period of time. Do not
operate the compressor contin-
uously for more than 10 min-
utes.
●Parts of the kit become hot
during operation. Be careful
handling the kit during and after
operation. Do not touch the
metal part around the connect-
ing area between the bottle and
compressor. It will be extremely
hot.
●Do not attach the vehicle speed
warning sticker to an area other
than the one indicated. If the
sticker is attached to an area
where an SRS airbag is located,
such as the pad of the steering
wheel, it may prevent the SRS
airbag from operating properly.
■Driving to spread the liquid
sealant evenly
Observe the following precautions
to reduce the risk of accidents.
Failing to do so may result in a
loss of vehicle control and cause
death or serious injury.
●Drive the vehicle carefully at a
low speed. Be especially careful
when turning and cornering.
●If the vehicle does not drive
straight or you feel a pull
through the steering wheel, stop
the vehicle and check the tire.
The tire may have separated
from the wheel.
NOTICE
■When performing an emer-
gency repair
●Perform the emergency repair
without removing the nail or
screw that has punctured the
tread of the tire. If the object
that has punctur ed the tire is
removed, repair by the emer-
gency tire puncture repair kit
may not be possible.
●The kit is not waterproof. Make
sure that the ki t is not exposed
to water, such as when it is
being used in the rain.
●Do not put the kit directly onto
dusty ground such as sand at
the side of the road. If the kit
vacuums up dust etc., a mal-
function may occur.
Page 407 of 449

407
9
9
For owners
For owners
.9-1. For ownersReporting safety defects for U.S. owners............... 408
Reporting safety defects for Canadian owners ...... 409
Seat belt instructions for Canadian owners (in
French) ...................... 409
SRS airbag instructions for Canadian owners (in
French) ...................... 411
Headlight aim instructions for Canadian owners (in
French) ...................... 422
Page 411 of 449
4119-1. For owners
9
For owners
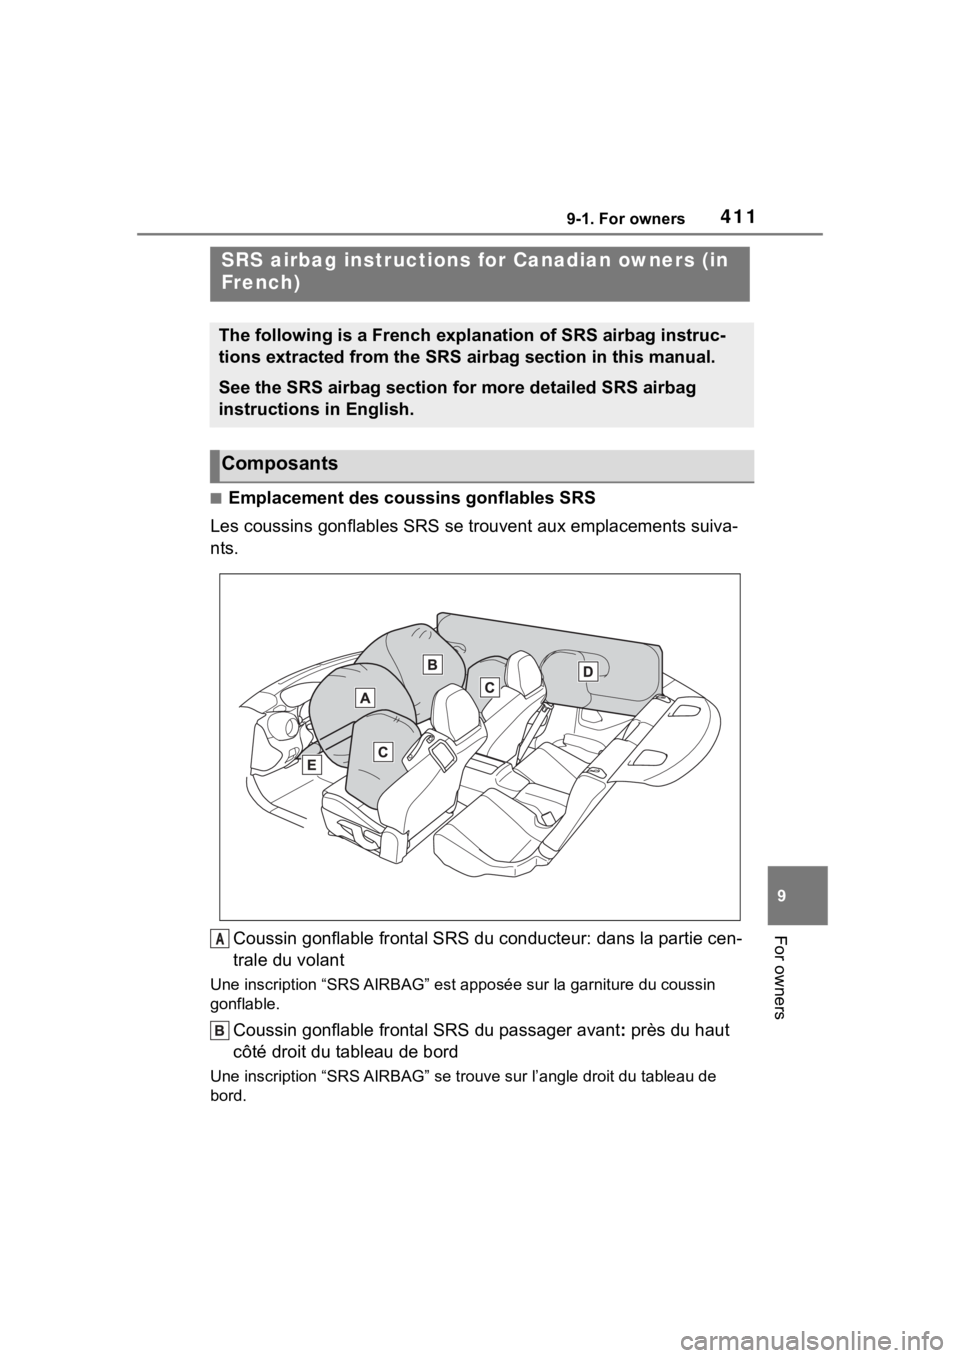
■Emplacement des coussins gonflables SRS
Les coussins gonflables SRS se trouvent aux emplacements suiva-
nts.
Coussin gonflable frontal SRS du conducteur: dans la partie cen -
trale du volant
Une inscription “SRS AI RBAG” est apposée sur la garniture du coussin
gonflable.
Coussin gonflable fronta l SRS du passager avant: près du haut
côté droit du tableau de bord
Une inscription “SRS AI RBAG” se trouve sur l’angle droit du tableau de
bord.
SRS airbag instructions for Canadian owners (in
French)
The following is a French explanation of SRS airbag instruc-
tions extracted from the SRS airbag section in this manual.
See the SRS airbag section for more detailed SRS airbag
instructions in English.
Composants
A