2023 TOYOTA 86 turn signal
[x] Cancel search: turn signalPage 156 of 449
1564-2. Driving procedures
turn signal lights will blink 3 times.
■If the turn signals do not
stop flashing after turning
left or right, or if you want
to stop them flashing
Operate the lever in the oppo-
site direction to either position 2
or 3. If you move the lever to
either position 1 or 4, the
selected turn signals will flash.
■Turn signals can be operated
when
The engine switch is in ON.
■If the indicator flashes faster
than usual
Check that a light bulb in the front or
rear turn signal lights has not
burned out.
■If the turn signals stop flashing
before a lane change has been
performed
Operate the lever again.
■Customization
Some functions can be customized.
( P.400)
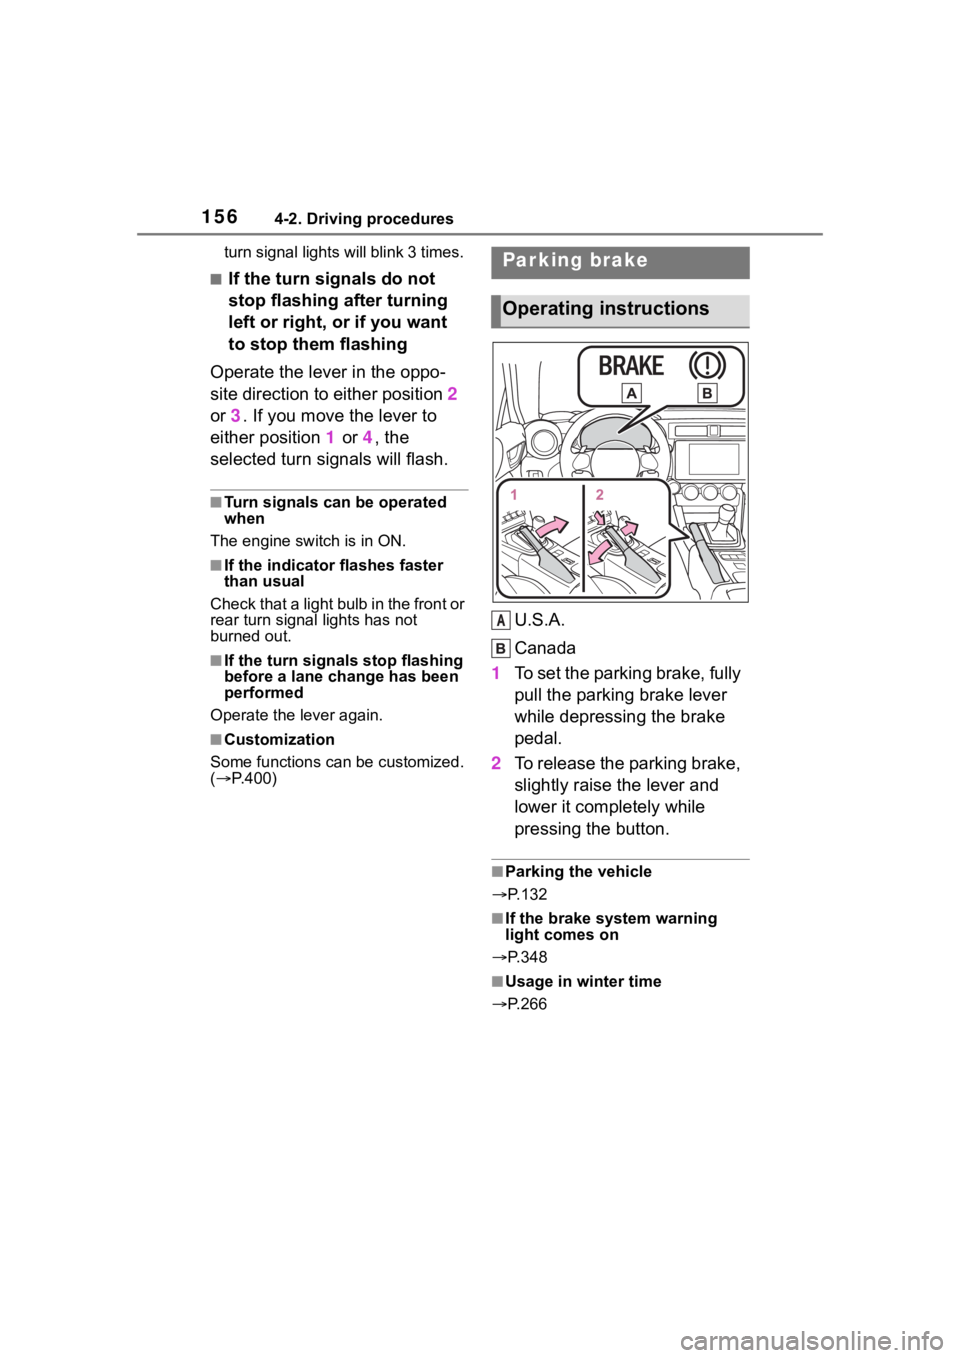
U.S.A.
Canada
1 To set the parking brake, fully
pull the parking brake lever
while depressing the brake
pedal.
2 To release the parking brake,
slightly raise the lever and
lower it completely while
pressing the button.
■Parking the vehicle
P.132
■If the brake system warning
light comes on
P.348
■Usage in winter time
P.266
Parking brake
Operating instructions
A
Page 159 of 449

1594-3. Operating the lights and wipers
4
Driving
parking lights and illuminate
brighter than the parking lights.
●To make your vehicle more visible
to other drivers during daytime
driving, the daytime running lights
turn on automatically when all of
the following conditions are met.
(The daytime running lights are
not designed for use at night.)
• The engine is running
• The shift lever is shifted out of P (vehicles with an automatic trans-
mission)
• The parking brake is released
• The headlight s witch is in the
(U.S.A. only), or
* position
*: When the surroundings are bright
The daytime running lights remain
on after they illumi nate, even if the
parking brake is set again.
●When the turn signal indicators
are flashing, the daytime running
light on the side that the turn sig-
nals are flashing will turn off.
●When the emergency flashers are
flashing, both daytime running
lights will turn off.
●Compared to turning on the head-
lights, the daytime running light
system offers gr eater durability
and consumes less electricity, so
it can help improve fuel economy.
■Headlight control sensor
In the following si tuations, the auto-
matic light control system may not
operate correctly.
●When an object is placed on the
sensor or something which blocks
the sensor is affixed to the wind-
shield
●When the surrounding area is lit
by light other than natural light
■Automatic light off system
When the light switch is in : The
headlights and tail lights turn off 30
seconds after a door is opened and
closed if the engine switch is turned
off. (The lights turn off immediately if on the key is pressed twice after
both side doors are closed.)
To turn the lights on again, turn the
engine switch to ON, or turn the light
switch off once and then back to
or (except for Canada).
■Light reminder buzzer
A buzzer sounds when the engine
switch is turned off and the driver’s
door is opened wh ile the lights are
turned on.
■Automatic headlight leveling
system
The level of the headlights is auto-
matically adjusted according to the
number of passengers and the load-
ing condition of the vehicle to
ensure that the headlights do not
interfere with o ther road users.
■Windshield wiper linked head-
light illumination
When driving during daytime with
the headlight switch turned to , if
the windshield wipers are used, the
headlights will turn o n automatically
after several se conds to help
enhance the visibility of your vehi-
cle.
■Battery-saving function
In order to prevent the battery of the
vehicle from discharging, if the
headlights and/or tail lights are on
Page 163 of 449
1634-3. Operating the lights and wipers
4
Driving
detected due to repeated curves,
road dividers or roadside trees
• When vehicles ahead appear in a
faraway lane on a wide road
• When the lights of vehicles ahead are not on
●The high beams may be turned off
if a vehicle ahead that is using fog
lights without its headlights turned
on is detected.
●House lights, street lights, traffic
signals, and illumi nated billboards
or signs and other reflective
objects may cause the high
beams to change to the low
beams, or the low beams to
remain on.
●The following factors may affect
the amount of time taken for the
high beams to turn on or off:
• The brightness of the headlights,
fog lights, and ta il lights of vehi-
cles ahead
• The movement and direction of
vehicles ahead
• When a vehicle ahead only has operational lights on one side
• When a vehicle ahead is a two-wheeled vehicle
• The condition of the road (gradi-
ent, curve, condi tion of the road
surface, etc.)
• The number of passengers and
amount of luggage in the vehicle
• When there is a lag in response due to the limitat ions of the detec-
tion range of the stereo camera
●The high beams may turn on or off
unexpectedly.
●Bicycles or similar vehicles may
not be detected.
●In the following situations the sys-
tem may not be abl e to correctly
detect the surrounding brightness
level. This may cause the low
beams to remain on or the high
beams to flash or dazzle pedestri-
ans or vehicles ahead. In such a
case, it is necess ary to manually
switch between the high and low
beams.
• When driving in inclement weather (heavy rain, snow, fog, sand-
storms, etc.)
• When the windshi eld is obscured
by fog, mist, ice, dirt, etc.
• When the windshield is cracked or damaged
• When the stereo camera is deformed or dirty
• When the temperature of the ste-
reo camera is extremely high
• When the surrounding brightness level is equal to that of headlights,
tail lights or fog lights
• When headlights or tail lights of vehicles ahead are turned off,
dirty, changing color, or not aimed
properly
• When the vehicle is hit by water,
snow, dust, etc. from a preceding
vehicle
• When driving through an area of
intermittently changing brightness
and darkness
• When frequently and repeatedly
driving ascending/descending
roads, or roads with rough, bumpy
or uneven surfaces (such as
stone-paved roads, gravel roads,
etc.)
• When frequently and repeatedly
taking curves or driving on a wind-
ing road
• When there is a h ighly reflective
object ahead of the vehicle, such
as a sign or mirror
• When the back of a preceding
vehicle is highly reflective, such as
a container on a truck
• When the vehicle’s headlights are
damaged or dirty, or are not aimed
properly
• When the vehicle is listing or titling
due to a flat tire, a trailer being
towed, etc.
• Immediately after the engine is
started
• When the headlights are changed between the high beams and low
beams repeatedly in an abnormal
manner
• When the driver believes that the high beams may be flashing or
dazzling pedestrians or other driv-
ers
Page 200 of 449
2004-5. EyeSight
approximately 37 mph (60 km/h),
the system starts acceleration to
the set vehicle speed more quickly
because it is linked with the turn
signal.
• If the setting of driving lane is dif-
ferent from the actual driving
direction, the vehicle may start to
accelerate faster than usual when
the driver signals a lane change to
move from the passing lane to the
driving lane. ( P.400)
●Cruise control acceleration char-
acteristics can be set to one of
four levels. ( P.400)
■Increasing the set vehicle
speed
Using the cruise control
switch
Push to the “+ RES” side
briefly.
Every time the switch is pushed,
the set vehicle sp eed will increase
in increments of 1 mph (1 km/h)
increment.
Push to the “+ RES” side con-
tinuously.
While the switch is being pushed,
the set vehicle sp eed will increase
in increments of 5 mph (5 km/h).
When operating the switch, the
set vehicle speed changes on
the meter display.
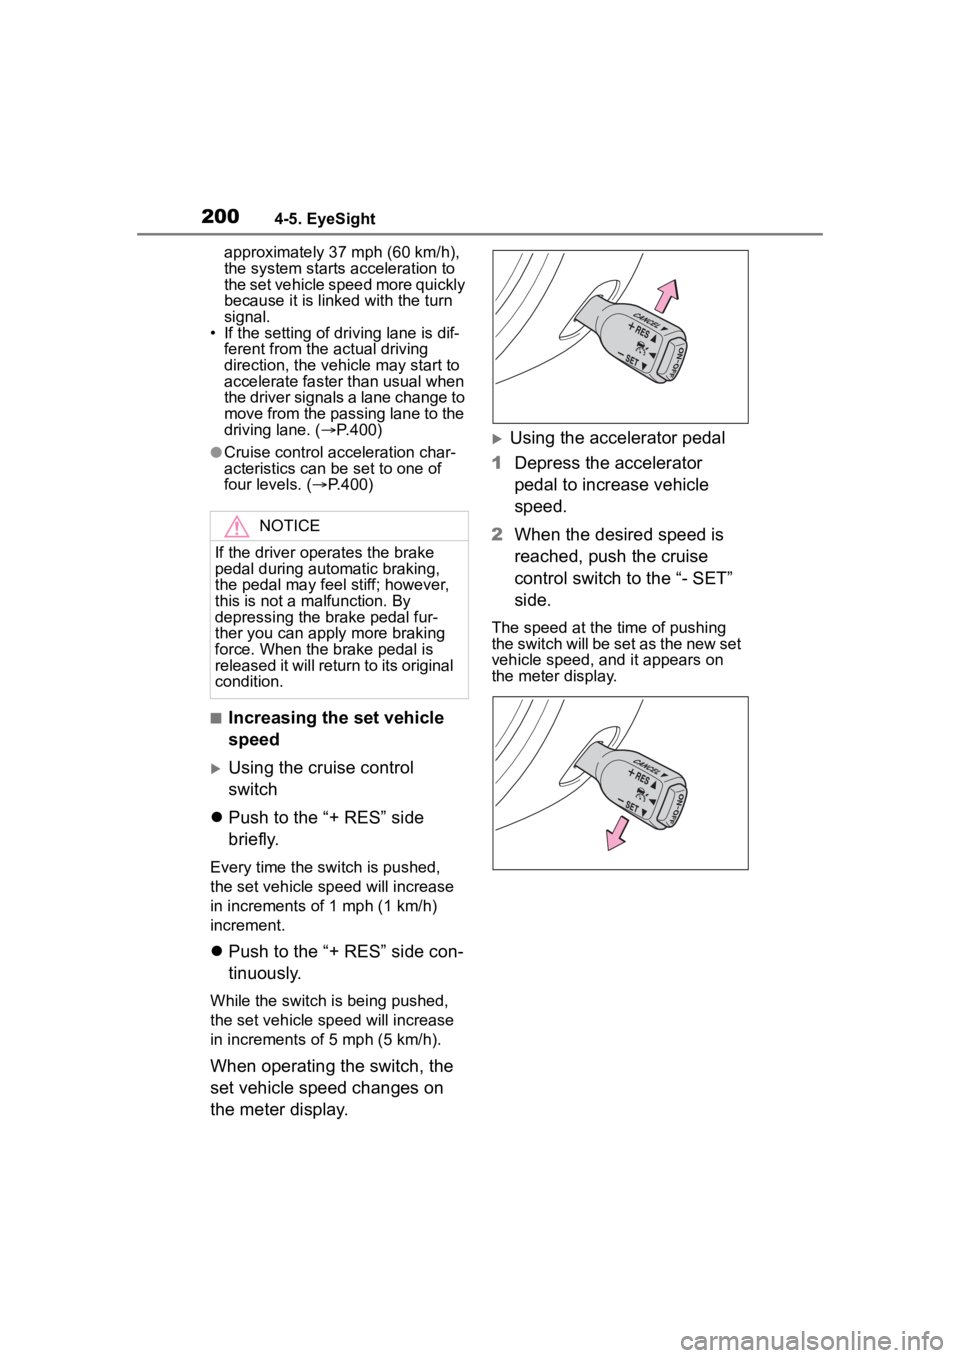
Using the accelerator pedal
1 Depress the accelerator
pedal to increase vehicle
speed.
2 When the desired speed is
reached, push the cruise
control switch to the “- SET”
side.
The speed at the time of pushing
the switch will be set as the new set
vehicle speed, and it appears on
the meter display.
NOTICE
If the driver operates the brake
pedal during automatic braking,
the pedal may feel stiff; however,
this is not a malfunction. By
depressing the brake pedal fur-
ther you can apply more braking
force. When the brake pedal is
released it will return to its original
condition.
Page 220 of 449
2204-5. EyeSight
*: If equipped
●The following situations may
cause incorrect lane detection and
a faulty Lane Departure Warning
to occur.
• There are tire tracks on a wet road or snow-covered road.
• There are boundaries between
snow and asphalt, or marks from
road repair, etc.
• There are the shadows of guard-
rails.
• Lane markings are drawn in dou- ble.
• There are some lane markings left from roadwork or markings from
the previous road.
●When the Lane Departure Warn-
ing OFF indicator is illuminated,
Lane Departure Warning is inac-
tive. ( P.221)Lane Depar ture War n-
ing*
When vehicle speed is
approximately 30 mph (50
km/h) or more, this function
warns the driver if the sys-
tem detects that the vehicle
is likely to depart the traffic
lane.
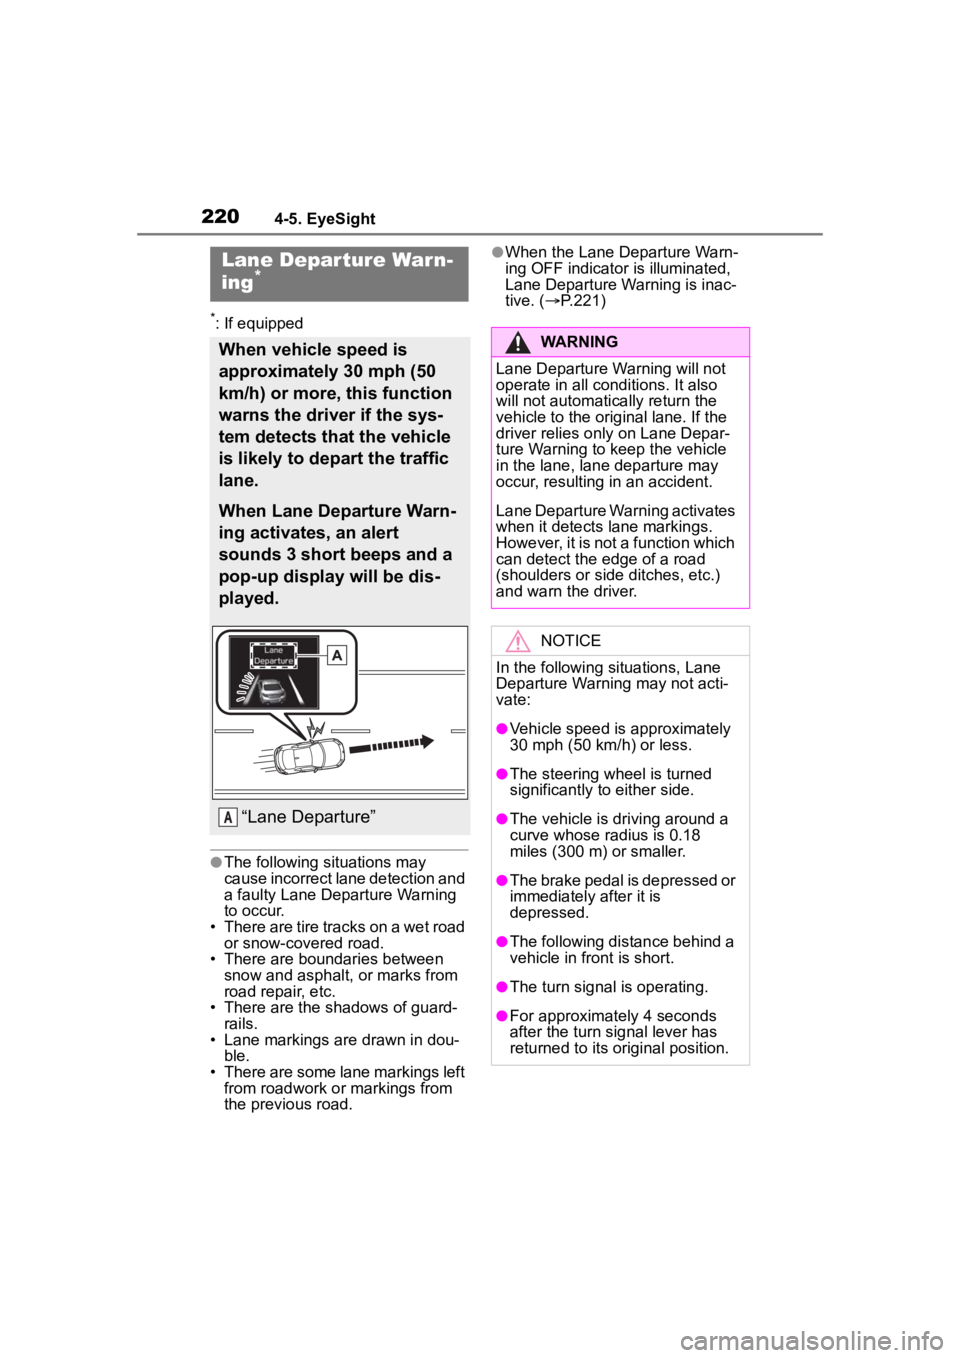
When Lane Departure Warn-
ing activates, an alert
sounds 3 short beeps and a
pop-up display will be dis-
played.
“Lane Departure”A
WARNING
Lane Departure Wa rning will not
operate in all conditions. It also
will not automatically return the
vehicle to the ori ginal lane. If the
driver relies only on Lane Depar-
ture Warning to keep the vehicle
in the lane, lane departure may
occur, resulting in an accident.
Lane Departure Warning activates
when it detects lane markings.
However, it is not a function which
can detect the edge of a road
(shoulders or side ditches, etc.)
and warn the driver.
NOTICE
In the following situations, Lane
Departure Warning may not acti-
vate:
●Vehicle speed is approximately
30 mph (50 km/h) or less.
●The steering wheel is turned
significantly to either side.
●The vehicle is driving around a
curve whose radius is 0.18
miles (300 m ) or smaller.
●The brake pedal is depressed or
immediately after it is
depressed.
●The following distance behind a
vehicle in front is short.
●The turn signal is operating.
●For approximately 4 seconds
after the turn signal lever has
returned to its or iginal position.
Page 232 of 449

2324-6. Using other driving systems
4-6.Using other driving systems
*: If equippedBSD/RCTA consists of the fol-
lowing functions.
To detect a vehicle in a blind
spot on an adjacent lane or a
vehicle approaching at high
speed while driving the vehi-
cle (Blind Spot Detection)
To detect a vehicle approach-
ing from the right or left while
reversing the vehicle (Rear
Cross Traffic Alert)
The system uses radar sensors
for the following features.
The BSD/RCTA radar sensor has
been certified by the radio wave
related laws of the U.S. and other
FCC compliant countries and Can-
ada. When drivi ng in other coun-
tries, certification of the country
where the vehicle is driven must be
obtained. For certif ication in the U.S.
and other FCC comp liant countries
and Canada, refer to P.440.
■Blind Spot Detection (BSD)
The system notifies the driver of
the presence of vehicles in its
blind spot.
If the system detects a vehicle
in its blind spot, it warns the
driver by illuminating the
BSD/RCTA approach indica-
tor(s) on the outside mirror(s).
If the driver operates the turn
signal lever in the direction
where the BSD/RCTA
approach indicator is illumi-
nating, the system warns the
BSD/RCTA*
The BSD/RCTA consists of
rear corner radars with
Blind Spot Detection, Lane
Change Assist and Rear
Cross Traffic Alert.
These functions of
BSD/RCTA are the systems
that detect objects and vehi-
cles to the rear and draw
attention to the driver when
changing a lane or when
driving in reverse.
WARNING
The driver is responsible for driv-
ing safely. Always be sure to
check the surroundings with your
eyes when changing lanes or
reversing the vehicle.
The system is designed to assist
the driver in changing lanes or
reversing safely by monitoring the
rear and side areas of the vehicle.
However, you cannot rely on this
system alone in assuring the
safety during a lane change or
reversing. Overconfidence in this
system could result in an accident
and lead to serious injury or
death. Since the system operation
has various limitations, the flash-
ing or illumination of the
BSD/RCTA approach indicator
may be delayed or it may not
operate at all even when a vehicle
is present in a neighboring lane or
approaching from either side.
The driver is responsible for pay-
ing attention to t he rear and side
areas of the vehicle.
System features
Page 233 of 449
2334-6. Using other driving systems
4
Driving
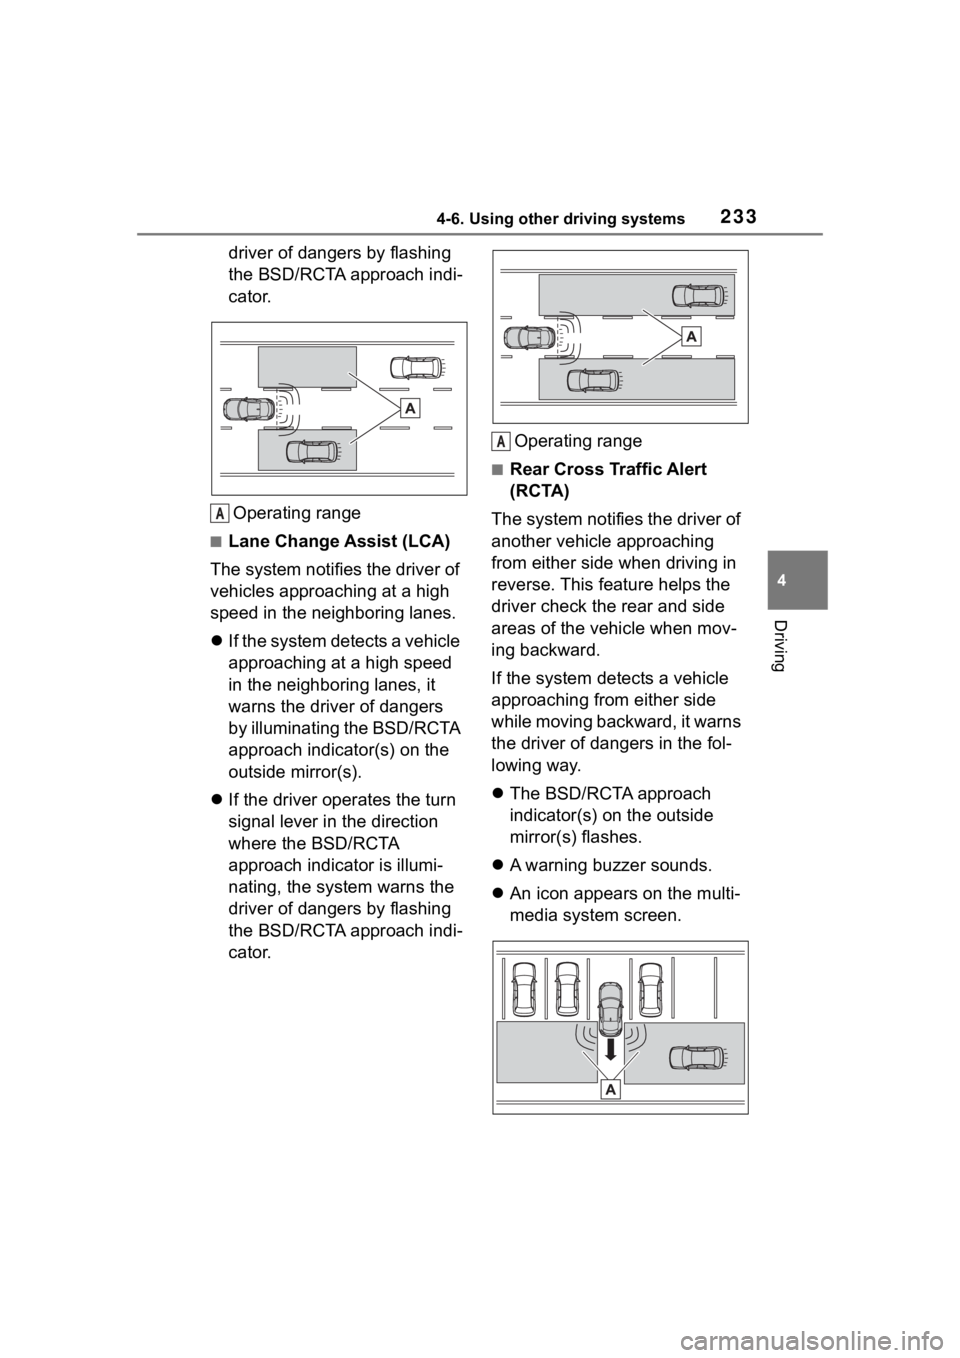
driver of dangers by flashing
the BSD/RCTA approach indi-
cator.Operating range
■Lane Change Assist (LCA)
The system notifies the driver of
vehicles approaching at a high
speed in the neighboring lanes.
If the system detects a vehicle
approaching at a high speed
in the neighboring lanes, it
warns the driver of dangers
by illuminating the BSD/RCTA
approach indicator(s) on the
outside mirror(s).
If the driver operates the turn
signal lever in the direction
where the BSD/RCTA
approach indicator is illumi-
nating, the system warns the
driver of dangers by flashing
the BSD/RCTA approach indi-
cator. Operating range
■Rear Cross Traffic Alert
(RCTA)
The system notifies the driver of
another vehicle approaching
from either side when driving in
reverse. This feature helps the
driver check the rear and side
areas of the vehicle when mov-
ing backward.
If the system detects a vehicle
approaching from either side
while moving backward, it warns
the driver of dangers in the fol-
lowing way.
The BSD/RCTA approach
indicator(s) on the outside
mirror(s) flashes.
A warning buzzer sounds.
An icon appears on the multi-
media system screen.
A
A
Page 236 of 449
2364-6. Using other driving systems
trying to overtake
●On a road with extremely narrow
lanes, the system may detect
vehicles driving in a lane next to
the neighboring lane.
While the BSD/RCTA is active,
the following item(s) will operate
to alert the driver:
The BSD/RCTA approach
indicator (when there are
vehicles in the neighboring
lanes).
The BSD/RCTA approach
indicator and warning buzzer
(when a vehicle is approach-
ing from the left or right side
while your vehicle is revers-
ing)
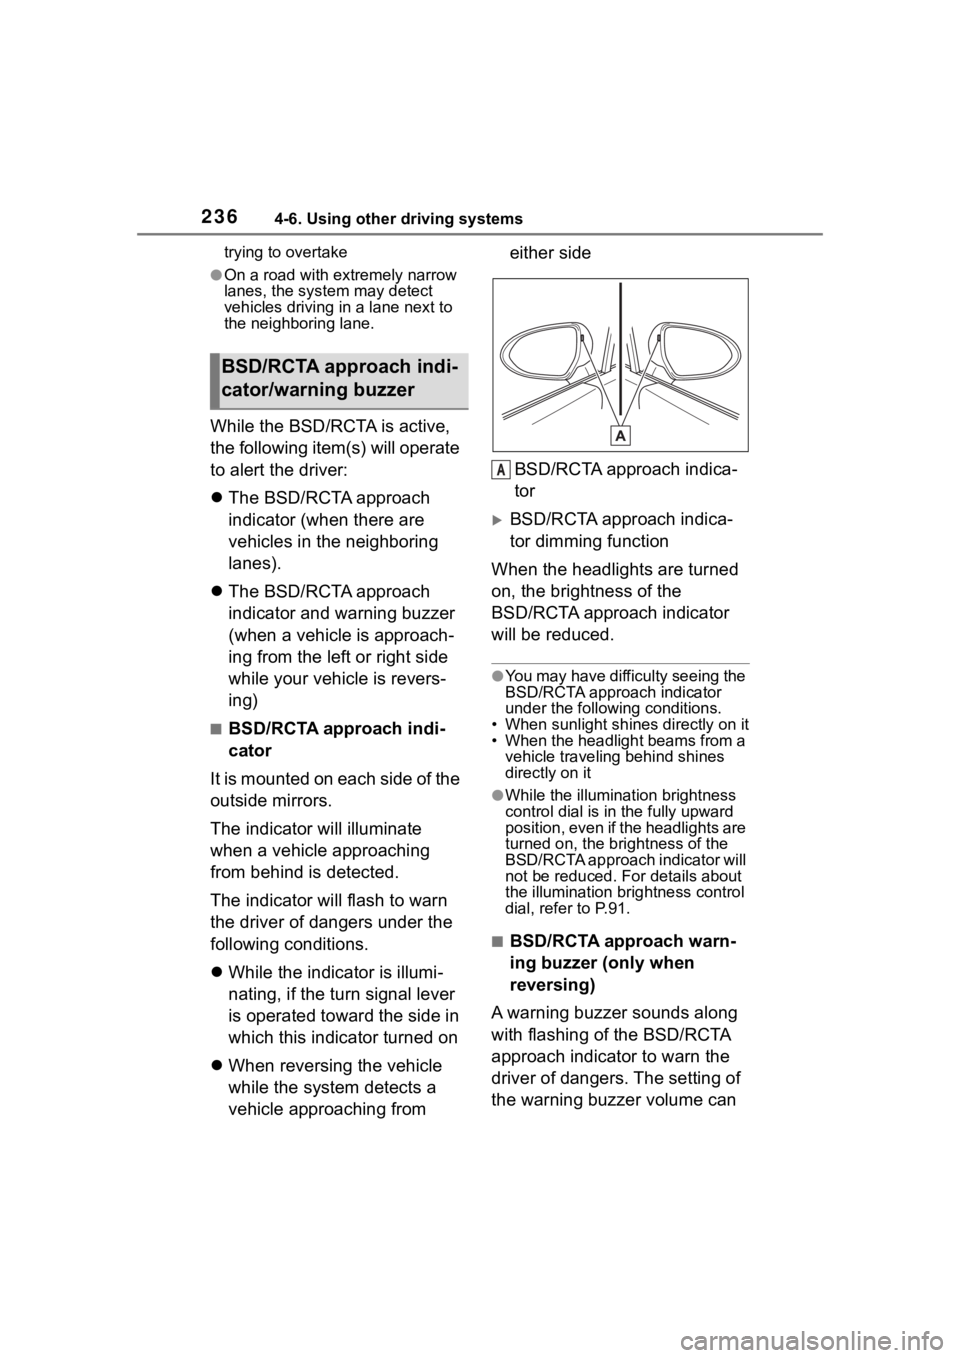
■BSD/RCTA approach indi-
cator
It is mounted on each side of the
outside mirrors.
The indicator will illuminate
when a vehicle approaching
from behind is detected.
The indicator will flash to warn
the driver of dangers under the
following conditions.
While the indicator is illumi-
nating, if the turn signal lever
is operated toward the side in
which this indicator turned on
When reversing the vehicle
while the system detects a
vehicle approaching from either side
BSD/RCTA approach indica-
tor
BSD/RCTA approach indica-
tor dimming function
When the headlights are turned
on, the brightness of the
BSD/RCTA approach indicator
will be reduced.
●You may have difficulty seeing the
BSD/RCTA approach indicator
under the following conditions.
• When sunlight shi nes directly on it
• When the headlight beams from a vehicle traveling behind shines
directly on it
●While the illumination brightness
control dial is in the fully upward
position, even if the headlights are
turned on, the brightness of the
BSD/RCTA approach indicator will
not be reduced. For details about
the illumination bri ghtness control
dial, refer to P.91.
■BSD/RCTA approach warn-
ing buzzer (only when
reversing)
A warning buzzer sounds along
with flashing of the BSD/RCTA
approach indicator to warn the
driver of dangers. The setting of
the warning buzzer volume can
BSD/RCTA approach indi-
cator/warning buzzer
A