2023 TOYOTA 86 steering
[x] Cancel search: steeringPage 47 of 449
471-1. For safe use
1
For safety and security
WARNING
■General Precautions regard-
ing front passenger’s SRS
frontal airbag
When the front passenger's seat
is occupied by an adult, observe
the following precautions. Failure
to do so may lessen the load on
the front passenger 's seat, deacti-
vating the front passenger's SRS
frontal airbag despite the fact that
the seat is occupied by an adult.
This may result in personal injury.
●Do not allow the rear seat occu-
pant to lift the front passenger's
seat cushion using his/her feet.
●Do not place any article under
the front passenger's seat, or
squeeze any article from behind
and under the seat.
●Do not squeeze any article
between the front passenger's
seat and side trim/pillar, door or
center console box. This may lift
the seat cushion.
■When a small a dult is seated
in the front passenger’s seat
When a small adult is seated in
the front passeng er’s seat, the
Toyota advanced frontal airbag
system may or may not activate
the front passenger’s SRS frontal
airbag depending on the occu-
pant’s seating posture. If the OFF
indicator remains illuminated
while the ON indi cator turns off
when a small adult is seated in
the front passenger's seat, refer to
P. 4 5 .
■General Precautions regard-
ing occupant detection sys-
tem
Do not kick the front passenger
seat or subject it to severe impact.
Otherwise, the SRS warning light
may illuminate to indicate a mal-
function of the front passenger
occupant detection system. In this
case, contact your Toyota dealer
immediately.
■After deployment
Do not touch the SRS airbag sys-
tem components around the
steering wheel and dashboard
with bare hands right after deploy-
ment. Doing so can cause burns
because the components can be
very hot as a result of deploy-
ment.
NOTICE
■Toyota advanced frontal air-
bag system precautions
Observe the following precau-
tions. Failure to do so may pre-
vent the Toyota advanced frontal
airbag system from functioning
correctly or cause the system to
fail.
●Do not apply any strong impact
to the front passenger’s seat
such as by kicking.
●Do not let rear passengers rest
their feet between the front
seatback and seat cushion.
●Do not spill liquid on the front
passenger’s seat. If liquid is
spilled, wipe it o ff immediately.
●Do not remove or disassemble
the front passenger’s seat.
Page 58 of 449
581-1. For safe use
■Adult*2
■Child*5, *6
WARNING
●Modifications for persons with
disabilities that may affect the
front passenger occupant clas-
sification system. (U.S. only)
Removing, replacing or modify-
ing any parts of the front seats,
seat belts, front bumper, front
side frame, instrument panel,
meter, steering wheel, steering
column, tires, suspension or
floor panel can affect the opera-
tion of the Toyota front passen-
ger occupant classification
system.
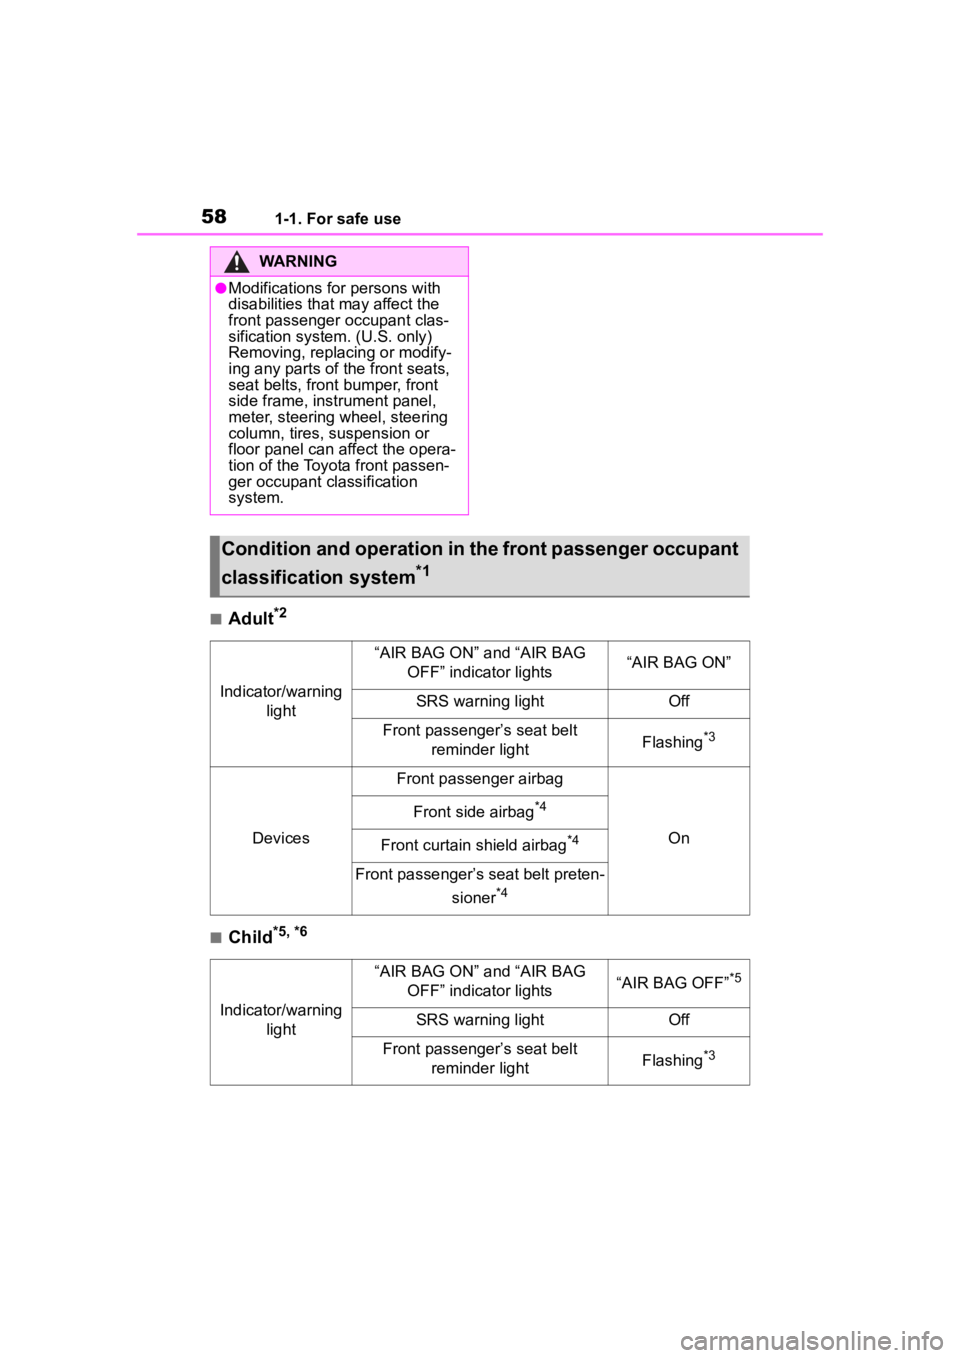
Condition and operation in the front passenger occupant
classification system
*1
Indicator/warning light
“AIR BAG ON” and “AIR BAG OFF” indicator lights“AIR BAG ON”
SRS warning lightOff
Front passenger’s seat belt reminder lightFlashing*3
Devices
Front passenger airbag
On
Front side airbag*4
Front curtain shield airbag*4
Front passenger’s seat belt preten-
sioner
*4
Indicator/warning light
“AIR BAG ON” and “AIR BAG OFF” indicator lights“AIR BAG OFF”*5
SRS warning lightOff
Front passenger’s seat belt reminder lightFlashing*3
Page 85 of 449
852-1. Instrument cluster
2
Vehicle status information and indicators
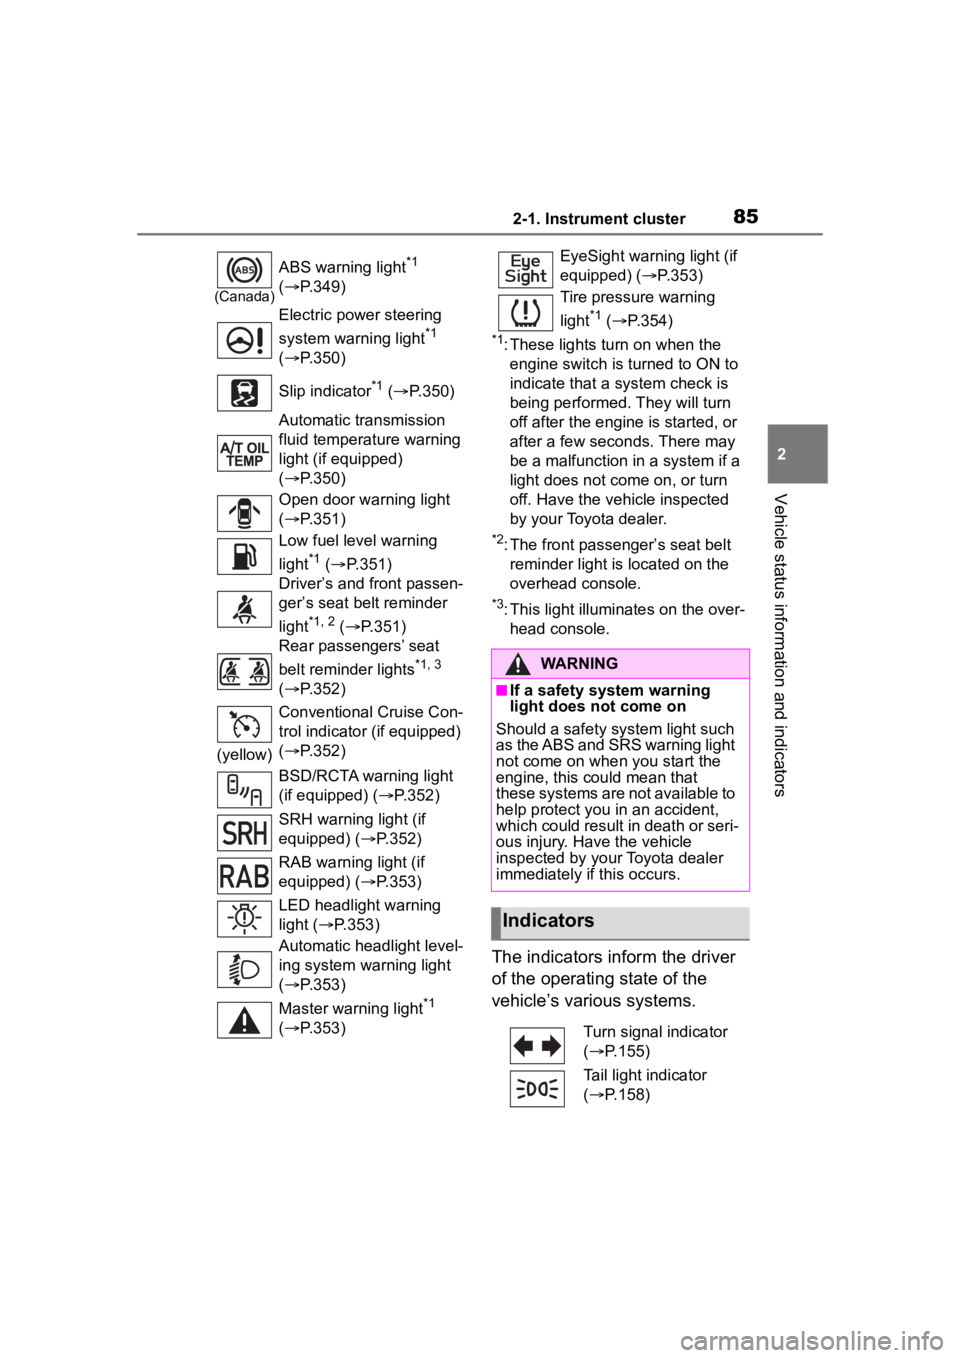
*1: These lights turn on when the
engine switch is turned to ON to
indicate that a system check is
being performed. They will turn
off after the engine is started, or
after a few seconds. There may
be a malfunction in a system if a
light does not come on, or turn
off. Have the vehicle inspected
by your Toyota dealer.
*2: The front passenger’s seat belt reminder light is located on the
overhead console.
*3: This light illuminates on the over-head console.
The indicators inform the driver
of the operating state of the
vehicle’s various systems.
(Canada)
ABS warning light*1
( P.349)
Electric power steering
system warning light
*1
( P.350)
Slip indicator
*1 ( P.350)
Automatic transmission
fluid temperature warning
light (if equipped)
( P.350)
Open door warning light
( P.351)
Low fuel level warning
light
*1 ( P.351)
Driver’s and front passen-
ger’s seat belt reminder
light
*1, 2 ( P.351)
Rear passengers’ seat
belt reminder lights
*1, 3
( P.352)
(yellow) Conventional Cruise Con-
trol indicator (if equipped)
(
P.352)
BSD/RCTA warning light
(if equipped) ( P.352)
SRH warning light (if
equipped) ( P.352)
RAB warning light (if
equipped) ( P.353)
LED headlight warning
light ( P.353)
Automatic headlight level-
ing system warning light
( P.353)
Master warning light
*1
( P.353)
EyeSight warning light (if
equipped) ( P.353)
Tire pressure warning
light
*1 ( P.354)
WARNING
■If a safety system warning
light does not come on
Should a safety system light such
as the ABS and SRS warning light
not come on when you start the
engine, this could mean that
these systems are not available to
help protect you in an accident,
which could result in death or seri-
ous injury. Have the vehicle
inspected by you r Toyota dealer
immediately if this occurs.
Indicators
Turn signal indicator
( P.155)
Tail light indicator
( P.158)
Page 96 of 449
962-1. Instrument cluster
speed/driving time/driving dis-
tance.
■Driving information (page 4)
Displays each tire pressure.
( P.315)
■Display items
Press or of the meter
control switch and select .
Then press or to display
the following items:
G-force
Suitable for confirming current lat-
eral G-forces on the vehicle.
G-force (peak hold function)
Suitable for confirming the size and
direction of the maximum lateral
G-forces on the vehicle.
Power and torque curve
Stopwatch
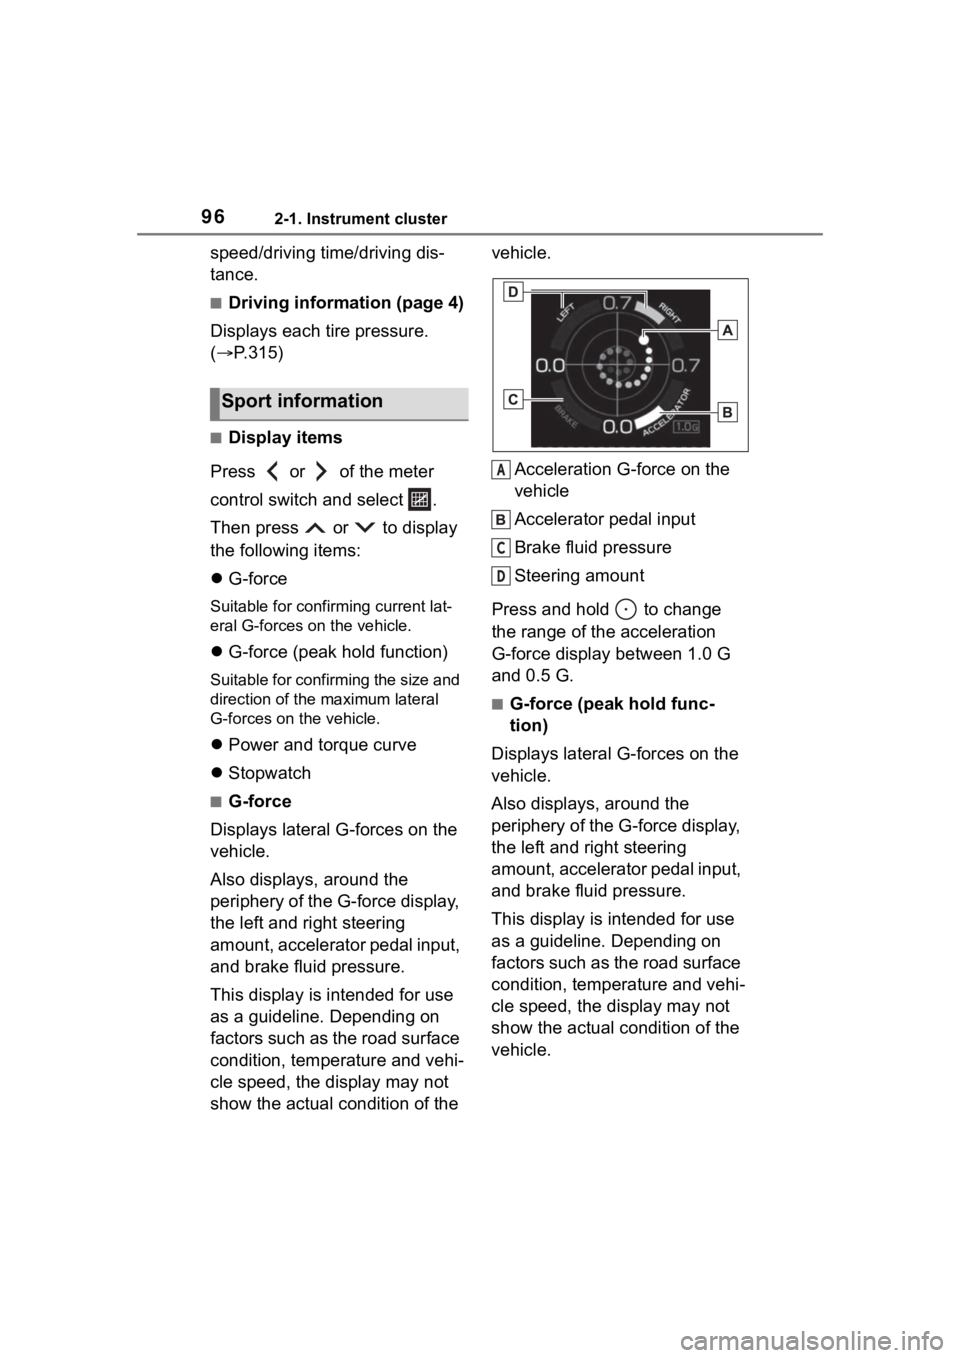
■G-force
Displays lateral G-forces on the
vehicle.
Also displays, around the
periphery of the G-force display,
the left and right steering
amount, accelerator pedal input,
and brake fluid pressure.
This display is intended for use
as a guideline. Depending on
factors such as the road surface
condition, temperature and vehi-
cle speed, the display may not
show the actual condition of the vehicle.
Acceleration G-force on the
vehicle
Accelerator pedal input
Brake fluid pressure
Steering amount
Press and hold to change
the range of the acceleration
G-force display between 1.0 G
and 0.5 G.
■G-force (peak hold func-
tion)
Displays lateral G-forces on the
vehicle.
Also displays, around the
periphery of the G-force display,
the left and right steering
amount, accelerator pedal input,
and brake fluid pressure.
This display is intended for use
as a guideline. Depending on
factors such as the road surface
condition, temperature and vehi-
cle speed, the display may not
show the actual condition of the
vehicle.
Sport information
A
C
D
Page 97 of 449
972-1. Instrument cluster
2
Vehicle status information and indicators
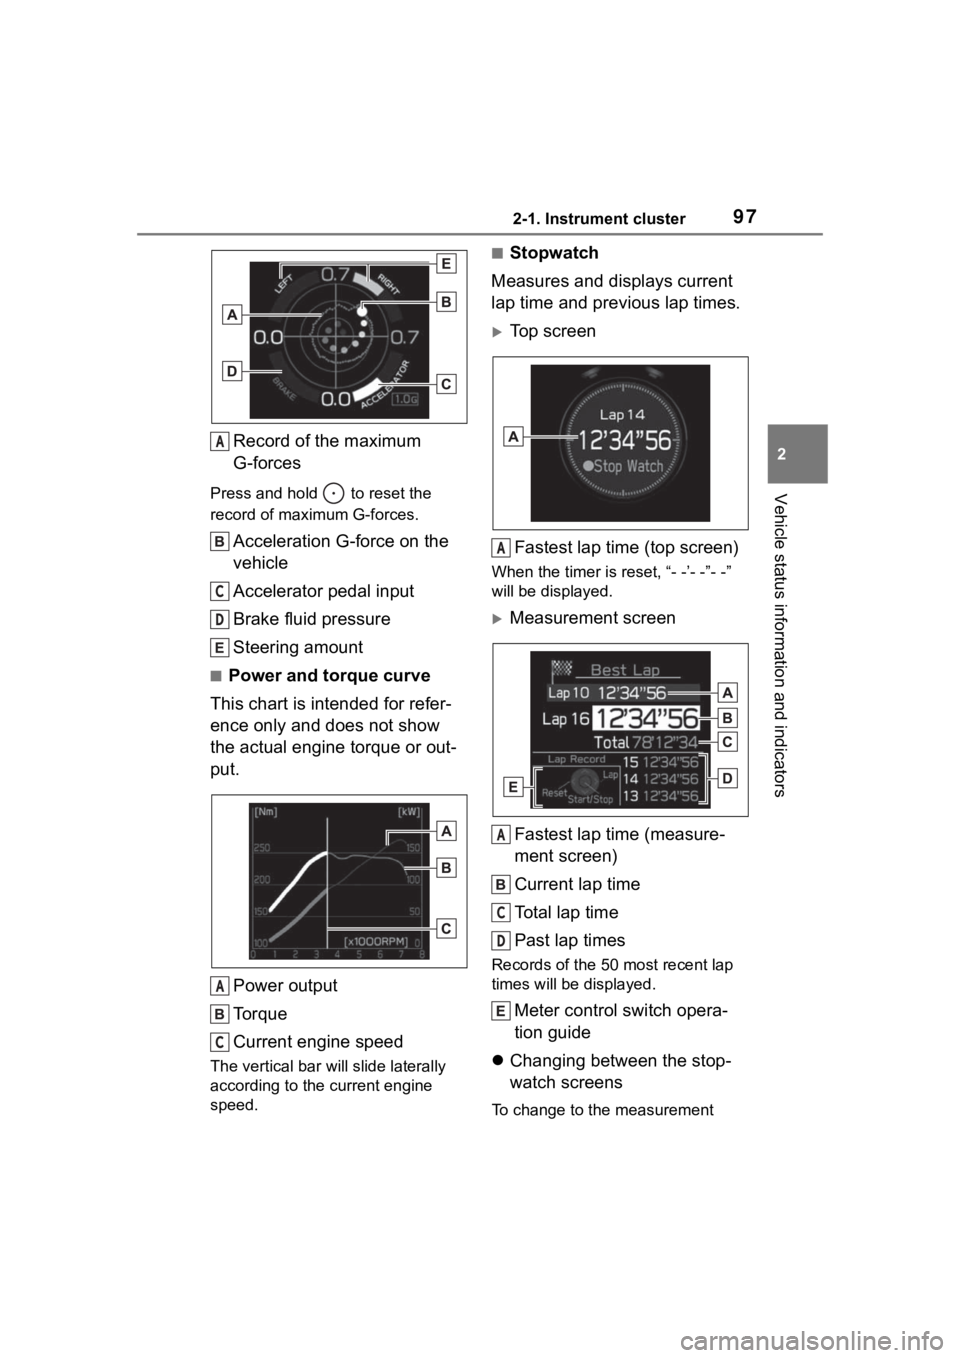
Record of the maximum
G-forces
Press and hold to reset the
record of maximum G-forces.
Acceleration G-force on the
vehicle
Accelerator pedal input
Brake fluid pressure
Steering amount
■Power and torque curve
This chart is intended for refer-
ence only and does not show
the actual engine torque or out-
put.
Power output
Torque
Current engine speed
The vertical bar will slide laterally
according to the current engine
speed.
■Stopwatch
Measures and displays current
lap time and previous lap times.
Top screen
Fastest lap time (top screen)
When the timer is reset, “- -’- -”- -”
will be displayed.
Measurement screenFastest lap time (measure-
ment screen)
Current lap time
Total lap time
Past lap times
Records of the 50 most recent lap
times will be displayed.
Meter control switch opera-
tion guide
Changing between the stop-
watch screens
To change to the measurement
A
C
D
A
C
A
A
C
D
Page 98 of 449
982-1. Instrument cluster
screen: Press .
To change to the top screen: Press .
Operating the measurement
screen
: Start/stop measurement
: Mark off one lap
: Reset measured lap times
: Scroll through the lap
times
Resetting measured lap times
After stopping the measurement,
press .
To display other content while
the stopwatch is operating
If the measurement screen is dis-
played, press to display the top
screen.
Then operate the meter control
switches to display other content.
While other items are displayed,
the measurement will continue but
the stopwatch cannot be operated.
Select to display the route guid-
ance information.
Select to enable selection of an
audio source or track on the dis-
play using the meter control switches.
Select to display the operational
status of the Adaptive Cruise
Control system (
P.190, 207)
The settings of the following
systems can be changed.
LDW (Lane Departure Warn-
ing) (if equipped)
PCB (Pre-Colli sion Braking)
(if equipped)
BSD/RCTA (if equipped)
RAB (Reverse Automatic
Braking system) (if equipped)
(Sonar Audible Alarm) (if
equipped)
SRH (Steering Responsive
Headlight) (if equipped)■Meter display settings that
can be changed
Units
Select to change the units of mea-
sure displayed.
Startup Scrn
Navigation system-linked
display
Audio system-linked dis-
play
Driving support system
information display (if
equipped)
Driving support system
setting display
Settings display
Page 101 of 449
101
3
3
Before driving
Before driving
.3-1. Key informationKeys ............................ 102
3-2. Opening, closing and locking the doors and
trunk
Doors .......................... 105
Trunk ........................... 107
Smart key system ....... 111
3-3. Adjusting the seats Front seats .................. 119
Rear seats................... 121
Head restraints............ 123
3-4. Adjusting the steering wheel and mirrors
Steering wheel ............ 125
Inside rear view mirror .................................. 126
Outside rear view mirrors .................................. 127
3-5. Opening, closing the win- dows
Power windows ........... 129
Page 125 of 449
1253-4. Adjusting the steering wheel and mirrors
3
Before driving
3-4.Adjusting the steering wheel and mirrors
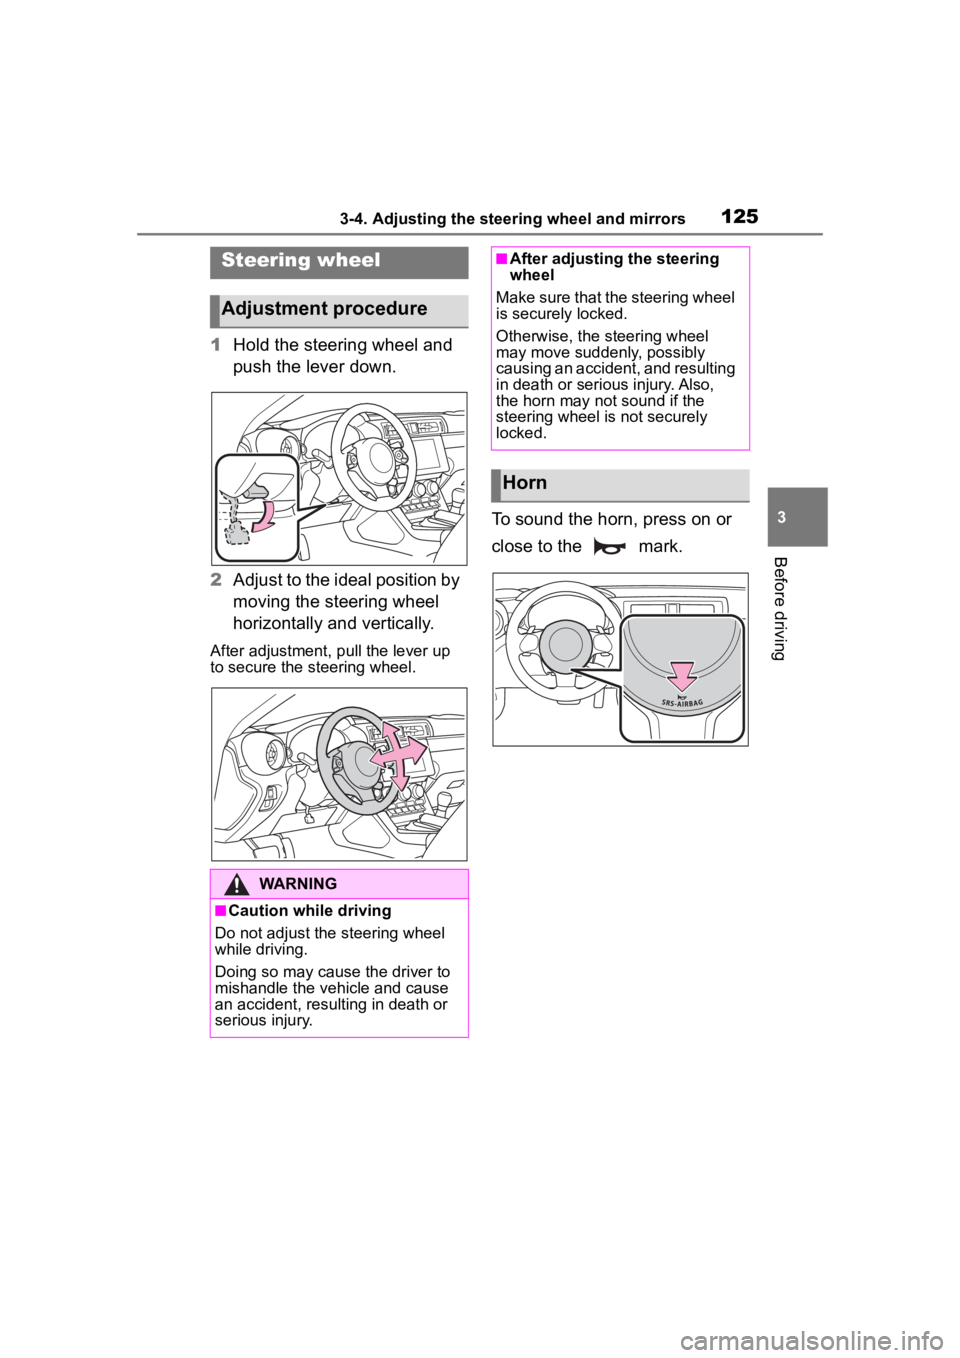
1Hold the steering wheel and
push the lever down.
2 Adjust to the ideal position by
moving the steering wheel
horizontally and vertically.
After adjustment, pull the lever up
to secure the steering wheel.
To sound the horn, press on or
close to the mark.
Steering wheel
Adjustment procedure
WARNING
■Caution while driving
Do not adjust the steering wheel
while driving.
Doing so may cause the driver to
mishandle the vehicle and cause
an accident, resul ting in death or
serious injury.
■After adjusting the steering
wheel
Make sure that the steering wheel
is securely locked.
Otherwise, the steering wheel
may move suddenly, possibly
causing an accident, and resulting
in death or serious injury. Also,
the horn may not sound if the
steering wheel is not securely
locked.
Horn