2023 TOYOTA 86 phone
[x] Cancel search: phonePage 78 of 449

781-3. Emergency assistance
connection screen on the multime-
dia system screen to cancel the
connection to a response-center
agent.
■Enhanced Roadside Assis-
tance (“i” button)
Enhanced Roadside Assistance
adds GPS data to the already
included warranty-based Toyota
roadside service.
Subscribers can press the “i”
button on the interior lights to
contact a Roadside Assistance
provider, who can help with a
wide range of needs, such as:
towing, flat tire, fuel delivery, etc.
For a description of the
Enhanced Roadside Assistance
services and their limitations,
please see the Safety Connect
Terms and Conditions, which
are available at Toyota.com in
the United States and Toyota.ca
in Canada.
If the “i” button on the interior
lights is pressed unintentionally,
press and hold the “i” button for
approximately 2 seconds or
more or operate the connection
screen on the multimedia sys-
tem screen to cancel the con-
nection to a roadside assistance
provider.
Important! Read this informa-
tion before using Safety Con- nect.
■Exposure to radio fre-
quency signals
The Safety Connect system
installed in your vehicle is a
low-power radio transmitter and
receiver. It receives and also
sends out radio frequency (RF)
signals.
In August 1996, the Federal
Communications Commission
(FCC) adopted RF exposure
guidelines with safety levels for
mobile wireless phones. Those
guidelines are consistent with
the safety standards previously
set by the following U.S. and
international standards bodies.
ANSI (American National
Standards Institute) C95.1
[1992]
NCRP (National Council on
Radiation Protection and
Measurement) Report 86
[1986]
ICNIRP (International Com-
mission on Non-Ionizing Radi-
ation Protection) [1996]
Those standards were based on
comprehensive and periodic
evaluations of the relevant sci-
entific literature. Over 120 scien-
tists, engineers, and physicians
from universities, and govern-
ment health agencies and
industries reviewed the avail-
able body of research to
develop the ANSI Standard
Safety information for
Safety Connect
Page 92 of 449

922-1. Instrument cluster
2Select .
3 Select “General”.
4 Select “Clock”.
5 Select “Time Setting”.
6 Select “AUTO”.
The clock will be set automati-
cally where a GPS signal is
available.
■Setting the clock to be
adjusted automatically
(vehicles without safety
connect)
1 Press .
2 Select .
3 Select “General”.
4 Select “Clock”.
5 Select “Time Setting”.
6 Select “Sync With Phone”.
The clock will be set and
adjusted automatically when a
smartphone is connected via
Bluetooth
®for transferring
phonebook data. For details,
refer to the “MULTIMEDIA
OWNER’S MANUAL”.
■Adjusting the clock manu-
ally
1 Press .
2 Select .
3 Select “General”.
4 Select “Clock”.
5 Select “Time Setting”. 6
Select “Manual” then adjust
the clock.
7 Select “OK”.
■Changing the clock
between 12H/24H format
1 Press .
2 Select .
3 Select “General”.
4 Select “Clock”.
5 Select “12H” or “24H”.
■Clock settings screen
The clock setting screen can also be
displayed by touch ing the clock on
the status bar.
Page 102 of 449
1023-1. Key information
3-1.Key information
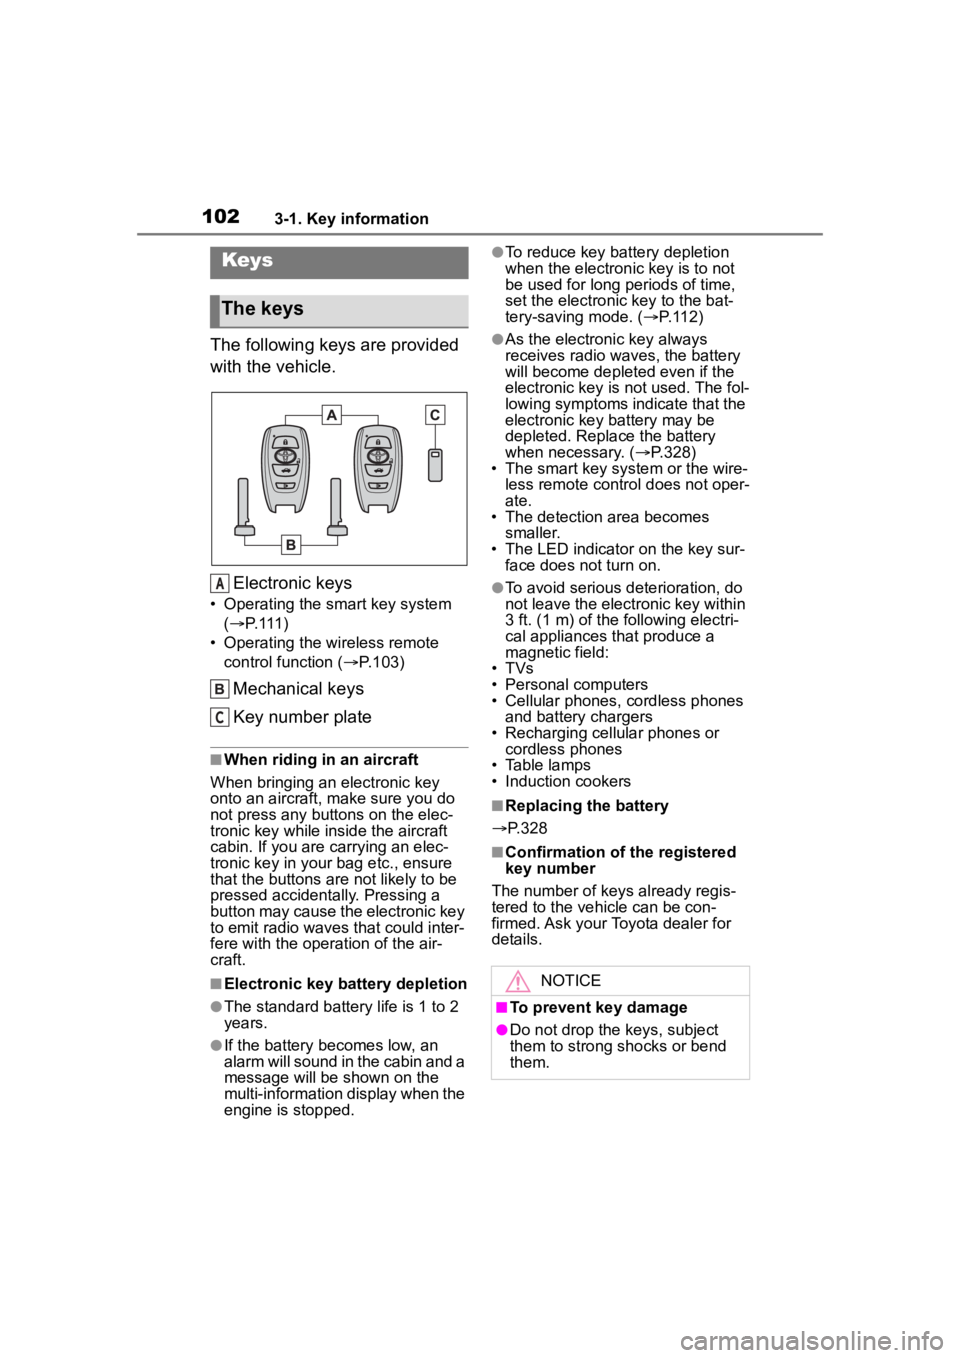
The following keys are provided
with the vehicle.Electronic keys
• Operating the smart key system ( P. 1 1 1 )
• Operating the wireless remote control function ( P.103)
Mechanical keys
Key number plate
■When riding in an aircraft
When bringing an electronic key
onto an aircraft, make sure you do
not press any buttons on the elec-
tronic key while inside the aircraft
cabin. If you are carrying an elec-
tronic key in your bag etc., ensure
that the buttons are not likely to be
pressed accidentally. Pressing a
button may cause the electronic key
to emit radio waves that could inter-
fere with the oper ation of the air-
craft.
■Electronic key battery depletion
●The standard battery life is 1 to 2
years.
●If the battery becomes low, an
alarm will sound in the cabin and a
message will be shown on the
multi-information display when the
engine is stopped.
●To reduce key battery depletion
when the electronic key is to not
be used for long periods of time,
set the electronic key to the bat-
tery-saving mode. ( P. 1 1 2 )
●As the electronic key always
receives radio waves, the battery
will become depleted even if the
electronic key is not used. The fol-
lowing symptoms indicate that the
electronic key battery may be
depleted. Replace the battery
when necessary. ( P.328)
• The smart key system or the wire-
less remote contro l does not oper-
ate.
• The detection area becomes
smaller.
• The LED indicator on the key sur- face does not turn on.
●To avoid serious deterioration, do
not leave the electronic key within
3 ft. (1 m) of the following electri-
cal appliances that produce a
magnetic field:
• TVs
• Personal computers
• Cellular phones, cordless phones and battery chargers
• Recharging cellular phones or cordless phones
• Table lamps
• Induction cookers
■Replacing the battery
P.328
■Confirmation of the registered
key number
The number of keys already regis-
tered to the vehi cle can be con-
firmed. Ask your Toyota dealer for
details.
Keys
The keys
A
C
NOTICE
■To prevent key damage
●Do not drop the keys, subject
them to strong shocks or bend
them.
Page 113 of 449

1133-2. Opening, closing and locking the doors and trunk
3
Before driving
depleted
●Near a TV tower, electric power
plant, gas station, radio station,
large display, airpo rt or other facil-
ity that generates strong radio
waves or electrical noise
●When carrying a portable radio,
cellular phone, cordless phone or
other wireless communication
device
●When the electronic key is in con-
tact with, or is covered by the fol-
lowing metallic objects
• Cards to which al uminum foil is
attached
• Cigarette boxes that have alumi- num foil inside
• Metallic wallets or bags
• Coins
• Hand warmers made of metal
• Media such as CDs and DVDs
●When other wireless keys (that
emit radio waves) are being used
nearby
●When carrying the electronic key
together with the following devices
that emit radio waves
• Another vehicle’s electronic key or
a wireless key that emits radio
waves
• Personal computers or personal
digital assistants (PDAs)
• Digital audio players
• Portable game systems
●If window tint with a metallic con-
tent or metallic objects are
attached to the rear window
●When the electronic key is placed
near a battery charger or elec-
tronic devices
■Note for the entry function
●Even when the electronic key is
within the effective range (detec-
tion areas), the system may not
operate properly in the following
cases:
• The electronic key is too close to the window or outside door han-
dle, near the ground, or in a high
place when the doors are locked or unlocked.
• The electronic key is near the ground or in a high place, or too
close to the rear bumper center
when the trunk is unlocked.
• The electronic key is on the instru-
ment panel, rear package tray or
floor, or in the door pockets or
glove box when the engine is
started or engine switch modes
are changed.
●Do not leave the electronic key on
top of the instrument panel or near
the door pockets when exiting the
vehicle. Depending on the radio
wave reception conditions, it may
be detected by the antenna out-
side the cabin and the doors will
become lockable from the outside,
possibly trapping the electronic
key inside the vehicle.
●As long as the electronic key is
within the effective range, the
doors may be locked or unlocked
by anyone. However, only the
doors detecting the electronic key
can be used to unlock the vehicle.
●Even if the electro nic key is not
inside the vehicle, it may be possi-
ble to start the engine if the elec-
tronic key is near the window.
●The doors may unlock or lock if a
large amount of water splashes on
the door handle, such as in the
rain or in a car wash, when the
electronic key is within the effec-
tive range. (The doors will auto-
matically be locked after
approximately 60 seconds if the
doors are not opened and closed.)
●If the wireless remote control is
used to lock the doors when the
electronic key is near the vehicle,
there is a possib ility that the door
may not be unlocked by the entry
function. (Use the wireless remote
control to unlock the doors.)
●Touching the door lock or unlock
sensor while wearing gloves may
prevent lock or unlock operation.
●When the lock operation is per-
Page 316 of 449
3166-3. Do-it-yourself maintenance
is equipped.
• If a window tint that affects the radio wave signals is installed.
• If there is a lot of snow or ice on the vehicle, particularly around the
wheels or wheel housings.
• If the tire inflation pressure is extremely higher than the speci-
fied level.
• If tires not equipped with tire pres- sure warning valves and transmit-
ters are used.
• If the ID code on the tire pressure warning valves and transmitters is
not registered in the tire pressure
warning computer.
●Performance may be affected in
the following situations.
• When driving near a TV tower, electric power plant, gas station,
radio station, large display, airport
or other facility that generates
strong radio waves or electrical
noise
• When carrying a portable radio, cellular phone, cordless phone or
other wireless communication
device
If tire position information is not cor-
rectly displayed due to the radio
wave conditions, the display may be
corrected by driving and changing
the radio wave conditions.
●When the vehicle is parked, the
time taken for the warning to start
or go off could be extended.
●When tire inflation pressure
declines rapidly for example when
a tire has burst, the warning may
not function.
■Warning performance of the tire
pressure warning system
The warning of the tire pressure
warning system will change in
accordance with driving conditions.
For this reason, the system may
give a warning even if the tire pres-
sure does not reach a low enough
level, or if the p ressure is higher
than the pressure that was adjusted
to when the system was initialized.
When replacing tires or wheels,
tire pressure warning valves and
transmitters must also be
installed.
When new tire pressure warning
valves and transmitters are
installed, new ID codes must be
registered in the tire pressure
warning computer and the tire
pressure warning system must
be initialized. Have tire pressure
warning valve and transmitter ID
codes registered by your Toyota
dealer. ( P.318)
■Replacing tires and wheels
If the ID code of the tire pressure
warning valve and tr ansmitter is not
registered, the tire pressure warning
system will not work properly. After
driving for about 20 minutes, the tire
pressure warning light blinks for 1
minute and stays on to indicate a
system malfunction.
Installing tire pressure
warning valves and trans-
mitters
NOTICE
■Repairing or replacing tires,
wheels, tire pressure warn-
ing valves, transmitters and
tire valve caps
●When removing or fitting the
wheels, tires or the tire pressure
warning valves and transmit-
ters, contact your Toyota dealer
as the tire pressure warning
valves and transmitters may be
damaged if not handled cor-
rectly.
Page 409 of 449
4099-1. For owners
9
For owners
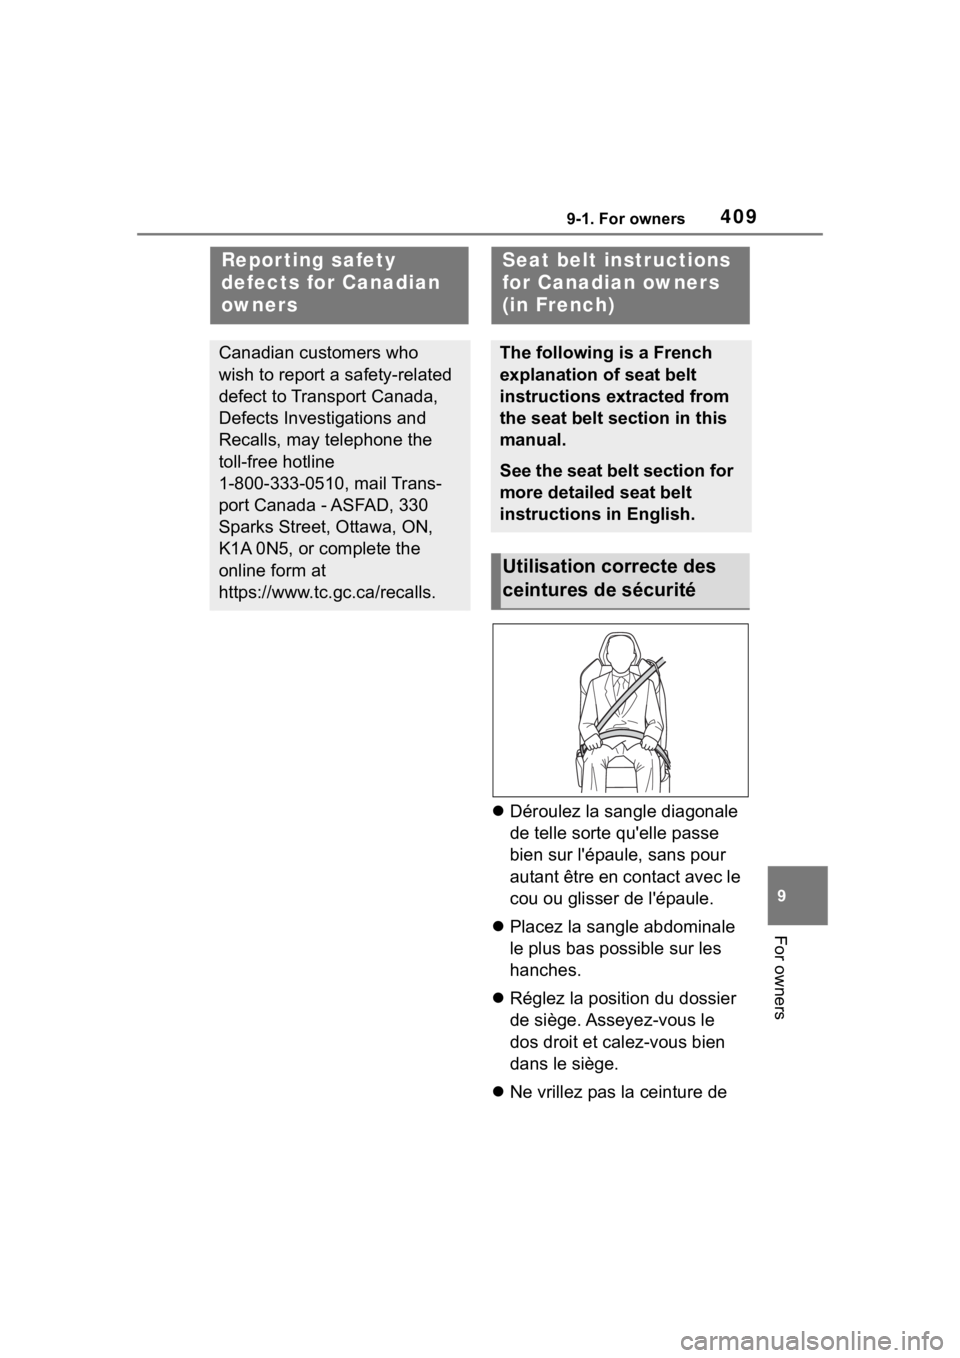
Déroulez la sangle diagonale
de telle sorte qu'elle passe
bien sur l'épaule, sans pour
autant être en contact avec le
cou ou glisser de l'épaule.
Placez la sangle abdominale
le plus bas possible sur les
hanches.
Réglez la position du dossier
de siège. Asseyez-vous le
dos droit et calez-vous bien
dans le siège.
Ne vrillez pas la ceinture de
Repor ting safety
defects for Canadian
owners
Canadian customers who
wish to report a safety-related
defect to Transport Canada,
Defects Investigations and
Recalls, may telephone the
toll-free hotline
1-800-333-0510, mail Trans-
port Canada - ASFAD, 330
Sparks Street, Ottawa, ON,
K1A 0N5, or complete the
online form at
https://www.tc.gc.ca/recalls.
Seat belt instructions
for Canadian owners
(in French)
The following is a French
explanation of seat belt
instructions extracted from
the seat belt section in this
manual.
See the seat belt section for
more detailed seat belt
instructions in English.
Utilisation correcte des
ceintures de sécurité
Page 417 of 449
4179-1. For owners
9
For owners
AVERTISSEMENT
●Ne fixez pas de microphone
mains libres ou tout autre
accessoire sur un montant
avant, un montan t central, un
montant arrière, le pare-brise,
une vitre latérale ou toute autre
surface de l’habitacle qui se
trouverait à proximité d’un cous-
sin gonflable rideau SRS qui se
déploie. Un microphone mains
libres ou un autre accessoire
placé à un tel endroit pourrait
être propulsé à travers l’habita-
cle avec une grande force par le
coussin gonflable rideau, ou
pourrait empêcher le déploie-
ment correct du coussin gon-
flable rideau. Dans les deux
cas, le résultat peut être des
blessures graves.
●Ne posez pas de vêtements ou
d’autres objets sur le dossier du
siège avant et ne collez pas
d’étiquettes ou d’autocollants
sur la surface d u siège avant
sur ou près de coussin gon-
flable latéral SRS. Ils pourraient
empêcher le déploiement cor-
rect du coussin gonflable latéral
SRS, réduisant ainsi la protec-
tion offerte à l’occupant du
siège avant.
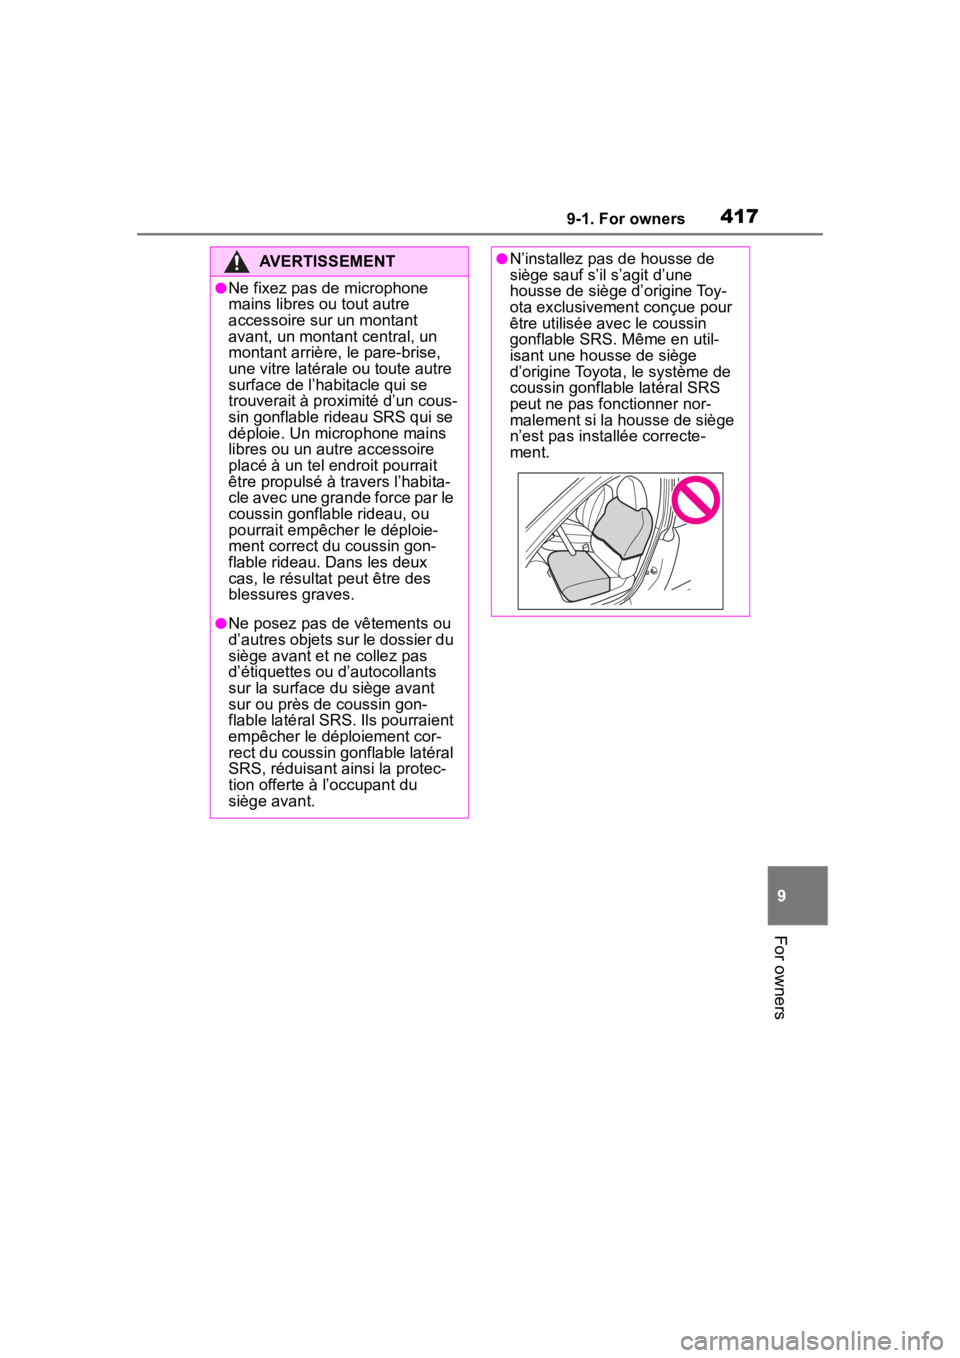
●N’installez pas de housse de
siège sauf s’il s’agit d’une
housse de siège d’origine Toy-
ota exclusivement conçue pour
être utilisée avec le coussin
gonflable SRS. Même en util-
isant une housse de siège
d’origine Toyota, le système de
coussin gonflable latéral SRS
peut ne pas fonctionner nor-
malement si la housse de siège
n’est pas installée correcte-
ment.
Page 420 of 449
4209-1. For owners
AVERTISSEMENT
• Installation de volants person-nalisés
• Fixation de matériaux de garni- ture supplémentaires au tableau
de bord
• Installation de sièges person- nalisés
• Remplacement du tissu ou du cuir de siège
• Installation de tissu ou de cuir supplémentaire sur le siège
avant
• Ne fixez pas un microphone mains libres ou de tout autre
accessoire sur un montant
avant, un montan t central, un
montant arrière, le pare-brise,
une vitre latérale, une poignée
d’assistance ou toute autre sur-
face de l’habitacle qui se trou-
verait à proximité d’un coussin
gonflable rideau SRS qui se
déploie.
• Il est déconseillé d’installer un équipement électrique/électro-
nique supplémentaire, tel
qu’une radio mobile bidirection-
nelle, sur ou à proximité des
composants et/ou du câblage
du système de coussins gonfla-
bles SRS. Cela pourrait nuire au
bon fonctionnement du système
de coussins gonflables SRS.
• Modifications sur ou à l’intérieur des panneaux de porte en vue
du remplacement d’un
haut-parleur ou de l’isolation
acoustique
●Les capteurs d’impact, qui
détectent la pression d’un
impact, sont situés dans les
portes. Ne modifiez aucun élé-
ment des portes ou des garni-
tures de porte, comme l’ajout de
haut-parleurs de porte par
exemple. Toute modification des
portes entraîne un risque de
dysfonctionnement du système
de coussins gonflables ou de
déploiement involontaire de
coussins gonflables.
●N’effectuez pas l’une des opéra-
tions suivantes. De telles modi-
fications peuvent nuire au bon
fonctionnement du système de
coussins gonflables SRS.
• Fixation d’un équipement (barre d’appui, treuils, chasse-neige,
plaque de protection, etc.) autre
que des pièces accessoires
Toyota d’origine sur le train
avant.
• Modification du système de sus- pension ou de la structure
avant.
• Installation d’un pneu de taille et de construction différentes des
pneus spécifiés sur la plaque
d’identification du véhicule fixée
au montant central du conduc-
teur ou spécifiés pour les
modèles de véhicules individu-
els dans ce Manuel du pro-
priétaire.
• Fixation de tout équipement (marchepieds latéraux ou pro-
tections de bas de caisse, etc.)
autre que des pièces acces-
soires d’origine Toyota sur la
carrosserie latérale.
Consultez toujours votre conces-
sionnaire Toyota si vous souhai-
tez installer des pièces
accessoires sur votre véhicule.