Page 12 of 296
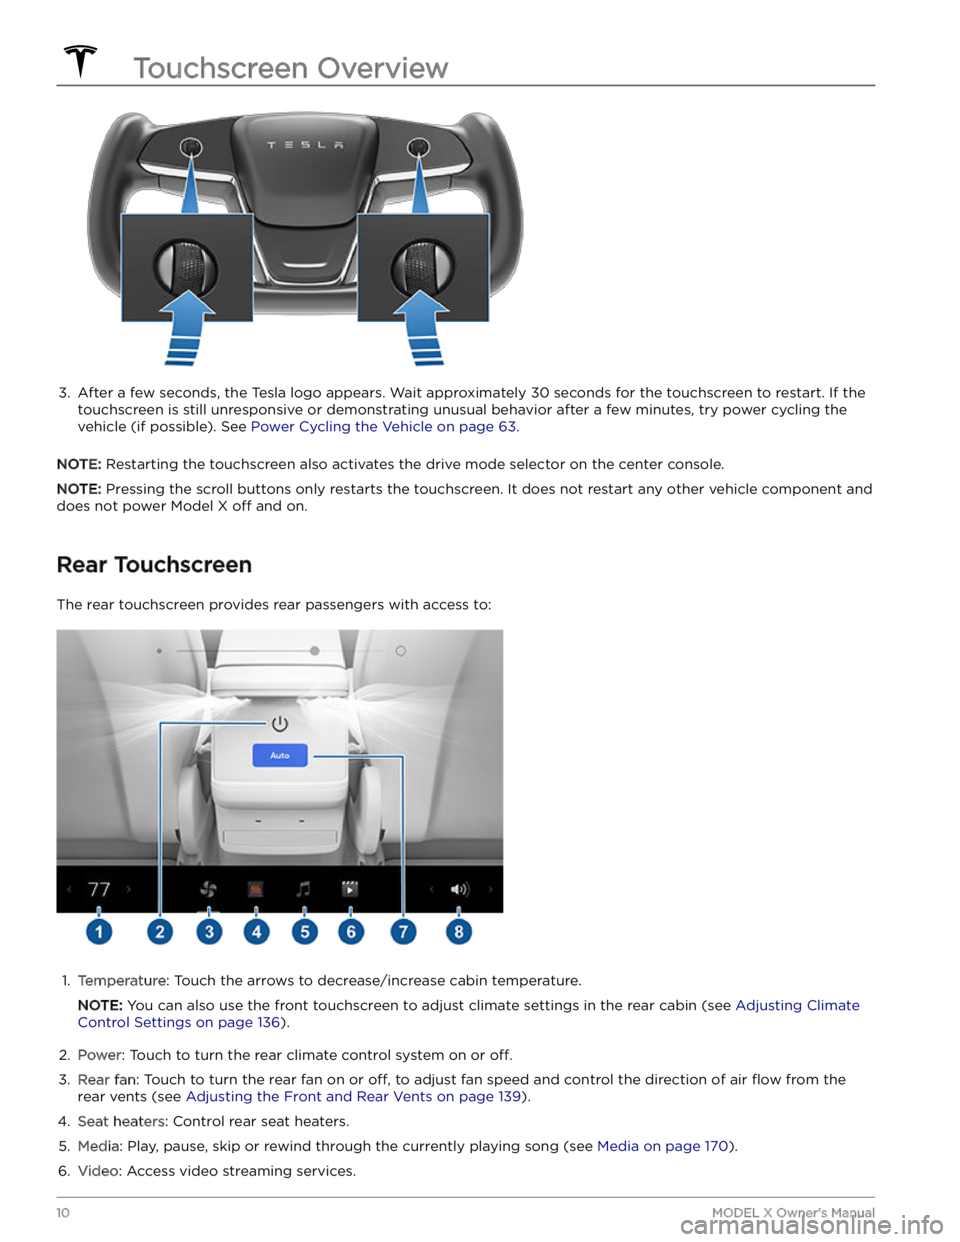
3.
After a few seconds, the Tesla logo appears. Wait approximately 30 seconds for the touchscreen to restart. If the
touchscreen is still unresponsive or demonstrating unusual behavior after a few minutes, try power cycling the
vehicle (if possible). See
Power Cycling the Vehicle on page 63.
NOTE: Restarting the touchscreen also activates the drive mode selector on the center console.
NOTE: Pressing the scroll buttons only restarts the touchscreen. It does not restart any other vehicle component and
does not power
Model X off and on.
Rear Touchscreen
The rear touchscreen provides rear passengers with access to:
1.
Temperature: Touch the arrows to decrease/increase cabin temperature.
NOTE: You can also use the front touchscreen to adjust climate settings in the rear cabin (see Adjusting Climate
Control Settings on page 136).
2.
Power: Touch to turn the rear climate control system on or off.
3.
Rear fan: Touch to turn the rear fan on or off, to adjust fan speed and control the direction of air flow from the
rear vents (see
Adjusting the Front and Rear Vents on page 139).
4.
Seat heaters: Control rear seat heaters.
5.
Media: Play, pause, skip or rewind through the currently playing song (see Media on page 170).
6.
Video: Access video streaming services.
Touchscreen Overview
10MODEL X Owner
Page 32 of 296
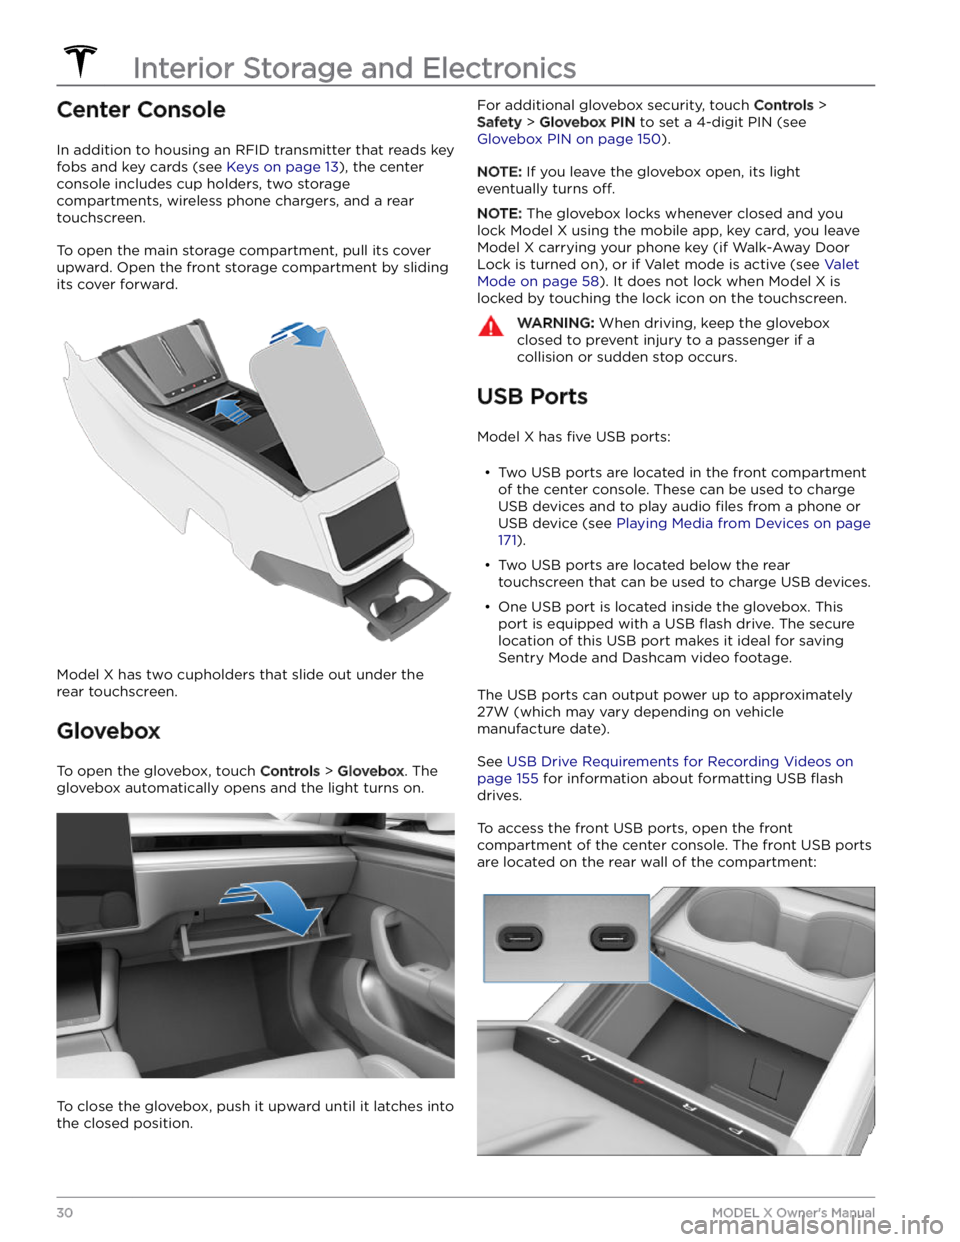
Center Console
In addition to housing an RFID transmitter that reads key fobs and key cards (see
Keys on page 13), the center
console includes cup holders, two storage
compartments, wireless phone chargers, and a rear
touchscreen.
To open the main storage compartment, pull its cover upward. Open the front storage compartment by sliding its cover forward.
Model X has two cupholders that slide out under the
rear touchscreen.
Glovebox
To open the glovebox, touch Controls > Glovebox. The
glovebox automatically opens and the light turns on.
To close the glovebox, push it upward until it latches into the closed position.
For additional glovebox security, touch Controls >
Safety > Glovebox PIN to set a 4-digit PIN (see
Glovebox PIN on page 150).
NOTE: If you leave the glovebox open, its light
eventually turns
off.
NOTE: The glovebox locks whenever closed and you
lock
Model X using the mobile app, key card, you leave
Model X carrying your phone key (if Walk-Away Door
Lock is turned on), or if Valet mode is active (see
Valet
Mode on page 58). It does not lock when Model X is
locked by touching the lock icon on the touchscreen.
WARNING: When driving, keep the glovebox
closed to prevent injury to a passenger if a
collision or sudden stop occurs.
USB Ports
Model X has five USB ports:
Page 68 of 296
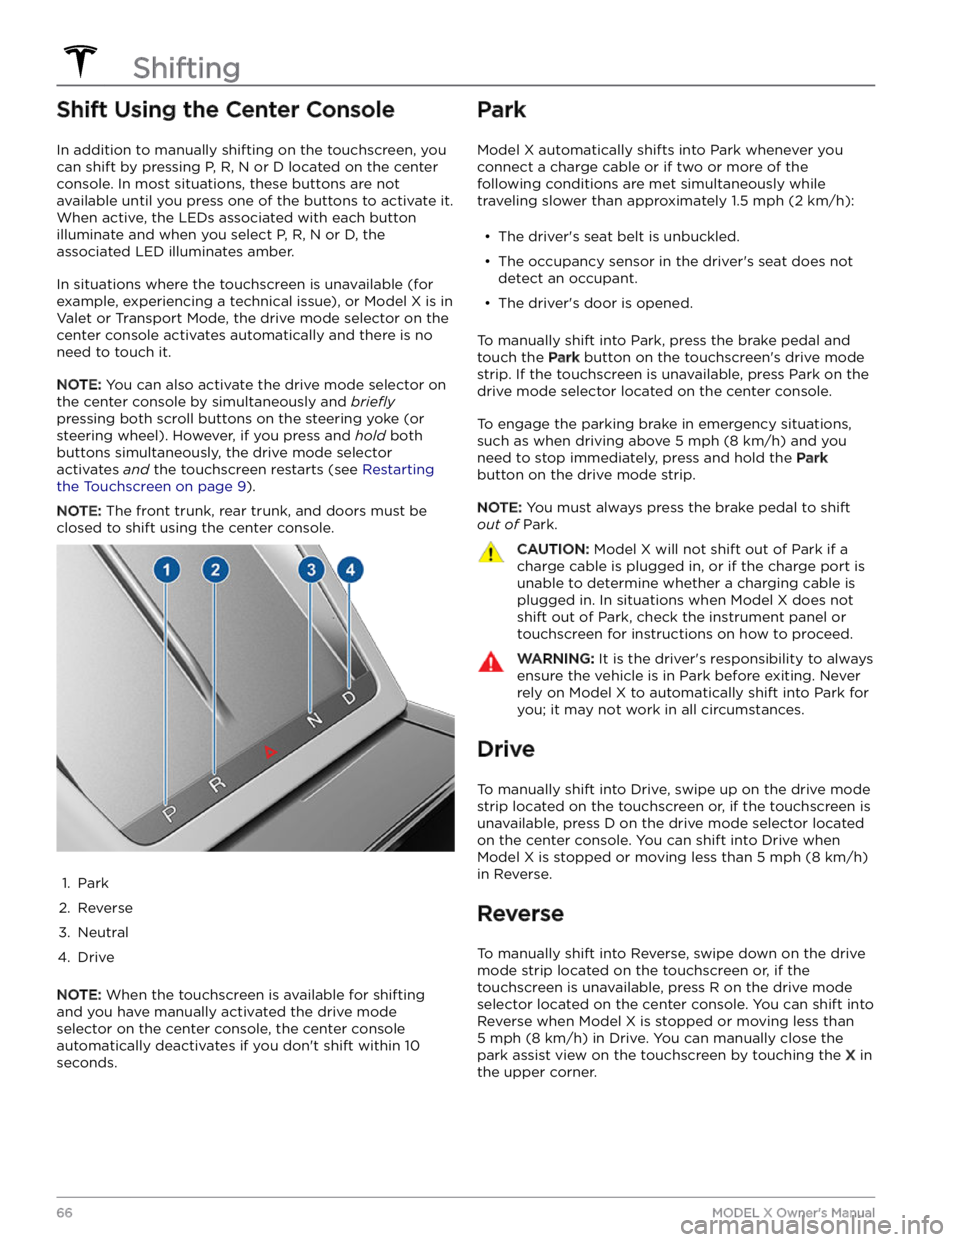
Shift Using the Center Console
In addition to manually shifting on the touchscreen, you
can shift by pressing P, R, N or D located on the center console. In most situations, these buttons are not available until you press one of the buttons to activate it. When active, the LEDs associated with each button illuminate and when you select P, R, N or D, the associated LED illuminates amber.
In situations where the touchscreen is unavailable (for
example, experiencing a technical issue), or
Model X is in
Valet or Transport Mode, the drive mode selector on the
center console activates automatically and there is no need to touch it.
NOTE: You can also activate the drive mode selector on
the center console by simultaneously and
briefly
pressing both scroll buttons on the steering yoke (or
steering wheel). However, if you press and hold both
buttons simultaneously, the drive mode selector
activates
and the touchscreen restarts (see Restarting
the Touchscreen on page 9).
NOTE: The front trunk, rear trunk, and doors must be
closed to shift using the center console.
1.
Park
2.
Reverse
3.
Neutral
4.
Drive
NOTE: When the touchscreen is available for shifting
and you have manually activated the drive mode selector on the center console, the center console automatically deactivates if you don
Page 72 of 296
If the AFS fails, the instrument panel displays an alert. Contact Tesla Service.
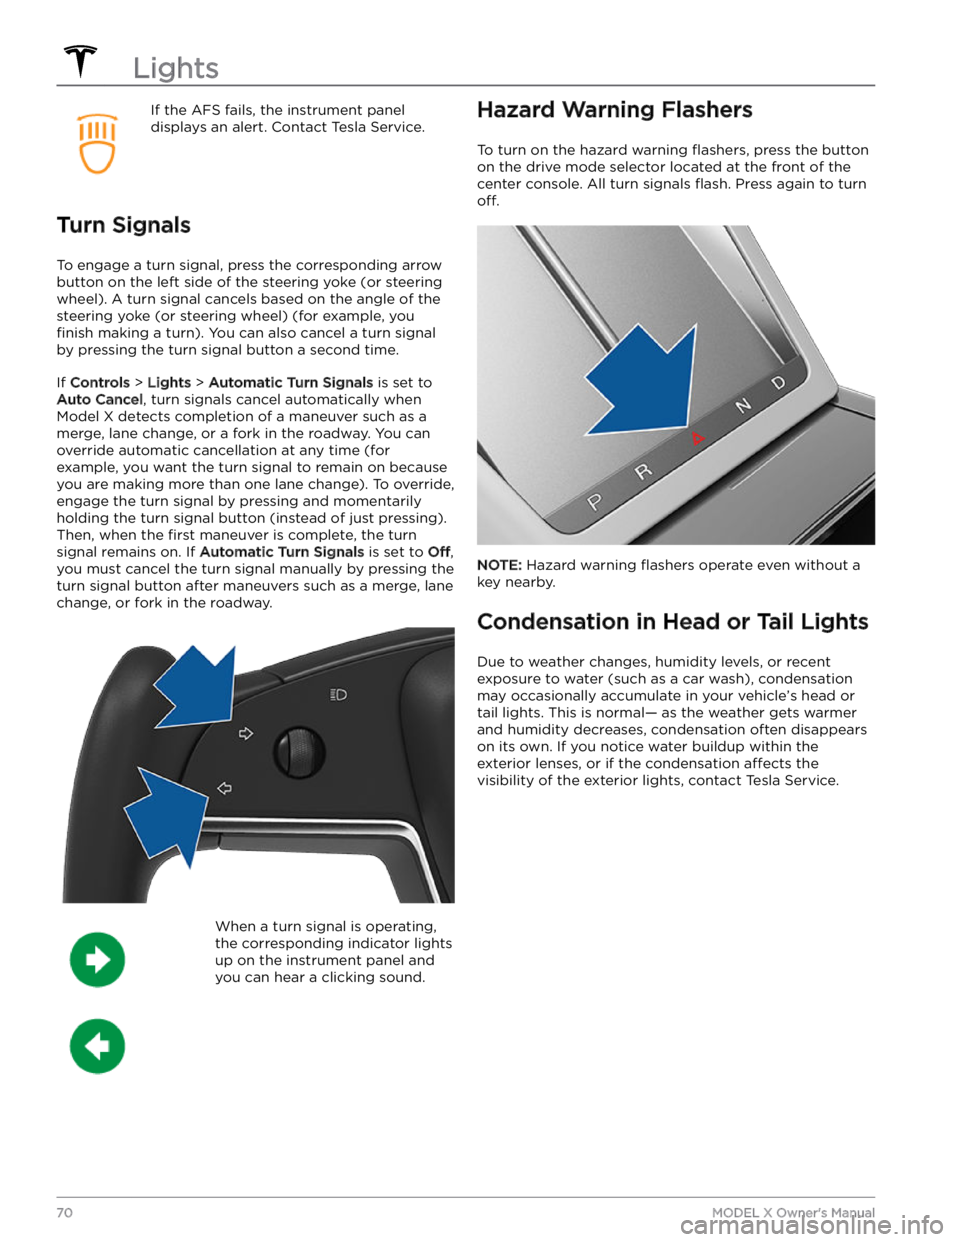
Turn Signals
To engage a turn signal, press the corresponding arrow
button on the left side of the
steering yoke (or steering
wheel). A turn signal cancels based on the angle of the
steering yoke (or steering wheel) (for example, you
finish making a turn). You can also cancel a turn signal
by pressing the turn signal button a second time.
If Controls > Lights > Automatic Turn Signals is set to
Auto Cancel, turn signals cancel automatically when
Model X detects completion of a maneuver such as a
merge, lane change, or a fork in the roadway. You can override automatic cancellation at any time (for
example, you want the turn signal to remain on because
you are making more than one lane change). To override,
engage the turn signal by pressing and momentarily
holding the turn signal button (instead of just pressing). Then, when the
first maneuver is complete, the turn
signal remains on. If
Automatic Turn Signals is set to Off,
you must cancel the turn signal manually by pressing the
turn signal button after maneuvers such as a merge, lane change, or fork in the roadway.
When a turn signal is operating,
the corresponding indicator lights
up on the instrument panel and
you can hear a clicking sound.Hazard Warning Flashers
To turn on the hazard warning flashers, press the button
on the drive mode selector located at the front of the center console. All turn signals
flash. Press again to turn
off.
NOTE: Hazard warning flashers operate even without a
key nearby.
Condensation in Head or Tail Lights
Due to weather changes, humidity levels, or recent exposure to water (such as a car wash), condensation may occasionally accumulate in your vehicle
Page 141 of 296
Adjusting the Front and Rear Vents
Model X has a unique horizontal face-level vent that spans the width of the dashboard. It also has vents at the top
and bottom of the rear console.
1.
Driver vents
2.
Driver controls
3.
Passenger controls
4.
Passenger vents
5.
Rear vents
6.
Rear controls
Using the touchscreens, you can pinpoint exactly where you want to direct the air flowing from this vent when
heating or cooling the cabin. When the face-level vent is on you can adjust the direction of the air
flow from each
vent. To adjust the direction of the air
flow, touch the radiating air waves from the corresponding vent on the
touchscreen. The air
flows in a single stream when centered or splits into mirrored air streams when air is directed
outward or inward from the center of the vent.
Climate Controls
139Using the Touchscreen
Page 174 of 296
USB Connected Flash Drives
Insert a flash drive into a front USB port (see USB Ports
on page 30). Touch Media Player > USB, and then touch
the name of the folder that contains the song you want to play. After you display the contents of a folder on the USB connected
flash drive, you can touch any song in
the list to play it. Or use the previous and next arrows in
Media Player to scroll through your songs. You can also
scroll to next/previous songs using the left scroll button on the
steering yoke (or steering wheel).
NOTE: To play media from a USB connection, Model X
recognizes flash drives only. To play media from other
types of devices (such as an iPod), you must connect the device using Bluetooth.
NOTE: Media Player supports USB flash drives with
exFAT formatting (NTFS is not currently supported).
NOTE: Use a USB port located at the front of the center
console. The USB connections at the rear of the console are for charging only.
Bluetooth Connected Devices
If you have a Bluetooth-capable device such as a phone that is paired and connected to
Model X (see Pairing a
Bluetooth Phone on page 143), you can play audio files
stored on it. Choose Media Player