2023 SUBARU SOLTERRA inflation pressure
[x] Cancel search: inflation pressurePage 535 of 628
5358-2. Steps to take in an emergency
Owners Manual_USA_M42C01_en
8
When trouble arises
the vehicle ma y get dirty.
24Store the bottle in the lug-
gage compartment while it is
connected to the compres-
sor.
25 Taking precautions to avoid
sudden braking, sudden
acceleration and sharp turns,
drive carefully at under 50
mph (80 km/h) to the nearest
Toyota dealer that is less
than 62 miles (100 km) away
for tire repair or replacement.
For repair and replacement of a tire
or disposal of the tire puncture
repair kit, contact your Toyota
dealer.
When having the tire repaired or
replaced, make sure to tell the Toy-
ota dealer that the sealant is
injected.
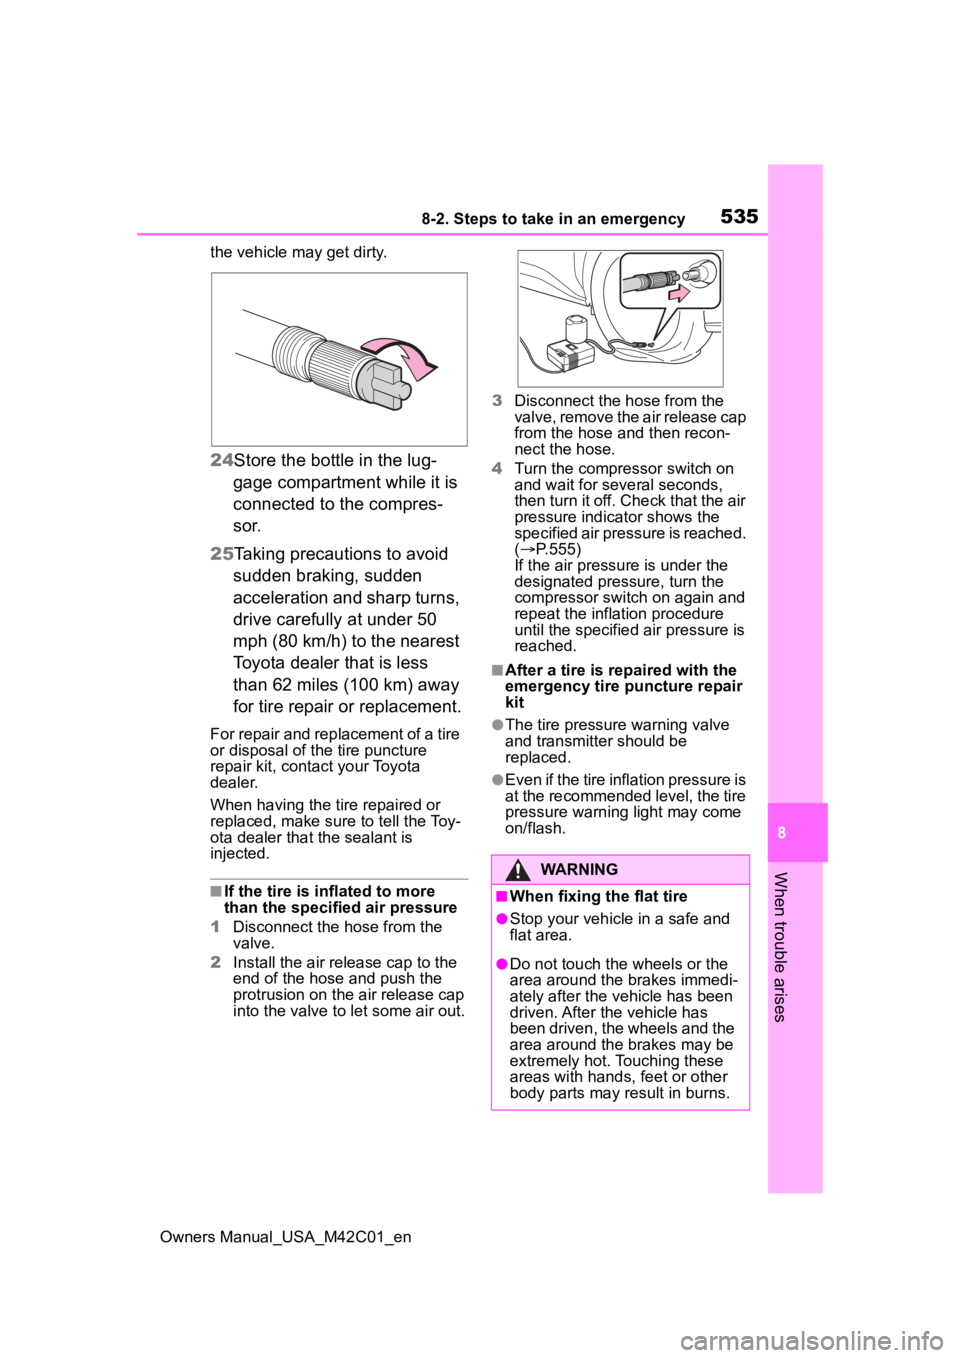
■If the tire is i nflated to more
than the specified air pressure
1 Disconnect the hose from the
valve.
2 Install the air release cap to the
end of the hose and push the
protrusion on the air release cap
into the valve to let some air out. 3
Disconnect the hose from the
valve, remove the air release cap
from the hose and then recon-
nect the hose.
4 Turn the compressor switch on
and wait for seve ral seconds,
then turn it off. Check that the air
pressure indicator shows the
specified air pressure is reached.
( P.555)
If the air pressure is under the
designated pressure, turn the
compressor switch on again and
repeat the inflation procedure
until the specified air pressure is
reached.
■After a tire is re paired with the
emergency tire puncture repair
kit
●The tire pressure warning valve
and transmitter should be
replaced.
●Even if the tire inflation pressure is
at the recommended level, the tire
pressure warning light may come
on/flash.
WARNING
■When fixing the flat tire
●Stop your vehicle in a safe and
flat area.
●Do not touch the wheels or the
area around the brakes immedi-
ately after the vehicle has been
driven. After the vehicle has
been driven, the wheels and the
area around the brakes may be
extremely hot. Touching these
areas with hands, feet or other
body parts may result in burns.
Page 536 of 628
5368-2. Steps to take in an emergency
Owners Manual_USA_M42C01_en
WARNING
●Connect the valve and hose
securely with the tire installed
on the vehicle.
If the hose is not properly con-
nected to the valve, air leakage
may occur as sealant may be
sprayed out.
●If the hose comes off the valve
while inflating the tire, there is a
risk that the hose will move
abruptly due to air pressure.
●After inflation of the tire has
completed, the sealant may
splatter when the hose is dis-
connected or some air is let out
of the tire.
●Follow the operation procedure
to repair the tire. If the proce-
dure is not followed, the sealant
may spray out.
●Keep back from the tire while it
is being repaired, as there is a
chance of it bursting while the
repair operation is being per-
formed. If you notice any cracks
or deformation of the tire, turn
off the compressor switch and
stop the repair operation imme-
diately.
●The repair kit may overheat if
operated for a long period of
time. Do not operate the com-
pressor continuously for more
than 40 minutes.
●Parts of the repair kit become
hot during operation. Be careful
handling the repair kit during
and after operation. Do not
touch the metal part connecting
the bottle and the compressor. It
will be extremely hot.
●Do not attach the vehicle speed
warning sticker to an area other
than the one indicated. If the
sticker is attached to an area
where an SRS airbag is located,
such as the pad of the steering
wheel, it may prevent the SRS
air bag from operating properly.
■Driving to spread the liquid
sealant evenly
Observe the following precautions
to reduce the risk of accidents.
Failing to do so may result in a
loss of vehicle control and cause
death or serious injury.
●Drive the vehicle carefully at a
low speed. Be especially careful
when turning and cornering.
●If the vehicle does not drive
straight or you feel a pull
through the steering wheel, stop
the vehicle and check the fol-
lowing:
• Tire condition. The tire may have separated from the wheel.
• Tire inflation pressure. If the tire inflation pressure is 19 psi (130
kPa, 1.3 kgf/cm
2 or bar) or less,
the tire may be severely dam-
aged.
NOTICE
■When performing an emer-
gency repair
●Perform the emergency repair
without removing the nail or
screw that has punctured the
tread of the tire. If the object
that has punctur ed the tire is
removed, repair by the emer-
gency tire puncture repair kit
may not be possible.
●The repair kit is not waterproof.
Make sure that the repair kit is
not exposed to water, such as
when it is being used in the rain.
Page 555 of 628

5559-1. Specifications
Owners Manual_USA_M42C01_en
9
Vehicle specifications
*2: Make sure to confirm that the brake system warning light (yell ow) does
not illuminate. (If th e brake system warning light illuminates, refer to
P.513)
Vehicles with 18-inch wheels
Vehicles with 20-inch wheels
Steering
Free playLess than 1.2 in. (30 mm)
Tires and wheels
Tire size235/60R18 103V
Tire inflation pressure
(Recommended cold tire infla-
tion pressure)
Front:
38 psi (260 kPa, 2.6 kgf/cm
2 or bar)
Rear:
38 psi (260 kPa, 2.6 kgf/cm
2 or bar)
Wheel size18 x 7 1/2J
Wheel bolt torque103 ft•lbf (140 N•m, 14.3 kgf•m)
Tire size235/50R20 100V
Tire inflation pressure
(Recommended cold tire infla-
tion pressure)
Front:
38 psi (260 kPa, 2.6 kgf/cm
2 or bar)
Rear:
38 psi (260 kPa, 2.6 kgf/cm
2 or bar)
Wheel size20 x 7 1/2J
Wheel bolt torque103 ft•lbf (140 N•m, 14.3 kgf•m)
Page 556 of 628
5569-1. Specifications
Owners Manual_USA_M42C01_en
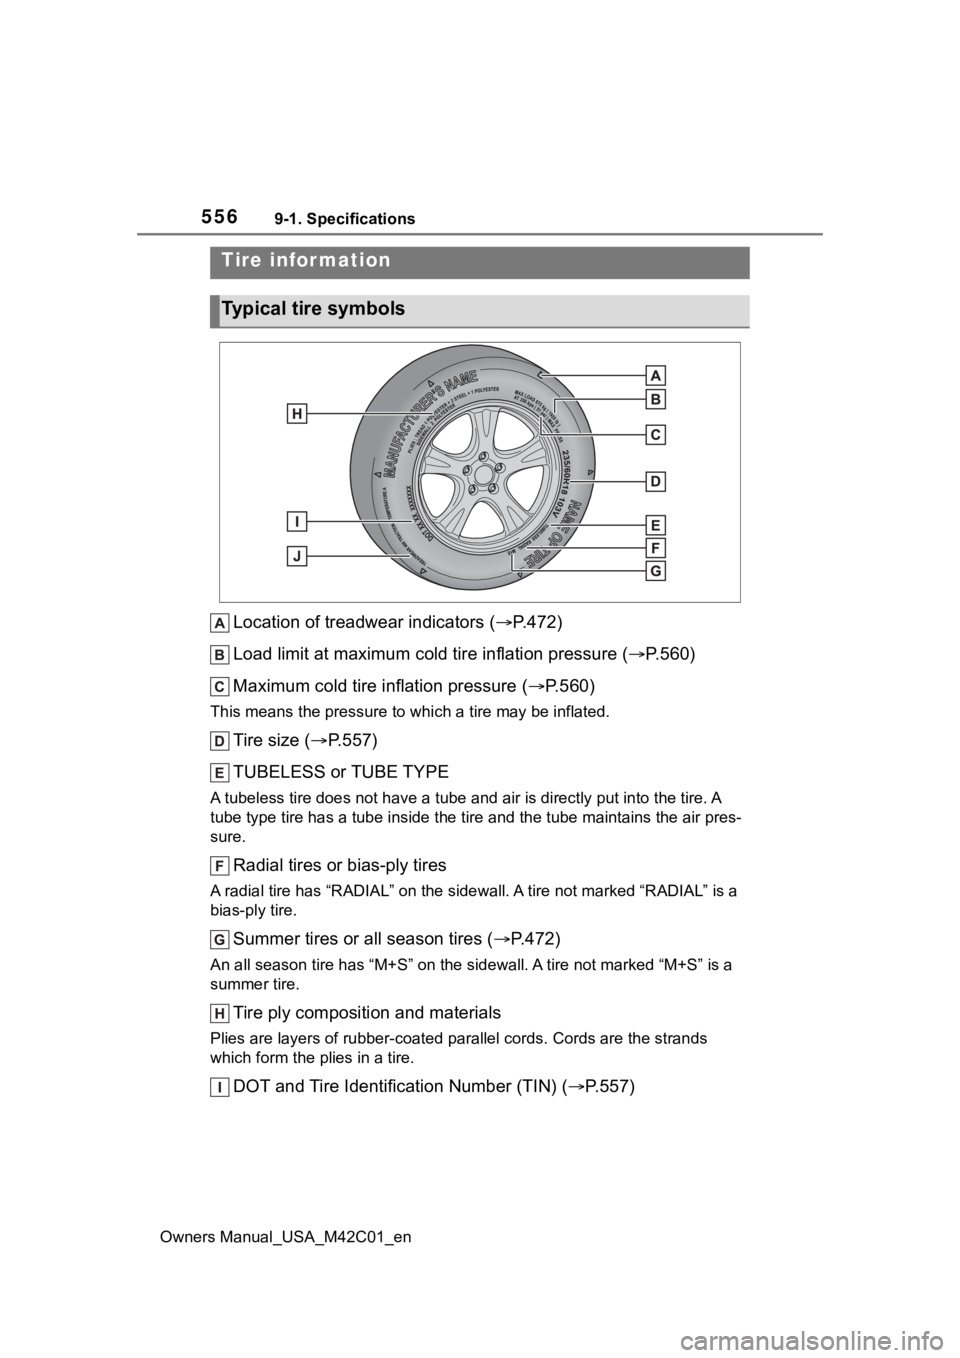
Location of treadwear indicators (P.472)
Load limit at maximum cold tire inflation pressure (P.560)
Maximum cold tire inflation pressure ( P.560)
This means the pressure to w hich a tire may be inflated.
Tire size (P.557)
TUBELESS or TUBE TYPE
A tubeless tire does not have a tube and air is directly put into the tire. A
tube type tire has a tube inside t he tire and the tube maintains the air pres-
sure.
Radial tires or bias-ply tires
A radial tire has “RADIAL” on the sidewall. A tire not marked “ RADIAL” is a
bias-ply tire.
Summer tires or all season tires ( P.472)
An all season tire has “M+S” on the sidewal l. A tire not marked “M+S” is a
summer tire.
Tire ply composition and materials
Plies are layers of rubber-coat ed parallel cords. Cords are the strands
which form the pl ies in a tire.
DOT and Tire Identification Number (TIN) ( P.557)
Tire information
Typical tire symbols
Page 560 of 628

5609-1. Specifications
Owners Manual_USA_M42C01_enheat buildup and possible tire fail- ure.
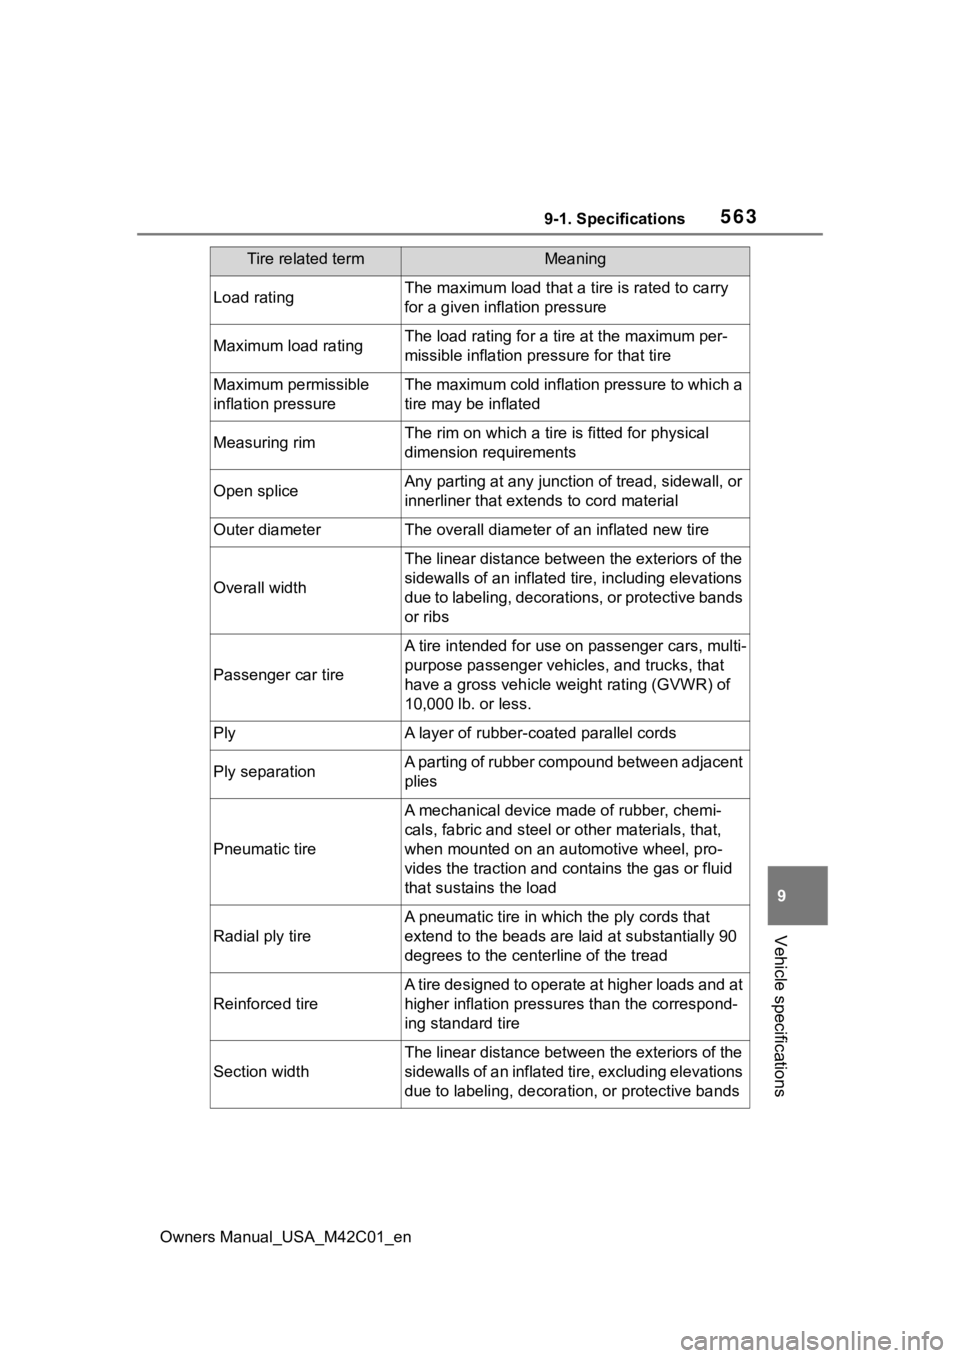
Glossary of tire terminology
Tire related termMeaning
Cold tire inflation pres-
sureTire pressure when the vehicle has been parked
for three hours or more, or has not been driven
more than 1 mile or 1.5 km under that condition
Maximum inflation pres-
sureThe maximum cold inflated pressure to which a
tire may be inflated, shown on the sidewall of
the tire
Recommended inflation
pressureCold tire inflation pressure recommended by a
manufacturer
Accessory weight
The combined weight (in
excess of those stan-
dard items which may be replaced) of transmis-
sion, power steering, power brakes, power
windows, power seats, radio and heater, to the
extent that these items are available as factory-
installed equipment (whether installed or not)
Curb weight
The weight of a motor vehicle with standard
equipment, including th e maximum capacity of
traction battery and coolant, and if so equipped,
air conditioning and additional weight optional
traction motor
Maximum loaded vehicle
weight
The sum of:
(a) Curb weight
(b) Accessory weight
(c) Vehicle capacity weight
(d) Production options weight
Normal occupant weight
150 lb. (68 kg) times the number of occupants
specified in the second column of Table 1
* that
follows
Occupant distributionDistribution of occupant s in a vehicle as speci-
fied in the third column of Table 1
* below
Page 562 of 628
5629-1. Specifications
Owners Manual_USA_M42C01_en
CarcassThe tire structure, except tread and sidewall
rubber which, when inflated, bears the load
ChunkingThe breaking away of pieces of the tread or
sidewall
CordThe strands forming the plies in the tire
Cord separationThe parting of cords from adjacent rubber com-
pounds
CrackingAny parting withi n the tread, sidewall, or inner-
liner of the tire extend ing to cord material
CT
A pneumatic tire with an inverted flange tire and
rim system in which the rim is designed with rim
flanges pointed radially inward and the tire is
designed to fit on the underside of the rim in a
manner that encloses the rim flanges inside the
air cavity of the tire
Extra load tire
A tire designed to operate at higher loads and at
higher inflation pressures than the correspond-
ing standard tire
GrooveThe space between two adjacent tread ribs
Innerliner
The layer(s) forming th e inside surface of a
tubeless tire that contains the inflating medium
within the tire
Innerliner separationThe parting of the innerliner from cord material
in the carcass
Intended outboard side-
wall
(a)The sidewall that conta ins a whitewall, bears
white lettering, or bear s manufacturer, brand,
and/or model name molding that is higher or
deeper than the same molding on the other
sidewall of the tire, or
(b)The outward facing sidewall of an asymmetri-
cal tire that has a par ticular side that must
always face outward whe n mounted on a vehi-
cle
Light truck (LT) tire
A tire designated by its manufacturer as primar-
ily intended for use on lightweight trucks or mul-
tipurpose passenger vehicles
Tire related termMeaning
Page 563 of 628
5639-1. Specifications
Owners Manual_USA_M42C01_en
9
Vehicle specifications
Load ratingThe maximum load that a tire is rated to carry
for a given inflation pressure
Maximum load ratingThe load rating for a tire at the maximum per-
missible inflation pressure for that tire
Maximum permissible
inflation pressureThe maximum cold inflation pressure to which a
tire may be inflated
Measuring rimThe rim on which a tire is fitted for physical
dimension requirements
Open spliceAny parting at any junction of tread, sidewall, or
innerliner that extends to cord material
Outer diameterThe overall diameter o f an inflated new tire
Overall width
The linear distance between the exteriors of the
sidewalls of an inflated ti re, including elevations
due to labeling, decorations, or protective bands
or ribs
Passenger car tire
A tire intended for use on passenger cars, multi-
purpose passenger vehicles, and trucks, that
have a gross vehicle weight rating (GVWR) of
10,000 lb. or less.
PlyA layer of rubber-coated parallel cords
Ply separationA parting of rubber compound between adjacent
plies
Pneumatic tire
A mechanical device made of rubber, chemi-
cals, fabric and steel or other materials, that,
when mounted on an aut omotive wheel, pro-
vides the traction and co ntains the gas or fluid
that sustains the load
Radial ply tire
A pneumatic tire in which the ply cords that
extend to the beads are laid at substantially 90
degrees to the centerline of the tread
Reinforced tire
A tire designed to operate at higher loads and at
higher inflation pressures than the correspond-
ing standard tire
Section width
The linear distance between the exteriors of the
sidewalls of an inflated tire, excluding elevations
due to labeling, decoratio n, or protective bands
Tire related termMeaning
Page 577 of 628

5779-3. Initialization
Owners Manual_USA_M42C01_en
9
Vehicle specifications
9-3.Initialization
*: If equipped
Items to initialize
The following items must be initialized for normal system
operation after such cases as the battery being reconnected,
or maintenance being performed on the vehicle:
List of the items to initialize
ItemWhen to initializeReference
Power back door*• After reconnecting or chang- ing the 12-volt battery
• After changing a fuse
P.181
Power window• When functioning abnor- mallyP.212
PKSB (Parking Support
Brake)*• After reconnecting or chang-ing the 12-volt batteryP.335
Tire pressure warning system
• When the specified tire infla-tion pressure has changed,
such as due to carried load,
etc.
• When the tire inflation pres- sure is changed such as
when the tire size is
changed.
P.477
Panoramic view monitor*
• 12-volt battery has been reinstalled
• The steering wheel has been moved while the 12-
volt battery was being rein-
stalled
• 12-volt battery power is low
Refer to
“MULTIME- DIA
OWNER’S
MANUAL”.