2023 SUBARU BRZ brake light
[x] Cancel search: brake lightPage 152 of 432
Warning and Indicator Lights
146
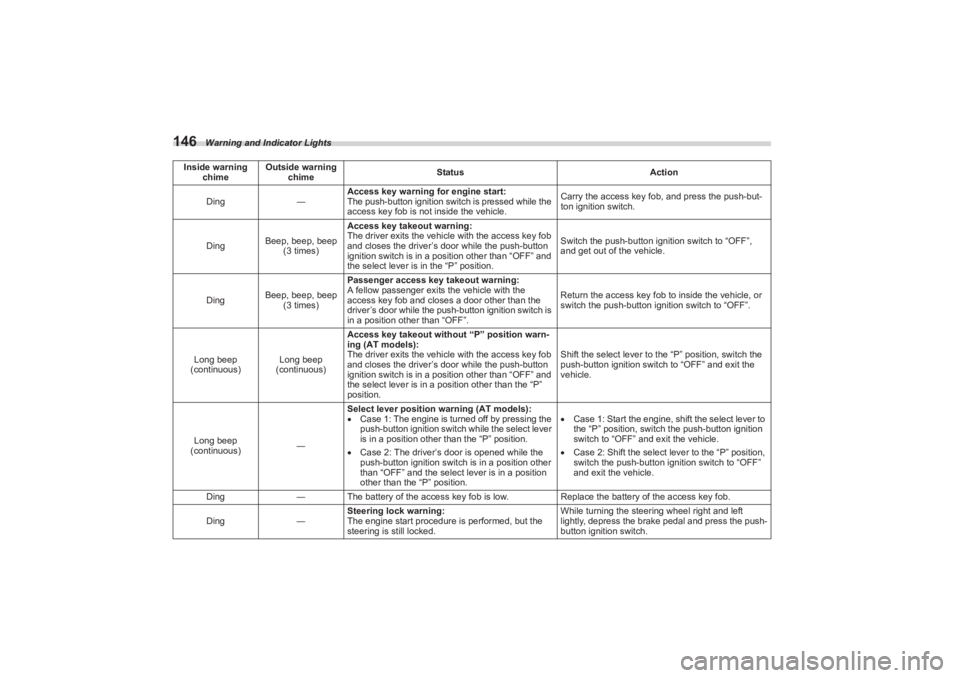
Ding―Access key warning for engine start:
The push-button ignition switch is pressed while the
access key fob is not
inside the vehicle. Carry the access key fob, and press the push-but-
ton ignition switch.
Ding Beep, beep, beep
(3 times) Access key takeout warning:
The driver exits the vehicl
e with the access key fob
and closes the driver’s door while the push-button
ignition switch is in a position other than “OFF” and
the select lever is in the “P” position. Switch the push-button ignition switch to “OFF”,
and get out of the vehicle.
Ding Beep, beep, beep
(3 times) Passenger access key takeout warning:
A fellow passenger exits the vehicle with the
access key fob and closes a door other than the
driver’s door while the push
-button ignition switch is
in a position other than “OFF”. Return the access key fob
to inside the vehicle, or
switch the push-button ignition switch to “OFF”.
Long beep
(continuous) Long beep
(continuous) Access key takeout without “P” position warn-
ing (AT models):
The driver exits the vehicl
e with the access key fob
and closes the driver’s door while the push-button
ignition switch is in a position other than “OFF” and
the select lever is in a position other than the “P”
position. Shift the select lever to the “P” position, switch the
push-button ignition switch to “OFF” and exit the
vehicle.
Long beep
(continuous) ―Select lever position warning (AT models):
Case 1: The engine is turned off by pressing the
push-button ignition switch while the select lever
is in a position other than the “P” position.
Case 2: The driver’s door is opened while the
push-button ignition switch is in a position other
than “OFF” and the select lever is in a position
other than the “P” position.
Case 1: Start the engine, shift the select lever to
the “P” position, switch the push-button ignition
switch to “OFF” and exit the vehicle.
Case 2: Shift the select lever to the “P” position,
switch the push-button ignition switch to “OFF”
and exit the vehicle.
Ding ―The battery of the access ke y fob is low.Replace the battery of the access key fob.
Ding ―Steering lock warning:
The engine start procedure is performed, but the
steering is still locked. While turning the steering wheel right and left
lightly, depress the brake pedal and press the push-
button ignition switch.
Inside warning
chime Outside warning
chime Status
Action
BRZ_U.book 146 ページ 2022年3月29日 火曜日 午後3時59分
Page 160 of 432
Combination Meter Display (Color TFT)
154Pressing and holding will reset the
average vehicle speed/driving time/
driving distance.▼ Drive information (page 4) (if
equipped)
This screen displays each tire pressure.
When a tire is deflated, the deflated tire
and the tire pressure will be displayed on
the screen in yellow.NOTE The tire pressure values are
displayed several minutes after
driving.
Once the tire pressure monitoring
system detects the low tire pressure,
the tire pressure values will display in
yellow until the system detects the
normal tire pressure.
Immediately adjust the tire pressure
when the warning light illuminates.
When the tire pr essure monitoring
system detects the adjusted tire pres-
sure, the warning ligh t will turn off and
the tire pressure values will turn to
white.
For information about the specified
value of the air pressure, refer to
"Tires" P385
■ Exclusive Content for
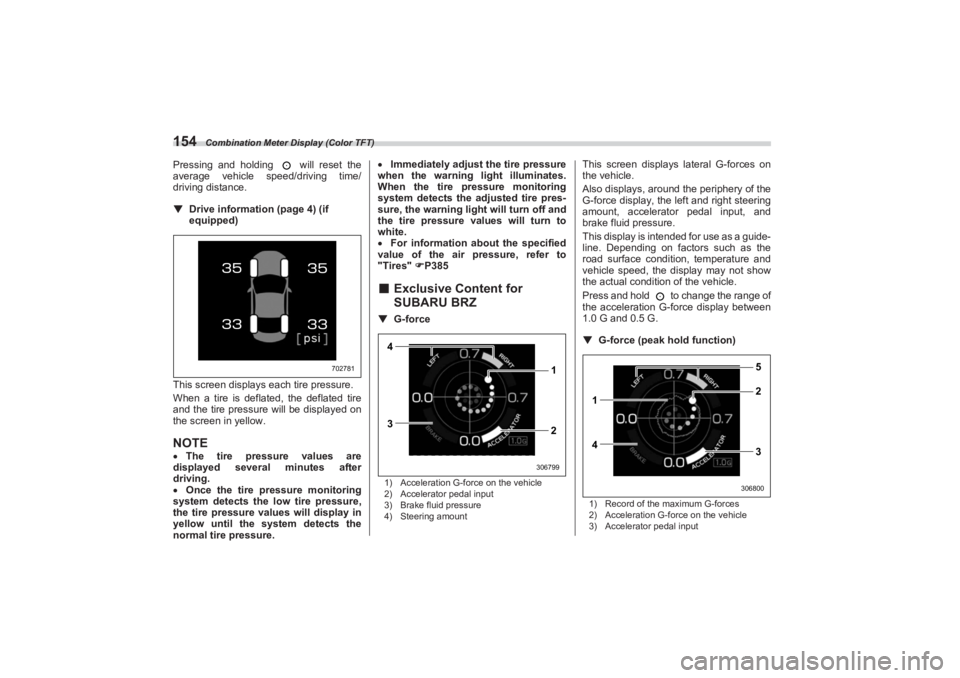
SUBARU BRZ▼ G-force1) Acceleration G-force on the vehicle
2) Accelerator pedal input
3) Brake fluid pressure
4) Steering amount
This screen displays lateral G-forces on
the vehicle.
Also displays, around the periphery of the
G-force display, the left and right steering
amount, accelerator pedal input, and
brake fluid pressure.
This display is intended for use as a guide-
line. Depending on factors such as the
road surface conditi on, temperature and
vehicle speed, the display may not show
the actual condition of the vehicle.
Press and hold to change the range of
the acceleration G-force display between
1.0 G and 0.5 G.
▼ G-force (peak ho ld function)1) Record of the maximum G-forces
2) Acceleration G-force on the vehicle
3) Accelerator pedal input
702781
4
3 1
2
306799
1
42 5
3
306800
BRZ_U.book 154 ページ 2022年3月29日 火曜日 午後3時59分
Page 180 of 432
Light Control Switch
1743-10. Light Control SwitchThe light control switch operates when the
push-button ignition switch is in the “ACC”
or “ON” position.
Regardless of the pos ition of the light
control switch, the illuminated lights are
turned off when the push-button ignition
switch is turned off.NOTEThe light control switch can be oper-
ated (except auto on/off headlights),
even the push-button ignition switch
is turned off.
If the driver’s door is opened while the
headlights are illuminated under such conditions, a chirp sound will inform
the driver that the lights are illumi-
nated.
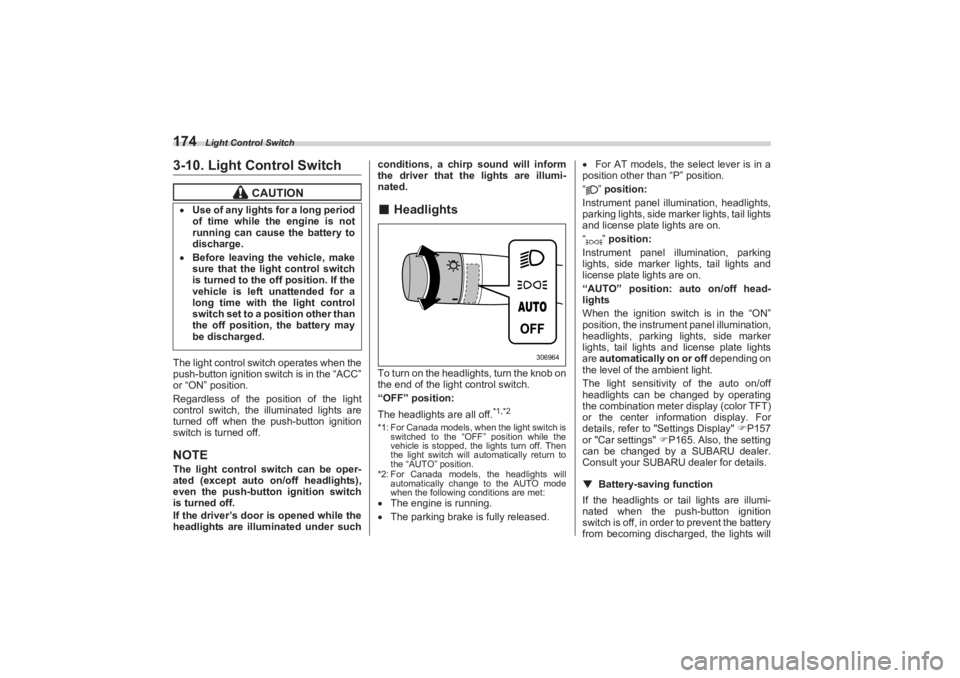
■ HeadlightsTo turn on the headlights, turn the knob on
the end of the light control switch.
“OFF” position:
The headlights are all off.
*1,*2
*1: For Canada models, when the light switch is
switched to the “OFF” position while the
vehicle is stopped, the lights turn off. Then
the light switch will automatically return to
the “AUTO” position.
*2: For Canada models, the headlights will automatically change to the AUTO mode
when the following conditions are met: The engine is running.
The parking brake is fully released.
For AT models, the select lever is in a
position other than “P” position.
“” position:
Instrument panel illumination, headlights,
parking lights, side marker lights, tail lights
and license plate lights are on.
“” position:
Instrument panel illumination, parking
lights, side marker lights, tail lights and
license plate lights are on.
“AUTO” position: auto on/off head-
lights
When the ignition switch is in the “ON”
position, the instrum ent panel illumination,
headlights, parking lights, side marker
lights, tail lights and license plate lights
are automatically on or off depending on
the level of the ambient light.
The light sensitivity of the auto on/off
headlights can be changed by operating
the combination meter display (color TFT)
or the center information display. For
details, refer to "Settings Display" P157
or "Car settings" P165. Also, the setting
can be changed by a SUBARU dealer.
Consult your SUBARU dealer for details.
▼ Battery-saving function
If the headlights or tail lights are illumi-
nated when the push-button ignition
switch is off, in order to prevent the battery
from becoming discharg ed, the lights will
CAUTION
Use of any lights for a long period
of time while the engine is not
running can cause the battery to
discharge. Before leaving the vehicle, make
sure that the light control switch
is turned to the off position. If the
vehicle is left unattended for a
long time with the light control
switch set to a position other than
the off position, the battery may
be discharged.
306964
BRZ_U.book 174 ページ 2022年3月29日 火曜日 午後3時59分
Page 186 of 432
Steering Responsive Headlight (SRH) (If Equipped)
180■Daytime Running Light
SystemThe daytime running lights will automati-
cally illuminate when the following condi-
tions are fulfilled.
The engine is running.
The parking brake is fully released.
The light control switch is in the
“AUTO”, “ ” or “OFF” position.
For AT models, the select lever is in a
position other than the “P” position.NOTE When the light switch is in the “ ”
position, the instrument panel illumina-
tion, side marker lights, tail lights and
license plate lights are also illumi-
nated.
While the headlight switch is in the
“AUTO” position and the headlights
turn on automatically, the daytime
running light is deactivated.
When the turn signal indicators are
flashing, the daytime running light on
the side that the turn signals are
flashing will turn off.
3-11. Steering Responsive
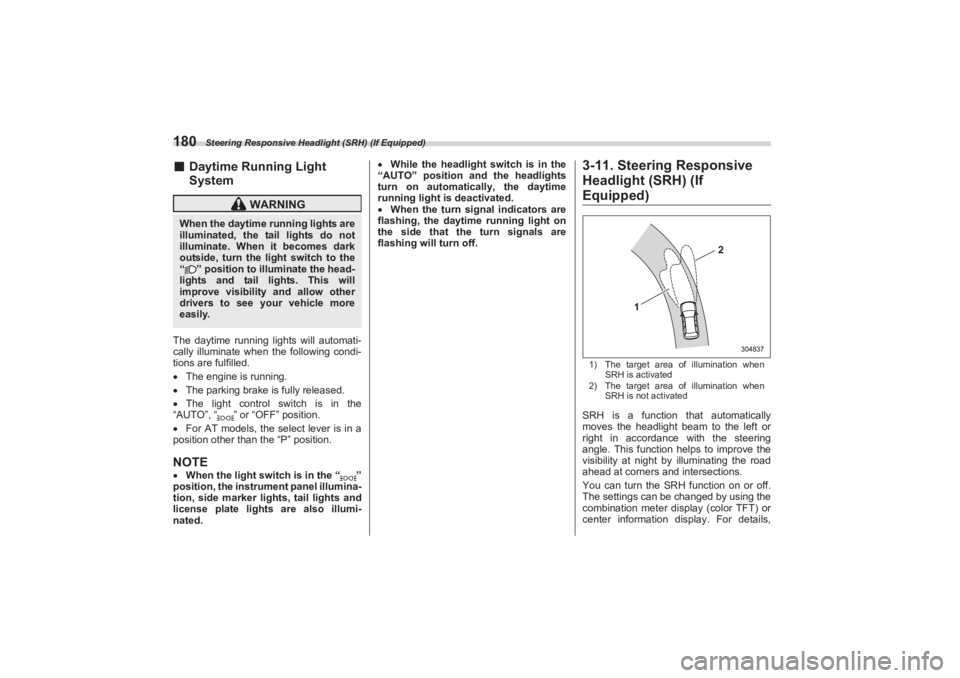
Headlight (SRH) (If Equipped)1) The target area of illumination when
SRH is activated
2) The target area of illumination when
SRH is not activatedSRH is a function that automatically
moves the headlight beam to the left or
right in accordance with the steering
angle. This function helps to improve the
visibility at night by illuminating the road
ahead at corners and intersections.
You can turn the SRH function on or off.
The settings can be changed by using the
combination meter display (color TFT) or
center information display. For details,
WARNING
When the daytime running lights are
illuminated, the tail lights do not
illuminate. When it becomes dark
outside, turn the li ght switch to the
“ ” position to illuminate the head-
lights and tail lights. This will
improve visibility and allow other
drivers to see your vehicle more
easily.
1
2
304837
BRZ_U.book 180 ページ 2022年3月29日 火曜日 午後3時59分
Page 227 of 432

Starting and Operating7
Starting and Operating
7-1. Fuel.......................................................................223
Fuel Requirements .......................................................223
Fuel Filler Lid and Cap .................................................224
7-2. State Emission Testing (U.S. Only) ...................227
7-3. Preparing to Drive ...............................................228
7-4. Starting and Stopping Engine ...........................229
Safety Precautions ............................................ ...........229
Operating Range for Push-Button Start System .......229
General Precautions When St arting Engine ..............229
Starting Engine .............................................................230
Stopping Engine ...........................................................232
When Access Key Fob Does Not Operate
Properly.......................................................................232
Steering Lock ................................................................232
7-5. Manual Transmission .........................................233
Shifting Speeds ............................................................234
Driving Tips ...................................................................235
7-6. Automatic Transmission ....................................235
Select Lever ..... .......................................... ...................236
Adaptive Control...........................................................237
Shift Lock Function ......................................................238
Selection of Manual Mode ...........................................239
Driving Tips ...................................................................240
7-7. Driving Mode Select Switch (If Equipped) ........241
Normal Mode .................................................................241
Sport Mode ....................................................................241
Snow Mode....................................................................241
Driving Mode Select Switch.........................................241
7-8. Active Sound Control .........................................242
7-9. Power Steering ....................................................242
7-10. Braking...............................................................243
Braking Tips ..................................................................243 Brake System ............................................................... 244
Disc Brake Pad Wear Warning Indicators ................. 245
7-11. ABS (Anti-Lock Brake System) ........................245
ABS Self-Check............................................................ 245
ABS Warning Light ...................................................... 245
7-12. Electronic Brake Force Distribution (EBD)
System ...............................................................246
EBD System Malfunctions .......................................... 246
7-13. Vehicle Stability Control (VSC)/TRAC
System ...............................................................247
Vehicle Stability Control (VSC) System ..................... 247
TRAC System ............................................................... 247
Vehicle Stability Control (VSC) System Monitor....... 248
Vehicle Stability Control (VSC) OFF Switch .............. 248
7-14. TRACK Mode .....................................................250
TRACK Mode ................................................................ 250
Selecting TRAC Mode and Ve hicle Stability Control
(VSC) Mode ............................................................... 251
7-15. Tire Pressure Monitoring System (TPMS)
(If Equipped) ......................................................251
Certification for the Transmitter ................................. 253
Certification for the Receiver...................................... 253
TPMS Screen ................................................................ 254
Initializing the Tire Pressure Monitoring System ..... 254
How to Initialize the Tire Pressure Monitoring
System (If Equipped) ................................................. 254
If You Press the Tire Pressure Monitoring Reset
Switch Accidentally................................................... 254
Initialization Procedure ............................................... 254
When Initialization of the Tire Pressure Monitoring System has Failed ..................................................... 255
Registering ID Codes .................................................. 255
BRZ_U.book 221 ページ 2022年3月29日 火曜日 午後3時59分
Page 228 of 432

Starting and Operating
Changing the ID code set ............................................ 255
7-16. Parking Your Vehicle ........................................255
Parking Brake ............................................................... 255
Parking Tips.................................................................. 256
7-17. Hill Start Assist System ....................................257
To Activate/Deactivate the Hill Start Assist
System ........................................................................ 258
Hill Start Assist Indicator Light................................... 259
7-18. Cruise Control (Models without the
EyeSight system) ..............................................260
To Set Cruise Control .................................................. 260
To Temporarily Cancel the Cr uise Control ................ 261
To Turn Off the Cruise Control ................................... 262
To Change the Cruising Speed ................................... 262
Cruise Control Indicator Light .................................... 263
7-19. Rear View Camera .............................................263
How to Use the Rear View Camera ............................. 264
Viewing Range on the Screen ..................................... 265
Help Lines ..................................................................... 266
7-20. BSD/RCTA (If Equipped)...................................268
System Features .......................................................... 268 System Operation......................................................... 270
BSD/RCTA Approach Indi
cator Light/Warning
Buzzer ......................................................................... 271
BSD/RCTA OFF Indicator ............................................ 273
BSD/RCTA Warning Indicator ..................................... 274
To Turn On/Off the BSD/RCTA .................................... 274
Certification for the BSD/RCTA................................... 274
Handling of Radar Sensors ......................................... 276
7-21. Reverse Automatic Braking (RAB) System
(If Equipped) ..................................................... 277
Reverse Automatic Braking (RAB) System
Overview ..................................................................... 278
Operating Conditions................................................... 279
Sonar Audible Alarm .................................................... 282
Automatic Braking Operation ..................................... 284
Canceling the Reverse Au tomatic Braking (RAB)
System Operation ...................................................... 285
Reverse Automatic Braking (RAB) System
ON/OFF Setting .......................................................... 286
RAB Warning Indicator ................................................ 286
Handling of the Sonar Sensors ................................... 286
BRZ_U.book 222 ページ 2022年3月29日 火曜日 午後3時59分
Page 236 of 432

Starting and Stopping Engine
230On rare occasions, it may be difficult
to start the engine depending on the
fuel and the usage condition (repeated
driving of a distance in which the
engine has not warmed up suffi-
ciently). In such a case, it is recom-
mended that you change to a different
brand of fuel.
On rare occasions, transient
knocking may be heard from the
engine when the accelerator is oper-
ated rapidly such as a rapid start-up
and a rapid acceleration. This is not a
malfunction.
The engine starts more easily when
the headlights, air conditioner and rear
window defogger are turned off.■ Starting Engine
NOTEWhen pressing the push-button
ignition switch while depressing the
clutch pedal (MT models) or the brake
pedal (AT models): - The engine starter operates for a
maximum of 10 seconds and after
starting the engine, the starter stops
automatically.
- The engine can be started
regardless of the power status.
If the engine does not start, check
the security indicator light. Then press
the push-button ignition switch
without depressing the clutch pedal
(MT models) or the brake pedal (AT
models) to switch the power to “OFF”. - If the light had illuminated, try to
start the engine again.
- If the light had been off, press the
push-button ignition switch while
depressing the clutch pedal (MT
models) or the brake pedal (AT
models) more forcefully.
The engine start procedures may
not function depending on the radio
wave conditions around the vehicle. In
such a case, refer to "Starting Engine"
P326.
If the vehicle battery is discharged,
the steering cannot be unlocked.
Charge the battery.
WARNING
There are some general precau-
tions when starting the engine.
Carefully read the precautions
described in "General Precau-
tions When Starting Engine"
P229. If the steering lock cannot be
released after the engine has
started, never drive the vehicle.
The steering is still locked, and it
may result in an accident.
CAUTION
If a system malfunction warning
message is displayed on the
combination meter, there may be
a malfunction with the vehicle.
Contact a SUBARU dealer imme-
diately. If a steering lock warning
message is displayed on the
combination me ter after the
engine has started, it means that
the steering is still locked. While
moving the steering wheel right
and left, depress the brake pedal,
and press the push-button igni-
tion switch. Do not continue pressing the
push-button ignition switch for
more than 10 seconds. Doing so
could cause a malfunction. If the
engine does not start, stop
pressing the push -button ignition
switch. Instead, press the push-
button ignition switch without
depressing the clutch pedal (MT
models) or the brake pedal (AT
models) to switch the power
status to “OFF”. Wait 10 seconds,
and then press the push-button
ignition switch to start the
engine.
BRZ_U.book 230 ページ 2022年3月29日 火曜日 午後3時59分
Page 243 of 432
Automatic Transmission
237
Starting and Operating7
– CONTINUED –
▼P (Park)
This position is for parking the vehicle and
starting the engine. In this position, the
transmission is mechanically locked to
prevent the vehicle from rolling freely.
When you park the vehicle, first apply the
parking brake, then shift into the “P” posi-
tion. Do not hold the vehicle with only the
mechanical friction of the transmission.
To shift the select lever from the “P” to any
other position, you should depress the
brake pedal fully then move the select
lever. This prevents the vehicle from
lurching when it is started.
▼ R (Reverse)
This position is for backing the vehicle. To
shift from the “N” to “R” position, stop the
vehicle completely th en move the lever to
the “R” position.
▼ N (Neutral)
This position is for restarting a stalled
engine. In this position, the transmission is
neutral, meaning that the wheels and
transmission are not locked. Therefore,
the vehicle will roll freely, even on the
slightest incline unless the parking brake
or foot brake is applied. ▼
D (Drive)
This position is for normal driving. The
transmission shifts automatically into a
suitable gear according to the vehicle
speed and the acceleration you require.
Also, while driving up and down a hill, the
transmission assists and controls the
driving performance and engine braking
while corresponding to the road grade.
When more acceleration is required in “D”
position, depress the accelerator pedal
fully to the floor and hold that position. The
transmission will auto matically downshift.
When you release the pedal, the transmis-
sion will return to the original gear posi-
tion.
To use the manual mode, move the lever
from this position into the manual gate.
If one of the shift paddles behind the
steering wheel is operated while driving in
the “D” position, the transmission will
temporarily switch to the manual mode. In
this mode, you can shift into any gear position using the shift paddles. For
details about the manual mode, refer to
"Selection of Manual Mode" P239.
Once the vehicle speed stabilizes, the
transmission will switch from the manual
mode back to the “D” position for normal
driving.
▽ While climbing a grade
When driving up a hill, undesired upshift is
prevented from taking place when the
accelerator is releas ed. This minimizes
the chance of subsequent downshifting to
a lower gear when accelerating again.
This prevents repeated upshifting and
downshifting resulting in a smoother oper-
ation of the vehicle.
NOTEThe transmission may downshift,
depending on the way the accelerator
pedal is depressed to accelerate the
vehicle again.■ Adaptive ControlIn order to realize smoother driving while
driving in “D” position, an appropriate gear
is automatically selected by limiting
upshifting and performing downshifting
operations according to driver operations
and driving conditions.
WARNING
Do not drive the vehicle with the
select lever in the “N” (neutral)
position. Engine braking has no
effect in this co ndition and the risk
of an accident is consequently
increased.
BRZ_U.book 237 ページ 2022年3月29日 火曜日 午後3時59分