2023 PEUGEOT LANDTREK dashboard
[x] Cancel search: dashboardPage 63 of 164
61
Safety
5Deployment
It deploys simultaneously with the corresponding
lateral airbag in the event of a serious side
impact applied to all or part of the side impact
zone B.
The curtain airbag inflates between the front
and rear occupants of the vehicle and the
corresponding windows.
Malfunction
In the event of a malfunction, this warning
lamp lights up on the instrument panel.
Contact a PEUGEOT dealer or a qualified
workshop to have the system checked.
The airbags may not be deployed in the event of
a serious impact.
In the event of a minor impact or bump at
the side of the vehicle or if the vehicle
rolls over, the airbags may not be deployed.
In the event of a rear or front collision, none of
the lateral airbags are deployed.
Advice
For the airbags to be fully effective,
observe the safety recommendations
below.
Adopt a normal and upright sitting position.
Fasten your seat belt and position it correctly.
Do not place anything between the occupants
and the airbags (e.g.
child, animal, object), do
not fix or attach anything near or in the path of
the airbags, as this could cause injuries when
they are deployed.
Never modify the original definition of the
vehicle, particularly in the area directly around
the airbags.
Even if all of the precautions mentioned are
observed, a risk of injury or of minor burns to
the head, chest or arms cannot be ruled out
when an airbag is deployed. The bag inflates
almost instantly (within a few milliseconds)
then deflates within the same time,
discharging the hot gas via openings provided
for this purpose.
After an accident or if the vehicle has been
stolen, have the airbag systems checked.
All work must be carried out only by a
PEUGEOT dealer or a qualified workshop
Front airbags
Do not drive holding the steering wheel
by its spokes or resting your hands on the
centre part of the wheel.
Passengers must not place their feet on the
dashboard.
Do not smoke as deployment of the airbags
can cause burns or the risk of injury from a
cigarette or pipe.
Never remove or pierce the steering wheel or
hit it violently.
Do not fix or attach anything to the steering
wheel or dashboard, as this could cause
injuries when the airbags are deployed.
Lateral airbags
Use only approved seat covers
compatible with the deployment of these
airbags. For information on the range of seat
covers suitable for your vehicle, contact a
PEUGEOT dealer.
Do not fix or attach anything to the seat
backrests (e.g.
clothing) as this could cause
injuries to the chest or arm when the airbag is
deployed.
Do not sit with the upper part of the body any
nearer to the door than necessary.
The vehicle's front door panels include side
impact sensors.
A damaged door or any unauthorised or
incorrectly executed work (modification or
repair) on the front doors or their interior trim
could compromise the operation of these
sensors - risk of malfunction of the lateral
airbags!
All work must be carried out only by a
PEUGEOT dealer or a qualified workshop
Curtain airbags
Do not fix or attach anything to the roof,
as this could cause head injuries when the
curtain airbag is deployed.
Do not remove the grab handles installed on
the roof, as these help to secure the curtain
airbags. CarM an uals 2 .c o m
Page 66 of 164
64
Safety
Vehicles not equipped with a
deactivation/reactivation control
Installing a "rearward
facing" child seat on
the front passenger seat is strictly prohibited
- risk of death or serious injury in the event of
airbag deployment!
Deactivating/Reactivating the front
passenger airbag
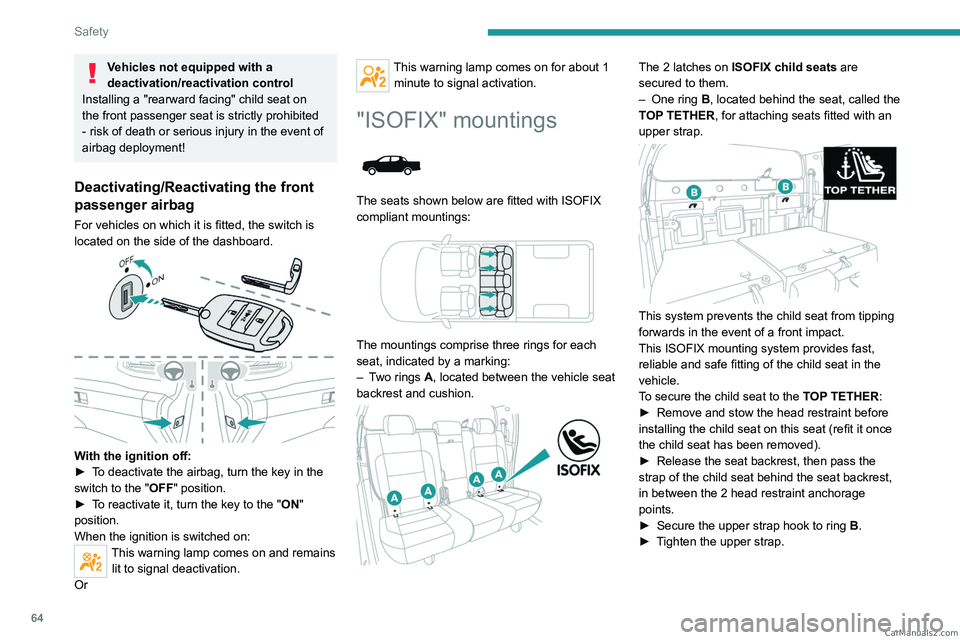
For vehicles on which it is fitted, the switch is
located on the side of the dashboard.
With the ignition off:
► T o deactivate the airbag, turn the key in the
switch to the "OFF " position.
►
T
o reactivate it, turn the key to the "ON"
position.
When the ignition is switched on:
This warning lamp comes on and remains lit to signal deactivation.
Or
This warning lamp comes on for about 1 minute to signal activation.
"ISOFIX" mountings
The seats shown below are fitted with ISOFIX
compliant mountings:
The mountings comprise three rings for each
seat, indicated by a marking:
–
T
wo rings A, located between the vehicle seat
backrest and cushion.
The 2 latches on ISOFIX child seats are
secured to them.
–
One ring
B, located behind the seat, called the
TOP TETHER, for attaching seats fitted with an
upper strap.
This system prevents the child seat from tipping
forwards in the event of a front impact.
This ISOFIX mounting system provides fast,
reliable and safe fitting of the child seat in the
vehicle.
To secure the child seat to the TOP TETHER:
►
Remove and stow the head restraint before
installing the child seat on this seat (refit it once
the child seat has been removed).
►
Release the seat backrest, then pass the
strap of the child seat behind the seat backrest,
in between the 2 head restraint anchorage
points.
►
Secure the upper strap hook to ring
B
.
►
T
ighten the upper strap. CarM an uals 2 .c o m
Page 99 of 164
97
Practical information
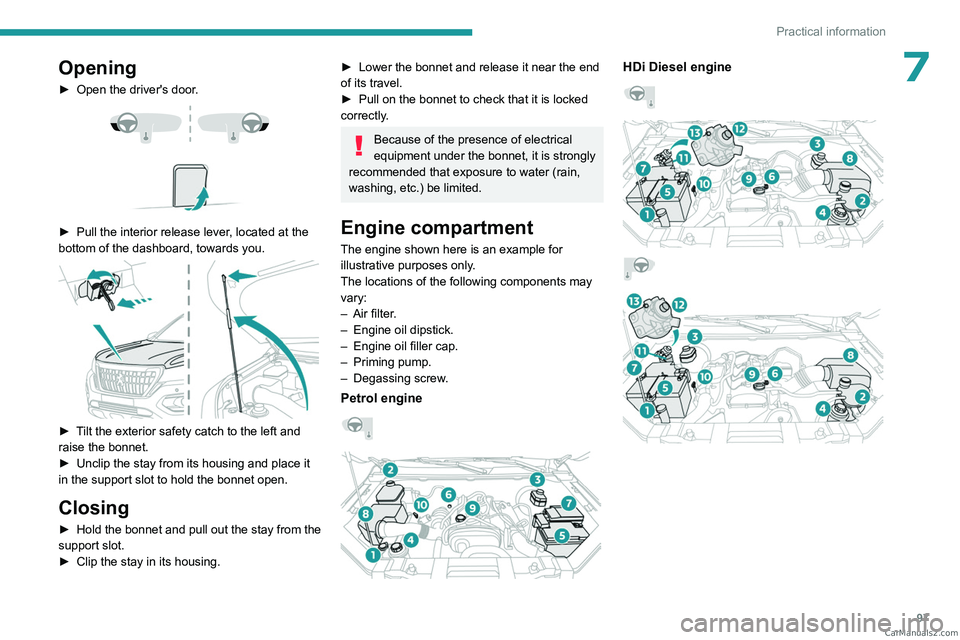
7Opening
► Open the driver's door.
► Pull the interior release lever , located at the
bottom of the dashboard, towards you.
► Tilt the exterior safety catch to the left and
raise the bonnet.
►
Unclip the stay from its housing and place it
in the support slot to hold the bonnet open.
Closing
► Hold the bonnet and pull out the stay from the
support slot.
►
Clip the stay in its housing.
► Lower the bonnet and release it near the end
of its travel.
►
Pull on the bonnet to check that it is locked
correctly
.
Because of the presence of electrical
equipment under the bonnet, it is strongly
recommended that exposure to water (rain,
washing, etc.) be limited.
Engine compartment
The engine shown here is an example for
illustrative purposes only.
The locations of the following components may
vary:
–
Air filter
.
–
Engine oil dipstick.
–
Engine oil filler cap.
–
Priming pump.
–
Degassing screw
.
Petrol engine
HDi Diesel engine
CarM an uals 2 .c o m
Page 114 of 164
11 2
Practical information
damage to the instruments and controls and
the controls located on the centre console. Be
vigilant!
When cleaning the windows, never use glass
cleaner on the heated rear screen.
Do not use corrosive cleaning products to
clean the surface of the vehicle windows.
Clean plastic components with a damp cotton
cloth dipped in a neutral pH and non-abrasive
solution. Clean oily or difficult stains with a
solvent-free product.
To clean instrument panels, touch screens
or other displays, wipe gently with a soft,
dry cloth. Do not use products (e.g. alcohol,
disinfectant) or soapy water directly on these
surfaces - risk of damage!
Bodywork
High-gloss paint
Do not use abrasive products, solvents,
petrol or oil to clean the bodywork.
Never use an abrasive sponge to clean
stubborn stains - risk of scratching the
paintwork!
Do not apply polish in strong sunshine, or to
plastic or rubber parts.
Use a soft cloth and soapy water or a pH
neutral product.
Gently wipe the bodywork with a clean
microfibre cloth.
Apply polish with the vehicle clean and dry.
Comply with the instructions for use stated on
the product.
Decals
(Depending on version)
Do not use a high-pressure washer to
clean the vehicle - risk of damaging or
detaching the decals!
Use a high-flow hose (temperature
between 25°C and 40°C).
Place the jet of water perpendicular to the
surface to be cleaned.
Rinse the vehicle with demineralised water.
Corrosion protection
Avoid accumulation of salt, dirt, chemicals and moisture in hard-to-clean
areas.
Have damaged parts of the bodywork
repaired.
Avoid parking the vehicle in wet areas; favour
aerated and ventilated areas.
Remove dust or sand from under the
mats and dry any moisture.
Regularly clean the drain holes in the doors,
the bodywork and the chassis.
When transporting corrosive objects (acids,
fertilisers, salt), use special containers and
clean after unloading.
Wash the vehicle, paying particular attention
to hard-to-reach areas, after driving on roads
treated with road salt.
Textile
The dashboard, door panels and seats may
contain parts made of textile material.
Maintenance
Do not use aggressive cleaning products
(e.g. alcohol, solvent or ammonia).
Do not use steam-cleaning systems - risk of
affecting the adhesion of the fabrics!
Remove dust from the textile parts
regularly with a dry cloth, soft brush or
vacuum cleaner
.
Rub down the
textile parts once per year with
a clean, damp cloth. After leaving overnight to
dry, brush with a soft-bristled brush.
Stain removal
Do not rub the stain or it may spread or
you may cause the substance to
penetrate the surface. CarM an uals 2 .c o m
Page 137 of 164
135
Technical data
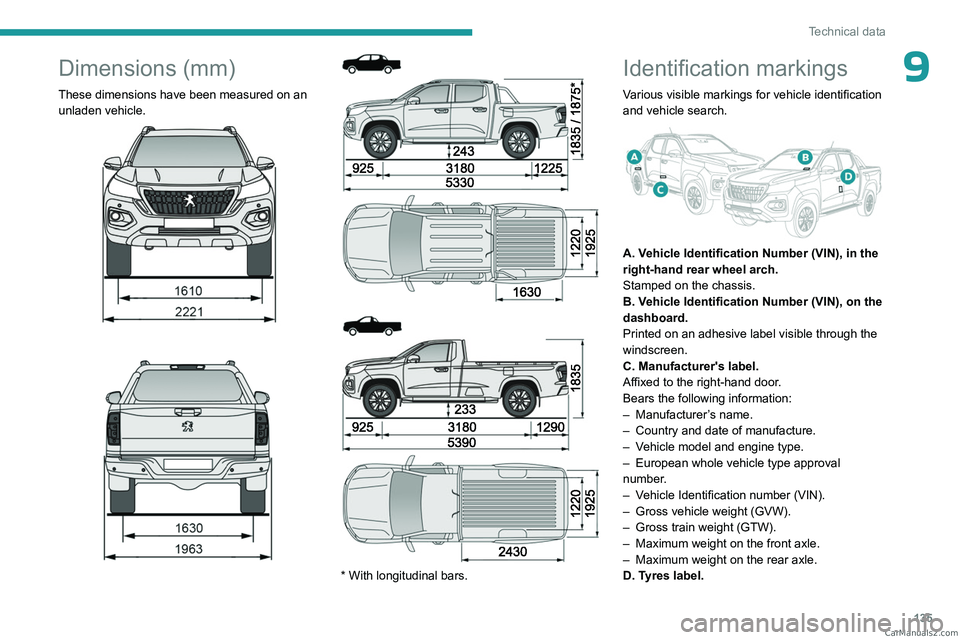
9Dimensions (mm)
These dimensions have been measured on an unladen vehicle.
* With longitudinal bars.
Identification markings
Various visible markings for vehicle identification
and vehicle search.
A. Vehicle Identification Number (VIN), in the
right-hand rear wheel arch.
Stamped on the chassis.
B. Vehicle Identification Number (VIN), on the
dashboard.
Printed on an adhesive label visible through the
windscreen.
C. Manufacturer's label.
Affixed to the right-hand door.
Bears the following information:
–
Manufacturer
’s name.
–
Country and date of manufacture.
–
V
ehicle model and engine type.
–
European whole vehicle type approval
number
.
–
V
ehicle Identification number (VIN).
–
Gross vehicle weight (GVW).
–
Gross train weight (GTW).
–
Maximum weight on the front axle.
–
Maximum weight on the rear axle.
D. T
yres label. CarM an uals 2 .c o m