2023 PEUGEOT 508 remove seats
[x] Cancel search: remove seatsPage 10 of 244

8
Eco-driving
Eco-driving
Eco-driving refers to a range of everyday
practices that allow the motorist to optimise
the vehicle's energy consumption (fuel and/or
electricity) and CO
2 emissions.
Optimise your use of the gearbox
With an automatic gearbox, favour automatic
mode. Do not depress the accelerator pedal
heavily or suddenly.
The gear shift indicator prompts you to engage
the most suitable gear. Whenever this indication
is displayed on the instrument panel, follow it
straight away.
With an automatic gearbox, this indicator
appears only in manual mode.
Drive smoothly
Maintain a safe distance between vehicles, use
engine braking rather than the brake pedal and
press the accelerator gradually. These practices
help to save on energy consumption, reduce
CO
2 emissions and decrease general traffic
noise.
Favour the use of the "Eco" driving mode by
selecting it using the "DRIVE MODE" control.
With an EAT8 gearbox, with the gear selector in
mode
D, and except in Sport mode, favour "free-
wheeling" by gradually lifting your foot fully off
the accelerator pedal in order to save fuel.
When the traffic is flowing smoothly, select the
cruise control.
Control the use of electrical equipment
Before moving off, if the passenger compartment
is too warm, ventilate it by opening the windows
and air vents before using the air conditioning.
At speeds above 31
mph (50 km/h), close the
windows and leave the air vents open.
Consider using equipment that can help keep
the temperature in the passenger compartment
down (e.g.
sunroof blind, window blinds).
Unless automatically regulated, switch off the air
conditioning as soon as the desired temperature
has been reached.
Switch off the demisting and defrosting functions,
if they are not managed automatically.
Switch off the heated seat as soon as possible.
Adapt your use of the headlamps and/or
foglamps to the level of visibility, in accordance
with current legislation in the country in which
you are driving.
Avoid running the engine before moving off,
particularly in winter (other than in severe wintry
conditions: temperature below -23°C). The
vehicle will warm up much faster while driving.
As a passenger, avoid connecting your
multimedia devices (e.g.
film, music, video
game) to help reduce the consumption of energy.
Disconnect all portable devices before leaving
the vehicle.
Limit the causes of excess consumption
Spread loads throughout the vehicle. Place the
heaviest items in the boot as close as possible to
the rear seats. Limit the loads carried in the vehicle and
minimise wind resistance (e.g.
roof bars, roof
rack, bicycle carrier, trailer). Preferably, use a
roof box.
Remove roof bars and roof racks after use.
At the end of winter, remove snow tyres and refit
summer tyres.
Comply with the servicing instructions
Check tyre pressures regularly, with the tyres
cold, referring to the label in the door aperture on
the driver's side.
Carry out this check in particular:
–
before a long journey
.
–
at each change of season.
–
after a long period out of use.
Do not forget the spare wheel and, where
applicable, the tyres on your trailer or caravan.
Have your vehicle serviced regularly (e.g.
engine
oil, oil filter, air filter, passenger compartment
filter, etc.). Observe the schedule of operations in
the manufacturer's service schedule.
With a BlueHDi Diesel engine, if the SCR system
has a fault, your vehicle will emit pollution. Visit
a PEUGEOT dealer or a qualified workshop
as soon as possible to restore your vehicle's
nitrogen oxide emissions to legal levels.
When filling the fuel tank, do not continue after
the third cut-out of the nozzle, to avoid overflow.
You will only see the fuel consumption of your
new vehicle settle down to a consistent average
after the first 1,900 miles (3,000 kilometres).
Page 41 of 244
39
Access
2Acknowledgement of the "kicking" movement
is confirmed by the lighting of the direction
indicators.
"Sideward kicking" movements do not
work. If the "kicking" movement has not
been detected, wait at least 2 seconds before
repeating the movement.
Do not perform repetitive "kicking"
movements.
If the motorised tailgate has not started to open
or close, check that:
–
the function is activated.
–
the electronic key is on your person, outside
the vehicle in the rear recognition area.
–
the "kicking" movement was performed in the
detection zone, close enough to the bumper
.
–
the foot was removed from the bumper quickly
enough.
Automatic locking
It is possible to lock automatically the vehicle
using the hands-free function (Hands-Free
Tailgate Access).
The "Handsfree Trunk Locking" function is configured in the Settings
> Vehicle
touch screen application.
When the vehicle is locked, the request
to open the tailgate with this function
unlocks the vehicle, or only the tailgate if
selective unlocking is activated, prior to the
opening of the tailgate.
Closing the tailgate with the "Hands-Free
Tailgate Access" function enables you to lock
the vehicle.
Recommendations on the
hands-free function (Hands-
Free Tailgate Access)
If it does not work, check that the electronic key
is not exposed to a source of electromagnetic
interference (e.g. smartphone).
The function may be deactivated or affected if
there is rain or snow.
The function may not work correctly with a
prosthetic leg.
In some circumstances, the tailgate may open or
close by itself, particularly when:
–
hitching up or removing a trailer
.
–
operating a towing device.
–
fitting or removing a bicycle carrier
.
–
loading
or unloading bicycles on/from a bicycle
carrier.
–
depositing or lifting something behind the
vehicle.
–
an animal approaches the rear bumper
.
–
washing the vehicle.
–
maintenance is performed on the vehicle.
–
accessing the spare wheel.
To avoid such operating problems, keep the
electronic key away from the recognition zone or
deactivate the hands-free function.
Towing device
The installation of a towing device may
disturb the detection system.
►
Perform the "kicking" movement on the
right side of the towing device.
Electric windows
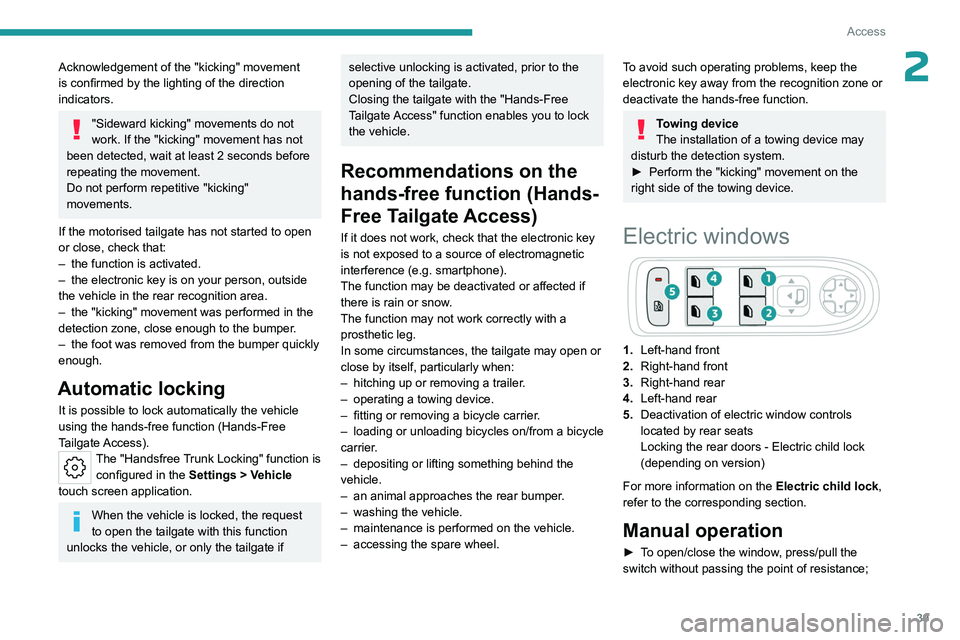
1. Left-hand front
2. Right-hand front
3. Right-hand rear
4. Left-hand rear
5. Deactivation of electric window controls
located by rear seats
Locking the rear doors - Electric child lock
(depending on version)
For more information on the Electric child lock,
refer to the corresponding section.
Manual operation
► To open/close the window, press/pull the
switch without passing the point of resistance;
Page 46 of 244
44
Ease of use and comfort
Front seats
Before moving the seat backwards,
ensure that there is no person or object
that might prevent the full travel of the seat.
There is a risk of trapping or pinching
passengers if present in the rear seats or of
jamming the seat if large objects are placed
on the floor behind the seat.
Front head restraints
Adjusting the height
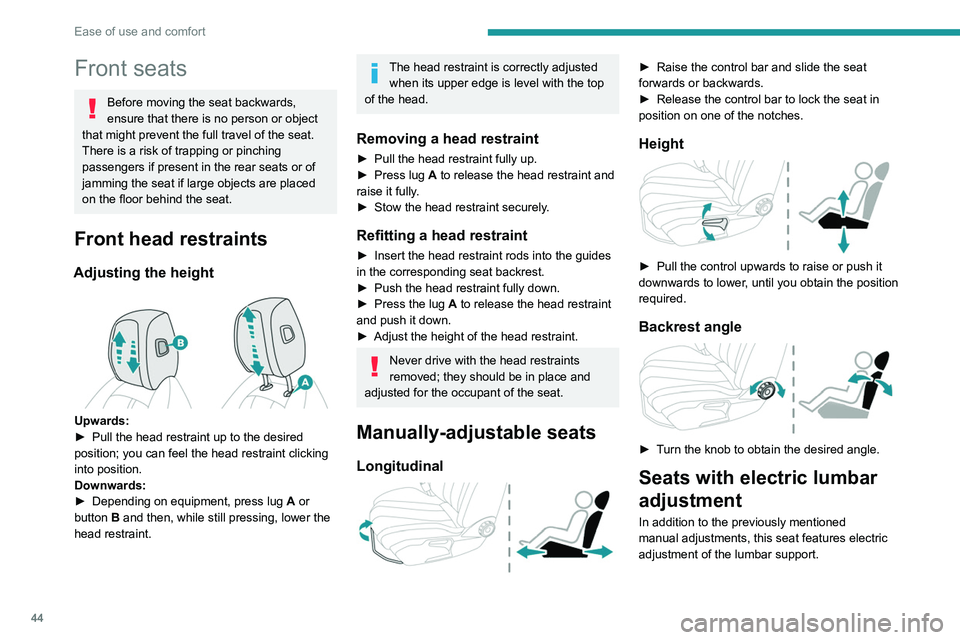
Upwards:
► Pull the head restraint up to the desired
position; you can feel the head restraint clicking
into position.
Downwards:
►
Depending on equipment, press lug A
or
button B and then, while still pressing, lower the
head restraint.
The head restraint is correctly adjusted when its upper edge is level with the top
of the head.
Removing a head restraint
► Pull the head restraint fully up.
► Press lug A to release the head restraint and
raise it fully.
►
Stow the head restraint securely
.
Refitting a head restraint
► Insert the head restraint rods into the guides
in the corresponding seat backrest.
►
Push the head restraint fully down.
►
Press the lug
A to release the head restraint
and push it down.
►
Adjust the height of the head restraint.
Never drive with the head restraints
removed; they should be in place and
adjusted for the occupant of the seat.
Manually-adjustable seats
Longitudinal
► Raise the control bar and slide the seat
forwards or backwards.
►
Release the control bar to lock the seat in
position on one of the notches.
Height
► Pull the control upwards to raise or push it
downwards to lower , until you obtain the position
required.
Backrest angle
► Turn the knob to obtain the desired angle.
Seats with electric lumbar
adjustment
In addition to the previously mentioned
manual adjustments, this seat features electric
adjustment of the lumbar support.
Page 51 of 244
49
Ease of use and comfort
3Rear seats
Rear head restraints
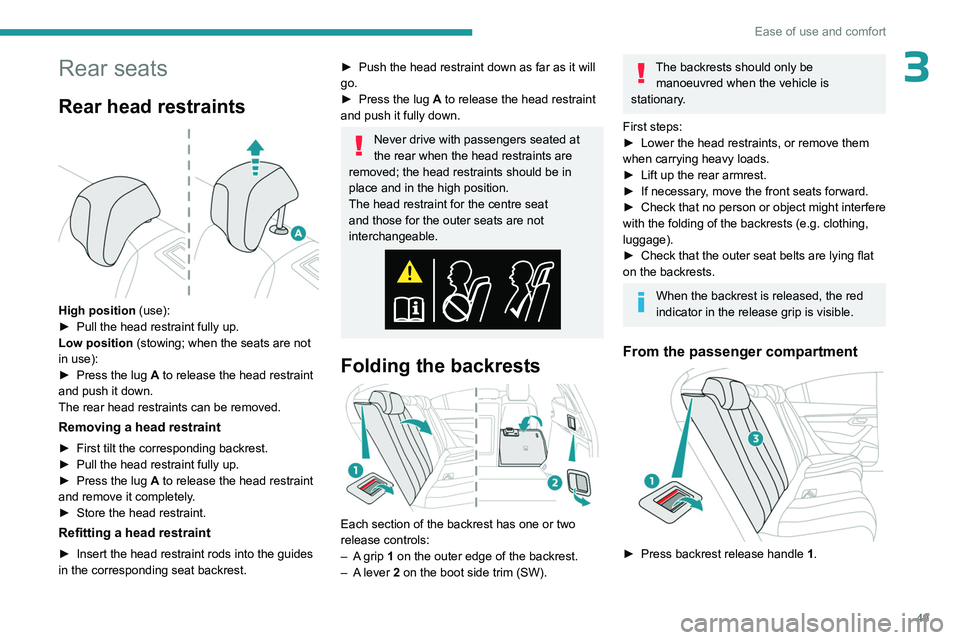
High position (use):
► Pull the head restraint fully up.
Low position (stowing; when the seats are not
in use):
►
Press the lug
A to release the head restraint
and push it down.
The rear head restraints can be removed.
Removing a head restraint
► First tilt the corresponding backrest.
► Pull the head restraint fully up.
►
Press the lug
A to release the head restraint
and remove it completely.
►
Store the head restraint.
Refitting a head restraint
► Insert the head restraint rods into the guides
in the corresponding seat backrest.
► Push the head restraint down as far as it will
go.
►
Press the lug
A to release the head restraint
and push it fully down.
Never drive with passengers seated at
the rear when the head restraints are
removed; the head restraints should be in
place and in the high position.
The head restraint for the centre seat
and those for the outer seats are not
interchangeable.
Folding the backrests
Each section of the backrest has one or two
release controls:
–
A
grip 1 on the outer edge of the backrest.
–
A
lever 2 on the boot side trim (SW).
The backrests should only be manoeuvred when the vehicle is
stationary.
First steps:
►
Lower the head restraints, or remove them
when carrying heavy loads.
►
Lift up the rear armrest.
►
If necessary
, move the front seats forward.
►
Check
that no person or object might interfere
with the folding of the backrests (e.g.
clothing,
luggage).
►
Check that the outer seat belts are lying flat
on the backrests.
When the backrest is released, the red
indicator in the release grip is visible.
From the passenger compartment
► Press backrest release handle 1 .
Page 64 of 244
62
Ease of use and comfort
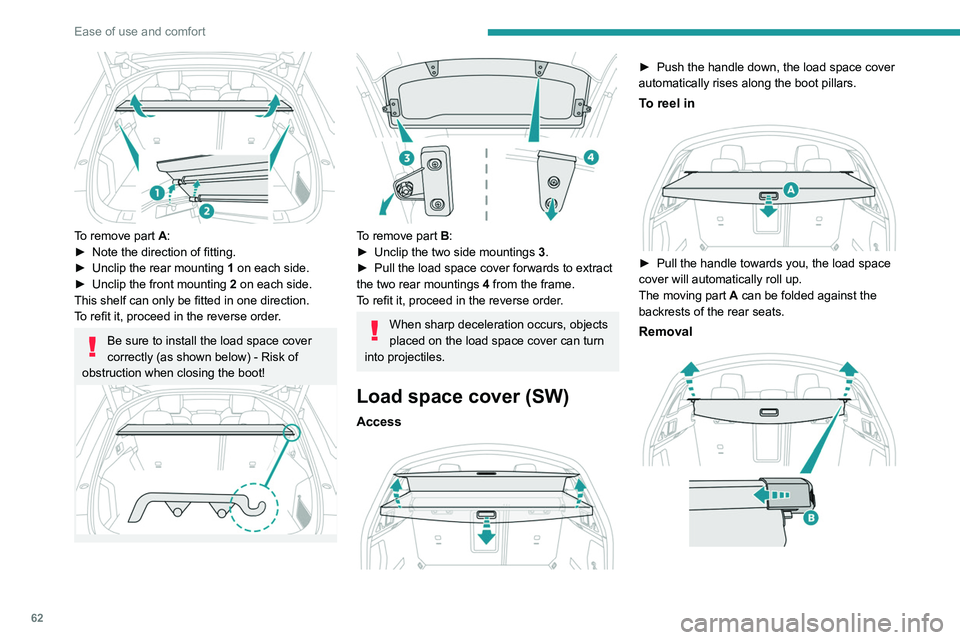
To remove part A:
► Note the direction of fitting.
►
Unclip the rear mounting 1
on each side.
►
Unclip the front mounting 2
on each side.
This shelf can only be fitted in one direction.
To refit it, proceed in the reverse order.
Be sure to install the load space cover
correctly (as shown below) - Risk of
obstruction when closing the boot!
To remove part B:
► Unclip the two side mountings 3
.
►
Pull the load space cover forwards to extract
the two rear mountings 4
from the frame.
To refit it, proceed in the reverse order.
When sharp deceleration occurs, objects
placed on the load space cover can turn
into projectiles.
Load space cover (SW)
Access
► Push the handle down, the load space cover
automatically rises along the boot pillars.
To reel in
► Pull the handle towards you, the load space
cover will automatically roll up.
The moving part
A can be folded against the
backrests of the rear seats.
Removal
Page 65 of 244
63
Ease of use and comfort
3► Compress the control B and lift the load
space cover on the right then on the left to
remove it.
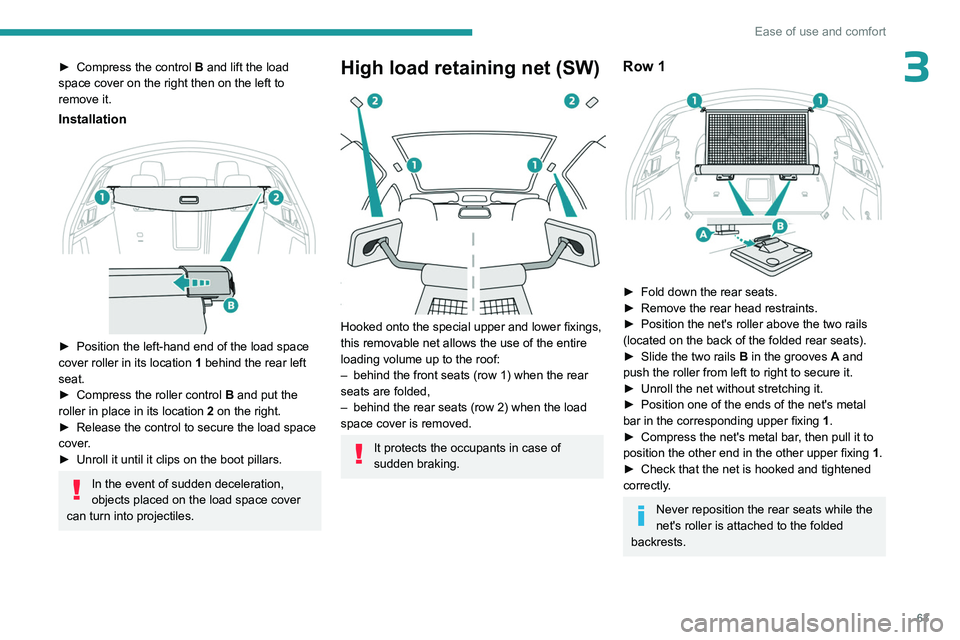
Installation
► Position the left-hand end of the load space
cover roller in its location 1
behind the rear left
seat.
►
Compress the roller control B
and put the
roller in place in its location 2 on the right.
►
Release the control to secure the load space
cover
.
►
Unroll it until it clips on the boot pillars.
In the event of sudden deceleration,
objects placed on the load space cover
can turn into projectiles.
High load retaining net (SW)
Hooked onto the special upper and lower fixings,
this removable net allows the use of the entire
loading volume up to the roof:
–
behind the front seats (row 1) when the rear
seats are folded,
–
behind the rear seats (row 2) when the load
space cover is removed.
It protects the occupants in case of
sudden braking.
Row 1
► Fold down the rear seats.
► Remove the rear head restraints.
►
Position the net's roller above the two rails
(located on the back of the folded rear seats).
►
Slide the two rails B
in the grooves A and
push the roller from left to right to secure it.
►
Unroll the net without stretching it.
►
Position one of the ends of the net's metal
bar in the corresponding upper fixing 1
.
►
Compress the net's metal bar
, then pull it to
position the other end in the other upper fixing 1.
►
Check that the net is hooked and tightened
correctly
.
Never reposition the rear seats while the
net's roller is attached to the folded
backrests.
Page 66 of 244
64
Ease of use and comfort
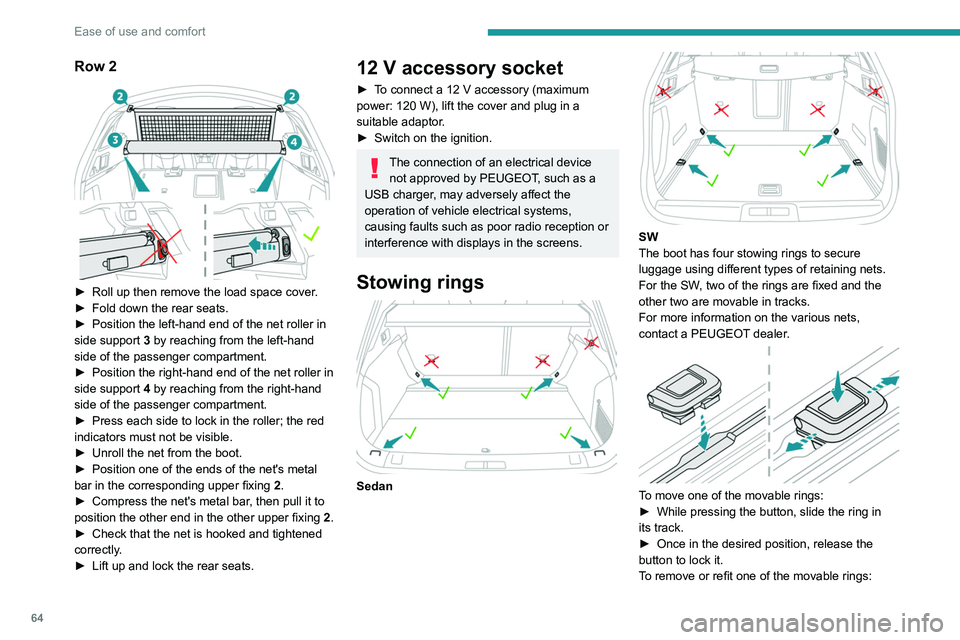
Row 2
► Roll up then remove the load space cover.
► Fold down the rear seats.
►
Position the left-hand end of the net roller in
side support 3
by reaching from the left-hand
side of the passenger compartment.
►
Position the right-hand end of the net roller in
side support 4
by reaching from the right-hand
side of the passenger compartment.
►
Press each side to lock in the roller; the red
indicators must not be visible.
►
Unroll the net from the boot.
►
Position one of the ends of the net's metal
bar in the corresponding upper fixing 2
.
►
Compress the net's metal bar
, then pull it to
position the other end in the other upper fixing 2.
►
Check that the net is hooked and tightened
correctly
.
►
Lift up and lock the rear seats.
12 V accessory socket
► To connect a 12 V accessory (maximum
power: 120 W), lift the cover and plug in a
suitable adaptor.
►
Switch on the ignition.
The connection of an electrical device not approved by PEUGEOT, such as a
USB charger, may adversely affect the
operation of vehicle electrical systems,
causing faults such as poor radio reception or
interference with displays in the screens.
Stowing rings
Sedan
SW
The boot has four stowing rings to secure
luggage using different types of retaining nets.
For the SW, two of the rings are fixed and the
other two are movable in tracks.
For more information on the various nets,
contact a PEUGEOT dealer.
To move one of the movable rings:
► While pressing the button, slide the ring in
its track.
►
Once in the desired position, release the
button to lock it.
T
o remove or refit one of the movable rings:
Page 90 of 244
88
Safety
Child seats
The regulations on carrying children are specific to each country. Refer to the
legislation in force in your country.
For maximum safety, please observe the
following recommendations:
–
In accordance with European regulations,
all children under the age of 12 or less than
1.5 metres tall must travel in approved child
seats suited to their size or weight , on seats
fitted with a seat belt or ISOFIX mountings.
–
Statistically
, the safest seats in your
vehicle for carrying children are the rear
seats.
–
Children ageing less than 15
months must
travel in the "rearward facing" position,
whether in the front or rear of the vehicle.
It is recommended that children travel
on the rear seats of the vehicle:
–
"rearward facing" up to the age of 3.
–
"forward facing" over the age of 3.
Make sure that the seat belt is correctly
positioned and tightened.
For child seats with a support leg, ensure that
the support leg is in firm and steady contact
with the floor.
An incorrectly installed child seat in a vehicle compromises the child's safety in
the event of an accident.
Ensure that there is no seat belt or seat belt
buckle under the child seat, as this could
destabilise it.
Remember to fasten the seat belts or the
child seat harness keeping the slack relative
to the child's body to a minimum, even for
short journeys.
When installing a child seat using the seat
belt, ensure that the seat belt is tightened
correctly on the child seat and that it secures
the child seat firmly on the vehicle seat. If
the passenger seat is adjustable, move it
forwards if necessary.
Remove the head restraint before
installing a child seat with a backrest on a
passenger seat.
Ensure that the head restraint is stored or
attached securely to prevent it from being
thrown around the vehicle in the event of
sharp braking. Refit the head restraint once
the child seat has been removed.
Installing a booster seat
The chest part of the seat belt must be
positioned on the child's shoulder without
touching the neck.
Ensure that the lap part of the seat belt
passes correctly over the child's thighs.
Use a booster seat with a backrest, equipped
with a belt guide at shoulder level.
Additional protections
To prevent accidental opening of the
doors and rear windows, use the "Child lock".
Take care not to open the rear windows by
more than one third.
To protect young children from the sun's rays,
fit side blinds on the rear windows.
As a safety measure, do not leave:
–
A
child alone and unsupervised inside a
vehicle.
–
A
child or an animal in a vehicle which is
exposed to the sun, with the windows closed.
–
The keys within reach of children inside the
vehicle.
Child seat at the rear
Forward-facing or rearward-facing
► Move the vehicle's front seat forward and
straighten the backrest so that the legs of the
child in the forward-facing or rearward-facing
child seat itself do not touch the vehicle's front
seat.