2023 PEUGEOT 508 ECU
[x] Cancel search: ECUPage 97 of 244
95
Safety
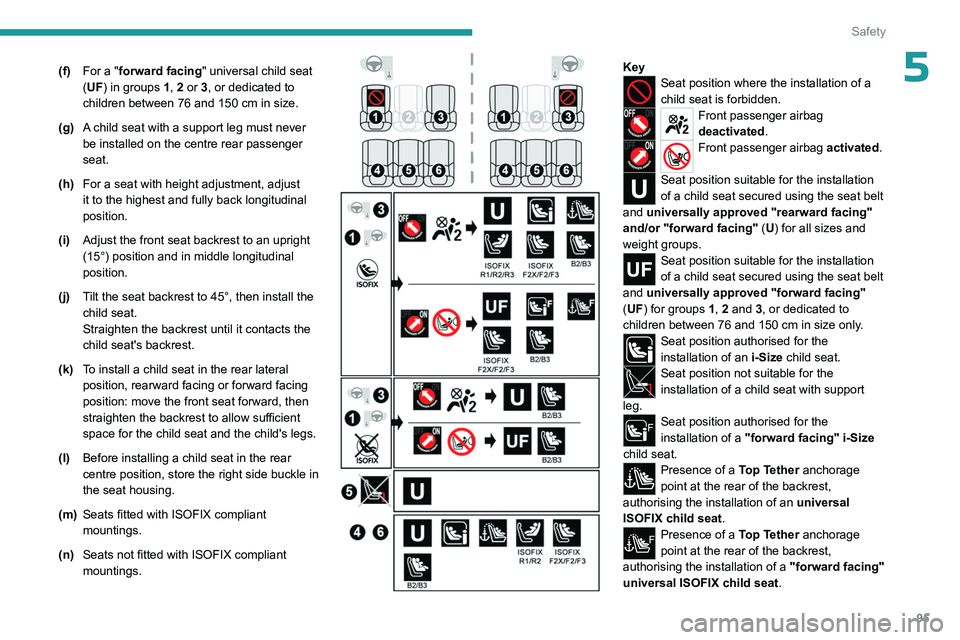
5(f)For a "forward facing" universal child seat
(UF) in groups 1, 2 or 3, or dedicated to
children between 76 and 150
cm in size.
(g) A child seat with a support leg must never
be installed on the centre rear passenger
seat.
(h) For a seat with height adjustment, adjust
it to the highest and fully back longitudinal
position.
(i) Adjust the front seat backrest to an upright
(15°) position and in middle longitudinal
position.
(j) Tilt the seat backrest to 45°, then install the
child seat.
Straighten the backrest until it contacts the
child seat's backrest.
(k) To install a child seat in the rear lateral
position, rearward facing or forward facing
position: move the front seat forward, then
straighten the backrest to allow sufficient
space for the child seat and the child's legs.
(l) Before installing a child seat in the rear
centre position, store the right side buckle in
the seat housing.
(m) Seats fitted with ISOFIX compliant
mountings.
(n) Seats not fitted with ISOFIX compliant
mountings.
KeySeat position where the installation of a
child seat is forbidden.
Front passenger airbag
deactivated.
Front passenger airbag activated.
Seat position suitable for the installation
of a child seat secured using the seat belt
and universally approved "rearward facing"
and/or "forward facing" (U) for all sizes and
weight groups.
Seat position suitable for the installation
of a child seat secured using the seat belt
and universally approved "forward facing"
(UF) for groups 1, 2 and 3, or dedicated to
children between 76 and 150
cm in size only.
Seat position authorised for the
installation of an i-Size child seat.
Seat position not suitable for the
installation of a child seat with support
leg.
Seat position authorised for the
installation of a "forward facing" i-Size
child seat.
Presence of a Top Tether anchorage
point at the rear of the backrest,
authorising the installation of an universal
ISOFIX child seat .
Presence of a Top Tether anchorage
point at the rear of the backrest,
authorising the installation of a "forward facing"
universal ISOFIX child seat .
Page 115 of 244

11 3
Driving
6In the event of a windscreen replacement,
contact a PEUGEOT dealer or a qualified
workshop to recalibrate the camera;
otherwise, the operation of the associated
driving aids may be disrupted.
Other cameras
The images from the camera(s)
displayed on the touch screen or on the
instrument panel may be distorted by the
terrain.
In the presence of areas in shade, or in
conditions of bright sunlight or inadequate
lighting, the image may be darkened and with
lower contrast.
Obstacles may appear further away than they
actually are.
Sensors
The operation of the sensors, as well as
any associated functions, may be disrupted
by noise pollution such as that emitted by
noisy vehicles and machinery (e.g. lorries,
pneumatic drills), by the accumulation of
snow or dead leaves on the road or in the
event of damaged bumpers and mirrors.
When reverse gear is engaged, an audible
signal (long beep) indicates that the sensors
may be dirty.
A front or rear impact to the vehicle can
upset the sensors’ settings, which is not
always detected by the system: distance
measurements may be distorted.
The sensors do not systematically detect
obstacles that are too low (pavements, studs)
or too thin (trees, posts, wire fences).
Certain obstacles located in the sensors’ blind
spots may not be detected or may no longer
be detected during the manoeuvre.
Certain materials (fabrics) absorb sound
waves: pedestrians may not be detected.
Maintenance
Clean the bumpers and door mirrors and
the field of vision of the cameras regularly.
When washing your vehicle at high pressure,
direct the spray from at least 30
cm away
from the radar, sensors and cameras.
Mats/Pedal trims
The use of mats or pedal trims not
approved by PEUGEOT may interfere with
the operation of the speed limiter or cruise
control.
To avoid any risk of jamming the pedals:
–
Ensure that the mat is secured correctly
.
–
Never fit one mat on top of another
.
Units of speed
Ensure that the units of speed displayed
on the instrument panel (mph or km/h) are
those for the country you are driving in.
If this is not the case, when the vehicle is
stationary, set the display to the required
units of speed so that it complies with what is
authorised locally.
In case of doubt, contact a PEUGEOT dealer
or a qualified workshop.
Shortcuts for driving aids
The full list of available driving aids can be found
in the Functions tab.
Driving aids can be accessed directly to quickly
activate/deactivate them.
By default, driving aids are already stored in the
Shortcuts tab (e.g.
Stop & Start, Lane keeping
assist).
Other driving aids can be added or deleted from
this tab.
It is configured in the ADAS>Functions
touch screen application.
► Press the button corresponding to the
driving assistance concerned:
•
Full symbol: the function is added to the
Shortcuts
tab.
•
Empty symbol: the function is deleted from
the
Shortcuts tab.
►
Check the modification in the Shortcuts
tab.
Page 162 of 244
160
Practical information
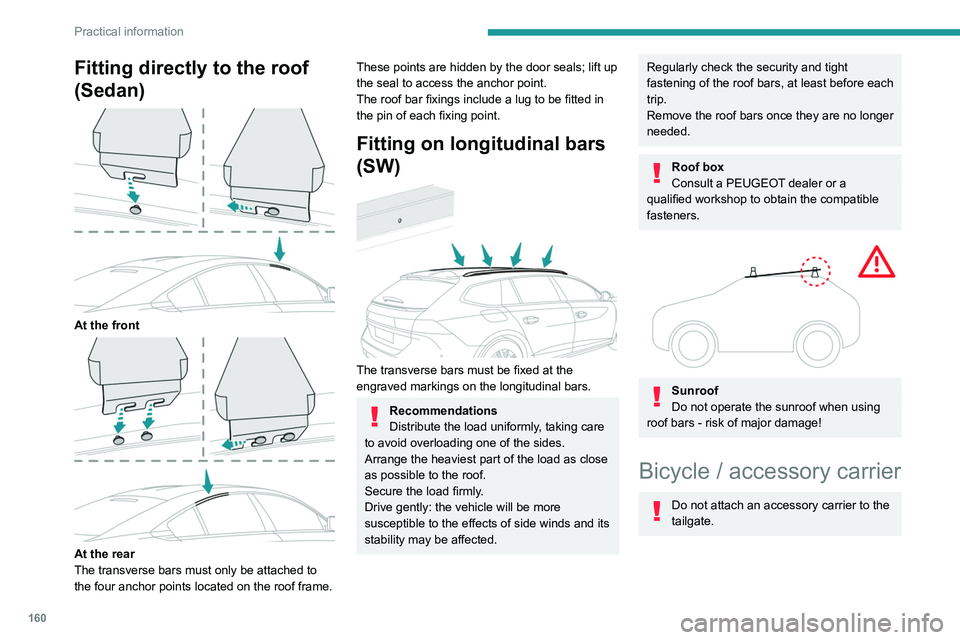
Fitting directly to the roof
(Sedan)
At the front
At the rear
The transverse bars must only be attached to
the four anchor points located on the roof frame.
These points are hidden by the door seals; lift up
the seal to access the anchor point.
The roof bar fixings include a lug to be fitted in
the pin of each fixing point.
Fitting on longitudinal bars
(SW)
The transverse bars must be fixed at the
engraved markings on the longitudinal bars.
Recommendations
Distribute the load uniformly, taking care
to avoid overloading one of the sides.
Arrange the heaviest part of the load as close
as possible to the roof.
Secure the load firmly.
Drive gently: the vehicle will be more
susceptible to the effects of side winds and its
stability may be affected.
Regularly check the security and tight
fastening of the roof bars, at least before each
trip.
Remove the roof bars once they are no longer
needed.
Roof box
Consult a PEUGEOT dealer or a
qualified workshop to obtain the compatible
fasteners.
Sunroof
Do not operate the sunroof when using
roof bars - risk of major damage!
Bicycle / accessory carrier
Do not attach an accessory carrier to the
tailgate.
Page 175 of 244
173
In the event of a breakdown
8
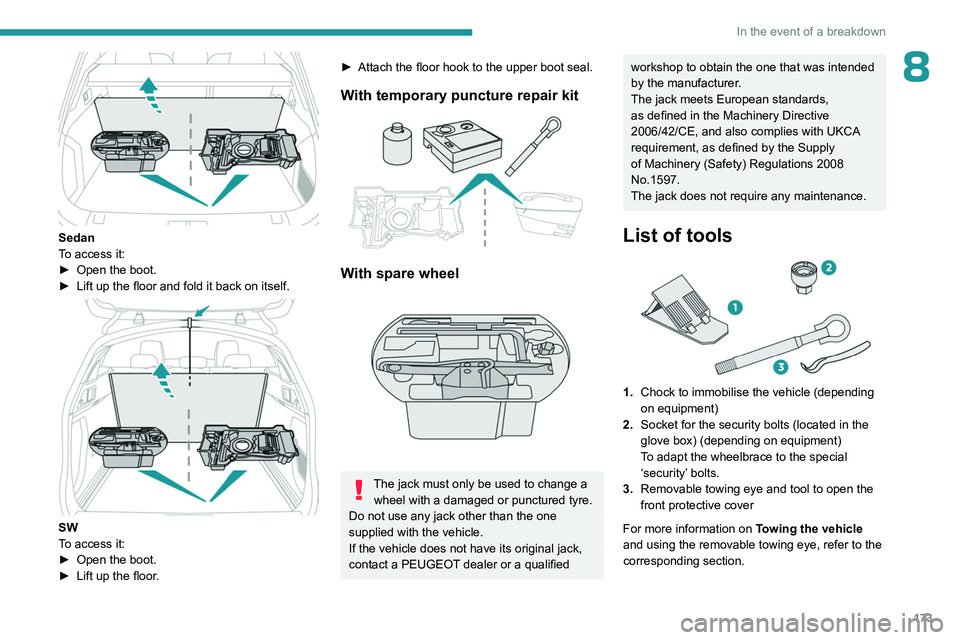
Sedan
To access it:
►
Open the boot.
►
Lift up the floor and fold it back on itself.
SW
To access it:
►
Open the boot.
►
Lift up the floor
.
► Attach the floor hook to the upper boot seal.
With temporary puncture repair kit
With spare wheel
The jack must only be used to change a wheel with a damaged or punctured tyre.
Do not use any jack other than the one
supplied with the vehicle.
If the vehicle does not have its original jack,
contact a PEUGEOT dealer or a qualified
workshop to obtain the one that was intended
by the manufacturer.
The jack meets European standards,
as defined in the Machinery Directive
2006/42/CE, and also complies with UKCA
requirement, as defined by the Supply
of Machinery (Safety) Regulations 2008
No.1597.
The jack does not require any maintenance.
List of tools
1. Chock to immobilise the vehicle (depending
on equipment)
2. Socket for the security bolts (located in the
glove box) (depending on equipment)
To adapt the wheelbrace to the special
‘security’ bolts.
3. Removable towing eye and tool to open the
front protective cover
For more information on Towing the vehicle
and using the removable towing eye, refer to the
corresponding section.
Page 180 of 244
178
In the event of a breakdown
Removing a wheel
Parking the vehicle
Immobilise the vehicle where it does
not obstruct traffic: the ground must be level,
stable and non-slippery.
Select mode
P on the automatic gearbox
to lock the wheels, apply the parking brake,
unless it is set to automatic mode, and switch
off the ignition.
Check that the parking brake indicator lamps
on the instrument panel are on fixed.
The occupants must get out of the vehicle
and wait where they are safe.
If necessary, place a chock under the wheel
diagonally opposite the wheel to be changed.
Never go underneath a vehicle raised using a
jack; use an axle stand.
Wheel with wheel trim
When removing the wheel , first remove
the wheel trim by pulling with both hands on
one of the upper arms.
When refitting the wheel , refit the wheel
trim, starting by placing its aperture in line
with the valve and then pushing it into place
all round its edge with the palm of your hand.
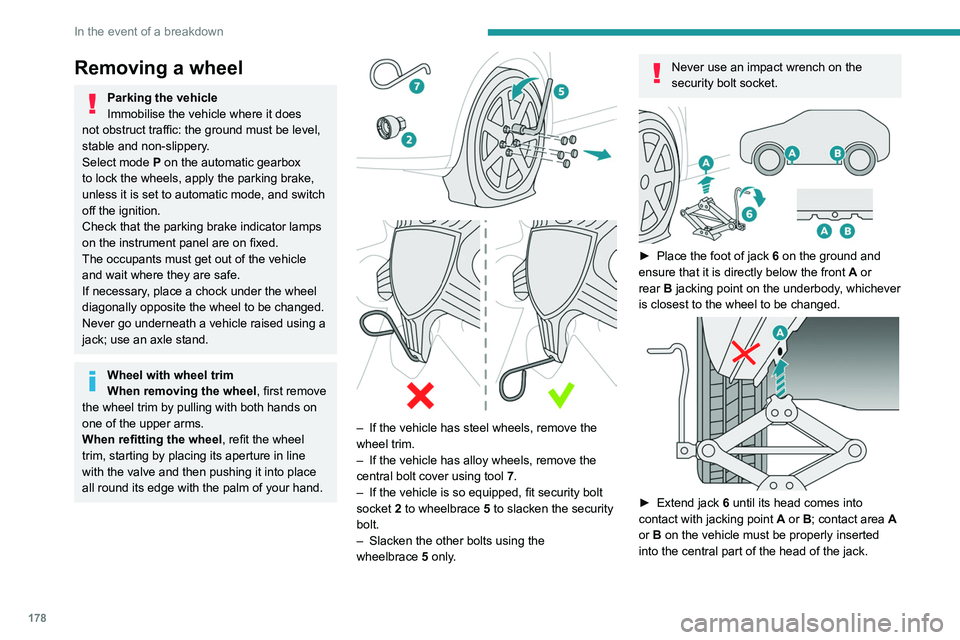
– If the vehicle has steel wheels, remove the
wheel trim.
–
If the vehicle has alloy wheels, remove the
central bolt cover using tool 7
.
–
If the vehicle is so equipped, fit security bolt
socket
2 to wheelbrace 5 to slacken the security
bolt.
–
Slacken the other bolts using the
wheelbrace
5
only.
Never use an impact wrench on the
security bolt socket.
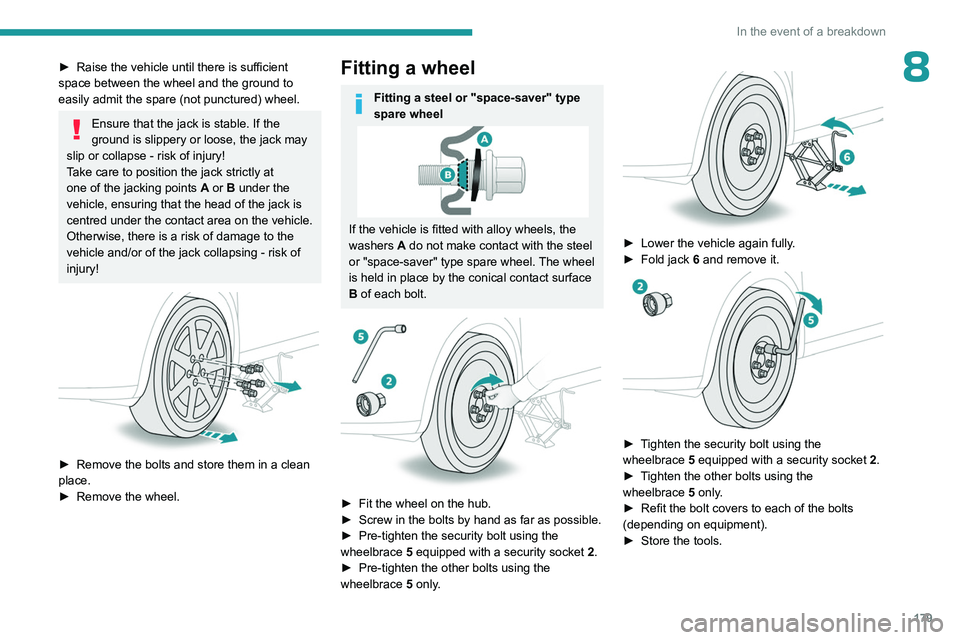
► Place the foot of jack 6 on the ground and
ensure that it is directly below the front A or
rear
B jacking point on the underbody, whichever
is closest to the wheel to be changed.
► Extend jack 6 until its head comes into
contact with jacking point A or B; contact area A
or B on the vehicle must be properly inserted
into the central part of the head of the jack.
Page 181 of 244
179
In the event of a breakdown
8► Raise the vehicle until there is sufficient
space between the wheel and the ground to
easily admit the spare (not punctured) wheel.
Ensure that the jack is stable. If the
ground is slippery or loose, the jack may
slip or collapse - risk of injury!
Take care to position the jack strictly at
one of the jacking points
A
or B under the
vehicle, ensuring that the head of the jack is
centred under the contact area on the vehicle.
Otherwise, there is a risk of damage to the
vehicle and/or of the jack collapsing - risk of
injury!
► Remove the bolts and store them in a clean
place.
►
Remove the wheel.
Fitting a wheel
Fitting a steel or "space-saver" type
spare wheel
If the vehicle is fitted with alloy wheels, the
washers A do not make contact with the steel
or "space-saver" type spare wheel. The wheel
is held in place by the conical contact surface
B of each bolt.
► Fit the wheel on the hub.
► Screw in the bolts by hand as far as possible.
►
Pre-tighten the security bolt using the
wheelbrace
5
equipped with a security socket
2
.
►
Pre-tighten the other bolts using the
wheelbrace
5
only.
► Lower the vehicle again fully .
► Fold jack 6 and remove it.
► Tighten the security bolt using the
wheelbrace 5 equipped with a security socket 2 .
►
T
ighten the other bolts using the
wheelbrace
5
only.
►
Refit the bolt covers to each of the bolts
(depending on equipment).
►
Store the tools.
Page 190 of 244
188
In the event of a breakdown
A professional towing service must be
called if:
–
Broken down on a motorway or main road.
–
Not possible to put
the gearbox into neutral,
unlock the steering, or release the parking
brake.
–
Not possible to tow a vehicle with an
automatic gearbox, with the engine running.
– Towing with only two wheels on the ground.
– Four-wheel drive vehicle.
–
No approved towbar available.
Rechargeable hybrid vehicles
Before any intervention, with the ignition
on, depress the brake pedal and select mode
N, then switch off the hybrid system (READY
indicator lamp off).
Always call on professionals for recovery of
the vehicle on a flatbed lorry or trailer.
Use the towing eye only
to free the vehicle
if it is stuck, or to secure it for recovery on a
flatbed lorry or trailer.
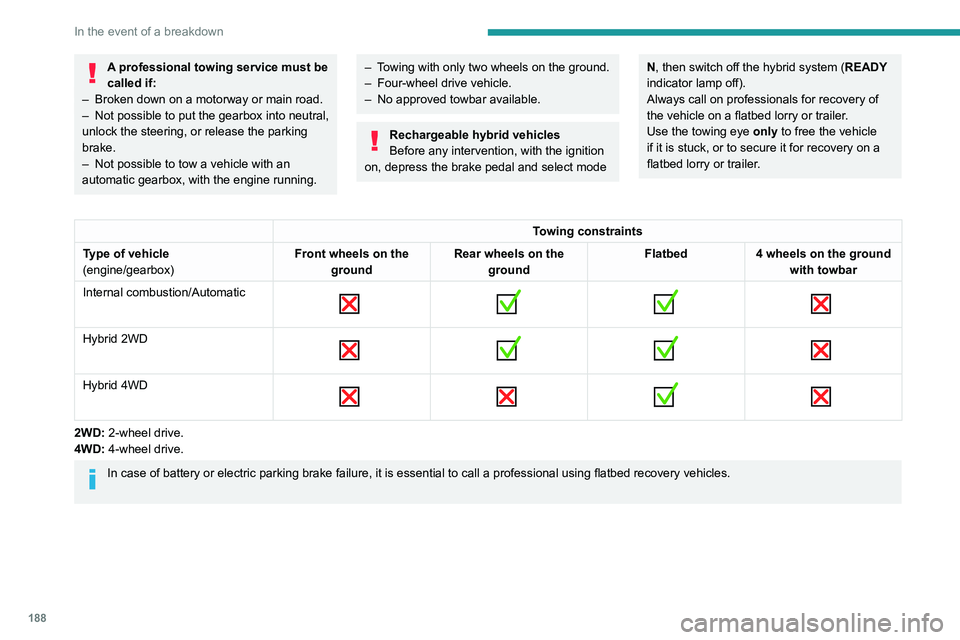
Towing constraints
Type of vehicle
(engine/gearbox) Front wheels on the
ground Rear wheels on the
ground Flatbed
4 wheels on the ground
with towbar
Internal combustion/Automatic
Hybrid 2WD
Hybrid 4WD
2WD: 2-wheel drive.
4WD: 4-wheel drive.
In case of battery or electric parking brake failure, it is essential to call a p
rofessional using flatbed recovery vehicles.
Page 200 of 244
198
PEUGEOT i-Connect Advanced - PEUGEOT i-Connect
Some connected services may not
function without the vehicle location data.
This mode will not be applied to the emergency call function or to specific
services to which the user has consented
under the terms of commercial contracts
(e.g.
Connected alarm).
"Private Mode"
This mode does not allow the vehicle to
transmit personal data outside the vehicle.
Connected services will only perform
local processing inside the vehicle with
limited functions.
This mode will not be applied to the emergency call function or to specific
services to which the user has consented
under the terms of commercial contracts
(e.g.
Connected alarm).
Professional purposes
If the vehicle is used for professional
purposes or under the terms of specific
contracts (e.g.
corporate fleet, government
assignment), some privacy modes will not
be available for the user on the screen,
depending on the data sharing needs of the
services. To change mode, swipe down from the upper
edge of the touch screen to display all of the
quick settings.
Press this button and select the chosen
mode. The mode is highlighted.
OR
Press the "Settings" application.
In the list, select the "Connectivity" tab.
Select "Privacy Settings".
Choose the mode.
Internet portal
During the first use, upon acquisition of the
vehicle, the user is invited to select the country
of residence for the use of the Internet portal.
If the country is not selected, the notification is
stored in the notification centre and disappears
once the country is selected. Slide a finger on
the touch screen from top to bottom to display all
the notifications.
The selection of a country is necessary to use
the available internet applications.
Press the "Settings" application.
In the list, select the "Connected Services".
Choose the country.
The first time you use it, via a connected mobile device, the system links to your
profile. The connected mobile device serves as
an access key to saved personal information.
First activate the mobile device’s Bluetooth®
function.
Select the desired application, authentication will
be requested if necessary. This authentication
will be saved for future uses via the mobile
device connected to the current profile.
An authentication will be requested at each use if
the mobile device is not connected to the current
profile or if the Guest profile is used.
With the use of the “Guest” profile, an
identification will be requested for each
use.
Updating the system
Managing devices remotely and
remote updating of software and
firmware.
Being an integral part of the
service used to
provide connected services contract(s), the
required management of devices as well as
the required updating of the software and
firmware associated with the aforementioned
connected service will be carried out remotely,
in particular using "Over the Air" technology.
To do this, a secure connection via radio
network is established between the vehicle
and the Manufacturer's device management
server each time the ignition is switched on,
when a mobile telephone network is available.
Depending on the vehicle's equipment,
the connection
configuration must be set