2023 PEUGEOT 5008 seats
[x] Cancel search: seatsPage 4 of 292
2
Contents
■
Overview
■
Eco-driving
1Dashboard instrumentsDriver information 9
Digital instrument panels 9
Warning and indicator lamps 11
Indicators 16
Manual test 20
Distance recorders 20
Lighting dimmer 21
Trip computer 21
Touch screen 22
Remotely operable additional functions
(Rechargeable hybrid)
24
2AccessElectronic key with remote control function
and built-in key 26
Keyless Entry and Start 28
Central locking 30
Back-up procedures 30
Doors 32
Boot 32
Hands-free tailgate 33
Alarm 37
Electric windows 38
Panoramic sunroof 39
3Ease of use and comfortDriving position 42
Front seats 43
Steering wheel adjustment 47
Mirrors 47
Rear bench seat 49
Rear seats 50
Seat modularity 55
Heating and Ventilation 56
Dual-zone automatic air conditioning 57
Front demisting - defrosting 60
Heated windscreen 60
Rear screen demisting/defrosting 61
Temperature pre-conditioning
(Rechargeable hybrid)
61
Front fittings 62
Courtesy lamps 66
Interior ambient lighting 66
Rear fittings 66
Boot fittings 68
4Lighting and visibilityLighting control stalk 74
Direction indicators 75
Headlamp beam height adjustment 76
Automatic illumination of headlamps 76
Guide-me-home and welcome lighting 77
Automatic lighting systems - General
recommendations
77
Automatic headlamp dipping 77
Static cornering lighting 78
Night Vision 79
Wiper control stalk 80
Automatic wipers 81
Changing a wiper blade 83
5SafetyGeneral safety recommendations 84
Hazard warning lamps 84
Horn 85
Pedestrian horn (Rechargeable hybrid) 85
Emergency or assistance 85
Electronic stability control (ESC) 87
Advanced Grip Control 89
Hill Assist Descent Control 90
Seat belts 91
Airbags 95
Child seats 97
Deactivating the front passenger airbag 99
ISOFIX child seats 102
i-Size child seats 108
Child lock 109
6DrivingDriving recommendations 111
Starting/Switching off the engine 11 2
Starting rechargeable hybrid vehicles 11 3
Electric parking brake 11 5
6-speed manual gearbox 11 7
Automatic gearbox (type 1) 11 7
Automatic gearbox (type 2) 120
Hill start assist 124
Driving modes 125
Gear shift indicator 126
Stop & Start 127
Tyre under-inflation detection 128
Driving and manoeuvring aids - General
recommendations
130
Memorising speeds 131
Road signs recognition 131
Speed limiter 135 CarM an uals 2 .c o m
Page 7 of 292
5
Overview
D.Select previous/next media
Confirm a selection
E. Access the Telephone menu
Manage calls
F. Select an audio source
G. Display the list of radio stations/audio tracks
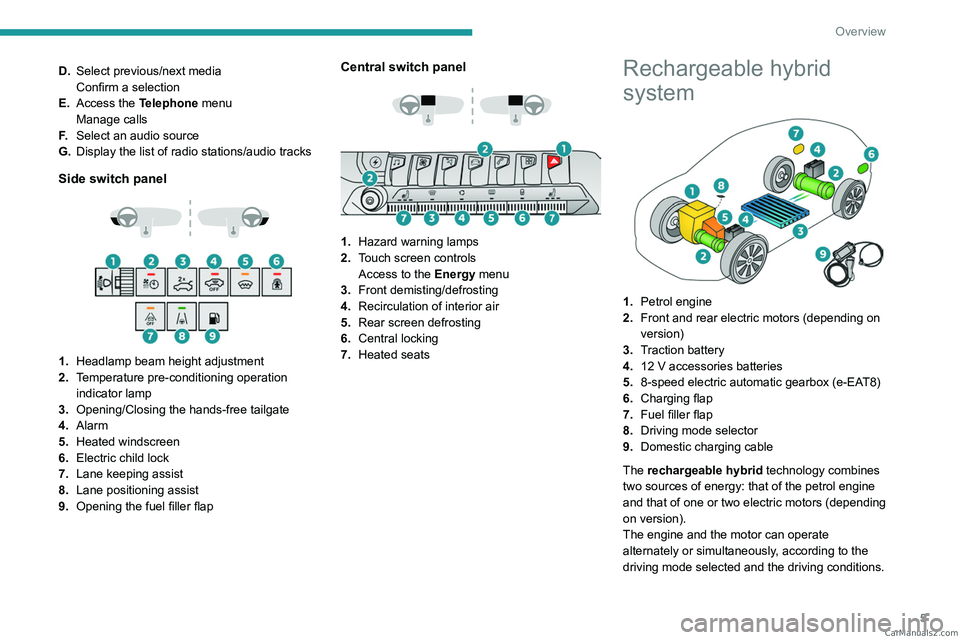
Side switch panel
1. Headlamp beam height adjustment
2. Temperature pre-conditioning operation
indicator lamp
3. Opening/Closing the hands-free tailgate
4. Alarm
5. Heated windscreen
6. Electric child lock
7. Lane keeping assist
8. Lane positioning assist
9. Opening the fuel filler flap
Central switch panel
1. Hazard warning lamps
2. Touch screen controls
Access to the Energy menu
3. Front demisting/defrosting
4. Recirculation of interior air
5. Rear screen defrosting
6. Central locking
7. Heated seats
Rechargeable hybrid
system
1.Petrol engine
2. Front and rear electric motors (depending on
version)
3. Traction battery
4. 12 V accessories batteries
5. 8-speed electric automatic gearbox (e-EAT8)
6. Charging flap
7. Fuel filler flap
8. Driving mode selector
9. Domestic charging cable
The rechargeable hybrid technology combines
two sources of energy: that of the petrol engine
and that of one or two electric motors (depending
on version).
The engine and the motor can operate
alternately or simultaneously, according to the
driving mode selected and the driving conditions. CarM an uals 2 .c o m
Page 8 of 292
6
Overview
The electric power alone provides the mobility
of the vehicle in Electric mode, and in Hybrid
mode in case of moderate demand. It assists the
petrol engine during starting and acceleration
phases.
The electric power is supplied by a rechargeable
traction battery.
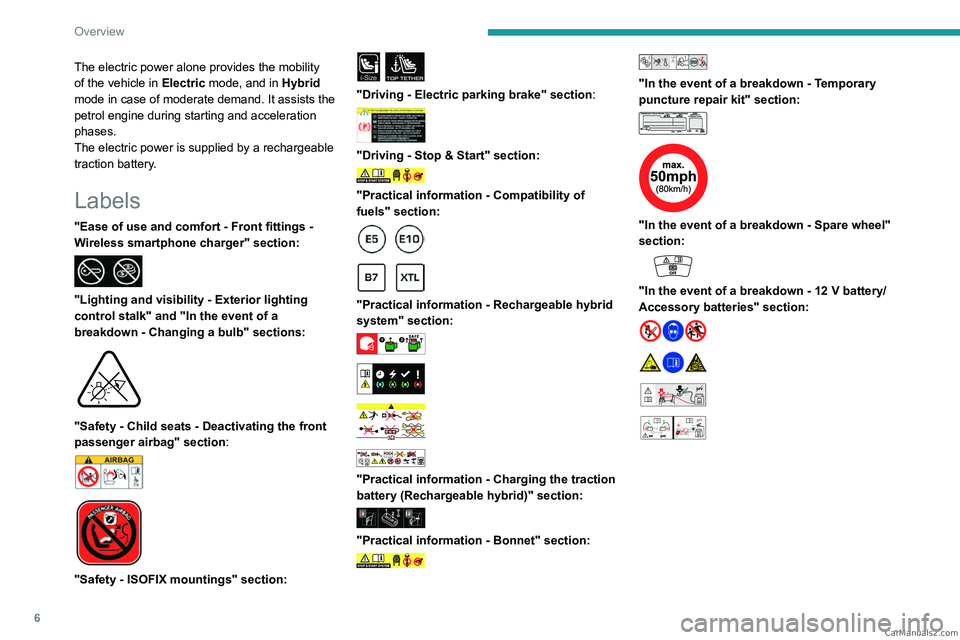
Labels
"Ease of use and comfort - Front fittings -
Wireless smartphone charger" section:
"Lighting and visibility - Exterior lighting
control stalk" and "In the event of a
breakdown - Changing a bulb" sections:
"Safety - Child seats - Deactivating the front
passenger airbag" section:
"Safety - ISOFIX mountings" section:
i-SizeTOP TETHER
"Driving - Electric parking brake" section:
"Driving - Stop & Start" section:
"Practical information - Compatibility of
fuels" section:
"Practical information - Rechargeable hybrid
system" section:
"Practical information - Charging the traction
battery (Rechargeable hybrid)" section:
"Practical information - Bonnet" section:
"In the event of a breakdown - Temporary
puncture repair kit" section:
"In the event of a breakdown - Spare wheel"
section:
"In the event of a breakdown - 12 V battery/
Accessory batteries" section:
24V12V
CarM an uals 2 .c o m
Page 9 of 292
7
Eco-driving
Eco-driving
Eco-driving refers to a range of everyday
practices that allow the motorist to optimise
the vehicle's energy consumption (fuel and/or
electricity) and CO
2 emissions.
Optimise your use of the gearbox
With a manual gearbox, move off gently and
change up promptly. While accelerating, change
up early.
With an automatic gearbox, favour automatic
mode. Do not depress the accelerator pedal
heavily or suddenly.
The gear shift indicator prompts you to engage
the most suitable gear. Whenever this indication
is displayed on the instrument panel, follow it
straight away.
With an automatic gearbox, this indicator
appears only in manual mode.
Drive smoothly
Maintain a safe distance between vehicles, use
engine braking rather than the brake pedal and
press the accelerator gradually. These practices
help to save on energy consumption, reduce
CO
2 emissions and decrease general traffic
noise.
When the traffic is flowing smoothly, select the
cruise control.
Control the use of electrical equipment
Before moving off, if the passenger compartment
is too warm, ventilate it by opening the windows
and air vents before using the air conditioning.
At speeds above 31
mph (50 km/h), close the
windows and leave the air vents open.
Consider using equipment that can help keep
the temperature in the passenger compartment
down (e.g.
sunroof blind, window blinds).
Unless automatically regulated, switch off the air
conditioning as soon as the desired temperature
has been reached.
Switch off the demisting and defrosting functions,
if they are not managed automatically.
Switch off the heated seat as soon as possible.
Adapt your use of the headlamps and/or
foglamps to the level of visibility, in accordance
with current legislation in the country in which
you are driving.
Avoid running the engine before moving off,
particularly in winter (other than in severe wintry
conditions: temperature below -23°C). The
vehicle will warm up much faster while driving.
As a passenger, avoid connecting your
multimedia devices (e.g.
film, music, video
game) to help reduce the consumption of energy.
Disconnect all portable devices before leaving
the vehicle.
Limit the causes of excess consumption
Spread loads throughout the vehicle. Place the
heaviest items in the boot as close as possible to
the rear seats. Limit the loads carried in the vehicle and
minimise wind resistance (e.g.
roof bars, roof
rack, bicycle carrier, trailer). Preferably, use a
roof box.
Remove roof bars and roof racks after use.
At the end of winter, remove snow tyres and refit
summer tyres.
Avoid using the Dynamic Pack for too long, in
order to limit your energy consumption.
Comply with the servicing instructions
Check tyre pressures regularly, with the tyres
cold, referring to the label in the door aperture on
the driver's side.
Carry out this check in particular:
–
before a long journey
.
–
at each change of season.
–
after a long period out of use.
Do not forget the spare wheel and, where
applicable, the tyres on your trailer or caravan.
Have your vehicle serviced regularly (e.g.
engine
oil, oil filter, air filter, passenger compartment
filter, etc.). Observe the schedule of operations in
the manufacturer's service schedule.
With a BlueHDi Diesel engine, if the SCR system
has a fault, your vehicle will emit pollution. Visit
a PEUGEOT dealer or a qualified workshop
as soon as possible to restore your vehicle's
nitrogen oxide emissions to legal levels.
When filling the fuel tank, do not continue after
the third cut-out of the nozzle, to avoid overflow. CarM an uals 2 .c o m
Page 35 of 292
33
Access
2► With the vehicle unlocked or with the
electronic key in the recognition zone, press the
central tailgate control.
►
Raise the tailgate.
When selective unlocking is activated,
the electronic key must be close to the
rear of the vehicle.
The tailgate is not designed to hold a bicycle carrier.
Closing the tailgate
► Lower the tailgate using the interior grips.
► Release the grips and press down on the
outside of the tailgate to close it.
In the event of a malfunction or if you
experience difficulty opening or closing
the tailgate, have it checked by a PEUGEOT
dealer or a qualified workshop without delay,
to avoid the issue deteriorating and prevent
any risk of the tailgate dropping, potentially
causing serious injury.
Back-up release
To manually unlock the boot in the event of a
battery or central locking failure.
Unlocking
► Fold the rear seats to gain access to the lock
from inside the boot.
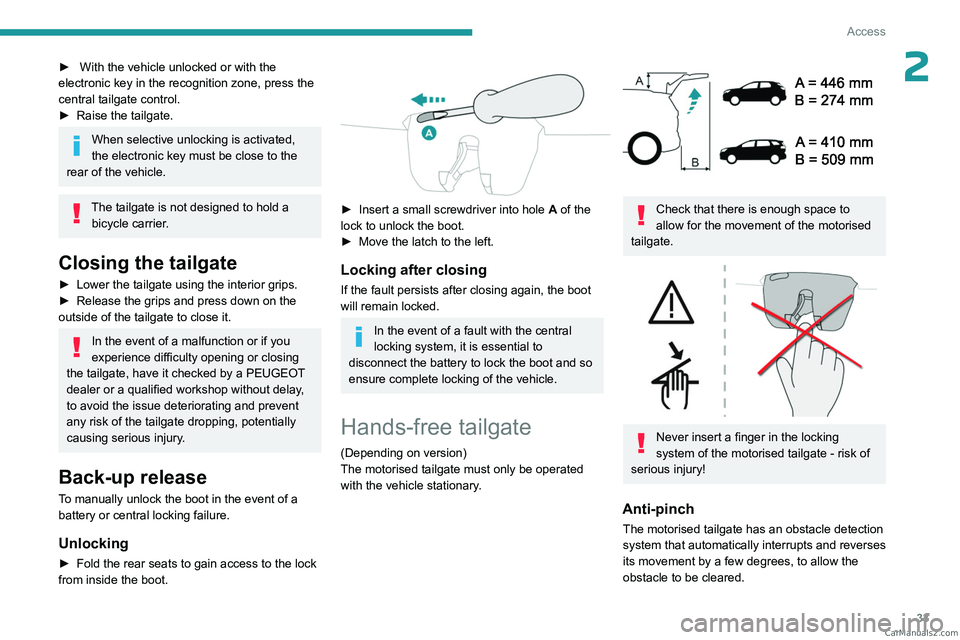
► Insert a small screwdriver into hole A of the
lock to unlock the boot.
►
Move the latch to the left.
Locking after closing
If the fault persists after closing again, the boot
will remain locked.
In the event of a fault with the central
locking system, it is essential to
disconnect the battery to lock the boot and so
ensure complete locking of the vehicle.
Hands-free tailgate
(Depending on version)
The motorised tailgate must only be operated
with the vehicle stationary.
Check that there is enough space to
allow for the movement of the motorised
tailgate.
Never insert a finger in the locking
system of the motorised tailgate - risk of
serious injury!
Anti-pinch
The motorised tailgate has an obstacle detection
system that automatically interrupts and reverses
its movement by a few degrees, to allow the
obstacle to be cleared. CarM an uals 2 .c o m
Page 40 of 292
38
Access
Locking the vehicle
with exterior perimeter
monitoring only
Deactivate the interior volumetric and anti-tilt
monitoring to avoid the unwanted triggering of
the alarm, in certain cases such as:
–
Slightly open window
.
–
W
ashing the vehicle.
–
Changing a wheel.
–
T
owing the vehicle.
–
T
ransport on a ship or ferry.
Deactivating the interior volumetric
and anti-tilt monitoring
► Switch off the ignition and within 10 seconds
press the alarm button until its red indicator lamp
is on fixed.
►
Get out of the vehicle.
►
Immediately lock the vehicle using the remote
control or the Keyless Entry and Start system.
Only the exterior perimeter monitoring is
activated; the button's red indicator lamp flashes
once every second.
To take effect, this deactivation must be carried out after each time the ignition is
switched off.
Reactivating the interior volumetric
and anti-tilt monitoring
► Deactivate the exterior perimeter monitoring
by unlocking the vehicle using the remote control
or the Keyless Entry and Start system.
The indicator lamp in the button goes off.
►
Reactivate all monitoring by locking the
vehicle using the remote control or the Keyless
Entry and Start system.
The red indicator lamp in the button once again
flashes every second.
Triggering of the alarm
This is indicated by sounding of the siren
and flashing of the direction indicators for 30
seconds.
Depending on the country of sale, certain
monitoring functions remain active until the alarm
has been triggered eleven times consecutively.
When the vehicle is unlocked using the remote
control or the Keyless Entry and Start system,
rapid flashing of the red indicator lamp in the
button informs you that the alarm was triggered
during your absence. When the ignition is
switched on, this flashing stops.
Failure of the remote control
To deactivate the monitoring functions:
► Unlock the vehicle using the key in the
driver's door lock.
►
Open the door; the alarm is triggered. ►
Switch on the ignition; this stops the alarm.
The indicator lamp in the button goes off.
Locking the vehicle without
activating the alarm
► Lock or deadlock the vehicle using the key
(built-in the remote control) in the driver's door
lock.
Malfunction
When the ignition is switched on, the fixed
lighting of the red indicator lamp in the button
indicates a system malfunction.
Have it checked by a PEUGEOT dealer or a
qualified workshop.
Electric windows
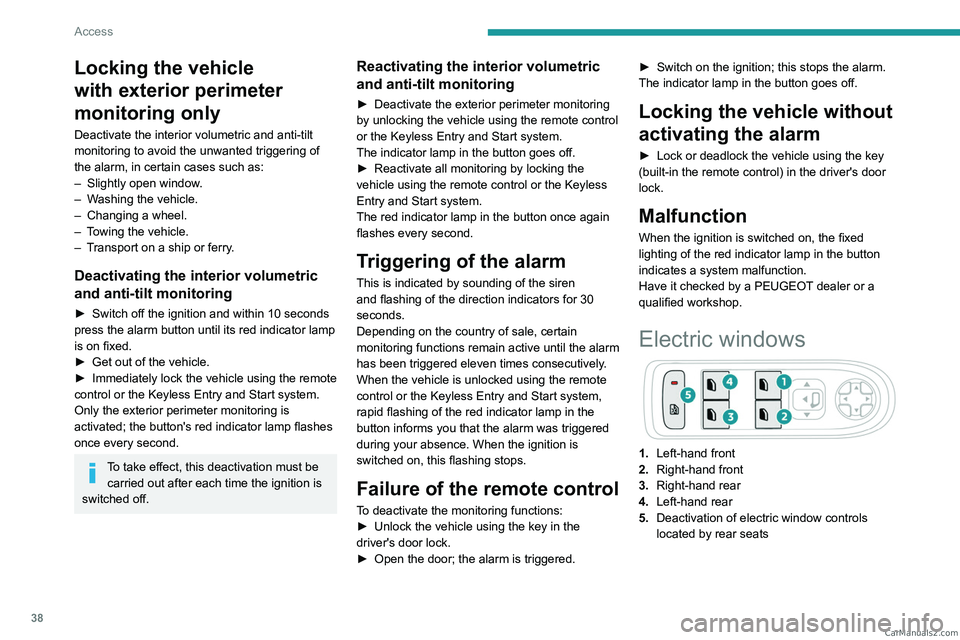
1. Left-hand front
2. Right-hand front
3. Right-hand rear
4. Left-hand rear
5. Deactivation of electric window controls
located by rear seats CarM an uals 2 .c o m
Page 44 of 292

42
Ease of use and comfort
Driving position
Correct seating position
Adopting a good driving position contributes to
improving driver comfort and protection.
It also optimises interior and exterior visibility as
well as access to controls.
Certain seat adjustments described in this
section depend on the trim level and the country
in which the vehicle is sold.
Driver’s side
Sit fully back in the seat with your pelvis, back
and shoulders in contact with the seat backrest.
Adjust the seat cushion height so that your eyes
are level with the centre of the windscreen.
The head should be at a minimum distance of
10 cm from the roof.
Adjust the longitudinal position of the seat so
that you can fully depress the pedals with legs
slightly flexed.
The distance between the knees and the
dashboard should be at least 10 cm, for easy
access to the dashboard controls.
Adjust the backrest angle to as vertical a position
as possible; never tilt it more than 25°.
Adjust the head restraint so that its upper edge is
level with the top of the head.
Adjust the length of the seat cushion to support
your thighs.
Adjust the lumbar support so that it conforms to
the shape of the spine.
Adjust the steering wheel so that it is at least
25
cm from the sternum and you can hold it with
the arms slightly bent.
The steering wheel should not hide the
instrument panel.
As a safety precaution, adjust the seats only when the vehicle is stationary.
Electrically-adjustable seats
Switch the ignition on to enable the
adjustments to be made.
Passenger’s side
Sit fully back in the seat with the pelvis, back and
shoulders in contact with the seat backrest.
Adjust the longitudinal position of the seat so that
you are at a distance of at least 25
cm from the
dashboard.
Adjust the head restraint so that its upper edge is
level with the top of the head.
Before moving off
Adjust the interior and exterior door mirrors to
reduce blind spots.
Fasten the seat belt: place the diagonal belt in
the middle of the shoulder and adjust the lap belt
so that it is tightened across the pelvis.
Ensure that all passengers have fastened their
seat belts correctly.
Electric door mirrors
Switch the ignition on to enable the
adjustments to be made. CarM an uals 2 .c o m
Page 45 of 292
43
Ease of use and comfort
3When driving
Maintain a good driving position and hold the
steering wheel with both hands at the 'quarter to
three' position, so that you can easily and quickly
reach the controls behind and near the steering
wheel.
Never adjust the seats or steering wheel
when driving.
Always keep your feet on the floor.
Front seats
Before moving the seat backwards,
ensure that there is no person or object
that might prevent the full travel of the seat.
There is a risk of trapping or pinching
passengers if present in the rear seats or of
jamming the seat if large objects are placed
on the floor behind the seat.
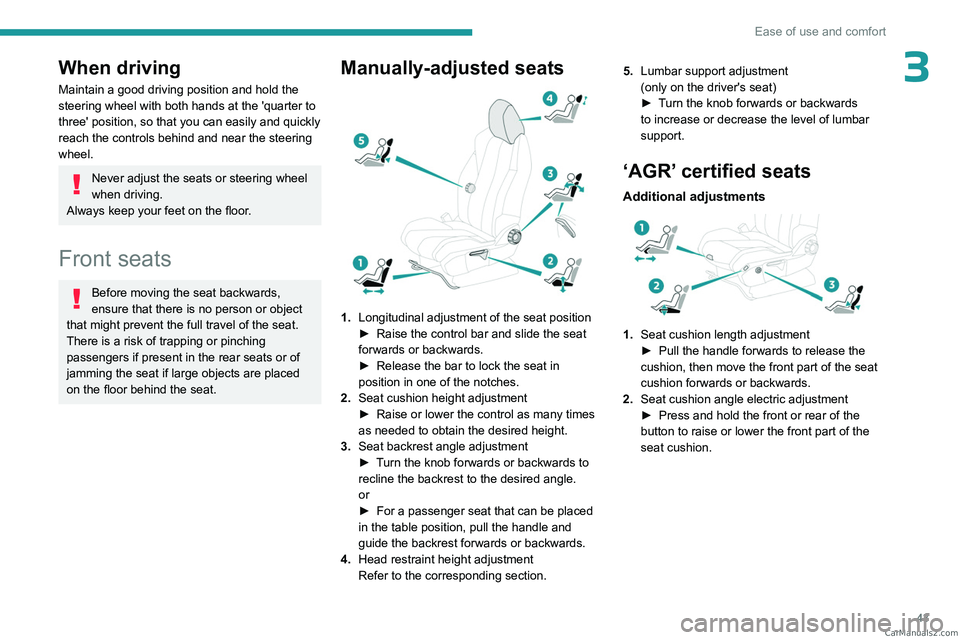
Manually-adjusted seats
1. Longitudinal adjustment of the seat position
►
Raise the control bar and slide the seat
forwards or backwards.
►
Release the bar to lock the seat in
position in one of the notches.
2. Seat cushion height adjustment
►
Raise or lower the control as many times
as needed to obtain the desired height.
3. Seat backrest angle adjustment
►
T
urn the knob forwards or backwards to
recline the backrest to the desired angle.
or
►
For a passenger seat that can be placed
in the table position, pull the handle and
guide the backrest forwards or backwards.
4. Head restraint height adjustment
Refer to the corresponding section. 5.
Lumbar support adjustment
(only on the driver's seat)
►
T
urn the knob forwards or backwards
to increase or decrease the level of lumbar
support.
‘AGR’ certified seats
Additional adjustments
1. Seat cushion length adjustment
►
Pull the handle forwards to release the
cushion, then move the front part of the seat
cushion forwards or backwards.
2. Seat cushion angle electric adjustment
►
Press and hold the front or rear of the
button to raise or lower the front part of the
seat cushion. CarM an uals 2 .c o m