2023 PEUGEOT 5008 tow bar
[x] Cancel search: tow barPage 202 of 292
200
In the event of a breakdown
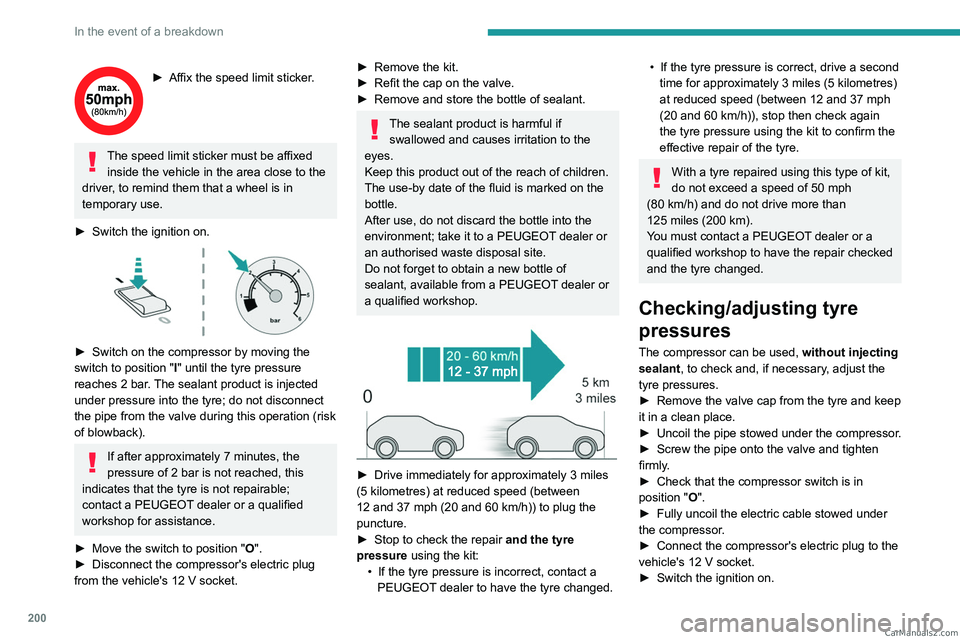
► Affix the speed limit sticker.
The speed limit sticker must be affixed
inside the vehicle in the area close to the
driver, to remind them that a wheel is in
temporary use.
►
Switch the ignition on.
► Switch on the compressor by moving the
switch to position "I" until the tyre pressure
reaches 2
bar. The sealant product is injected
under pressure into the tyre; do not disconnect
the pipe from the valve during this operation (risk
of blowback).
If after approximately 7 minutes, the
pressure of 2 bar is not reached, this
indicates that the tyre is not repairable;
contact a PEUGEOT dealer or a qualified
workshop for assistance.
►
Move the switch to position
"O".
►
Disconnect the compressor's electric plug
from the vehicle's 12
V socket.
► Remove the kit.
► Refit the cap on the valve.
►
Remove and store the bottle of sealant.
The sealant product is harmful if swallowed and causes irritation to the
eyes.
Keep this product out of the reach of children.
The use-by date of the fluid is marked on the
bottle.
After use, do not discard the bottle into the
environment; take it to a PEUGEOT dealer or
an authorised waste disposal site.
Do not forget to obtain a new bottle of
sealant, available from a PEUGEOT dealer or
a qualified workshop.
► Drive immediately for approximately 3 miles
(5 kilometres) at reduced speed (between
12 and 37
mph (20 and 60 km/h)) to plug the
puncture.
►
Stop to check the repair
and the tyre
pressure using the kit:
•
If the tyre pressure is incorrect, contact a
PEUGEOT
dealer to have the tyre changed.
• If the tyre pressure is correct, drive a second
time for approximately 3 miles (5 kilometres)
at reduced speed (between 12 and 37
mph
(20 and 60
km/h)), stop then check again
the tyre pressure using the kit to confirm the
effective repair of the tyre.
With a tyre repaired using this type of kit,
do not exceed a speed of 50 mph
(80
km/h) and do not drive more than
125
miles (200 km).
You must contact a PEUGEOT dealer or a
qualified workshop to have the repair checked
and the tyre changed.
Checking/adjusting tyre
pressures
The compressor can be used, without injecting
sealant, to check and, if necessary, adjust the
tyre pressures.
►
Remove the valve cap from the tyre and keep
it in a clean place.
►
Uncoil
the pipe stowed under the compressor.
►
Screw the pipe onto the valve and tighten
firmly
.
►
Check that the compressor switch is in
position
"O".
►
Fully uncoil the electric cable stowed under
the compressor
.
►
Connect the compressor's electric plug to the
vehicle's 12
V socket.
►
Switch the ignition on. CarM an uals 2 .c o m
Page 203 of 292
201
In the event of a breakdown
8► Start the compressor by placing the switch at
position "I" and adjust the pressure to the value
shown on the vehicle's tyre pressure label. To
deflate: press the black button located on the
compressor pipe, near the valve connection.
If after 7 minutes the pressure of 2 bar is
not reached, the tyre is damaged;
contact a PEUGEOT
dealer or a qualified
workshop for assistance.
►
Once the correct pressure is reached, put the
switch in position
"O".
►
Remove the kit and stow it.
►
Refit the cap on the valve.
Spare wheel
Visit this link to view explanatory videos:
http://q-r.to/bagGl9
Accessing the spare wheel
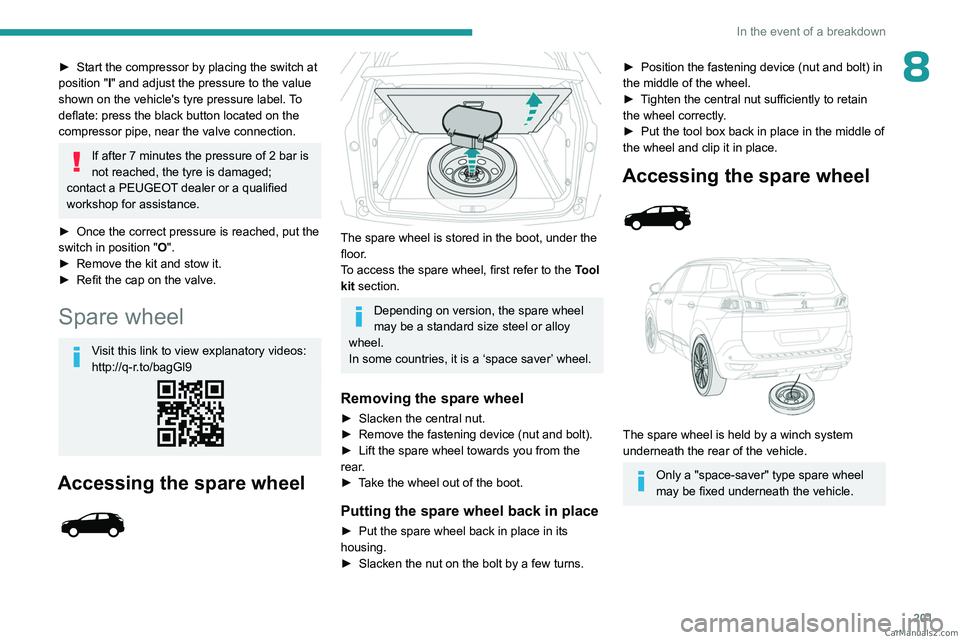
The spare wheel is stored in the boot, under the
floor.
To access the spare wheel, first refer to the Tool
kit
section.
Depending on version, the spare wheel
may be a standard size steel or alloy
wheel.
In some countries, it is a ‘space saver’ wheel.
Removing the spare wheel
► Slacken the central nut.
► Remove the fastening device (nut and bolt).
►
Lift the spare wheel towards you from the
rear
.
►
T
ake the wheel out of the boot.
Putting the spare wheel back in place
► Put the spare wheel back in place in its
housing.
►
Slacken the nut on the bolt by a few turns.
► Position the fastening device (nut and bolt) in
the middle of the wheel.
►
T
ighten the central nut sufficiently to retain
the wheel correctly.
►
Put the tool box back in place in the middle of
the wheel and clip it in place.
Accessing the spare wheel
The spare wheel is held by a winch system
underneath the rear of the vehicle.
Only a "space-saver" type spare wheel
may be fixed underneath the vehicle. CarM an uals 2 .c o m
Page 216 of 292
214
In the event of a breakdown
General recommendations
Observe the legislation in force in the country where you are driving.
Check that the towing vehicle is heavier than the towed vehicle.
The driver must remain at the wheel of the towed vehicle and must have a\
valid driving licence.
When towing a vehicle with all four wheels on the ground, always use an \
approved towbar; ropes and straps are prohibited.
The towing vehicle must move off gently.
When the vehicle is towed with its engine off, there is no longer braking and steering assistance.
A professional recovery service must be called in the following cases:
– broken down on a motorway or main road;
–
not possible to put the gearbox into neutral, unlock the steering, or re\
lease the parking brake;
–
not possible to tow a vehicle with an automatic gearbox, with the engine\
running;
–
towing with only two wheels on the ground;
–
four-wheel drive vehicle;
–
no approved towbar available.
Rechargeable hybrid vehicles
Before any intervention, with the ignition
on, depress the brake pedal and select mode N, then switch off the hybrid system (READY
indicator lamp off).
Always call on professionals for recovery of
the vehicle on a flatbed lorry or trailer.Use the towing eye only to free the vehicle
if it is stuck, or to secure it for recovery on a
flatbed lorry or trailer.
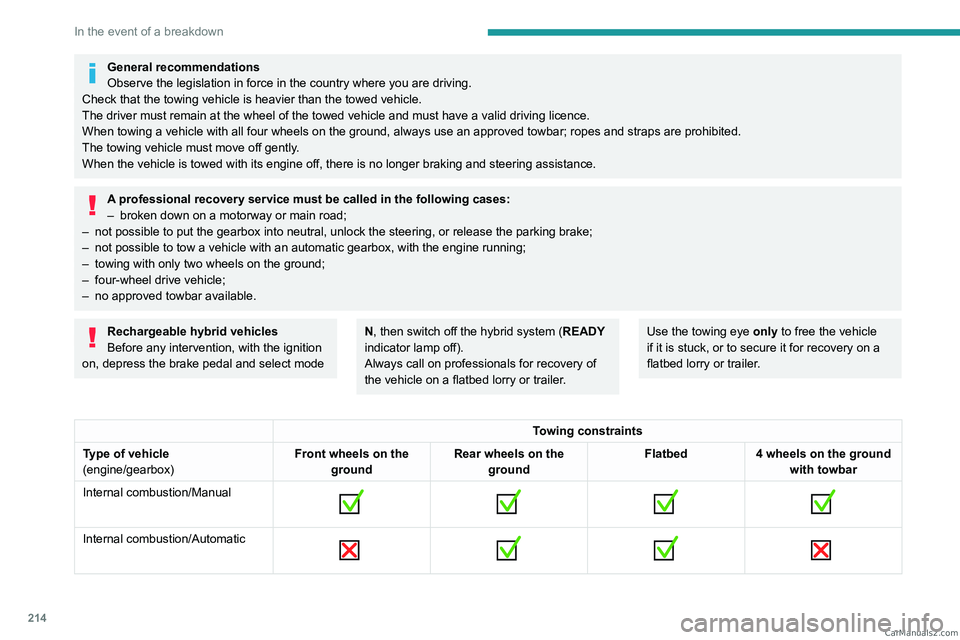
Towing constraints
Type of vehicle
(engine/gearbox) Front wheels on the
ground Rear wheels on the
ground Flatbed
4 wheels on the ground
with towbar
Internal combustion/Manual
Internal combustion/Automatic
CarM an uals 2 .c o m
Page 217 of 292
215
In the event of a breakdown
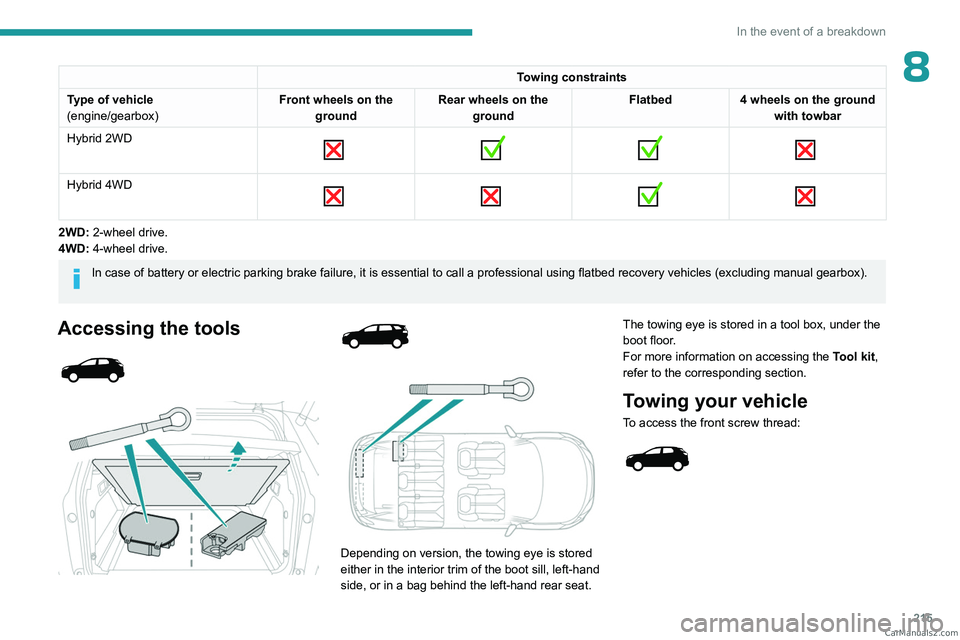
8Towing constraints
Type of vehicle
(engine/gearbox) Front wheels on the
ground Rear wheels on the
ground Flatbed
4 wheels on the ground
with towbar
Hybrid 2WD
Hybrid 4WD
2WD: 2-wheel drive.
4WD: 4-wheel drive.
In case of battery or electric parking brake failure, it is essential to call a p
rofessional using flatbed recovery vehicles (excluding manual gearbox).
Accessing the tools
Depending on version, the towing eye is stored
either in the interior trim of the boot sill, left-hand
side, or in a bag behind the left-hand rear seat. The towing eye is stored in a tool box, under the
boot floor.
For more information on accessing the
Tool kit,
refer to the corresponding section.
Towing your vehicle
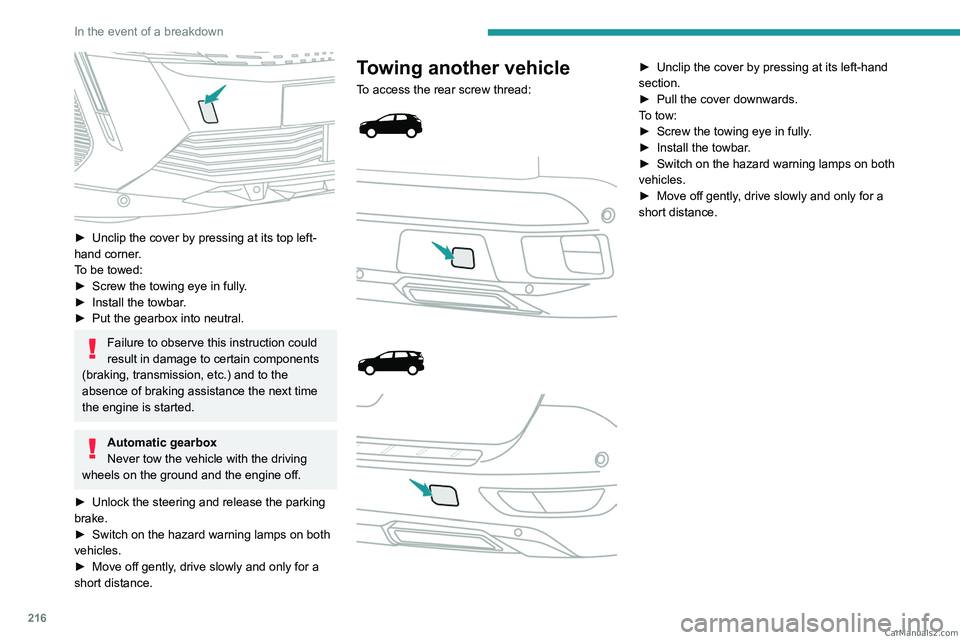
To access the front screw thread:
CarM an uals 2 .c o m
Page 218 of 292
216
In the event of a breakdown
► Unclip the cover by pressing at its top left-
hand corner .
To be towed:
►
Screw the towing eye in fully
.
►
Install the towbar
.
►
Put the gearbox into neutral.
Failure to observe this instruction could
result in damage to certain components
(braking, transmission, etc.) and to the
absence of braking assistance the next time
the engine is started.
Automatic gearbox
Never tow the vehicle with the driving
wheels on the ground and the engine off.
►
Unlock the steering and release the parking
brake.
►
Switch on the hazard warning lamps on both
vehicles.
►
Move off gently
, drive slowly and only for a
short distance.
Towing another vehicle
To access the rear screw thread:
► Unclip the cover by pressing at its left-hand
section.
►
Pull the cover downwards.
T
o tow:
►
Screw the towing eye in fully
.
►
Install the towbar
.
►
Switch on the hazard warning lamps on both
vehicles.
►
Move off gently
, drive slowly and only for a
short distance. CarM an uals 2 .c o m
Page 269 of 292
267
Alphabetical index
Energy economy (mode) 183
Energy economy mode
183
Energy flows
23
Energy recovery
19, 123
Engine
189
Engine compartment
183–185
Engine, Diesel
165, 185, 195, 220
Engine, petrol
126, 185, 218
Engines
217–218, 220
Environment
7, 31
e-Save function (energy reserve)
24
ESC (electronic stability control)
87
Expanded traffic sign recognition
135
Exterior lighting
77
F
Fatigue detection 153
Filling the AdBlue® tank
187, 190
Filling the fuel tank
165–166
Filter, air
187
Filter, oil
187
Filter, particle
186–187
Filter, passenger compartment
56, 187
Fitting a wheel
203, 205
Fitting roof bars
180–181
Fittings, boot
68
Fittings, front
62
Fittings, interior
62
Fittings, rear
66
Flap, charging
176
Flap, fuel filler
165–166
Flap, ski 67
Flashing indicators
75
Flat bed (towing)
214
Floor, boot, adjustable
72
Floor, concertina
53
Fluid, brake
186
Fluid, engine coolant
186
Foglamps, rear
74, 207
Folding the rear seats
49–52
Four-wheel drive (4WD)
126, 182
Frequency (radio)
251
Fuel
7, 165
Fuel consumption
7, 19
Fuel level, low
165
Fuel (tank)
165–166
Fuses
208
G
Gauge, fuel 165
Gearbox, automatic
117–118, 120–124, 188, 208
Gearbox, manual
117, 124, 188
Gear lever, manual gearbox
11 7
Gear shift indicator
126
Glove box
62
G.P.S.
245
Grab handles
62
H
Hands-free access 34–35
Hands-free tailgate
34–36
Hazard warning lamps
84, 195
Headlamps (adjustment)
76
Headlamps, automatic dipping
77–78
Headlamps, automatic operation
76
Headlamps, dipped beam
207
Headlamps, halogen
76
Headlamps, main beam
77, 207
Head restraints, front
44–45
Head restraints, rear
48–50
Heating
56
Heating, programmable
24, 61
Hi-Fi system
63
High voltage
167
Hill Assist Descent Control (HADC)
90
Hill start assist
124
Histogramme, fuel consumption
24
Horn
85
Hybrid
221
I
i-Cockpit® amplify function 46
Ignition
114, 255
Ignition on
11 4
Immobiliser, electronic
11 2
Indicator, AdBlue® range
18
Indicator, coolant temperature
18
Indicator, engine oil level
17, 20 CarM an uals 2 .c o m
Page 272 of 292

270
Alphabetical index
Resetting the trip 21–22
Resetting the trip recorder
21
Rev counter
9
Reversing camera
130, 157–159
Reversing lamps
207
Roof bars
180–181
Running out of fuel (Diesel)
195
S
Safety, children 96–102, 105–106, 108
Saturation of the particle filter (Diesel)
187
Screen menu map
231
Screens, very cold conditions
182
Screenwash
81
Screenwash, front
81
Screenwash, rear
81
SCR (Selective Catalytic Reduction)
19, 189
Seat belts
91–92, 94, 100
Seat belts, rear
92–93
Seats, additional
53–55
Seats, electric
45–46
Seats, front
43, 45–46
Seats, heated
46
Seats, rear
48–55, 98
Selector, gear
118, 121–124
Sensors (warnings)
130
Serial number, vehicle
223
Servicing
16, 187, 189
Settings, equipment
23–24
Settings, system
234, 257
Sidelamps
75, 207
Silent vehicle warning sound (Rechargeable
hybrid)
85
Smartphone
25, 64
Snow chains
129, 181–182
Snow screen
182
Socket, 12 V accessory
63, 66, 72
Socket, auxiliary
230, 252
Socket, Jack
252
Speakers
63
Speed limiter
131, 134–136
Speed limit recognition
131, 133
Speedometer
9, 131
Sport mode
125–126
Spotlamps, side
77
Stability control (ESC)
87–88, 90
Starting a Diesel engine
165
Starting the engine
11 3
Starting the vehicle
113, 122–123
Starting using another battery
114, 209
State of charge, battery
23
Station, radio
227–228, 251
Stay, engine bonnet
184
Steering mounted controls, audio
225, 238
Steering wheel (adjustment)
47
Stickers, customising
193
Stopping the vehicle
113, 122–123
Stop & Start
22, 57, 60, 127–128, 165, 183, 187, 211
Storage
62, 65, 67–68
Storage box
72
Storage boxes
68
Storage compartments
62
Storage wells
72Storing driving positions 45–46
Sunroof, panoramic
39–41
Sunshine sensor
56
Sun visor
62
Suspension
189
Synchronising the remote control
32
T
Table position 44
Tables, aircraft
67
Tables of engines
221
Tailgate
32
Tank, fuel
165–166
Technical data
218, 220–221
Telephone
232–233, 254–256
Temperature, coolant
18
Ticket holder
62
Time (setting)
234, 258
TMC (Traffic info)
245
Tool box
72
Tools
195–198, 201–203
Topping-up AdBlue®
190
Top Tether (fixing)
102
Total distance recorder
20–21
Touch screen
21–24, 61
Towball, quickly detachable
178–180
Towbar
88, 177
Towbar with quickly detachable
towball
178–180
Towed loads
217–218, 220–221
Towing
213–216 CarM an uals 2 .c o m