2023 PEUGEOT 408 window
[x] Cancel search: windowPage 70 of 244
68
Lighting and visibility
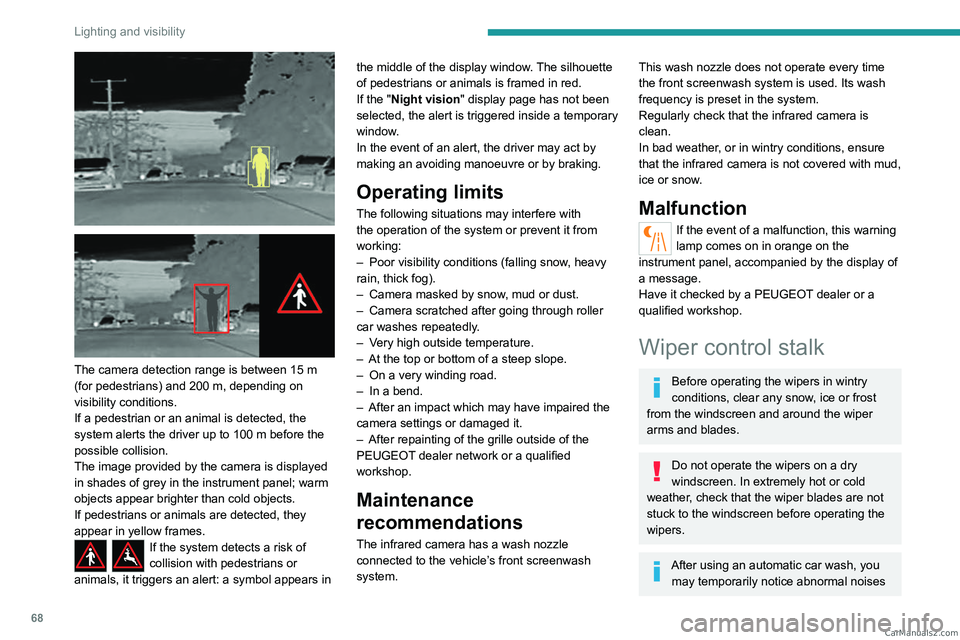
The camera detection range is between 15 m
(for pedestrians) and 200 m, depending on
visibility conditions.
If a pedestrian or an animal is detected, the
system alerts the driver up to 100 m before the
possible collision.
The image provided by the camera is displayed
in shades of grey in the instrument panel; warm
objects appear brighter than cold objects.
If pedestrians or animals are detected, they
appear in yellow frames.
If the system detects a risk of
collision with pedestrians or
animals, it triggers an alert: a symbol appears in the middle of the display window. The silhouette
of pedestrians or animals is framed in red.
If the "
Night vision " display page has not been
selected, the alert is triggered inside a temporary
window.
In the event of an alert, the driver may act by
making an avoiding manoeuvre or by braking.
Operating limits
The following situations may interfere with
the operation of the system or prevent it from
working:
–
Poor visibility conditions (falling snow
, heavy
rain, thick fog).
–
Camera masked by snow
, mud or dust.
–
Camera scratched after going through roller
car washes repeatedly
.
–
V
ery high outside temperature.
–
At the top or bottom of a steep slope.
–
On a very winding road.
–
In a bend.
–
After an impact which may have impaired the
camera settings or damaged it.
–
After repainting of the grille outside of the
PEUGEOT
dealer network or a qualified
workshop.
Maintenance
recommendations
The infrared camera has a wash nozzle
connected to the vehicle’s front screenwash
system.
This wash nozzle does not operate every time
the front screenwash system is used. Its wash
frequency is preset in the system.
Regularly check that the infrared camera is
clean.
In bad weather, or in wintry conditions, ensure
that the infrared camera is not covered with mud,
ice or snow.
Malfunction
If the event of a malfunction, this warning
lamp comes on in orange on the
instrument panel, accompanied by the display of
a message.
Have it checked by a PEUGEOT dealer or a
qualified workshop.
Wiper control stalk
Before operating the wipers in wintry
conditions, clear any snow, ice or frost
from the windscreen and around the wiper
arms and blades.
Do not operate the wipers on a dry
windscreen. In extremely hot or cold
weather, check that the wiper blades are not
stuck to the windscreen before operating the
wipers.
After using an automatic car wash, you may temporarily notice abnormal noises CarM an uals 2 .c o m
Page 83 of 244
81
Safety
5Lateral airbags
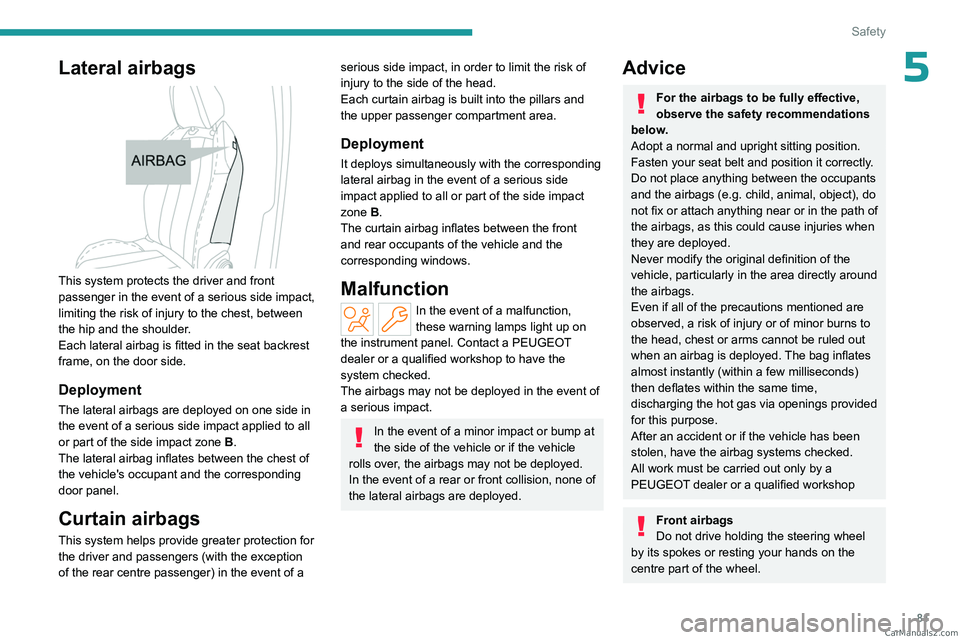
This system protects the driver and front
passenger in the event of a serious side impact,
limiting the risk of injury to the chest, between
the hip and the shoulder.
Each lateral airbag is fitted in the seat backrest
frame, on the door side.
Deployment
The lateral airbags are deployed on one side in
the event of a serious side impact applied to all
or part of the side impact zone B.
The lateral airbag inflates between the chest of
the vehicle's occupant and the corresponding
door panel.
Curtain airbags
This system helps provide greater protection for
the driver and passengers (with the exception
of the rear centre passenger) in the event of a
serious side impact, in order to limit the risk of
injury to the side of the head.
Each curtain airbag is built into the pillars and
the upper passenger compartment area.
Deployment
It deploys simultaneously with the corresponding
lateral airbag in the event of a serious side
impact applied to all or part of the side impact
zone B.
The curtain airbag inflates between the front
and rear occupants of the vehicle and the
corresponding windows.
Malfunction
In the event of a malfunction,
these warning lamps light up on
the instrument panel. Contact a PEUGEOT
dealer or a qualified workshop to have the
system checked.
The airbags may not be deployed in the event of
a serious impact.
In the event of a minor impact or bump at
the side of the vehicle or if the vehicle
rolls over, the airbags may not be deployed.
In the event of a rear or front collision, none of
the lateral airbags are deployed.
Advice
For the airbags to be fully effective,
observe the safety recommendations
below.
Adopt a normal and upright sitting position.
Fasten your seat belt and position it correctly.
Do not place anything between the occupants
and the airbags (e.g.
child, animal, object), do
not fix or attach anything near or in the path of
the airbags, as this could cause injuries when
they are deployed.
Never modify the original definition of the
vehicle, particularly in the area directly around
the airbags.
Even if all of the precautions mentioned are
observed, a risk of injury or of minor burns to
the head, chest or arms cannot be ruled out
when an airbag is deployed. The bag inflates
almost instantly (within a few milliseconds)
then deflates within the same time,
discharging the hot gas via openings provided
for this purpose.
After an accident or if the vehicle has been
stolen, have the airbag systems checked.
All work must be carried out only by a
PEUGEOT dealer or a qualified workshop
Front airbags
Do not drive holding the steering wheel
by its spokes or resting your hands on the
centre part of the wheel. CarM an uals 2 .c o m
Page 85 of 244
83
Safety
5Child seats
The regulations on carrying children are specific to each country. Refer to the
legislation in force in your country.
For maximum safety, please observe the
following recommendations:
–
In accordance with European regulations,
all children under the age of 12 or less than
1.5 metres tall must travel in approved child
seats suited to their weight , on seats fitted with
a seat belt or ISOFIX mountings.
–
Statistically
, the safest seats in your
vehicle for carrying children are the rear
seats.
–
Children weighing less than 9 kg must
travel in the "rearward facing" position,
whether in the front or rear of the vehicle.
It is recommended that children travel
on the rear seats of the vehicle:
–
"rearward facing" up to the age of 3.
–
"forward facing" over the age of 3.
Make sure that the seat belt is correctly
positioned and tightened.
For child seats with a support leg, ensure that
the support leg is in firm and steady contact
with the floor.
An incorrectly installed child seat in a vehicle compromises the child's safety in
the event of an accident.
Ensure that there is no seat belt or seat belt
buckle under the child seat, as this could
destabilise it.
Remember to fasten the seat belts or the
child seat harness keeping the slack relative
to the child's body to a minimum, even for
short journeys.
When installing a child seat using the seat
belt, ensure that the seat belt is tightened
correctly on the child seat and that it secures
the child seat firmly on the vehicle seat. If
the passenger seat is adjustable, move it
forwards if necessary.
Remove the head restraint before
installing a child seat with a backrest on a
passenger seat.
Ensure that the head restraint is stored or
attached securely to prevent it from being
thrown around the vehicle in the event of
sharp braking. Refit the head restraint once
the child seat has been removed.
Installing a booster seat
The chest part of the seat belt must be
positioned on the child's shoulder without
touching the neck.
Ensure that the lap part of the seat belt
passes correctly over the child's thighs.
Use a booster seat with a backrest, equipped
with a belt guide at shoulder level.
Additional protections
To prevent accidental opening of the
doors and rear windows, use the "Child lock".
Take care not to open the rear windows by
more than one third.
To protect young children from the sun's rays,
fit side blinds on the rear windows.
As a safety measure, do not leave:
–
A
child alone and unsupervised inside a
vehicle.
–
A
child or an animal in a vehicle which is
exposed to the sun, with the windows closed.
–
The keys within reach of children inside the
vehicle.
Child seat at the rear
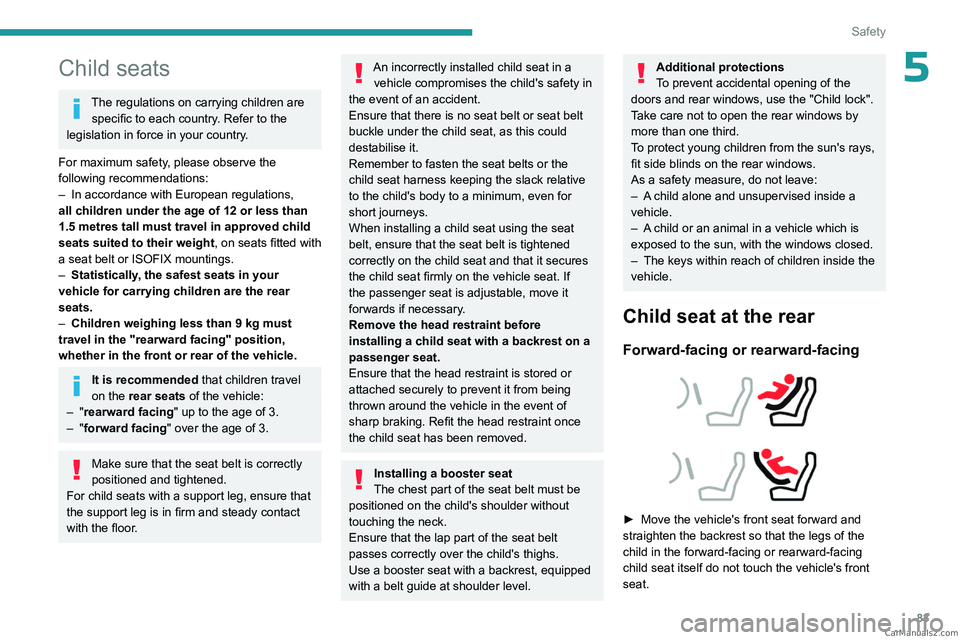
Forward-facing or rearward-facing
► Move the vehicle's front seat forward and
straighten the backrest so that the legs of the
child in the forward-facing or rearward-facing
child seat itself do not touch the vehicle's front
seat. CarM an uals 2 .c o m
Page 137 of 244

135
Driving
6The system may be temporarily disturbed by certain weather conditions (e.g. heavy
rain, hail or extreme temperature changes).
In particular, driving on a wet road or going
from a dry to a wet area can cause false
alerts (e.g.
presence of a cloud of water
droplets in the blind spot interpreted as a
vehicle).
In bad or wintry weather, ensure that
the
radars are not covered by mud, ice or
snow.
Take care not to cover the warning zone in
the door mirrors, or the detection zones on
the rear bumper, with adhesive labels or
other objects; they may hamper the correct
operation of the system.
Parking sensors
For more information, refer to the
General recommendations on the use
of driving and manoeuvring aids .
This system detects and signals the proximity of
obstacles (e.g.
pedestrian, vehicle, tree, barrier)
using sensors located in the bumper.
Rear parking sensors
► Engage reverse gear to start the system
(confirmed by an audible signal).
The system is switched off when reverse gear is
disengaged.
Audible assistance
The system signals the presence of obstacles
which are both within the sensors’ detection zone
and in the vehicle path defined by the direction of
the steering wheel.
Depending on version, in the example shown,
only the obstacles present in the shaded area
will be signalled by the audible assistance.
The proximity information is given by an
intermittent audible signal, the frequency of
which increases as the vehicle approaches the
obstacle.
When the distance between the vehicle and
the obstacle becomes less than about thirty
centimetres, the audible signal becomes
continuous.
The sound emitted by the speaker (right or
left) indicates the side on which the obstacle is
located.
Adjusting the audible signalPressing this button opens the
window for adjusting the volume
of the audible signal.
Visual assistance
This supplements the audible signal, without
taking account of the vehicle's trajectory, by
displaying bars on the screen whose location
represents the distance between the obstacle
and the vehicle (white: more distant, orange:
close, red: very close). CarM an uals 2 .c o m
Page 181 of 244
179
In the event of a breakdown
8Consult a PEUGEOT dealer or a qualified
workshop.
To charge the vehicle's battery yourself, use only a charger compatible with
lead-acid batteries with a nominal voltage of
12
V.
Follow the instructions provided by the
manufacturer of the charger.
Never reverse polarities.
It is not necessary to disconnect the
battery.
►
Switch the ignition off.
►
Switch off all electrical consumers (audio
system, lighting, wipers, etc.).
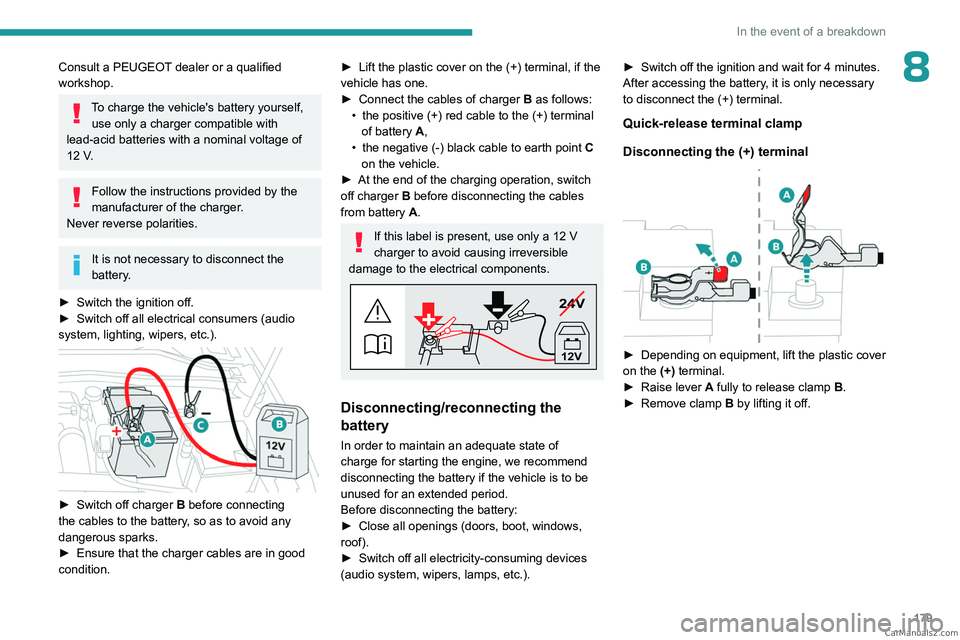
► Switch off charger B before connecting
the cables to the battery, so as to avoid any
dangerous sparks.
►
Ensure that the charger cables are in good
condition.
► Lift the plastic cover on the (+) terminal, if the
vehicle has one.
►
Connect the cables of charger B
as follows:
•
the positive (+) red cable to the (+) terminal
of battery
A,
•
the negative (-) black cable to earth point C
on the vehicle.
►
At the end of the charging operation, switch
off charger B
before disconnecting the cables
from battery A.
If this label is present, use only a 12 V
charger to avoid causing irreversible
damage to the electrical components.
24V
12V
Disconnecting/reconnecting the
battery
In order to maintain an adequate state of
charge for starting the engine, we recommend
disconnecting the battery if the vehicle is to be
unused for an extended period.
Before disconnecting the battery:
►
Close all openings (doors, boot, windows,
roof).
►
Switch off all electricity-consuming devices
(audio system, wipers, lamps, etc.). ►
Switch off the ignition and wait for 4
minutes.
After accessing the battery, it is only necessary
to disconnect the (+) terminal.
Quick-release terminal clamp
Disconnecting the (+) terminal
► Depending on equipment, lift the plastic cover
on the (+) terminal.
►
Raise lever
A
fully to release clamp
B
.
►
Remove clamp
B
by lifting it off. CarM an uals 2 .c o m
Page 184 of 244
182
In the event of a breakdown
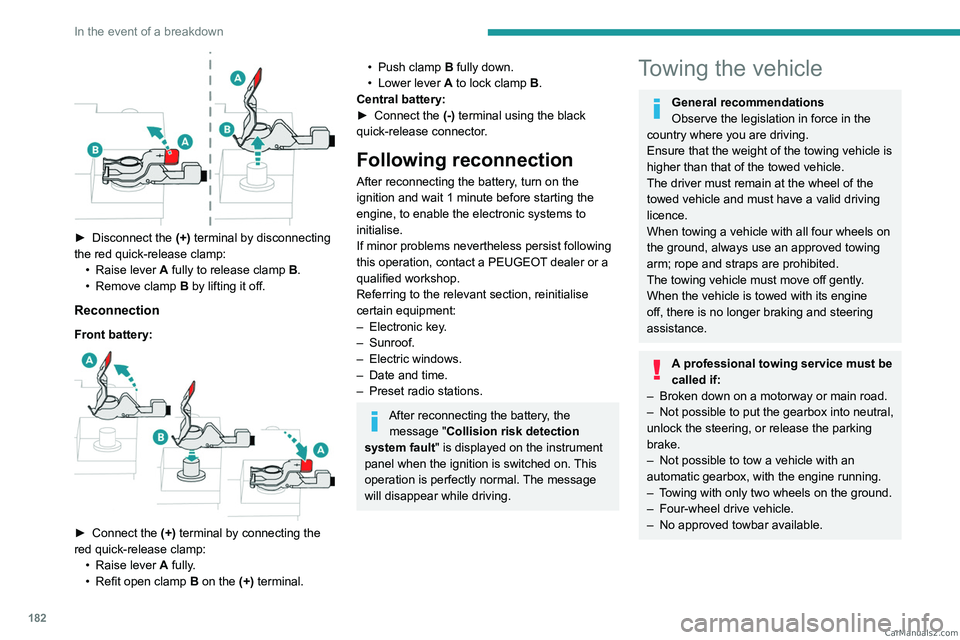
► Disconnect the (+) terminal by disconnecting
the red quick-release clamp: •
Raise lever
A
fully to release clamp
B
.
•
Remove clamp
B
by lifting it off.
Reconnection
Front battery:
► Connect the (+) terminal by connecting the
red quick-release clamp: •
Raise lever
A
fully.
•
Refit open clamp
B
on the (+) terminal.
• Push clamp B fully down.
• Lower lever A to lock clamp B.
Central battery:
►
Connect the
(-) terminal using the black
quick-release connector.
Following reconnection
After reconnecting the battery, turn on the
ignition and wait 1 minute before starting the
engine, to enable the electronic systems to
initialise.
If minor problems nevertheless persist following
this operation, contact a PEUGEOT dealer or a
qualified workshop.
Referring to the relevant section, reinitialise
certain equipment:
–
Electronic key
.
–
Sunroof.
–
Electric windows.
–
Date and time.
–
Preset radio stations.
After reconnecting the battery, the message "Collision risk detection
system fault" is displayed on the instrument
panel when the ignition is switched on. This
operation is perfectly normal. The message
will disappear while driving.
Towing the vehicle
General recommendations
Observe the legislation in force in the
country where you are driving.
Ensure that the weight of the towing vehicle is
higher than that of the towed vehicle.
The driver must remain at the wheel of the
towed vehicle and must have a valid driving
licence.
When towing a vehicle with all four wheels on
the ground, always use an approved towing
arm; rope and straps are prohibited.
The towing vehicle must move off gently.
When the vehicle is towed with its engine
off, there is no longer braking and steering
assistance.
A professional towing service must be
called if:
–
Broken down on a motorway or main road.
–
Not possible to put
the gearbox into neutral,
unlock the steering, or release the parking
brake.
–
Not possible to tow a vehicle with an
automatic gearbox, with the engine running.
–
T
owing with only two wheels on the ground.
–
Four-wheel drive vehicle.
–
No approved towbar available. CarM an uals 2 .c o m
Page 194 of 244
192
PEUGEOT i-Connect Advanced - PEUGEOT i-Connect
to "Connected vehicle" to enable to the
connection to the radio network.
Irrespective of a valid subscription to a
connected service, the remote management
of devices relating to or connected with
the security of devices, and the updating
of software and firmware, will be carried
out when necessary in order to comply
with a legal requirement applicable to the
Manufacturer (e.g. the applicable law in terms
of product liability, the regulations governing
e-call) or when necessary to protect the
respective vital interests of the vehicle's users
and passengers.
The establishment of a secure connection via
radio network and the corresponding remote
updates are not affected by the privacy
settings and are intended to be carried out
after being initialised by the user in response
to a related notification.
The system can notify the receipt of an update
when it is connected to an exterior Wi-Fi network
or a mobile telephone network.
Large updates are downloaded only via the Wi-Fi
network.
The availability of an update is notified on the
screen at the end of the journey with an option
of immediate installation or postponement of
installation.
The installation time is variable and can take
several minutes with a maximum of about 30 minutes. A notification will give an estimate of the
duration and a description of the update.
Update information is available through the
"Settings" application.
Press the "Settings" application.
In the list, select the "Updates" tab.
This button allows you to change the authorisation for automatic downloading
of updates via an exterior Wi-Fi network.
For safety reasons and because it
requires sustained attention on the part
of the driver, the installation must be carried
out with the ignition on but without starting the
engine.
The installation cannot be carried out in the
following cases:
–
engine running.
–
emergency call in progress.
–
insufficient battery level.
–
when charging for electric vehicles.
If an update has failed or has expired, contact a
dealer or a qualified workshop.
The Manufacturer does not charge for the use of this service.
However, the use of Wi-Fi and/or mobile
telephone networks by your smartphone may
incur extra charges if you exceed the data
allowance included in your contract.
Any associated costs will be billed to you by
your mobile telephone operator.
Personalisation
Press and hold the screen from one of the
system's home pages.
Or
Press the "Settings" application.
In the list, select the "Customization" tab.
Press the "Displays" field.
A page divided into 2 parts is displayed.
Press the HOME button at any time to leave this
page.
Personalising the screen
Press the pencil in the "Customize
Touchscreen" part.
A representation of the organisation of the
different home page ( HOME) Widgets
is
displayed.
A Widget is a reduced window of an application or service.
Adding a Widget
To add a Widget, press "Widget" on the left of the screen.
Or
Press one of these buttons on the screen.
Select the desired Widget.
Press the back arrow to return to the
previous page. CarM an uals 2 .c o m
Page 195 of 244

193
PEUGEOT i-Connect Advanced - PEUGEOT i-Connect
10Organising the Widgets on a home
page (HOME)
To move a Widget, press and hold it, then drag it
to the desired location.
Adding a page
To add a page, press "Page" on the left of the screen.
Press the back arrow to return to the
previous page.
Deleting a Widget
To move a Widget to the bin, press and hold it, then drag it to the bin.
Personalising the
instrument panel
Press the pencil in the "Customize
Driver Information" part.
The modification of the organisation of the
different Widget is displayed on the instrument
panel in real time.
A Widget is a reduced window of an application or service.
Adding a Widget
To add a Widget, press "Widget" on the left of the screen.
Or
Press one of these buttons on the screen.
Select the desired Widget.Press the back arrow to return to the
previous page.
Deleting a Widget
To move a Widget to the bin, press and hold it, then drag it to the bin.
Personalising i-Toggles
(depending on equipment)
In the central screen, display the page containing
the button that you want to include.
The shortcuts are used to access an application (air conditioning page, radio
page, etc.) or to perform an action (set the
temperature to 21°, call a selected directory
contact, etc.).
Press and hold the shortcut you want to
replace.
A panel is displayed on the central screen with
all of the eligible shortcuts in boxes.
A notification also informs you of the next step to
perform.
Select the new shortcut required. It will be
duplicated in i-Toggles and will replace the one
originally selected. A notification also informs you
of this.
To exit this function at any time, press this button or press the main "Home" button.
Steering-mounted
controls
Voice control:
Short press, system voice commands
(depending on equipment).
Long press, voice commands of
the
smartphone connected using Bluetooth
® or
Mirror Screen® (Apple®CarPlay®/Android Auto)
via the system.
Increase volume.
Decrease volume.
Mute the sound: long press on the
decrease volume button.
Restore the sound by pressing one of the two
volume buttons.
Incoming call (short press): accept the
call.
Call in progress (short press): hang up.
Incoming call (long press): refuse the incoming
call.
Out of call (short press): access the call log of
the telephone connected via
Bluetooth
®.
Mirror Screen® connected (short press): access
the projected view of the telephone application of
your Mirror Screen
® equipment.Radio: automatic search for the
previous/next station (in the list of
radio stations sorted by name or by frequencies).
Media: previous/next track, movement in the
lists.
Phone: browse the telephone's call log. CarM an uals 2 .c o m