2023 PEUGEOT 408 phone
[x] Cancel search: phonePage 30 of 244

28
Access
Automatic folding/unfolding of the door mirrors is configured in the touch screen.
For more information on Mirrors, refer to the
corresponding section.
As a safety measure, never leave the vehicle, even for a short time, without
taking the Keyless Entry and Start system’s
electronic key with you.
Be aware of the risk of theft of the vehicle if
the key is present in one of the defined areas
while the vehicle is unlocked.
In order to preserve the battery in the
electronic key and the vehicle's battery:
–
The unlocking
on approach function
(zone
C) automatically switches to hibernation
mode after several days (approximately one
week) without being used. To unlock the
vehicle, use the remote control or press on
the driver’s door handle. The next time the
vehicle is started, the automatic unlocking
and locking functions will be reactivated.
–
If the welcome lighting is triggered
several times in succession without the
vehicle subsequently being started, it will be
deactivated.
–
All "hands-free" functions switch to
hibernation mode after 21 days without being
used.
To restore these functions, unlock the
vehicle using the remote control and start the
engine.
Electrical interference
The electronic key may not work if it is
close to an electronic device (e.g.
mobile
telephone (switched on or on standby), laptop
computer, strong magnetic fields). If this
occurs, move the electronic key away from
the electronic device.
Central locking
Manual
► Press these buttons to lock/unlock the vehicle
(doors and boot) from inside the passenger
compartment.
Central locking does not take place if any
of the doors are open.
When locking/deadlocking from the
outside
When the vehicle is locked or deadlocked
from the outside, the indicator lamp in the
locking button flashes and the buttons are
inactive.
►
After normal locking, pull one of the
interior door controls to unlock the vehicle.
►
After deadlocking, you must use the
remote control, the "Keyless Entry and
Start" system or the built-in key to unlock the
vehicle.
Automatic (anti-intrusion security)
The doors and boot lock automatically while
driving (speed above 6 mph (10
km/h)).
To deactivate/reactivate this function (activated
by default):
►
Press the locking button until a confirmation
message appears.
Transporting long or voluminous
objects
Press the central locking control to drive
with the boot open and the doors locked.
Otherwise, every time the speed of the
vehicle exceeds 6 mph (10 km/h), the sound
of the locks rebounding will be heard and an
alert will be displayed. CarM an uals 2 .c o m
Page 35 of 244
33
Access
2► Two consecutive presses on the control D of
the dashboard.
It is possible to interrupt the operation of
the tailgate at any point.
Pressing one of these controls again
interrupts the movement that is underway.
Following the interruption of a movement,
pressing one of these controls again reverses
the movement.
If the tailgate is left open for an extended
period of time, the tailgate may need to
be closed manually to reset power tailgate
functionality.
Hands-free function (Hands-
Free Tailgate Access)
With the electronic key on your person, this
function allows the motorised tailgate to be
opened, closed or stopped via a "kicking"
movement under the rear bumper.
The "Handsfree Trunk Opening" function is configured in the Settings
> Vehicle
touch screen application.
Ensure that you are steady on your feet
before performing the "kicking"
movement.
Take care not to touch the exhaust system
which may be hot - risk of burns!
Rechargeable hybrid vehicles
The function is not available when the
vehicle is connected.
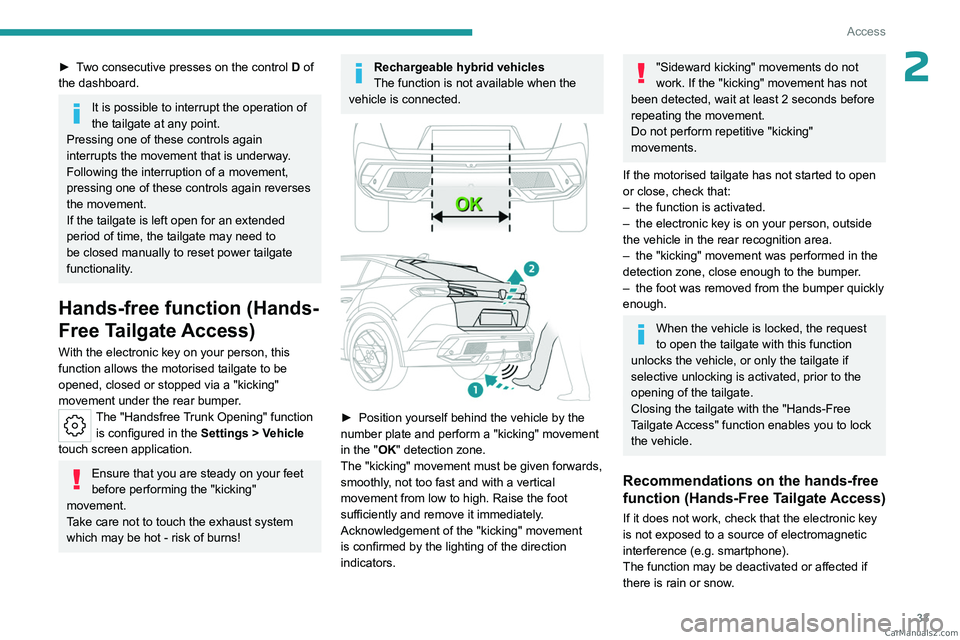
► Position yourself behind the vehicle by the
number plate and perform a "kicking" movement
in the "
OK" detection zone.
The "kicking" movement must be given forwards,
smoothly, not too fast and with a vertical
movement from low to high. Raise the foot
sufficiently and remove it immediately.
Acknowledgement of the "kicking" movement
is confirmed by the lighting of the direction
indicators.
"Sideward kicking" movements do not
work. If the "kicking" movement has not
been detected, wait at least 2 seconds before
repeating the movement.
Do not perform repetitive "kicking"
movements.
If the motorised tailgate has not started to open
or close, check that:
–
the function is activated.
–
the electronic key is on your person, outside
the vehicle in the rear recognition area.
–
the "kicking" movement was performed in the
detection zone, close enough to the bumper
.
–
the foot was removed from the bumper quickly
enough.
When the vehicle is locked, the request
to open the tailgate with this function
unlocks the vehicle, or only the tailgate if
selective unlocking is activated, prior to the
opening of the tailgate.
Closing the tailgate with the "Hands-Free
Tailgate Access" function enables you to lock
the vehicle.
Recommendations on the hands-free
function (Hands-Free Tailgate Access)
If it does not work, check that the electronic key
is not exposed to a source of electromagnetic
interference (e.g. smartphone).
The function may be deactivated or affected if
there is rain or snow. CarM an uals 2 .c o m
Page 56 of 244
54
Ease of use and comfort
The programming can also be carried out from a smartphone via the MYPEUGEOT
APP application.
For more information on Remotely operable
additional functions , refer to the corresponding
section.
The fan noise that occurs during temperature pre-conditioning is perfectly
normal.
Vehicles equipped with an alarm
system
Depending on version, interior volumetric
and anti-tilt monitoring may be reduced or
even suspended during temperature pre-
conditioning sequences.
Operating conditions
– The function is only activated when the
ignition is switched off and the
vehicle
locked.
–
When the vehicle is not connected, the
function is only activated if the battery charge
level is greater than 20%.
–
When the vehicle is not connected and a
recurring programme is active (e.g. from Monday
to Friday), if two temperature pre-conditioning
sequences are run without the vehicle being
used, the programme will be deactivated.
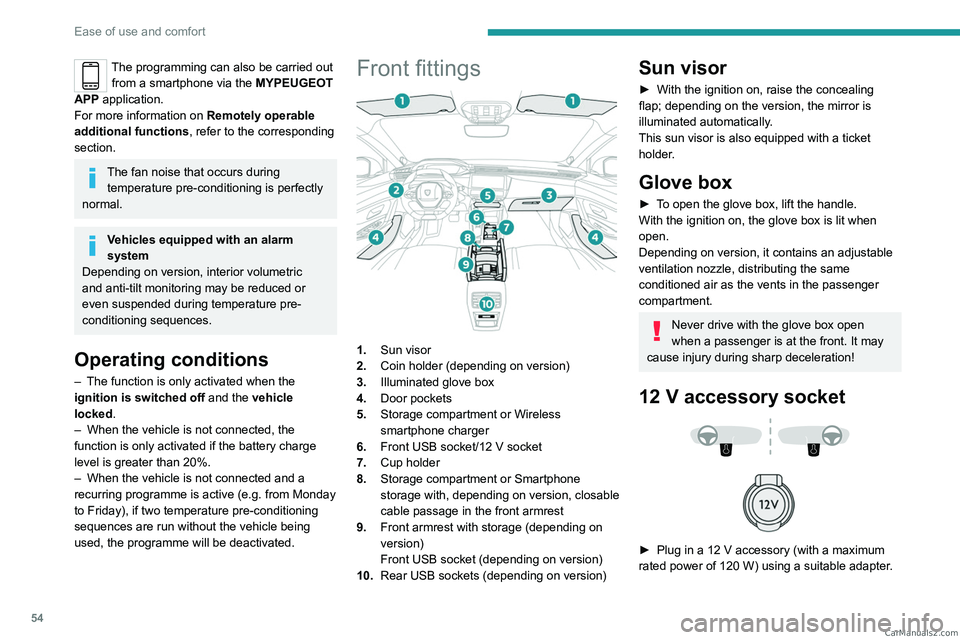
Front fittings
1. Sun visor
2. Coin holder (depending on version)
3. Illuminated glove box
4. Door pockets
5. Storage compartment or Wireless
smartphone charger
6. Front USB socket/12 V socket
7. Cup holder
8. Storage compartment or Smartphone
storage with, depending on version,
closable
cable passage in the front armrest
9. Front armrest with storage (depending on
version)
Front USB socket (depending on version)
10. Rear USB sockets (depending on version)
Sun visor
► With the ignition on, raise the concealing
flap; depending on the version, the mirror is
illuminated automatically.
This sun visor is also equipped with a ticket
holder.
Glove box
► To open the glove box, lift the handle.
With the ignition on, the glove box is lit when
open.
Depending on version, it contains an adjustable
ventilation nozzle, distributing the same
conditioned air as the vents in the passenger
compartment.
Never drive with the glove box open
when a passenger is at the front. It may
cause injury during sharp deceleration!
12 V accessory socket
► Plug in a 12 V accessory (with a maximum
rated power of 120 W) using a suitable adapter. CarM an uals 2 .c o m
Page 57 of 244
55
Ease of use and comfort
3Observe the maximum power rating to
avoid damaging the accessory.
The connection of an electrical device not approved by PEUGEOT, such as a
USB charger, may adversely affect the
operation of vehicle electrical systems,
causing faults such as poor radio reception or
interference with displays in the screens.
USB sockets
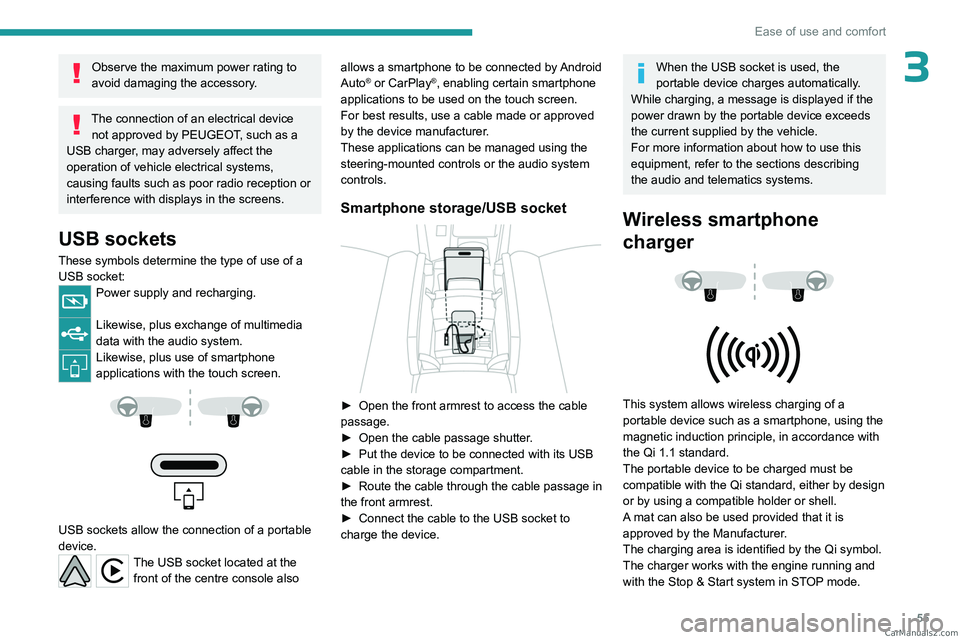
These symbols determine the type of use of a USB socket:
Power supply and recharging.
Likewise, plus exchange of multimedia
data with the audio system.
Likewise, plus use of smartphone
applications with the touch screen.
USB sockets allow the connection of a portable
device.
The USB socket located at the front of the centre console also allows a smartphone to be connected by Android
Auto
® or CarPlay®, enabling certain smartphone
applications to be used on the touch screen.
For best results, use a cable made or approved
by the device manufacturer.
These applications can be managed using the
steering-mounted controls or the audio system
controls.
Smartphone storage/USB socket
► Open the front armrest to access the cable
passage.
►
Open the cable passage shutter
.
►
Put the device to be connected with its USB
cable in the storage compartment.
►
Route the cable through the cable passage in
the front armrest.
►
Connect the cable to the USB socket to
charge the device.
When the USB socket is used, the
portable device charges automatically.
While charging, a message is displayed if the
power drawn by the portable device exceeds
the current supplied by the vehicle.
For more information about how to use this
equipment, refer to the sections describing
the audio and telematics systems.
Wireless smartphone
charger
This system allows wireless charging of a
portable device such as a smartphone, using the
magnetic induction principle, in accordance with
the Qi 1.1 standard.
The portable device to be charged must be
compatible with the Qi standard, either by design
or by using a compatible holder or shell.
A mat can also be used provided that it is
approved by the Manufacturer.
The charging area is identified by the Qi symbol.
The charger works with the engine running and
with the Stop & Start system in STOP mode. CarM an uals 2 .c o m
Page 58 of 244
56
Ease of use and comfort
Charging is managed by the smartphone.
With the Keyless Entry and Start system, the
charger’s operation may be briefly disrupted
when a door is opened or the ignition is switched
off.
Charging
► With the charging area clear, place a device
in its centre.
When the portable device is detected, the
charger’s indicator lamp lights up green. It
remains lit for the whole time that the battery is
being charged.
The system is not designed to charge multiple devices simultaneously.
Do not leave metal objects (e.g. coins,
keys, vehicle remote control) in the
charging area while a device is being charged
- Risk of overheating or interrupting the
charging!
When using applications for a long time
in combination with wireless charging,
some smartphones may switch to thermal
safety and cause some functions to stop.
Checking operation
The state of the indicator lamp allows the
operation of the charger to be monitored.
State of the
indicator lamp Meaning
Off Engine switched off.
No compatible devices
detected.
Charging complete.
Fixed green Compatible portable device detected.
Charging.
Flashing orange Foreign object detected in the charging zone.
Portable device not well
centred in the charging
zone.
Fixed orange Malfunction of the portable device's battery
meter.
Device battery
temperature too high.
Charger malfunction.
If the indicator lamp is fixed orange:
– remove the device, then place it back in the
centre of the charging zone.
or –
remove the device and try again in a quarter
of an hour
.
If the problem persists, have the system checked
by a PEUGEOT dealer or a qualified workshop.
Front armrest
It includes a storage space and is illuminated
when the cover is opened (depending on
version).
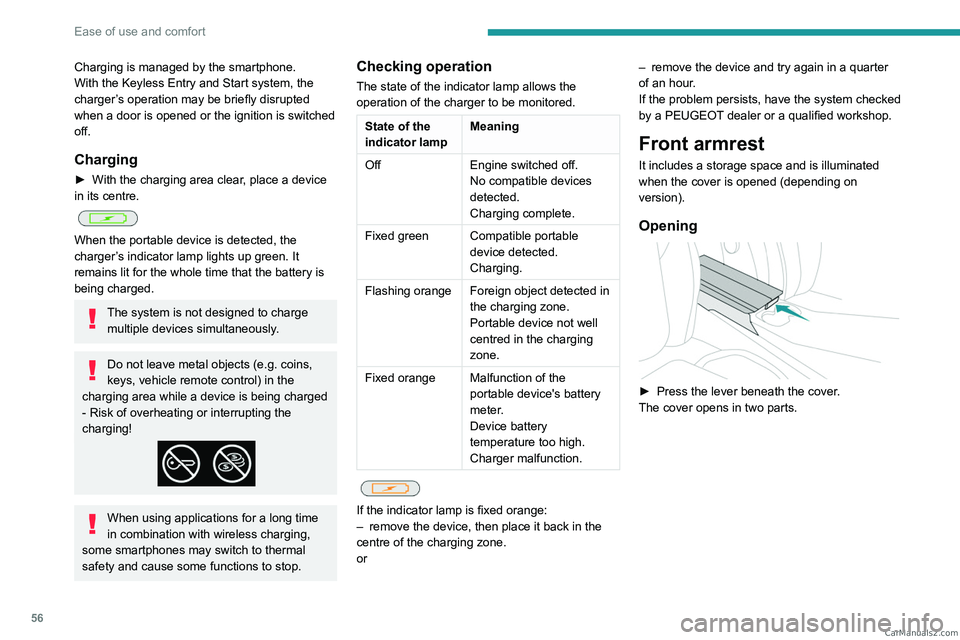
Opening
► Press the lever beneath the cover.
The cover opens in two parts. CarM an uals 2 .c o m
Page 61 of 244
59
Ease of use and comfort
3The cup holders have a removable reducer to
be used depending on the diameter of the cans
and cups.
The pen holder can also hold a smartphone.
Ski flap
Device for storing and transporting long objects.
Opening
► With the rear armrest lowered, open the flap
by pulling its handle downwards.
► Load the objects from inside the boot.
Shark fin antenna
A ventilation grille is present at the rear of the
roof for cooling the shark fin antenna.
Any ventilation noise produced, with the ignition
on or the engine running, is completely normal.
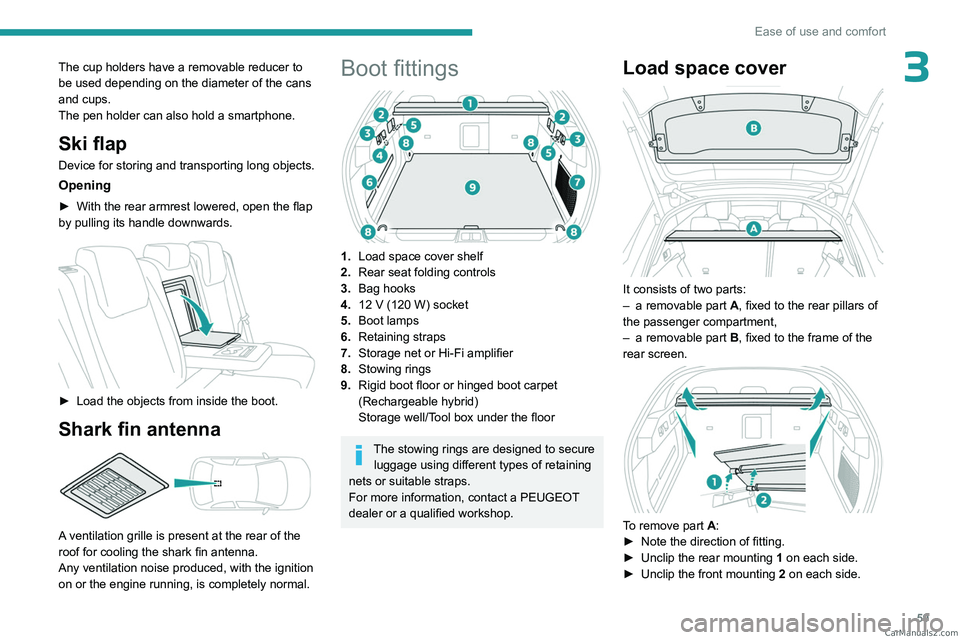
Boot fittings
1. Load space cover shelf
2. Rear seat folding controls
3. Bag hooks
4. 12
V (120 W) socket
5. Boot lamps
6. Retaining straps
7. Storage net or Hi-Fi amplifier
8. Stowing rings
9. Rigid boot floor or hinged boot carpet
(Rechargeable hybrid)
Storage well/Tool box under the floor
The stowing rings are designed to secure
luggage using different types of retaining
nets or suitable straps.
For more information, contact a PEUGEOT
dealer or a qualified workshop.
Load space cover
It consists of two parts:
– a removable part A
, fixed to the rear pillars of
the passenger compartment,
–
a removable part B
, fixed to the frame of the
rear screen.
To remove part A:
► Note the direction of fitting.
►
Unclip the rear mounting 1
on each side.
►
Unclip the front mounting 2
on each side. CarM an uals 2 .c o m
Page 155 of 244
153
Practical information
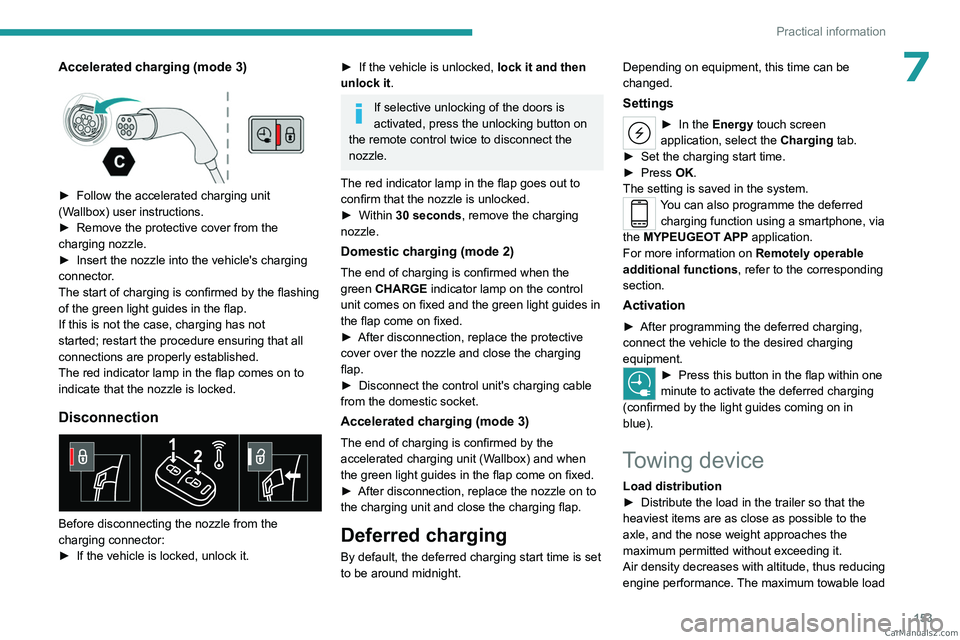
7Accelerated charging (mode 3)
► Follow the accelerated charging unit
(W allbox) user instructions.
►
Remove the protective cover from the
charging nozzle.
►
Insert the nozzle into the vehicle's charging
connector
.
The start of charging is confirmed by the flashing
of the green light guides in the flap.
If this is not the case, charging has not
started; restart the procedure ensuring that all
connections are properly established.
The red indicator lamp in the flap comes on to
indicate that the nozzle is locked.
Disconnection
Before disconnecting the nozzle from the
charging connector:
►
If the vehicle is locked, unlock it.
► If the vehicle is unlocked, lock it and then
unlock it .
If selective unlocking of the doors is
activated, press the unlocking button on
the remote control twice to disconnect the
nozzle.
The red indicator lamp in the flap goes out to
confirm that the nozzle is unlocked.
►
Within
30 seconds, remove the charging
nozzle.
Domestic charging (mode 2)
The end of charging is confirmed when the
green CHARGE indicator lamp on the control
unit comes on fixed and the green light guides in
the flap come on fixed.
►
After disconnection, replace the protective
cover over the nozzle and close the charging
flap.
►
Disconnect the control unit's charging cable
from the domestic socket.
Accelerated charging (mode 3)
The end of charging is confirmed by the
accelerated charging unit (Wallbox) and when
the green light guides in the flap come on fixed.
►
After disconnection, replace the nozzle on to
the charging unit and close the charging flap.
Deferred charging
By default, the deferred charging start time is set
to be around midnight. Depending on equipment, this time can be
changed.
Settings
► In the
Energy touch screen
application, select the Charging tab.
►
Set the charging start time.
►
Press
OK.
The setting is saved in the system.
You can also programme the deferred charging function using a smartphone, via
the MYPEUGEOT APP application.
For more information on Remotely operable
additional functions , refer to the corresponding
section.
Activation
► After programming the deferred charging,
connect the vehicle to the desired charging
equipment.
► Press this button in the flap within one
minute to activate the deferred charging
(confirmed by the light guides coming on in
blue).
Towing device
Load distribution
► Distribute the load in the trailer so that the
heaviest items are as close as possible to the
axle, and the nose weight approaches the
maximum permitted without exceeding it.
Air density decreases with altitude, thus reducing
engine performance.
The maximum towable load CarM an uals 2 .c o m
Page 161 of 244
159
Practical information
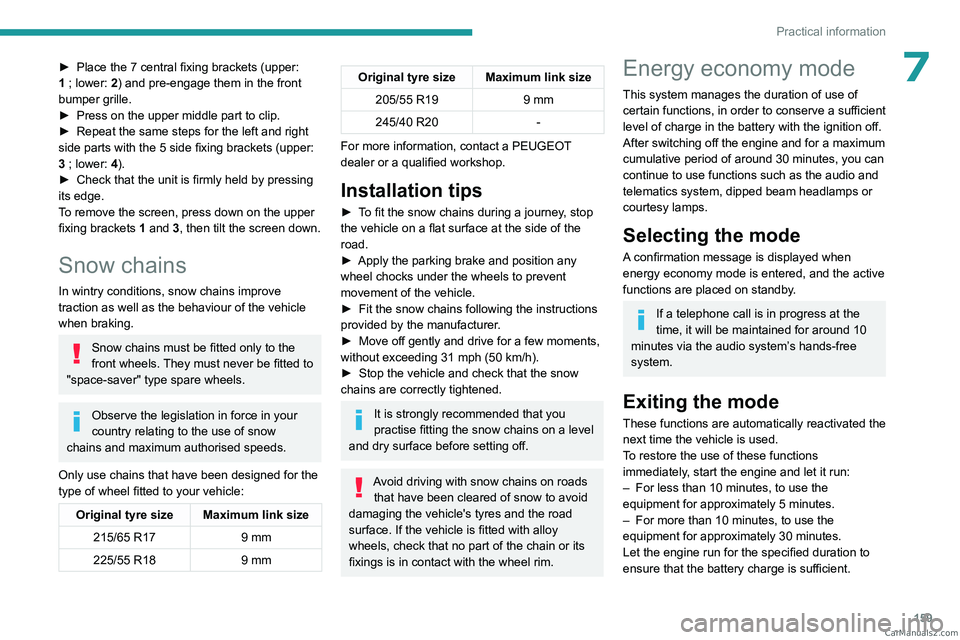
7► Place the 7 central fixing brackets (upper:
1 ; lower: 2) and pre-engage them in the front
bumper grille.
►
Press on the upper middle part to clip.
►
Repeat the same steps for the left and right
side parts with the 5 side fixing brackets (upper:
3
; lower: 4).
►
Check that the unit is firmly held by pressing
its edge.
T
o remove the screen, press down on the upper
fixing brackets 1 and 3, then tilt the screen down.
Snow chains
In wintry conditions, snow chains improve
traction as well as the behaviour of the vehicle
when braking.
Snow chains must be fitted only to the
front wheels. They must never be fitted to
"space-saver" type spare wheels.
Observe the legislation in force in your
country relating to the use of snow
chains and maximum authorised speeds.
Only use chains that have been designed for the
type of wheel fitted to your vehicle:
Original tyre size Maximum link size 215/65 R17 9 mm
225/55 R18 9 mm
Original tyre size Maximum link size
205/55 R19 9 mm
245/40 R20 -
For more information, contact a PEUGEOT
dealer or a qualified workshop.
Installation tips
► To fit the snow chains during a journey, stop
the vehicle on a flat surface at the side of the
road.
►
Apply the parking brake and position any
wheel chocks under the wheels to prevent
movement of the vehicle.
►
Fit the snow chains following the instructions
provided by the manufacturer
.
►
Move off gently and drive for a few moments,
without exceeding 31
mph (50 km/h).
►
Stop the vehicle and check that the snow
chains are correctly tightened.
It is strongly recommended that you
practise fitting the snow chains on a level
and dry surface before setting off.
Avoid driving with snow chains on roads that have been cleared of snow to avoid
damaging the vehicle's tyres and the road
surface. If the vehicle is fitted with alloy
wheels, check that no part of the chain or its
fixings is in contact with the wheel rim.
Energy economy mode
This system manages the duration of use of
certain functions, in order to conserve a sufficient
level of charge in the battery with the ignition off.
After switching off the engine and for a maximum
cumulative period of around 30 minutes, you can
continue to use functions such as the audio and
telematics system, dipped beam headlamps or
courtesy lamps.
Selecting the mode
A confirmation message is displayed when
energy economy mode is entered, and the active
functions are placed on standby.
If a telephone call is in progress at the
time, it will be maintained for around 10
minutes via the audio system’s hands-free
system.
Exiting the mode
These functions are automatically reactivated the
next time the vehicle is used.
To restore the use of these functions
immediately, start the engine and let it run:
–
For less than 10 minutes, to use the
equipment for approximately 5 minutes.
–
For more than 10 minutes, to use the
equipment for approximately 30 minutes.
Let the engine run for the specified duration to
ensure that the battery charge is sufficient. CarM an uals 2 .c o m