2023 PEUGEOT 408 check oil
[x] Cancel search: check oilPage 165 of 244

163
Practical information
7Fluid specification
The fluid must be topped up with a pre-mixed
product.
In winter (temperatures below zero), a fluid
containing an anti-freeze agent which is
appropriate for the temperature conditions
must be used in order to protect the system's
components (pump, tank, ducts, jets).
Filling with pure water is prohibited in all
circumstances (risk of freezing,
limescale, etc.).
Checks
Unless otherwise indicated, check these
components in accordance with the
Manufacturer's service schedule and according
to your engine.
Otherwise, have them checked by a PEUGEOT
dealer or a qualified workshop.
Only use products recommended by
PEUGEOT or products of equivalent
quality and specification.
In order to optimise the operation of
components as important as those in the
braking system, PEUGEOT selects and offers
very specific products.
12 V battery
The battery does not require any maintenance.
Check regularly that the terminals are correctly
tightened (versions without quick-release
terminals) and that the connections are clean.
For more information on the precautions
to take before any work on the 12 V
battery, refer to the corresponding section.
Versions equipped with Stop & Start are
fitted with a 12 V lead-acid battery with
special technology and specifications.
Its replacement should be carried out only by
a PEUGEOT dealer or a qualified workshop.
Passenger compartment
filter
Depending on the environment and the
use of the vehicle (e.g. dusty atmosphere,
city driving), change it twice as often, if
necessary .
A clogged passenger compartment filter
can adversely affect air conditioning
system performance and generate
undesirable odours.
Air filter
Depending on the environment and the
use of the vehicle (e.g. dusty atmosphere,
city driving), change it twice as often, if
necessary .
Oil filter
Change the oil filter each time the engine
oil is changed.
Automatic gearbox
The gearbox does not require any
maintenance (no oil change).
Brake pads
Brake wear depends on the style of
driving, particularly in the case of vehicles
used in town, over short distances. It may be
necessary to have the condition of the brakes
checked, even between vehicle services.
Unless there is a leak in the circuit, a drop in the
brake fluid level indicates that the brake pads
are worn.
After washing the vehicle, moisture, or in wintry conditions, ice can form on the
brake discs and pads: braking efficiency may
be reduced. Gently dab the brakes to dry and
defrost them. CarM an uals 2 .c o m
Page 172 of 244

170
In the event of a breakdown
Only the 12 V socket located at the front
of the vehicle can be used to power the
compressor.
For more information on the Tool kit,
refer to the corresponding section.
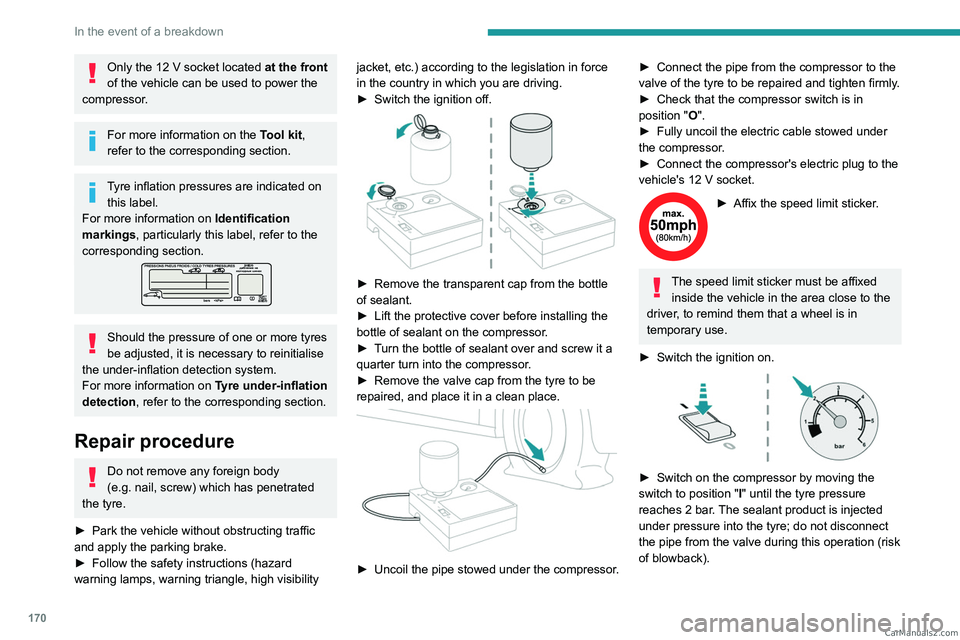
Tyre inflation pressures are indicated on this label.
For more information on Identification
markings, particularly this label, refer to the
corresponding section.
Should the pressure of one or more tyres
be adjusted, it is necessary to reinitialise
the under-inflation detection system.
For more information on Tyre under-inflation
detection, refer to the corresponding section.
Repair procedure
Do not remove any foreign body
(e.g. nail, screw) which has penetrated
the tyre.
►
Park the vehicle without obstructing traffic
and apply the parking brake.
►
Follow the safety instructions (hazard
warning lamps, warning triangle, high visibility jacket, etc.) according to the legislation in force
in the country in which you are driving.
►
Switch the ignition off.
► Remove the transparent cap from the bottle
of sealant.
►
Lift the protective cover before installing the
bottle of sealant on the compressor
.
►
T
urn the bottle of sealant over and screw it a
quarter turn into the compressor.
►
Remove the valve cap from the tyre to be
repaired, and place it in a clean place.
► Uncoil the pipe stowed under the compressor.
► Connect the pipe from the compressor to the
valve of the tyre to be repaired and tighten firmly .
►
Check that the compressor switch is in
position
"O".
►
Fully uncoil the electric cable stowed under
the compressor
.
►
Connect the compressor's electric plug to the
vehicle's 12
V socket.
► Affix the speed limit sticker .
The speed limit sticker must be affixed
inside the vehicle in the area close to the
driver, to remind them that a wheel is in
temporary use.
►
Switch the ignition on.
► Switch on the compressor by moving the
switch to position "I" until the tyre pressure
reaches 2
bar. The sealant product is injected
under pressure into the tyre; do not disconnect
the pipe from the valve during this operation (risk
of blowback). CarM an uals 2 .c o m
Page 173 of 244

171
In the event of a breakdown
8If after approximately 7 minutes, the
pressure of 2 bar is not reached, this
indicates that the tyre is not repairable;
contact a PEUGEOT dealer or a qualified
workshop for assistance.
►
Move the switch to position
"O".
►
Disconnect the compressor's electric plug
from the vehicle's 12
V socket.
►
Remove the kit.
►
Refit the cap on the valve.
►
Remove and store the bottle of sealant.
The sealant product is harmful if swallowed and causes irritation to the
eyes.
Keep this product out of the reach of children.
The use-by date of the fluid is marked on the
bottle.
After use, do not discard the bottle into the
environment; take it to a PEUGEOT dealer or
an authorised waste disposal site.
Do not forget to obtain a new bottle of
sealant, available from a PEUGEOT dealer or
a qualified workshop.
► Drive immediately for approximately 3 miles
(5 kilometres) at reduced speed (between
12 and 37
mph (20 and 60 km/h)) to plug the
puncture.
►
Stop to check the repair
and the tyre
pressure using the kit:
•
If the tyre pressure is incorrect, contact a
PEUGEOT
dealer to have the tyre changed.
•
If the tyre pressure is correct, drive a second
time for approximately 3
miles (5 kilometres)
at reduced speed (between 12 and 37
mph
(20 and 60
km/h)), stop then check again
the tyre pressure using the kit to confirm the
effective repair of the tyre.
With a tyre repaired using this type of kit,
do not exceed a speed of 50 mph
(80
km/h) and do not drive more than
125
miles (200 km).
You must contact a PEUGEOT dealer or a
qualified workshop to have the repair checked
and the tyre changed.
Checking/adjusting tyre
pressures
The compressor can be used, without injecting
sealant, to check and, if necessary, adjust the
tyre pressures.
►
Remove the valve cap from the tyre and keep
it in a clean place.
►
Uncoil
the pipe stowed under the compressor.
►
Screw the pipe onto the valve and tighten
firmly
.
►
Check that the compressor switch is in
position
"O".
►
Fully uncoil the electric cable stowed under
the compressor
.
►
Connect the compressor's electric plug to the
vehicle's 12
V socket.
►
Switch the ignition on.
►
Start the compressor by placing the switch at
position
"I" and adjust the pressure to the value
shown on the vehicle's tyre pressure label. To
deflate: press the black button located on the
compressor pipe, near the valve connection.
If after 7 minutes the pressure of 2 bar is
not reached, the tyre is damaged;
contact a PEUGEOT
dealer or a qualified
workshop for assistance.
►
Once the correct pressure is reached, put the
switch in position
"O".
►
Remove the kit and stow it.
►
Refit the cap on the valve. CarM an uals 2 .c o m
Page 210 of 244

208
Alphabetical index
A
ABS 75
Accelerated charging unit (Wallbox)
146–147
Accessories
72
Active LED Vision
63, 65
Active Safety Brake
126–127, 129
Adjusting headlamps
62
Adjusting head restraints
41
Adjusting seat
41–42
Adjusting the air distribution
49, 51
Adjusting the air flow
49, 51
Adjusting the headlamp beam height
62
Adjusting the height and reach of
the steering wheel
45
Adjusting the lumbar support
42
Adjusting the seat angle
42
Adjusting the temperature
50
Adjusting the time
203
Advice on care and maintenance
145, 165
Advice on driving
8, 91–92
Airbags
80–82, 84
Airbags, curtain
81–82
Airbags, front
80–81, 85
Airbags, lateral
81–82
Air conditioning
49, 52
Air conditioning, automatic
52
Air conditioning, dual-zone automatic
49
Air intake
51–52
Air vents
48
Alarm
35–36
Amplifier, audio
57
Anti-lock braking system (ABS)
75
Antitheft / Immobiliser 25
Applications
21–22
Armrest, front
56
Armrest, rear
58
Assistance call
73–74
Assistance, emergency braking
76, 128
Audio streaming (Bluetooth)
200
B
Battery, 12 V 159, 163, 177–181
Battery, ancillaries
177
Battery, charging
177–178, 181
Battery, remote control
29–30
Blanking screen (snow shield)
158
Blind
38
Bluetooth (hands-free)
197
Bluetooth (telephone)
197–198
Bodywork
165
Bonnet
160
Bonnet, active
82
Boot
31, 34, 60
Brake discs
163–164
Brake lamps
176
Brakes
163–164
Braking
98
Braking assistance system
75–76
Braking, automatic emergency
126–127, 129
Braking, dynamic emergency
95–96
Bulbs (changing)
175–176
C
Capacity, fuel tank 143
Care of the bodywork
165
Central locking
27–28
Changing a bulb
175–176
Changing a fuse
177
Changing a wheel
168, 172
Changing a wiper blade
71
Changing the remote control battery
29
Changing to free-wheeling
164
Charge level indicator (Rechargeable
hybrid)
19
Charger, induction
55
Charger, wireless
55
Charging cable
148
Charging cable (Rechargeable
hybrid)
146–147, 152
Charging connector (Rechargeable
hybrid)
146, 151–153
Charging flap (Rechargeable
hybrid)
146, 151–153
Charging the traction battery
(Rechargeable hybrid)
18, 144, 151–153
CHECK
19
Checking the engine oil level
17
Checking the levels
161–162
Checking tyre pressures
(using the kit)
169, 171
Checks
161, 163–164
Checks, routine
163–164
Child lock
90
Children
79, 85–87 CarM an uals 2 .c o m
Page 213 of 244

2 11
Alphabetical index
Lamps with Full LED technology 63, 65
Lane assist
114–115, 119–121
Lane keeping assist
131
Leather (care)
167
LEDs - Light-emitting diodes
62, 176
Level, brake fluid
162
Level, engine coolant
18, 162
Level, engine oil
17, 161
Levels and checks
161–162
Level, screenwash fluid
69, 162
Light-emitting diodes - LEDs
62, 176
Lighting, boot
60
Lighting dimmer
19
Lighting, exterior
61, 64
Lighting, guide-me home
63
Lighting, interior
57–58
Lighting, mood
58
Lighting, welcome
63–64
Loading
157–158
Load reduction mode
160
Load space cover
59
Locating your vehicle
25
Locking
25, 27
Locking from the inside
28
Locking the doors
28
Log, alerts
19
Long-distance blind spot monitoring
134
Long objects, transporting
59
Lumbar
42M
Mains socket (domestic network) 146–147
Maintenance (advice)
145, 165
Maintenance, routine
105, 163–164
Manoeuvring aids (recommendations)
104
Map reading lamps
57
Markings, identification
188
Massage function
44
Massage, multi-point
44
Mat
57, 106
Menu, shortcuts
21
Mirror, rear view
46
Mirrors, door
45–46, 52, 134
Mirror, vanity
54
Mobile application
22, 53, 151, 153
Motor, electric
100, 144, 187
Motorised tailgate
31–32, 34
Mountings, ISOFIX
85, 88–89
N
Net, luggage retaining 59
Night vision
67
Night Vision
67
O
Obstacle detection 135
Oil change
161
Oil consumption
161
Oil, engine 161
On-board tools
60, 168–169
Opening the bonnet
160
Opening the boot
26, 31
Opening the doors
26, 31
P
Pads, brake 163
Paint
165, 188
Paint colour code
188
Parcel shelf, rear
59
Parking brake, electric
94–96, 164
Parking (sensors)
135
Parking sensors, audible and visual
135
Parking sensors, front
136
Parking sensors, rear
135
Passenger compartment temperature pre-
conditioning (Rechargeable hybrid)
22, 53
Pedestrian horn (Rechargeable hybrid)
73
Personalisation
10, 22
Plates, identification
188
Port, USB
55, 58
Post Collision Safety Brake
76
Power
18
Power indicator (Rechargeable hybrid)
9, 18
Pressures, tyres
164, 170, 188
Pre-tensioning (seat belts)
79
Profiles
190
Protecting children
80, 83–87
Proximity Keyless Entry and Start
26
Puncture
169–170, 172 CarM an uals 2 .c o m