2023 PEUGEOT 408 audio
[x] Cancel search: audioPage 161 of 244
159
Practical information
7► Place the 7 central fixing brackets (upper:
1 ; lower: 2) and pre-engage them in the front
bumper grille.
►
Press on the upper middle part to clip.
►
Repeat the same steps for the left and right
side parts with the 5 side fixing brackets (upper:
3
; lower: 4).
►
Check that the unit is firmly held by pressing
its edge.
T
o remove the screen, press down on the upper
fixing brackets 1 and 3, then tilt the screen down.
Snow chains
In wintry conditions, snow chains improve
traction as well as the behaviour of the vehicle
when braking.
Snow chains must be fitted only to the
front wheels. They must never be fitted to
"space-saver" type spare wheels.
Observe the legislation in force in your
country relating to the use of snow
chains and maximum authorised speeds.
Only use chains that have been designed for the
type of wheel fitted to your vehicle:
Original tyre size Maximum link size 215/65 R17 9 mm
225/55 R18 9 mm
Original tyre size Maximum link size
205/55 R19 9 mm
245/40 R20 -
For more information, contact a PEUGEOT
dealer or a qualified workshop.
Installation tips
► To fit the snow chains during a journey, stop
the vehicle on a flat surface at the side of the
road.
►
Apply the parking brake and position any
wheel chocks under the wheels to prevent
movement of the vehicle.
►
Fit the snow chains following the instructions
provided by the manufacturer
.
►
Move off gently and drive for a few moments,
without exceeding 31
mph (50 km/h).
►
Stop the vehicle and check that the snow
chains are correctly tightened.
It is strongly recommended that you
practise fitting the snow chains on a level
and dry surface before setting off.
Avoid driving with snow chains on roads that have been cleared of snow to avoid
damaging the vehicle's tyres and the road
surface. If the vehicle is fitted with alloy
wheels, check that no part of the chain or its
fixings is in contact with the wheel rim.
Energy economy mode
This system manages the duration of use of
certain functions, in order to conserve a sufficient
level of charge in the battery with the ignition off.
After switching off the engine and for a maximum
cumulative period of around 30 minutes, you can
continue to use functions such as the audio and
telematics system, dipped beam headlamps or
courtesy lamps.
Selecting the mode
A confirmation message is displayed when
energy economy mode is entered, and the active
functions are placed on standby.
If a telephone call is in progress at the
time, it will be maintained for around 10
minutes via the audio system’s hands-free
system.
Exiting the mode
These functions are automatically reactivated the
next time the vehicle is used.
To restore the use of these functions
immediately, start the engine and let it run:
–
For less than 10 minutes, to use the
equipment for approximately 5 minutes.
–
For more than 10 minutes, to use the
equipment for approximately 30 minutes.
Let the engine run for the specified duration to
ensure that the battery charge is sufficient. CarM an uals 2 .c o m
Page 167 of 244

165
Practical information
7► Release the brake pedal to switch on the
ignition and deactivate the electric parking brake.
A message is displayed on the instrument panel to confirm the unlocking
of the wheels for 15
minutes.
When the vehicle is free-wheeling, the
audio system cannot be updated (message
displayed on the instrument panel).
After 15 minutes or reverting to normal
operation
► While depressing the brake pedal, restart the
engine and select mode P .
Keyless Entry and Start
You must not depress the brake pedal
while switching the ignition on again, then
switching it off. If you do, the engine will start,
requiring you to restart the procedure.
Advice on care and maintenance
General recommendations
Observe the following recommendations to avoid
damaging the vehicle.
Exterior
Never use a high-pressure jet wash in
the engine compartment - risk of
damaging the electrical components!
Do not wash the vehicle in bright sunshine or
extremely cold conditions.
When washing the vehicle in an
automatic roller-brush car wash, be sure
to lock the doors and, depending on version,
move the electronic key away and deactivate
the "hands-free" function (Hands-Free
Tailgate Access).
When using a pressure washer, keep the jet
nozzle at a minimum distance of 30 cm from
the vehicle (particularly when cleaning areas
containing chipped paint, sensors or seals).
Promptly clean up any stains containing
chemicals liable to damage the vehicle's
paintwork (including tree resin, bird
droppings, insect secretions, pollen and tar).
Depending on the environment, clean the
vehicle frequently to remove salty deposits
(in coastal areas), soot (in industrial areas)
and mud/salts (in wet or cold areas). These
substances can be highly corrosive.
Contact a PEUGEOT dealer or a qualified
workshop for advice on removing stubborn
stains requiring special products (such as tar
or insect removers).
Preferably, have paint touch-ups performed
by a PEUGEOT dealer or a qualified
workshop.
Interior
When washing the vehicle, never use a
water hose or high-pressure jet to clean
the interior.
Liquids carried in cups or other open
containers can spill, presenting a risk of
damage to the instruments and controls and
the controls located on the centre console. Be
vigilant!
To clean instrument panels, touch screens
or other displays, wipe gently with a soft,
dry cloth. Do not use products (e.g. alcohol,
disinfectant) or soapy water directly on these
surfaces - risk of damage!
Bodywork
High-gloss paint
Do not use abrasive products, solvents,
petrol or oil to clean the bodywork.
Never use an abrasive sponge to clean
stubborn stains - risk of scratching the
paintwork!
Do not apply polish in strong sunshine, or to
plastic or rubber parts. CarM an uals 2 .c o m
Page 180 of 244
178
In the event of a breakdown
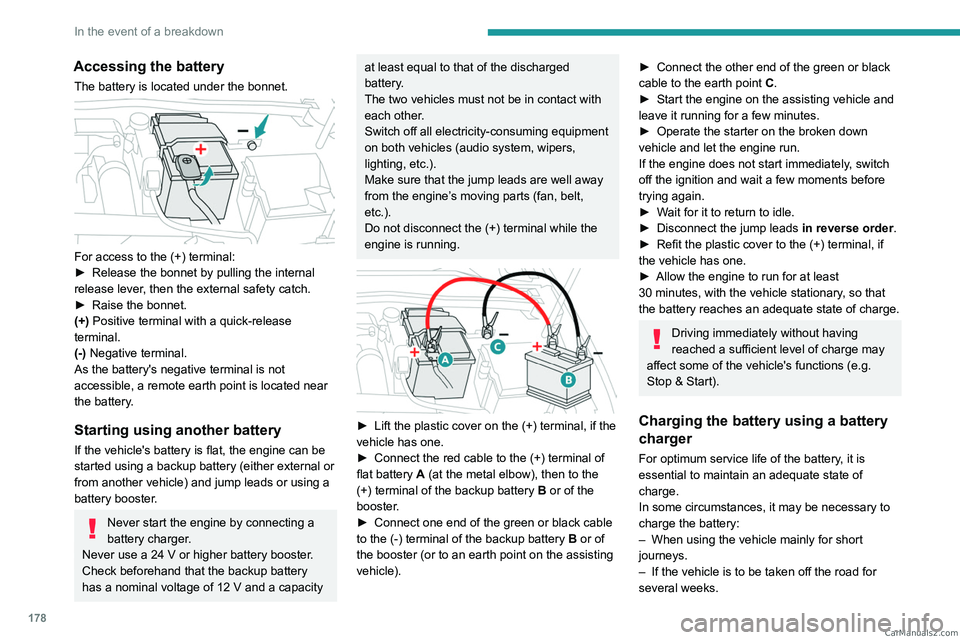
Accessing the battery
The battery is located under the bonnet.
For access to the (+) terminal:
► Release the bonnet by pulling the internal
release lever
, then the external safety catch.
►
Raise the bonnet.
(+)
Positive terminal with a quick-release
terminal.
(-) Negative terminal.
As the battery's negative terminal is not
accessible, a remote earth point is located near
the battery.
Starting using another battery
If the vehicle's battery is flat, the engine can be
started using a backup battery (either external or
from another vehicle) and jump leads or using a
battery booster.
Never start the engine by connecting a
battery charger.
Never use a 24
V or higher battery booster.
Check beforehand that the backup battery
has a nominal voltage of 12
V and a capacity
at least equal to that of the discharged
battery.
The two vehicles must not be in contact with
each other.
Switch off all electricity-consuming equipment
on both vehicles (audio system, wipers,
lighting, etc.).
Make sure that the jump leads are well away
from the engine’s moving parts (fan, belt,
etc.).
Do not disconnect the (+) terminal while the
engine is running.
► Lift the plastic cover on the (+) terminal, if the
vehicle has one.
►
Connect the red cable to the (+) terminal of
flat battery
A (at the metal elbow), then to the
(+) terminal of the backup battery
B or of the
booster.
►
Connect one end of the green or black cable
to the (-) terminal of the backup battery
B or of
the booster (or to an earth point on the assisting
vehicle).
► Connect the other end of the green or black
cable to the earth point C .
►
Start the engine on the assisting vehicle and
leave it running for a few minutes.
►
Operate the starter on the broken down
vehicle and let the engine run.
If the engine does not start immediately
, switch
off the ignition and wait a few moments before
trying again.
►
W
ait for it to return to idle.
►
Disconnect the jump leads in reverse order.
►
Refit the plastic cover to the (+) terminal, if
the vehicle has one.
►
Allow the engine to run for at least
30
minutes, with the vehicle stationary, so that
the battery reaches an adequate state of charge.
Driving immediately without having
reached a sufficient level of charge may
affect some of the vehicle's functions (e.g.
Stop & Start).
Charging the battery using a battery
charger
For optimum service life of the battery, it is
essential to maintain an adequate state of
charge.
In some circumstances, it may be necessary to
charge the battery:
–
When using the vehicle mainly for short
journeys.
–
If the vehicle is to be taken off the road for
several weeks. CarM an uals 2 .c o m
Page 181 of 244
179
In the event of a breakdown
8Consult a PEUGEOT dealer or a qualified
workshop.
To charge the vehicle's battery yourself, use only a charger compatible with
lead-acid batteries with a nominal voltage of
12
V.
Follow the instructions provided by the
manufacturer of the charger.
Never reverse polarities.
It is not necessary to disconnect the
battery.
►
Switch the ignition off.
►
Switch off all electrical consumers (audio
system, lighting, wipers, etc.).
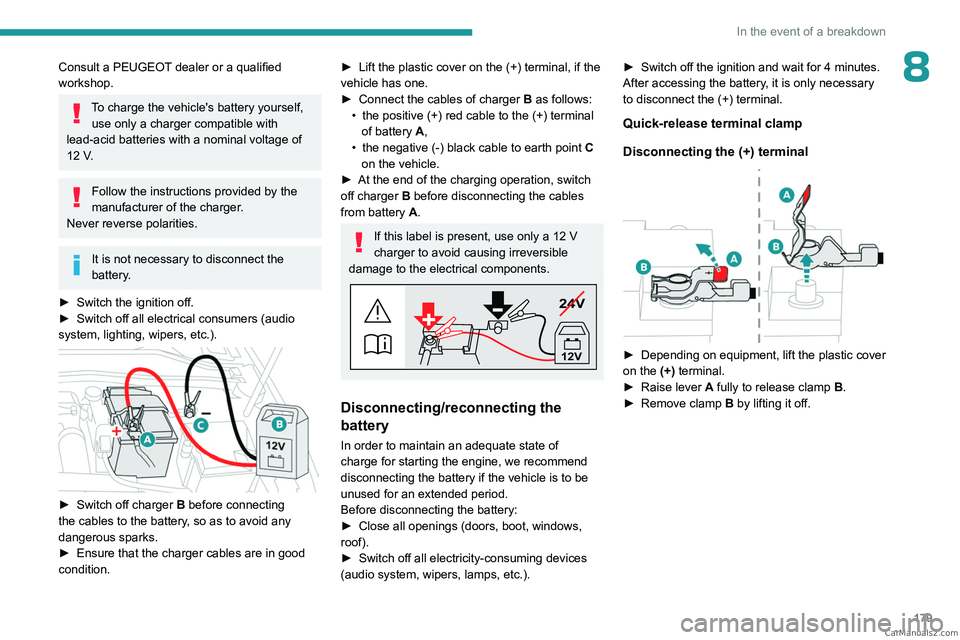
► Switch off charger B before connecting
the cables to the battery, so as to avoid any
dangerous sparks.
►
Ensure that the charger cables are in good
condition.
► Lift the plastic cover on the (+) terminal, if the
vehicle has one.
►
Connect the cables of charger B
as follows:
•
the positive (+) red cable to the (+) terminal
of battery
A,
•
the negative (-) black cable to earth point C
on the vehicle.
►
At the end of the charging operation, switch
off charger B
before disconnecting the cables
from battery A.
If this label is present, use only a 12 V
charger to avoid causing irreversible
damage to the electrical components.
24V
12V
Disconnecting/reconnecting the
battery
In order to maintain an adequate state of
charge for starting the engine, we recommend
disconnecting the battery if the vehicle is to be
unused for an extended period.
Before disconnecting the battery:
►
Close all openings (doors, boot, windows,
roof).
►
Switch off all electricity-consuming devices
(audio system, wipers, lamps, etc.). ►
Switch off the ignition and wait for 4
minutes.
After accessing the battery, it is only necessary
to disconnect the (+) terminal.
Quick-release terminal clamp
Disconnecting the (+) terminal
► Depending on equipment, lift the plastic cover
on the (+) terminal.
►
Raise lever
A
fully to release clamp
B
.
►
Remove clamp
B
by lifting it off. CarM an uals 2 .c o m
Page 183 of 244
181
In the event of a breakdown
8Charging the front battery using a
battery charger
For optimum service life of the front battery, it
is essential to maintain an adequate state of
charge.
In some circumstances, it may be necessary to
charge the front battery:
–
When using the vehicle mainly for short
journeys.
–
If the vehicle is to be taken off the road for
several weeks.
Consult a PEUGEOT
dealer or a qualified
workshop.
To charge the vehicle's front battery yourself, use only a charger compatible
with lead-acid batteries with a nominal voltage
of 12
V.
Follow the instructions provided by the
manufacturer of the charger.
Never reverse polarities.
It is not necessary to disconnect the
battery.
►
Switch the ignition off. ►
Switch off all electrical consumers (audio
system, lighting, wipers, etc.).
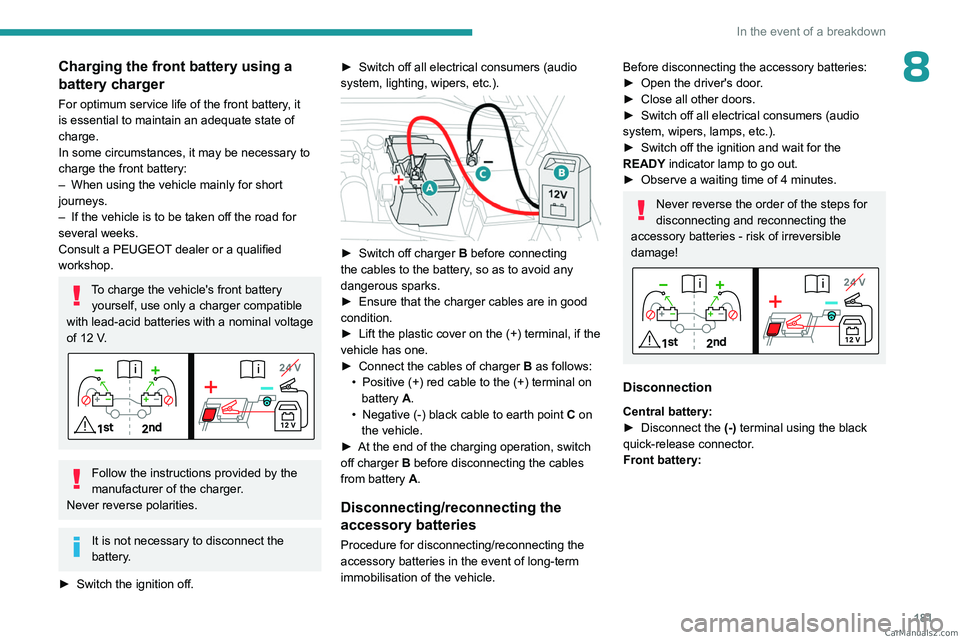
► Switch off charger B before connecting
the cables to the battery, so as to avoid any
dangerous sparks.
►
Ensure that the charger cables are in good
condition.
►
Lift the plastic cover on the (+) terminal, if the
vehicle has one.
►
Connect the cables of charger B
as follows:
•
Positive (+) red cable to the (+) terminal on
battery
A.
•
Negative (-) black cable to earth point C
on
the vehicle.
►
At the end of the charging operation, switch
off charger B
before disconnecting the cables
from battery A.
Disconnecting/reconnecting the
accessory batteries
Procedure for disconnecting/reconnecting the
accessory batteries in the event of long-term
immobilisation of the vehicle.
Before disconnecting the accessory batteries:
► Open the driver's door .
►
Close all other doors.
►
Switch off all electrical consumers (audio
system, wipers, lamps, etc.).
►
Switch off the ignition and wait for the
READY
indicator lamp to go out.
►
Observe a waiting time of 4 minutes.
Never reverse the order of the steps for
disconnecting and reconnecting the
accessory batteries - risk of irreversible
damage!
Disconnection
Central battery:
► Disconnect the (-)
terminal using the black
quick-release connector.
Front battery:
CarM an uals 2 .c o m
Page 191 of 244

189
PEUGEOT i-Connect Advanced - PEUGEOT i-Connect
10PEUGEOT i-Connect
Advanced - PEUGEOT
i-Connect
GPS navigation -
Applications - Multimedia
audio system - Bluetooth
®
telephone
The functions and settings described
vary according to the version and
configuration of the vehicle, and according to
the country of sale.
For safety reasons and because they
require continued attention on the part of
the driver, the following operations must be
carried out with the vehicle stationary and
the ignition on:
–
Pairing the smartphone with the system via
Bluetooth®.
–
Using the smartphone.
–
Connecting to Mirror Screen
(Apple®CarPlay® or Android Auto).
–
Changing the system settings and
configuration.
The message Energy economy mode is displayed when the system is about to go
into standby.
For more information on Energy economy
mode, refer to the "Practical information"
section.
Warning
Navigation is a driving aid. It cannot
replace the driver. All guidance instructions
should be carefully checked by the user.
By using the navigation, you accept the
following terms and conditions:
https://www.tomtom.com/en_gb/legal/
eula-automotive/?388448
First steps
The system starts when the ignition is switched on.
Short press, ignition off: system on/off.
Short press, ignition on: mute/restore sound.
Long press, ignition on: start standby mode
(mute sound, screens and clock display off).
Rotation: volume adjustment.
Information
This system gives access to the following
elements:
–
Audio equipment and telephone controls with
display of associated information. –
Connected services and display of associated
information.
–
Navigation system controls and display
of associated information (depending on
equipment).
–
V
oice recognition (depending on equipment).
–
T
ime and outside temperature.
–
Heating/air conditioning system controls and
reminders of settings.
–
Settings for driving aid functions, comfort
and safety functions, extended head-up display
(depending on equipment and version), audio
equipment and digital instrument panel.
–
Settings for functions specific to rechargeable
hybrid vehicles.
–
Display of visual manoeuvring aid functions.
–
Interactive handbook.
–
V
ideo tutorials (e.g. screen management,
driving aids, voice recognition).
Upper banner
Certain information is displayed permanently in
the upper banner of the touch screen:
–
Outside temperature from the vehicle's
sensors (associated with a blue symbol if there is
a risk of ice).
–
T
emperature setting reminder for the air
conditioning on the driver's and passenger sides.
–
Charge level of the connected smartphone.
–
System connection status (Bluetooth®, Wi-Fi,
mobile telephone network).
–
Time. CarM an uals 2 .c o m
Page 192 of 244

190
PEUGEOT i-Connect Advanced - PEUGEOT i-Connect
– Quick access to the Mirror Screen® functions
(associated with a connected smartphone).
Swipe down from the upper edge of the touch
screen to access the notifications centre and
display a list of quick settings :Guest, Privacy
Settings, Brightness, My Devices, night mode,
etc.
Principles
► Use this button (HOME) to display the
most recent home page used; a second
press displays the first home page, then press
the virtual buttons displayed
on the touch screen.
Scroll through the home pages by sliding
your finger along the screen to the right or
to the left.
Principle of movement in the system
Depending on the pages displayed on the
screen, scroll through the text or the menu (on
the left side of the screen) by sliding your finger,
as with a smartphone.
Touch buttons
Display/hide the context menu.
Return to the previous page.
►
T
o change the status of a function, press the
description for the corresponding line (change
confirmed by the slider moving to the right/left:
function activated/deactivated).
Access to additional information about the function.
Access to a function’s settings.
Add/delete shortcuts.
Configuring profiles
Press the "Settings" application.
In the list, select the "Profile" tab.
The screen displays a "Guest" profile built
into the system and allows you to create and
personalise several new profiles with or without
an associated mobile device.
The "Guest" profile has a default display with the possibility of adding to it and/or
returning it to its initial configuration. This profile
is built into the system and cannot be deleted.
Each profile created can be associated
with a mobile device of your choice
connected via Bluetooth
®; the Bluetooth® function
of the mobile device must first be activated. This
association allows the system to detect your
presence in the vehicle when it starts and to
propose the activation of your personalised
profile.
If a profile is not connected to the mobile device,
the last profile used will be highlighted.
Select "Create Profile", then follow the
procedure.
Creating a new profile allows you to personalise:
–
Language, units, Privacy Settings.
–
Screen configuration, appearance, i-T
oggles
(depending on equipment).
– Audio settings, favourite radio stations.
– Lighting, interior ambience (refer to the "Ease
of use and comfort" section).
–
Navigation history
, favourite points of interest
(POIs), navigation settings.
–
Some driving aids and the list of favourites.
To delete a profile, select it from the list of profiles then press the bin.
Privacy Settings
The "Privacy Settings" management is
associated with each profile. This function is
used with:
a "Guest" profile configured by default in "Private
Mode",
or
a profile to be created in the system, with or
without connection to a mobile device.
For each profile (even "Guest"), the last privacy
mode saved value will be restored.
"Sharing Data and Location"
This mode allows the vehicle to externally
transmit all the personal data needed for each
valid available connected service.
The personal data required to use the connected services is sent to the
providers of these services.
"Sharing Data"
This mode allows the vehicle to externally
transmit all the data needed for each valid
available connected service, with the exception
of vehicle location data (e.g.
GPS coordinates). CarM an uals 2 .c o m
Page 196 of 244
194
PEUGEOT i-Connect Advanced - PEUGEOT i-Connect
Short press: validate a selection. Out of
selection, display the lists.
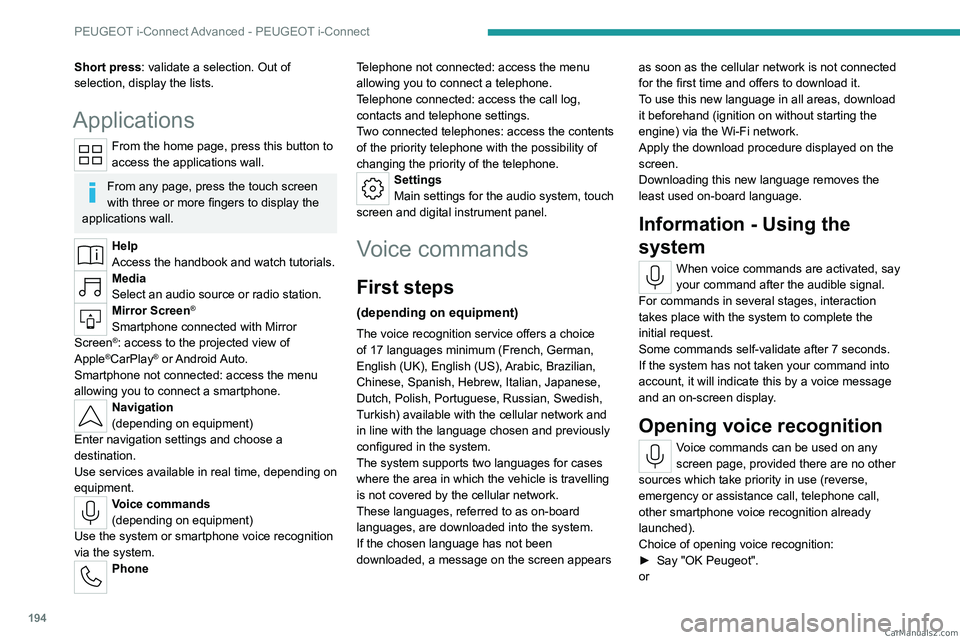
Applications
From the home page, press this button to
access the applications wall.
From any page, press the touch screen
with three or more fingers to display the
applications wall.
Help
Access the handbook and watch tutorials.
Media
Select an audio source or radio station.
Mirror Screen®
Smartphone connected with Mirror
Screen®: access to the projected view of
Apple®CarPlay® or Android Auto.
Smartphone not connected: access the menu
allowing you to connect a smartphone.
Navigation
(depending on equipment)
Enter navigation settings and choose a
destination.
Use services available in real time, depending on
equipment.
Voice commands
(depending on equipment)
Use the system or smartphone voice recognition
via the system.
Phone Telephone not connected: access the menu
allowing you to connect a telephone.
Telephone connected: access the call log,
contacts and telephone settings.
Two connected telephones: access the contents
of the priority telephone with the possibility of
changing the priority of the telephone.
Settings
Main settings for the audio system, touch
screen and digital instrument panel.
Voice commands
First steps
(depending on equipment)
The voice recognition service offers a choice
of 17 languages minimum (French, German,
English (UK), English (US),
Arabic, Brazilian,
Chinese, Spanish, Hebrew, Italian, Japanese,
Dutch, Polish, Portuguese, Russian, Swedish,
Turkish) available with the cellular network and
in line with the language chosen and previously
configured in the system.
The system supports two languages
for cases
where the area in which the vehicle is travelling
is not covered by the cellular network.
These languages, referred to as on-board
languages,
are downloaded into the system.
If the chosen language has not been
downloaded, a message on the screen appears as soon as the cellular network is not connected
for the first time and offers to download it.
T
o use this new language in all areas, download
it beforehand (ignition on without starting the
engine) via the Wi-Fi network.
Apply the download procedure displayed on the
screen.
Downloading this new language removes the
least used on-board language.
Information - Using the
system
When voice commands are activated, say
your command after the audible signal.
For
commands in several stages, interaction
takes place with the system to complete the
initial request.
Some commands self-validate after 7 seconds.
If the system has not taken your command into
account, it will indicate this by a voice message
and an on-screen display.
Opening voice recognition
Voice commands can be used on any
screen page, provided there are no other
sources which take priority in use (reverse,
emergency or assistance call, telephone call,
other smartphone voice recognition already
launched).
Choice of opening voice recognition:
►
Say
"OK Peugeot".
or CarM an uals 2 .c o m