2023 PEUGEOT 308 lock
[x] Cancel search: lockPage 58 of 260
56
Ease of use and comfort
This function is available when the vehicle is
connected or not connected.
Programming
In the Climate touch screen application,
select the Preconditioning tab.
►
Press
+ to add a programme.
►
Select the time of entry into the vehicle and
the desired days. Press
OK.
►
Press
ON to activate this programming.
The pre-conditioning sequence begins
approximately 45
minutes before the
programmed time when the vehicle is connected
(20
minutes when it is not connected) and is
maintained for 10
minutes after.
This indicator lamp comes on fixed when
a temperature pre-conditioning cycle is
programmed. It flashes when temperature pre-
conditioning is in progress.
You can set multiple programmes. Each one is saved in the system.
To optimise the driving range, we recommend
starting a programme while the vehicle is
connected.
The programming can also be carried out from a smartphone via the MYPEUGEOT
APP application.
For more information on Remotely operable
additional functions , refer to the corresponding
section.
The fan noise that occurs during temperature pre-conditioning is perfectly
normal.
Vehicles equipped with an alarm
system
Depending on version, interior volumetric
and anti-tilt monitoring may be reduced or
even suspended during temperature pre-
conditioning sequences.
Operating conditions
– The function is only activated when the
ignition is switched off and the
vehicle
locked.
–
When the vehicle is not connected, the
function is only activated if the battery charge
level is greater than 20%.
–
When the vehicle is not connected and a
recurring programme is active (e.g. from Monday
to Friday), if two temperature pre-conditioning
sequences are run without the vehicle being
used, the programme will be deactivated.
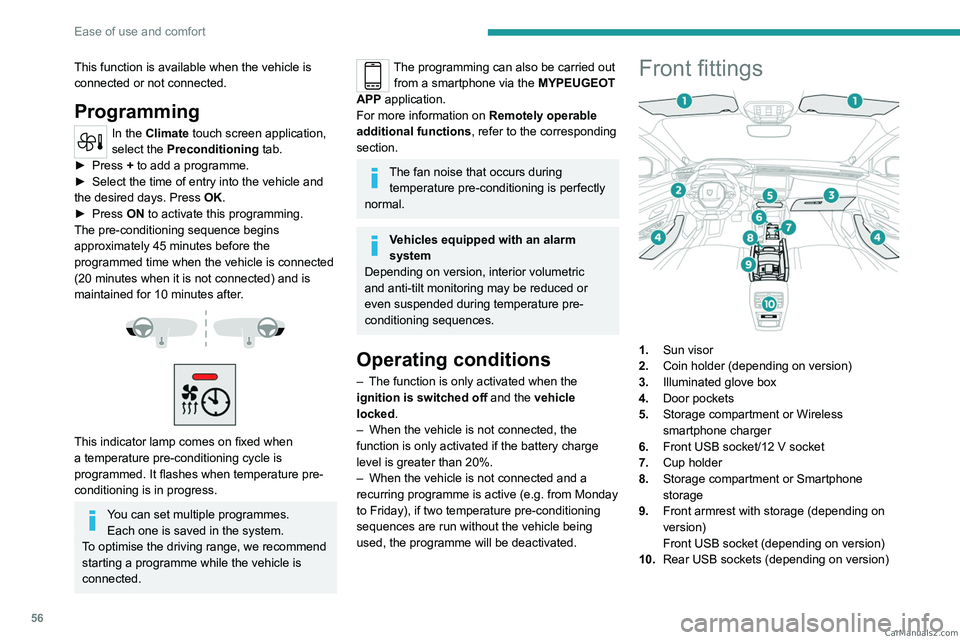
Front fittings
1. Sun visor
2. Coin holder (depending on version)
3. Illuminated glove box
4. Door pockets
5. Storage compartment or Wireless
smartphone charger
6. Front USB socket/12 V socket
7. Cup holder
8. Storage compartment or Smartphone
storage
9. Front armrest with storage (depending on
version)
Front USB socket (depending on version)
10. Rear USB sockets (depending on version) CarM an uals 2 .c o m
Page 61 of 260
59
Ease of use and comfort
3Opening
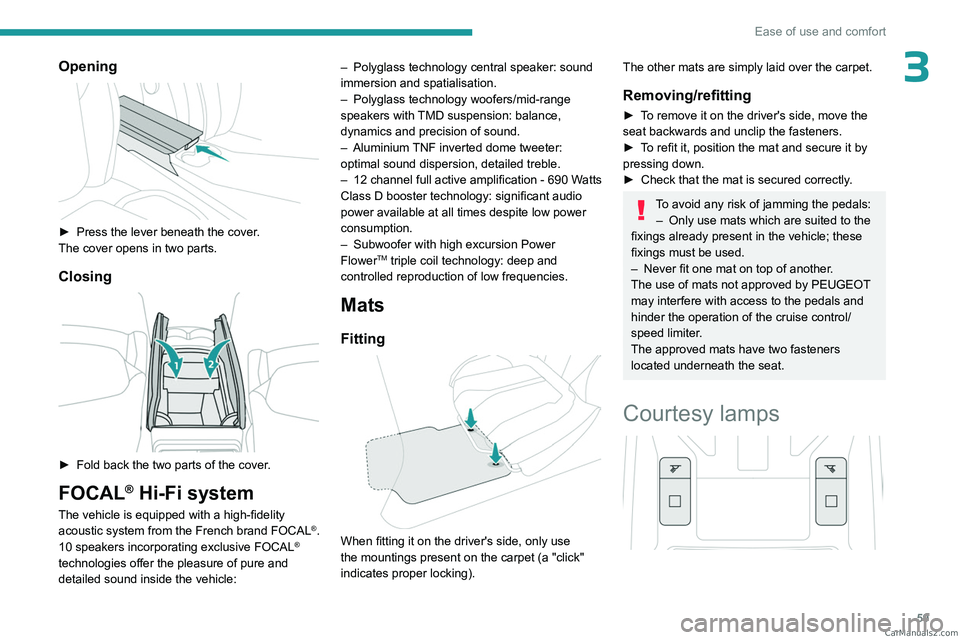
► Press the lever beneath the cover.
The cover opens in two parts.
Closing
► Fold back the two parts of the cover .
FOCAL® Hi-Fi system
The vehicle is equipped with a high-fidelity
acoustic system from the French brand FOCAL®.
10 speakers incorporating exclusive FOCAL®
technologies offer the pleasure of pure and
detailed sound inside the vehicle: –
Polyglass technology central speaker: sound
immersion and spatialisation.
–
Polyglass technology woofers/mid-range
speakers with
TMD suspension: balance,
dynamics and precision of sound.
–
Aluminium
TNF inverted dome tweeter:
optimal sound dispersion, detailed treble.
–
12 channel full active amplification - 690 W
atts
Class D booster technology: significant audio
power available at all times despite low power
consumption.
–
Subwoofer with high excursion Power
FlowerTM triple coil technology: deep and
controlled reproduction of low frequencies.
Mats
Fitting
When fitting it on the driver's side, only use
the mountings present on the carpet (a "click"
indicates proper locking).
The other mats are simply laid over the carpet.
Removing/refitting
► To remove it on the driver's side, move the
seat backwards and unclip the fasteners.
►
T
o refit it, position the mat and secure it by
pressing down.
►
Check that the mat is secured correctly
.
To avoid any risk of jamming the pedals:– Only use mats which are suited to the
fixings already present in the vehicle; these
fixings must be used.
–
Never fit one mat on top of another
.
The use of mats not approved by PEUGEOT
may interfere with access to the pedals and
hinder the operation of the cruise control/
speed limiter.
The approved mats have two fasteners
located underneath the seat.
Courtesy lamps
CarM an uals 2 .c o m
Page 70 of 260
68
Lighting and visibility
► With the ignition off, pull the lighting control
stalk toward you ("headlamp flash") to activate/
deactivate the function.
Manual guide-me-home lighting goes off
automatically after a period of time.
Welcome lighting
When the vehicle is unlocked in low light
conditions and the "Automatic illumination of
headlamps" function is activated, this system
automatically switches on:
–
On the outside, sidelamps, dipped beam
headlamps and door mirror spotlamps.
–
Inside, courtesy lamps and footwell lighting.
Door mirror spotlamps
These spotlamps facilitate access to the vehicle
by lighting the ground near the front doors.
The spotlamps come on automatically:
–
when the vehicle is unlocked.
–
when a door is opened.
–
when a request to locate the vehicle is
received from the remote control.
They also come on with the welcome lighting
and guide-me-home lighting functions.
They go off automatically after 30 seconds.
Automatic lighting systems - General
recommendations
The automatic lighting systems use a detection
camera, located at the top of the windscreen.
Operating limits
The system may be disrupted or not work
correctly:
–
When visibility conditions are poor
(e.g.
snowfall, heavy rain).
–
If the windscreen is dirty
, misted-up or
masked (e.g.
sticker) in front of the camera.
–
If the vehicle is facing highly reflective signs
or safety barrier reflectors.
The system is not able to detect:
–
Road users that do not have their own
lighting, such as pedestrians.
–
V
ehicles with hidden lighting (e.g. travelling
behind a safety barrier on the motorway).
–
V
ehicles at the top or bottom of a steep
slope, on winding roads, on crossroads.
Maintenance
Clean the windscreen regularly,
particularly the area in front of the camera.
The internal surface of the windscreen can
also become misted around the camera.
In humid and cold weather, demist the
windscreen regularly.
Do not allow snow to accumulate on the
bonnet or roof of the vehicle as this could
obstruct the camera.
Automatic headlamp dipping
For more information, refer to the
General recommendations for
automatic lighting systems.
With the ring of the lighting control stalk in the
"AUTO" position and the function activated on
the touch screen, this system automatically
switches between dipped and main beam
headlamps, according to lighting and traffic
conditions, using a camera located at the top of
the windscreen.
CarM an uals 2 .c o m
Page 81 of 260
79
Safety
5ASSISTANCE
► If the vehicle breaks down, press button 2
for more than 2 seconds to request assistance
(confirmed by a voice message*).
►
Pressing again immediately cancels the
request.
Privacy mode allows you to manage the
level of sharing (data and/or location)
between your vehicle and PEUGEOT.
It can be configured in the Settings touch
screen application.
If you purchased your vehicle outside the
PEUGEOT dealer network, you are
invited to have a dealer check the
configuration of these services and, if desired,
modify it as required. In a multilingual country,
services can be configured to use the official
national language of your choice.
For technical reasons and in particular to
improve the quality of telematics services
provided to customers, the Manufacturer
reserves the right to carry out updates to the
vehicle's on-board telematics system at any
time.
* Depending on the geographic coverage of the "eCall (SOS)" and "ASSISTANCE" systems and the official national language chosen by the owner of the
vehicle.
The list of countries covered and the telematic services provided is ava\
ilable from dealers or on the website for your country.
During an update to the vehicle's
on-board telematics system, the
ASSISTANCE system will be unavailable.
If you benefit from the Peugeot Connect
Packs offer with the SOS and Assistance
Pack included, there are additional services
available to you in your personal space, via
the website for your country.
For information about the SOS and
Assistance Pack, please refer to the general
conditions for these services.
Electronic stability control
(ESC)
The electronic stability control programme includes the following systems:
–
Anti-lock braking system (ABS) and Electronic
brake force distribution (EBFD).
–
Emergency braking assistance (EBA).
–
Post Collision Safety Brake (PCSB).
–
Anti-slip regulation (ASR).
–
Dynamic stability control (DSC).
–
T
railer stability assist (TSA).
Anti-lock braking system (ABS)/Electronic brake force
distribution (EBFD)
These systems enhance the vehicle’s stability
and handling during braking, and enable greater
control while cornering, particularly on poor or
slippery road surfaces.
ABS prevents wheel locking in the event of
emergency braking.
Electronic brake force distribution (EBFD)
manages overall braking pressure on each
individual wheel.
►
When braking in an emergency
, depress
the pedal very firmly and maintain this
pressure.
Normal operation of the ABS may make
itself felt by slight vibrations of the brake
pedal.
The fixed illumination of this warning lamp signals that there is a fault with the ABS.
The vehicle retains conventional braking. Drive
carefully at a moderate speed.
Have it checked by a PEUGEOT dealer or a
qualified workshop.
This warning lamp, when lit together with the STOP and ABS warning lamps, CarM an uals 2 .c o m
Page 84 of 260
82
Safety
Seat belts
Inertia reel
The seat belts are equipped with an inertia
reel which allows the strap length to adjust
automatically to the shape of the user. The seat
belt returns to its storage automatically when it
is not used.
The inertia reels are fitted with a device which
automatically locks the strap in the event of a
collision, emergency braking or if the vehicle rolls
over. It can be released by pulling the strap firmly
and then releasing it so that it reels in slightly.
Pyrotechnic pretensioning
This system improves safety in the event of a
frontal or side impact.
Depending on the severity of the impact, the
pyrotechnic pretensioning system instantly
tightens the seat belts against the body of the
occupants.
The pyrotechnic pretensioning seat belts are
enabled when the ignition is on.
Progressive force limiting system
This system reduces the pressure of the seat
belt on the chest of the occupant, taking their
stature into account, thus improving their
protection.
In the event of an impact
Depending on the nature and
seriousness of the impacts, the pyrotechnic
device may trigger before and independently
of airbag deployment. Deployment of the
pretensioners is accompanied by a slight
discharge of harmless smoke and a noise,
due to the activation of the pyrotechnic
cartridge incorporated in the system.
In all cases, the airbag warning lamp comes
on.
Following an impact, have the seat belt
system checked, and if necessary replaced,
by a PEUGEOT dealer or a qualified
workshop.
Front seat belts
The front seat belts are fitted with a pyrotechnic
pretensioning system and a progressive force
limiting system.
Rear seat belts
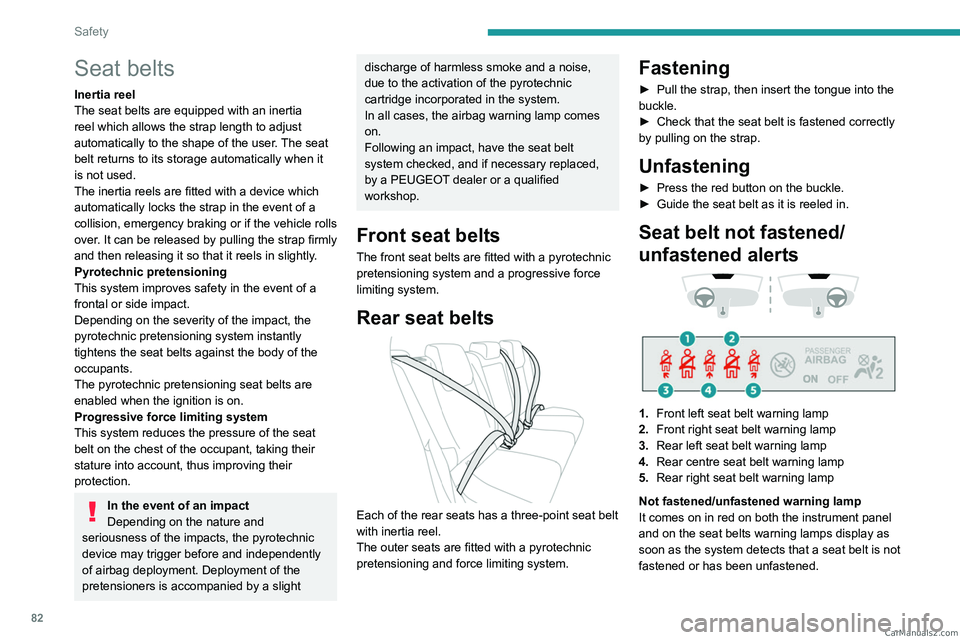
Each of the rear seats has a three-point seat belt
with inertia reel.
The outer seats are fitted with a pyrotechnic
pretensioning and force limiting system.
Fastening
► Pull the strap, then insert the tongue into the
buckle.
►
Check that the seat belt is fastened correctly
by pulling on the strap.
Unfastening
► Press the red button on the buckle.
► Guide the seat belt as it is reeled in.
Seat belt not fastened/
unfastened alerts
1. Front left seat belt warning lamp
2. Front right seat belt warning lamp
3. Rear left seat belt warning lamp
4. Rear centre seat belt warning lamp
5. Rear right seat belt warning lamp
Not fastened/unfastened warning lamp
It comes on in red on both the instrument panel
and on the seat belts warning lamps display as
soon as the system detects that a seat belt is not
fastened or has been unfastened. CarM an uals 2 .c o m
Page 89 of 260
87
Safety
5Installing a booster seat
The chest part of the seat belt must be
positioned on the child's shoulder without
touching the neck.
Ensure that the lap part of the seat belt
passes correctly over the child's thighs.
Use a booster seat with a backrest, equipped
with a belt guide at shoulder level.
Additional protections
To prevent accidental opening of the
doors and rear windows, use the "Child lock".
Take care not to open the rear windows by
more than one third.
To protect young children from the sun's rays,
fit side blinds on the rear windows.
As a safety measure, do not leave:
–
A
child alone and unsupervised inside a
vehicle.
–
A
child or an animal in a vehicle which is
exposed to the sun, with the windows closed.
–
The keys within reach of children inside the
vehicle.
Child seat at the rear
Forward-facing or rearward-facing
► Move the vehicle's front seat forward and
straighten the backrest so that the legs of the
child in the forward-facing or rearward-facing
child seat itself do not touch the vehicle's front
seat.
►
Check that the backrest of the forward-facing
child seat is as close as possible to the backrest
of the vehicle's rear seat, and ideally in contact
with it.
Centre rear seat
A child seat with a support leg must never be
installed on the centre rear passenger seat .
Child seat at the front
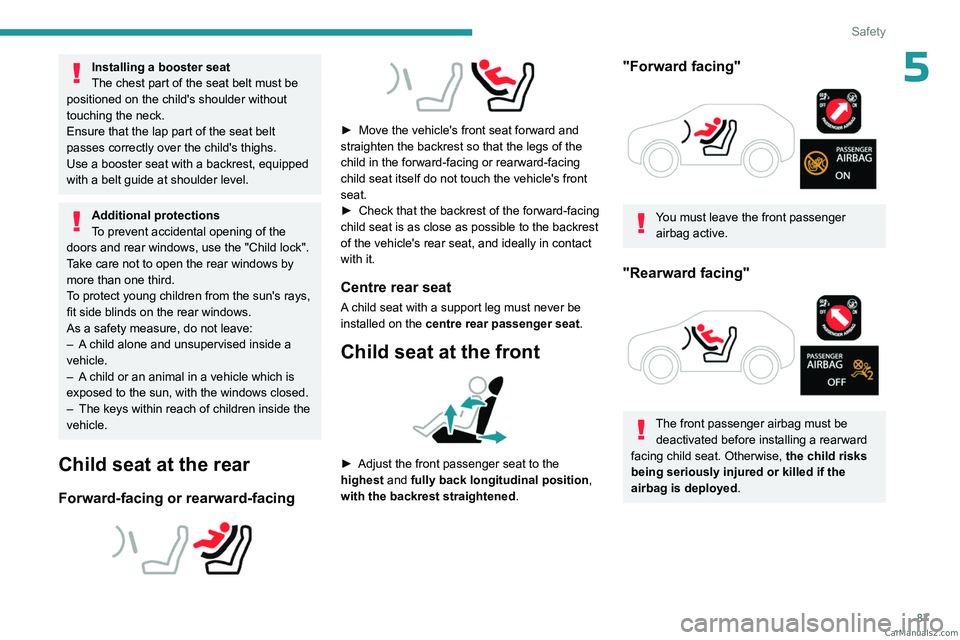
► Adjust the front passenger seat to the
highest and fully back longitudinal position ,
with the backrest straightened.
"Forward facing"
You must leave the front passenger airbag active.
"Rearward facing"
The front passenger airbag must be deactivated before installing a rearward
facing child seat. Otherwise, the child risks
being seriously injured or killed if the
airbag is deployed .
CarM an uals 2 .c o m
Page 95 of 260
93
Safety
5– F3: ISOFIX full height child seat.Booster child seat:
–
B2
: reduced width booster seat.
–
B3
: full width booster seat.
Seat position where the installation of an
ISOFIX child seat is forbidden.
For seat adjustments, refer to the table
"Installing universal, ISOFIX and i-Size child
seats ".
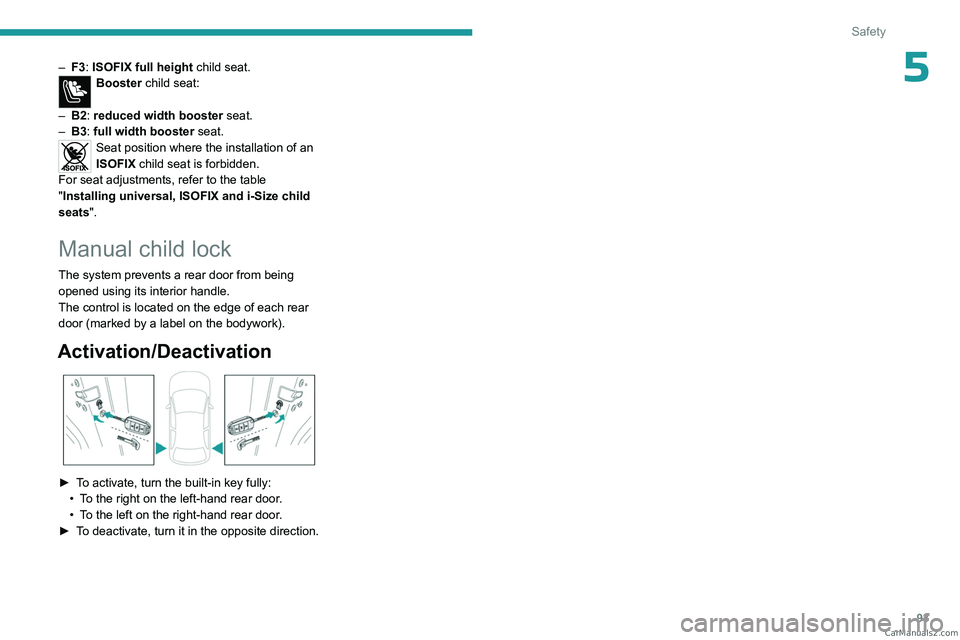
Manual child lock
The system prevents a rear door from being
opened using its interior handle.
The control is located on the edge of each rear
door (marked by a label on the bodywork).
Activation/Deactivation
► To activate, turn the built-in key fully:
• T o the right on the left-hand rear door.
•
T
o the left on the right-hand rear door.
►
T
o deactivate, turn it in the opposite direction. CarM an uals 2 .c o m
Page 98 of 260
96
Driving
If there is still a problem, refer to the "Key
not detected - Back-up starting or Back-up
switch-off" section.
Starting
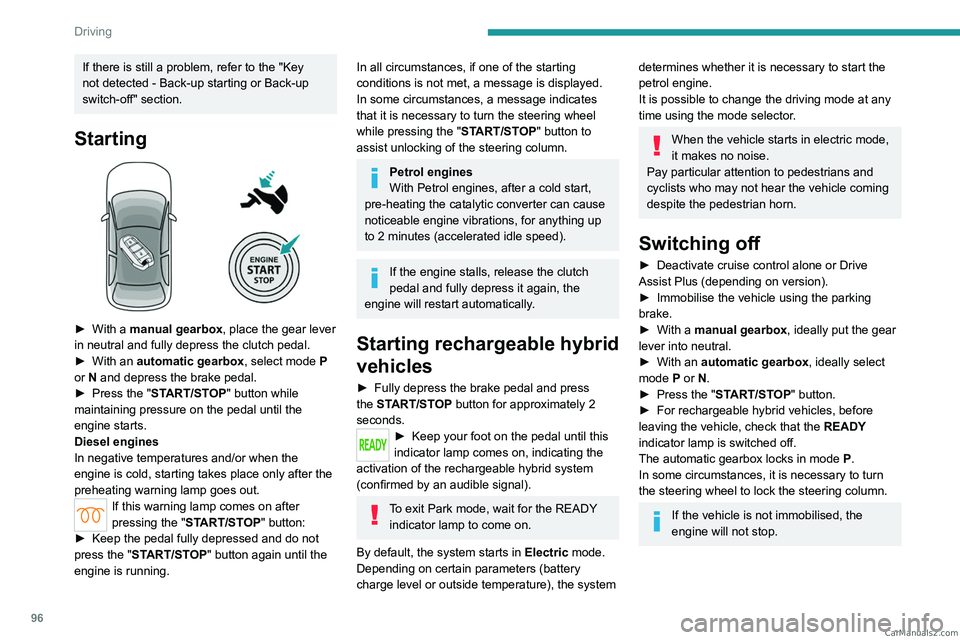
► With a manual gearbox, place the gear lever
in neutral and fully depress the clutch pedal.
►
With an
automatic gearbox, select mode P
or
N and depress the brake pedal.
►
Press the "
START/STOP" button while
maintaining pressure on the pedal until the
engine starts.
Diesel engines
In negative temperatures and/or when the
engine is cold, starting takes place only after the
preheating warning lamp goes out.
If this warning lamp comes on after
pressing the " START/STOP" button:
►
Keep the pedal fully depressed and do not
press the "
START/STOP" button again until the
engine is running.
In all circumstances, if one of the starting
conditions is not met, a message is displayed.
In some circumstances, a message indicates
that it is necessary to turn the steering wheel
while pressing the " START/STOP" button to
assist unlocking of the steering column.
Petrol engines
With Petrol engines, after a cold start,
pre-heating the catalytic converter can cause
noticeable engine vibrations, for anything up
to 2 minutes (accelerated idle speed).
If the engine stalls, release the clutch
pedal and fully depress it again, the
engine will restart automatically.
Starting rechargeable hybrid
vehicles
► Fully depress the brake pedal and press
the START/STOP button for approximately 2
seconds.
► Keep you r foot on the pedal until this
indicator lamp comes on, indicating the
activation of the rechargeable hybrid system
(confirmed by an audible signal).
To exit Park mode, wait for the READY indicator lamp to come on.
By default, the system starts in Electric mode.
Depending on certain parameters (battery
charge level or outside temperature), the system
determines whether it is necessary to start the
petrol engine.
It is possible to change the driving mode at any
time using the mode selector.
When the vehicle starts in electric mode,
it makes no noise.
Pay particular attention to pedestrians and
cyclists who may not hear the vehicle coming
despite the pedestrian horn.
Switching off
► Deactivate cruise control alone or Drive
Assist Plus (depending on version).
►
Immobilise the vehicle using the parking
brake.
►
With a
manual gearbox, ideally put the gear
lever into neutral.
►
With an
automatic gearbox, ideally select
mode
P or N.
►
Press the "
START/STOP" button.
►
For rechargeable hybrid vehicles, before
leaving the vehicle, check that the READY
indicator lamp is switched off.
The automatic gearbox locks in mode P.
In some circumstances, it is necessary to turn
the steering wheel to lock the steering column.
If the vehicle is not immobilised, the
engine will not stop. CarM an uals 2 .c o m