2023 PEUGEOT 308 roof
[x] Cancel search: roofPage 133 of 260

131
Driving
6(50 km/h), if both sensors are able to detect
the thread.
The system also takes motorcyclists into account.
It may also react on animals. Animals
(especially animals smaller than 0.5
m)
and objects on the road are not necessarily
detected.
This system includes three functions:
–
Collision
Risk Alert.
–
Intelligent emergency braking assistance
(iEBA).
–
Active Safety Brake (automatic emergency
braking).
The vehicle has a multifunction camera located
at the top of the windscreen and, depending on
version, a radar located in the front bumper.
This system does not replace the need for driver vigilance.
This system is designed to assist the driver
and improve road safety.
It is the driver's responsibility to continuously
monitor traffic conditions in accordance with
applicable driving regulations.
As soon as the system detects a potential collision, it prepares the braking
circuit. This may cause a slight noise and a
slight sensation of deceleration.
Deactivation/Activation
By default, the system is automatically activated
at every engine start.
It is configured in the ADAS touch screen
application.
Deactivation of the system is signalled by
the illumination of this warning lamp,
accompanied by the display of a message.
Operating conditions and
limits
Vehicle moving forward without trailer.
Brake system operational.
ASR system activated.
Seat belts fastened for all passengers.
Stabilised speed on roads with no or low
curvature.
This warning lamp lights up on the instrument panel without any additional
message, to indicate that the automatic braking
system is not available.
This is a normal behavior indicating that a
condition is not fulfilled and which does not
request the support of a workshop.
In any situations with ignition on where automatic
braking presents a risk, deactivating the system
via the driving aids touch screen application is
recommended, for instance:
–
Carrying long objects on roof bars.
–
Using an automatic car wash.
–
Performing any maintenance (e.g.
changing a
wheel, working inside the engine compartment).
–
Placing the vehicle on a rolling bench in a
workshop.
–
T
owing the vehicle.
–
Following a damage of the windscreen close
to the detection camera.
The system is automatically deactivated if:
–
A
spare wheel with a too small diameter is
detected.
–
A
fault with the brake pedal switch or with
the right or left brake lamp is detected.
–
A
fault in the sensors, in the electronic or in
the brake system is detected.
–
A
trailer is detected by the equipped vehicle
hitch (with an electrical connection plug).
–
A
severe crash (e.g. with airbag
deployment) is detected.
In case the detection is degraded or
temporarily unavailable by environment
conditions, then a driver indication is not CarM an uals 2 .c o m
Page 134 of 260
132
Driving
displayed (because a driver action is not
requested).
It can be dangerous to drive if the brake
lamps are not in perfect working order.
The driver must not overload the vehicle (keep within the GVW and GTW limits
and load height limits for roof bars).
Collision Risk Alert
This function warns the driver if there is a risk
of collision with the preceding vehicle, or with a
pedestrian or cyclist.
Modifying the alert trigger threshold
The trigger threshold determines the sensitivity
with which the function warns of the risk of
collision.
► In the ADAS touch screen application,
select Functions>Automatic Braking
System .
►
Select one of the 3 preset
thresholds:
"Far", "Medium" or "Near".
The selected threshold is memorised when the
ignition is switched off.
Operation
Depending on the collision risk detected by the
system and the alert trigger threshold chosen
by the driver, different levels of alert may be
triggered and displayed on the instrument panel.
The system takes into account the vehicle
dynamics, the difference speed of the own
vehicle and the object identified for the
collision risk, and the operation of the vehicle
(e.g.
actions on the pedals, steering wheel) to
trigger the alert at the most relevant moment.
(orange)
Level 1: visual alert only, warning that the
preceding vehicle is very close.
The message "Vehicle close" is displayed.
(red)
Level 2: visual and audible alert, warning
that a collision is imminent.
The message "Brake! " is displayed.
Level 3: a micro-braking may be given,
confirming the risk of collision (optional).
While approaching a vehicle too quickly,
the level 2 alert may be displayed
directly.
Important: the level 1 alert depends on the
trigger threshold selected. It reacts only on
moving vehicles. It is disabled automatically
at lower speed.
It is possible that collision warnings are
not given, are given too late or seem
unjustified.
The driver must always stay in control of the
vehicle and be prepared to react at any time
to avoid an accident.
If you select "Far" in the touch screen,
then the system warns sooner. This
increases the safety but increases also the
amount of alerts, if the legal safety distance is
not kept.
To reduce the alert occurrence, you can
change the setting to either of the other two.
Intelligent emergency
braking assistance (iEBA)
This function increases vehicle deceleration
if the driver does not brake enough to avoid a
collision.
This assistance is only provided if the driver
presses the brake pedal. CarM an uals 2 .c o m
Page 164 of 260
162
Practical information
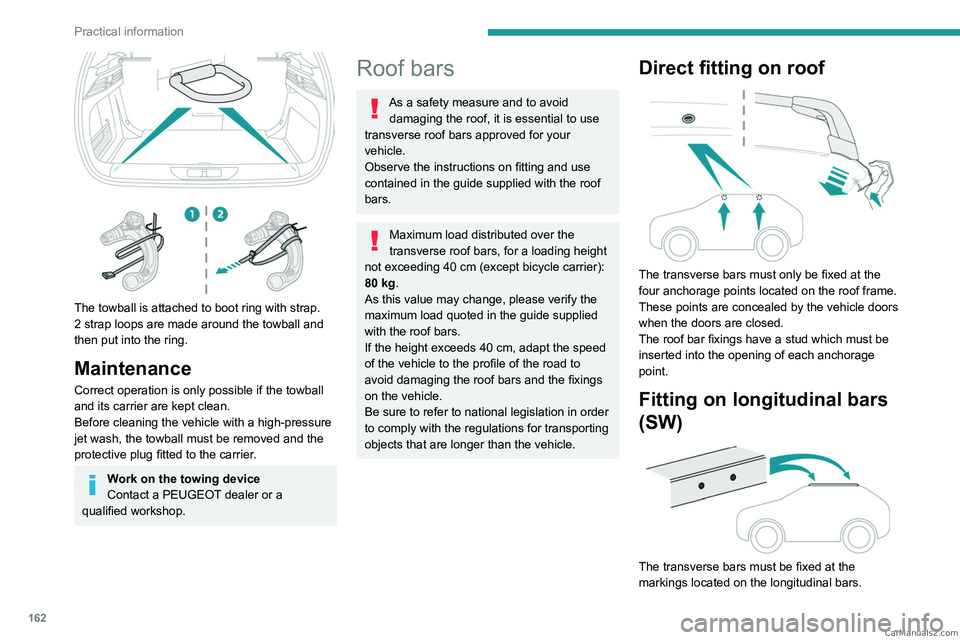
The towball is attached to boot ring with strap.
2 strap loops are made around the towball and
then put into the ring.
Maintenance
Correct operation is only possible if the towball
and its carrier are kept clean.
Before cleaning the vehicle with a high-pressure
jet wash, the towball must be removed and the
protective plug fitted to the carrier.
Work on the towing device
Contact a PEUGEOT dealer or a
qualified workshop.
Roof bars
As a safety measure and to avoid damaging the roof, it is essential to use
transverse roof bars approved for your
vehicle.
Observe the instructions on fitting and use
contained in the guide supplied with the roof
bars.
Maximum load distributed over the
transverse roof bars, for a loading height
not exceeding 40 cm (except bicycle carrier):
80
kg.
As this value may change, please verify the
maximum load quoted in the guide supplied
with the roof bars.
If the height exceeds 40 cm, adapt the speed
of the vehicle to the profile of the road to
avoid damaging the roof bars and the fixings
on the vehicle.
Be sure to refer to national legislation in order
to comply with the regulations for transporting
objects that are longer than the vehicle.
Direct fitting on roof
The transverse bars must only be fixed at the
four anchorage points located on the roof frame.
These points are concealed by the vehicle doors
when the doors are closed.
The roof bar fixings have a stud which must be
inserted into the opening of each anchorage
point.
Fitting on longitudinal bars
(SW)
The transverse bars must be fixed at the
markings located on the longitudinal bars. CarM an uals 2 .c o m
Page 165 of 260
163
Practical information
7Recommendations
Distribute the load uniformly, taking care
to avoid overloading one of the sides.
Arrange the heaviest part of the load as close
as possible to the roof.
Secure the load firmly.
Drive gently: the vehicle will be more
susceptible to the effects of side winds and its
stability may be affected.
Regularly check the security and tight
fastening of the roof bars, at least before each
trip.
Sunroof
Do not operate the sunroof when using
roof bars - risk of major damage!
Very cold climate screens
(Depending on country of sale)
Only available for Diesel vehicles.
This removable device prevents the
accumulation of snow around the radiator
cooling fan.
It consists of two elements for the upper part of
the front grille, a central element and two other
elements for the lower part.
In case of difficulty with installation/
removal
Contact a PEUGEOT dealer or a qualified
workshop.
Before any operation, ensure that the
engine is off and the cooling fan has
stopped.
It is essential to remove them when:
– the outside temperature exceeds
10°C.
–
recovery is in progress.
–
the speed is above 75 mph (120
km/h).
First installation
The type of grille depends on the vehicle version.
The lower screens are suitable for all versions.
The upper and centre screens can be adapted
according to the vehicle version.
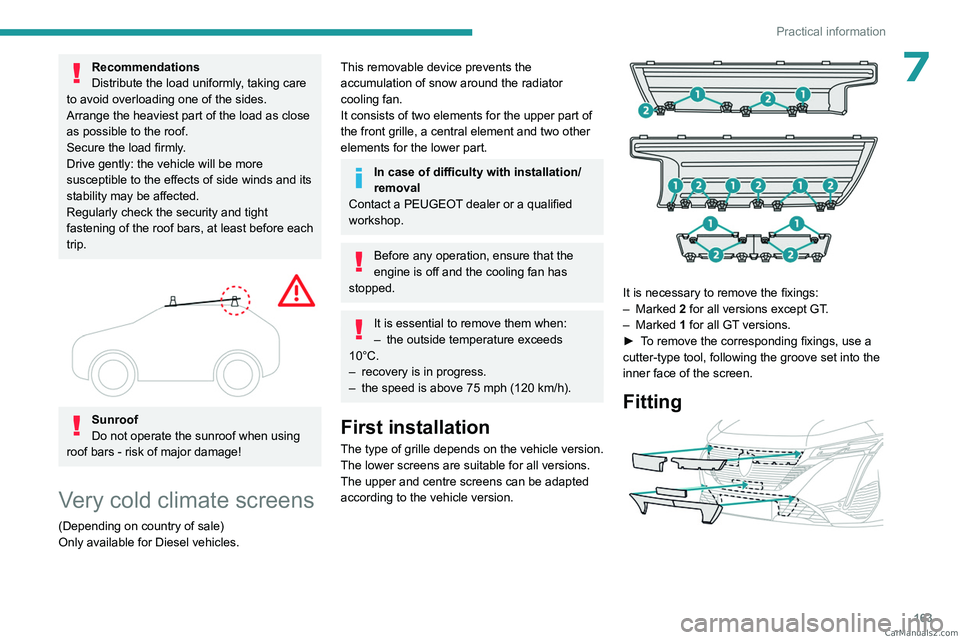
It is necessary to remove the fixings:
– Marked 2
for all versions except GT.
–
Marked 1
for all GT versions.
►
T
o remove the corresponding fixings, use a
cutter-type tool, following the groove set into the
inner face of the screen.
Fitting
CarM an uals 2 .c o m
Page 190 of 260
188
In the event of a breakdown
► Connect the other end of the green or black
cable to the earth point C .
►
Start the engine on the assisting vehicle and
leave it running for a few minutes.
►
Operate the starter on the broken down
vehicle and let the engine run.
If the engine does not start immediately
, switch
off the ignition and wait a few moments before
trying again.
►
W
ait for it to return to idle.
►
Disconnect the jump leads in reverse order.
►
Refit the plastic cover to the (+) terminal, if
the vehicle has one.
►
Allow the engine to run for at least
30
minutes, with the vehicle stationary, so that
the battery reaches an adequate state of charge.
Driving immediately without having
reached a sufficient level of charge may
affect some of the vehicle's functions (e.g.
Stop & Start).
Charging the battery using a battery
charger
For optimum service life of the battery, it is
essential to maintain an adequate state of
charge.
In some circumstances, it may be necessary to
charge the battery:
–
When using the vehicle mainly for short
journeys.
–
If the vehicle is to be taken off the road for
several weeks.
Consult a PEUGEOT dealer or a qualified
workshop.
To charge the vehicle's battery yourself, use only a charger compatible with
lead-acid batteries with a nominal voltage of
12
V.
Follow the instructions provided by the
manufacturer of the charger.
Never reverse polarities.
It is not necessary to disconnect the
battery.
►
Switch the ignition off.
►
Switch off all electrical consumers (audio
system, lighting, wipers, etc.).
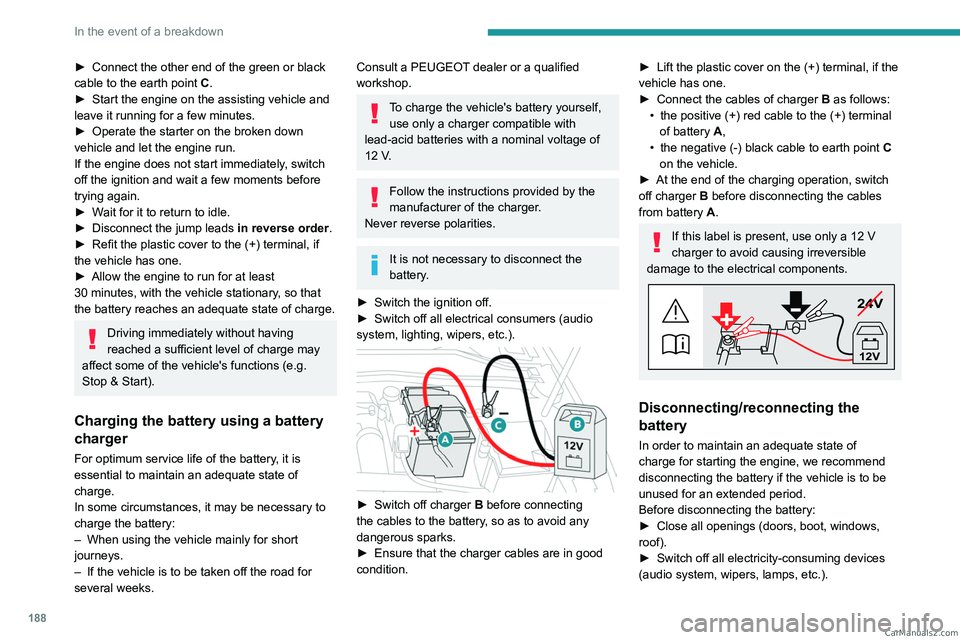
► Switch off charger B before connecting
the cables to the battery, so as to avoid any
dangerous sparks.
►
Ensure that the charger cables are in good
condition.
► Lift the plastic cover on the (+) terminal, if the
vehicle has one.
►
Connect the cables of charger B
as follows:
•
the positive (+) red cable to the (+) terminal
of battery
A,
•
the negative (-) black cable to earth point C
on the vehicle.
►
At the end of the charging operation, switch
off charger B
before disconnecting the cables
from battery A.
If this label is present, use only a 12 V
charger to avoid causing irreversible
damage to the electrical components.
24V
12V
Disconnecting/reconnecting the
battery
In order to maintain an adequate state of
charge for starting the engine, we recommend
disconnecting the battery if the vehicle is to be
unused for an extended period.
Before disconnecting the battery:
►
Close all openings (doors, boot, windows,
roof).
►
Switch off all electricity-consuming devices
(audio system, wipers, lamps, etc.). CarM an uals 2 .c o m
Page 193 of 260
191
In the event of a breakdown
8Before disconnecting the accessory batteries:
► Open the driver's door .
►
Close all other doors.
►
Switch off all electrical consumers (audio
system, wipers, lamps, etc.).
►
Switch off the ignition and wait for the
READY
indicator lamp to go out.
►
Observe a waiting time of 4 minutes.
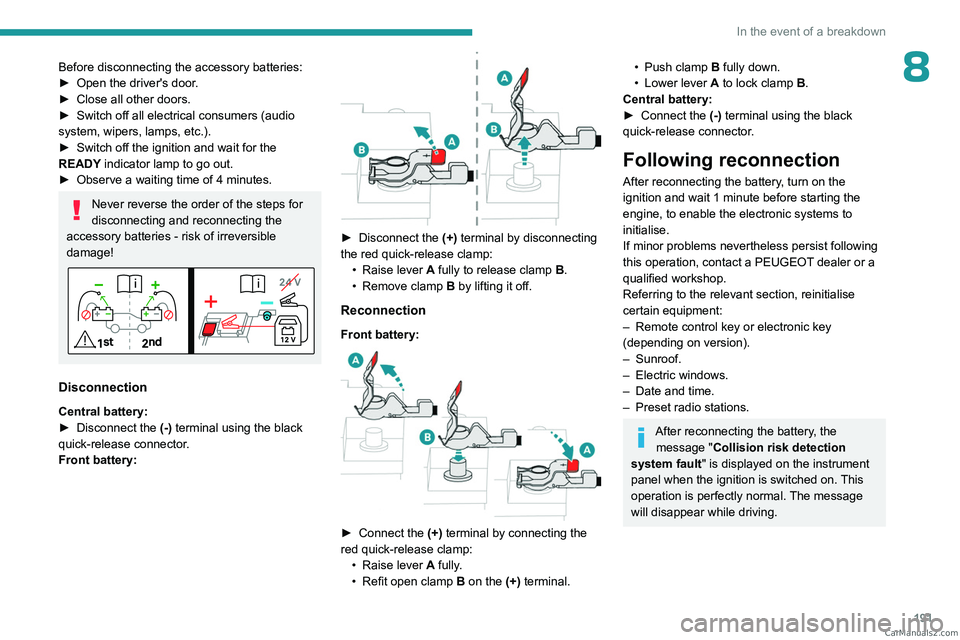
Never reverse the order of the steps for
disconnecting and reconnecting the
accessory batteries - risk of irreversible
damage!
Disconnection
Central battery:
► Disconnect the (-)
terminal using the black
quick-release connector.
Front battery:
► Disconnect the (+) terminal by disconnecting
the red quick-release clamp: •
Raise lever
A
fully to release clamp
B
.
•
Remove clamp
B
by lifting it off.
Reconnection
Front battery:
► Connect the (+) terminal by connecting the
red quick-release clamp: •
Raise lever
A
fully.
•
Refit open clamp
B
on the (+) terminal.
• Push clamp B fully down.
• Lower lever A to lock clamp B.
Central battery:
►
Connect the
(-) terminal using the black
quick-release connector.
Following reconnection
After reconnecting the battery, turn on the
ignition and wait 1 minute before starting the
engine, to enable the electronic systems to
initialise.
If minor problems nevertheless persist following
this operation, contact a PEUGEOT dealer or a
qualified workshop.
Referring to the relevant section, reinitialise
certain equipment:
–
Remote control key or electronic key
(depending on version).
–
Sunroof.
–
Electric windows.
–
Date and time.
–
Preset radio stations.
After reconnecting the battery, the message "Collision risk detection
system fault" is displayed on the instrument
panel when the ignition is switched on. This
operation is perfectly normal. The message
will disappear while driving. CarM an uals 2 .c o m
Page 209 of 260
207
PEUGEOT i-Connect Advanced - PEUGEOT i-Connect
10► Press the button located on the steering
wheel.
or
►
Press the touch screen button.
To ensure that voice commands are always recognised by the system, please
follow these recommendations:
–
Use natural language in a normal tone
without breaking up words or raising your
voice.
–
After opening voice recognition with the
steering wheel-mounted button or the button
on the touch screen, always wait for the
"beep” (audible signal) before talking. No
"beep" sounds when voice recognition is
opened using "OK Peugeot".
–
For optimal operation, it is recommended
that you close the windows and the sunroof
(depending on equipment) to avoid any
external interference, and switch the
ventilation off.
–
Before speaking the voice commands, ask
the other passengers not to speak.
Voice command example for air
conditioning:
"raise the fan speed"
"Turn on air conditioning"
"i'm too hot"
Voice command example for radio and
media:
"I want to listen to michael jackson"
"switch to radio"
"tune to 88.5"
Media voice commands are only
available with a USB connection.
Voice command example for navigation:
"navigate home"
"Navigate me to gabrielle's house"
"search for public parking nearby"
Depending on the country, give
destination (address) instructions in the
language configured for the system.
Voice command example for telephone:
"Call Matthew's mobile"
"call 0113 345 9869"
"Call jonathan"
If there is no telephone connected by
Bluetooth®, a voice message announces:
"Connect a telephone by Bluetooth®", and the
voice session will be closed.
Voice command example for the weather:
"do i need a raincoat"
"how is the weather tonight"
"what is today's humidity level"
Navigation
Navigation home screen
(depending on equipment)
Access to additional videos
https://www.tomtom.com/
PSAGroup-Connected-Nav
Press the "Navigation" application to
display the navigation home screen.
Press "Search" to enter an address or a
name.
Press this button to display the main
menu for the various options.
Press this button to display the 3D/2D
mode.
Select "Sound activated", "Alerts only"
and "Silent" with successive presses on
this button.
Press the "plus"/"minus" buttons to zoom
in/out, or use two fingers on the screen.
Main menu
Press the "Navigation" application to
display the navigation home screen.
Press this button to display the main
menu for the various options. CarM an uals 2 .c o m
Page 224 of 260

222
Alphabetical index
Environment 8, 32
e-Save function (energy reserve)
24
ESC (electronic stability control)
79
Expanded traffic sign recognition
11 4
Exterior lighting
68
F
Fatigue detection 134–135
Favourite driving functions
11 0
Filling the AdBlue® tank
168, 172
Filling the fuel tank
147–148
Filter, air
169
Filter, oil
169
Filter, particle
168–169
Filter, passenger compartment
51, 169
Fitting a wheel
182–183
Fitting roof bars
162–163
Fittings, boot
61
Fittings, front
56
Fittings, interior
57
Fittings, rear
60
Flap, charging
158
Flap, fuel filler
147–148
Flap, ski
60
Flashing indicators
66
Flat bed (towing)
192
Floor, boot, adjustable
63
Fluid, brake
168
Fluid, engine coolant
168
Foglamps, rear
65, 186
Folding the rear seats 49–50
Frequency (radio)
212
Fuel
8, 147
Fuel consumption
8, 20
Fuel level, low
147
Fuel (tank)
147–148
Fuses
186
G
Gauge, fuel 147
Gearbox, automatic
100–103, 105, 169, 187
Gearbox, manual
100, 105, 169
Gear lever
100
Gear lever, manual gearbox
100
Gear shift indicator
105
Glove box
57
H
Hands-free access 35–36
Hands-free tailgate
35–36
Hazard warning lamps
76, 176
Headlamps (adjustment)
66
Headlamps, automatic dipping
68–69
Headlamps, automatic operation
67
Headlamps, halogen
66
Headlamps, main beam
68
Head restraints, front
43
Head restraints, rear
49–50
Heated steering wheel 47
Heating
51
Heating, programmable
24, 55
Hi-Fi system
59
High voltage
149
Hill start assist
104–105
Histogramme, fuel consumption
23–24
Horn
77
I
Ignition 97, 214
Ignition on
97
Immobiliser, electronic
95
Indicator, AdBlue® range
18
Indicator, coolant temperature
18
Indicator, engine oil level
18
Indicators, direction
66
Indicator, service
17
Inflating tyres
170, 200
Inflating tyres and accessories
(using the kit)
178, 180
Information, vehicle
10, 217
Infrared camera
109
Instrument panel
10, 21, 110
Instrument panels
10
ISOFIX mountings
89, 91–92 CarM an uals 2 .c o m