2023 PEUGEOT 308 remote control
[x] Cancel search: remote controlPage 99 of 260
97
Driving
6With the engine off, the braking and
steering assistance systems are also cut
off - risk of loss of control of the vehicle!
Never leave your vehicle with the
electronic key still inside.
Switching on the ignition
without starting the engine
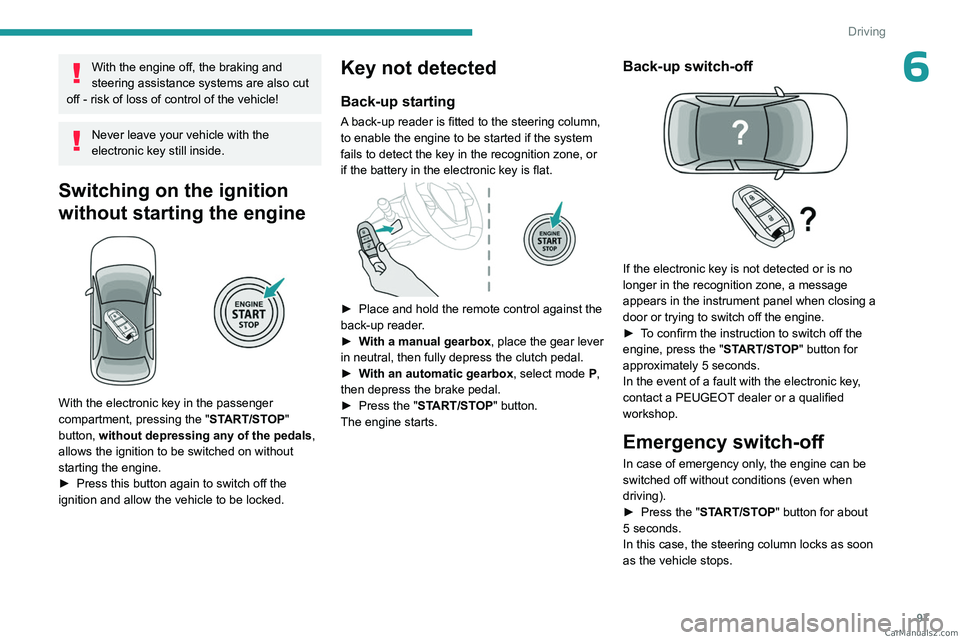
With the electronic key in the passenger
compartment, pressing the " START/STOP"
button, without depressing any of the pedals ,
allows the ignition to be switched on without
starting the engine.
►
Press this button again to switch off the
ignition and allow the vehicle to be locked.
Key not detected
Back-up starting
A back-up reader is fitted to the steering column,
to enable the engine to be started if the system
fails to detect the key in the recognition zone, or
if the battery in the electronic key is flat.
► Place and hold the remote control against the
back-up reader .
►
W
ith a manual gearbox, place the gear lever
in neutral, then fully depress the clutch pedal.
►
W
ith an automatic gearbox, select mode P,
then depress the brake pedal.
►
Press the "
START/STOP" button.
The engine starts.
Back-up switch-off
If the electronic key is not detected or is no
longer in the recognition zone, a message
appears in the instrument panel when closing a
door or trying to switch off the engine.
►
T
o confirm the instruction to switch off the
engine, press the " START/STOP" button for
approximately 5
seconds.
In the event of a fault with the electronic key,
contact a PEUGEOT dealer or a qualified
workshop.
Emergency switch-off
In case of emergency only, the engine can be
switched off without conditions (even when
driving).
►
Press the "
START/STOP" button for about
5
seconds.
In this case, the steering column locks as soon
as the vehicle stops. CarM an uals 2 .c o m
Page 156 of 260
154
Practical information
6.Never attempt to repair or open this
charging cable. It contains no repairable
parts - replace the charging cable if it is
damaged.
7. Never immerse this charging cable in water.
8. Never use this charging cable with an
extension cable, a multi-plug socket, a
conversion adaptor or on a damaged
electrical socket.
9. Do not unplug the plug from the wall as a
means of stopping charging. 10.
Immediately stop charging, by locking and
then unlocking the vehicle using the remote
control key, if the charging cable or wall
socket feel burning hot to the touch.
11 . This charging cable includes components
liable to cause electrical arcing or sparks.
Do not expose to flammable vapours.
12. Only use this charging cable with PEUGEOT
vehicles.
13. Never plug the cable into the wall socket (or
unplug it) with wet hands.
14. Do not force the connector if it is locked into
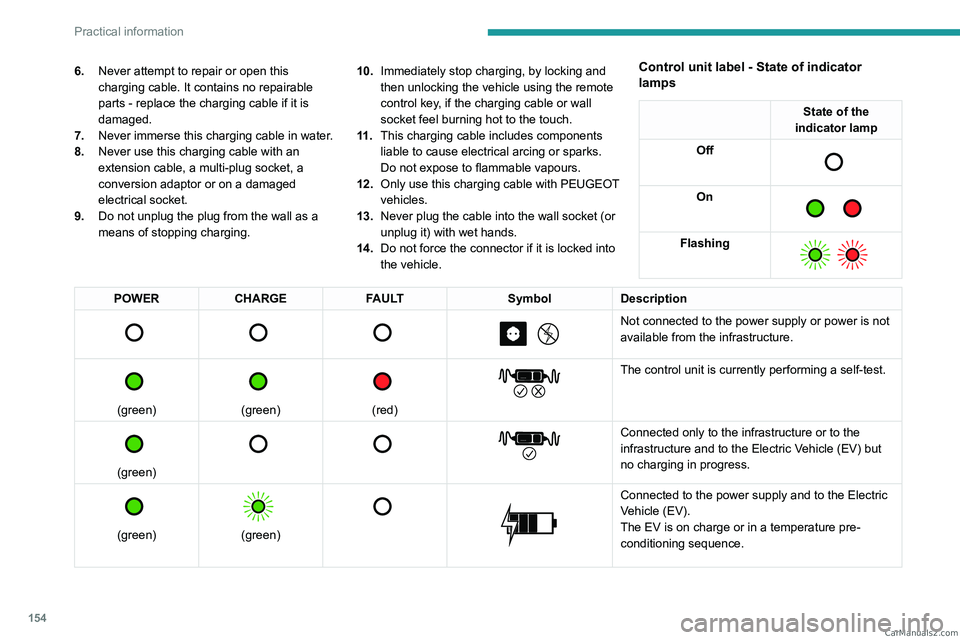
the vehicle.Control unit label - State of indicator
lamps
State of the
indicator lamp
Off
On
Flashing
POWER CHARGE FAULT SymbolDescription
Not connected to the power supply or power is not
available from the infrastructure.
(green)
(green)
(red)
The control unit is currently performing a self-test.
(green)
Connected only to the infrastructure or to the
infrastructure and to the Electric Vehicle (EV) but
no charging in progress.
(green)
(green)
Connected to the power supply and to the Electric
Vehicle (EV).
The EV is on charge or in a temperature pre-
conditioning sequence. CarM an uals 2 .c o m
Page 157 of 260
155
Practical information
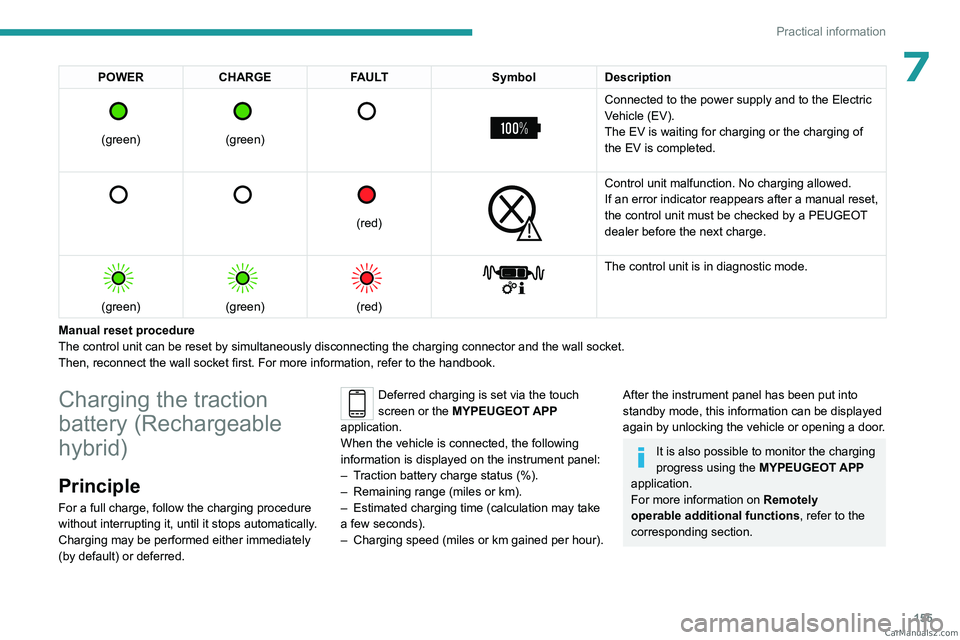
7POWERCHARGE FAULT SymbolDescription
(green)
(green)
Connected to the power supply and to the Electric
Vehicle (EV).
The EV is waiting for charging or the charging of
the EV is completed.
(red)
Control unit malfunction. No charging allowed.
If an error indicator reappears after a manual reset,
the control unit must be checked by a PEUGEOT
dealer before the next charge.
(green)
(green)
(red)
The control unit is in diagnostic mode.
Manual reset procedure
The control unit can be reset by simultaneously disconnecting the chargi\
ng connector and the wall socket.
Then, reconnect the wall socket first. For more information, refer to the handbook.
Charging the traction
battery (Rechargeable
hybrid)
Principle
For a full charge, follow the charging procedure
without interrupting it, until it stops automatically.
Charging may be performed either immediately
(by default) or deferred.
Deferred charging is set via the touch
screen or the MYPEUGEOT APP
application.
When the vehicle is connected, the following
information is displayed on the instrument panel:
–
T
raction battery charge status (%).
–
Remaining range (miles or km).
–
Estimated charging time (calculation may take
a few seconds).
–
Charging speed (miles or km gained per hour).
After the instrument panel has been put into
standby mode, this information can be displayed
again by unlocking the vehicle or opening a door.
It is also possible to monitor the charging
progress using the MYPEUGEOT APP
application.
For more information on Remotely
operable additional functions , refer to the
corresponding section. CarM an uals 2 .c o m
Page 159 of 260
157
Practical information
7or electrocution in the event of contact with or
immersion in water!
Charging procedure
Connection
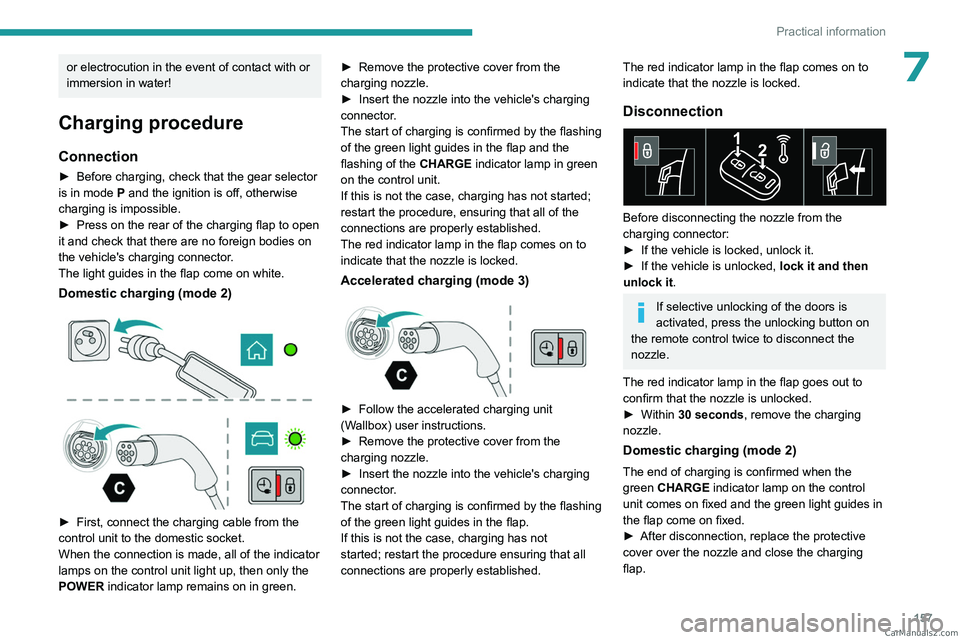
► Before charging, check that the gear selector
is in mode P and the ignition is off, otherwise
charging is impossible.
►
Press on the rear of the charging flap to open
it and check that there are no foreign bodies on
the vehicle's charging connector
.
The light guides in the flap come on white.
Domestic charging (mode 2)
► First, connect the charging cable from the
control unit to the domestic socket.
When the connection is made, all of the indicator
lamps on the control unit light up, then only the
POWER
indicator lamp remains on in green. ►
Remove the protective cover from the
charging nozzle.
►
Insert the nozzle into the vehicle's charging
connector
.
The start of charging is confirmed by the flashing
of the green light guides in the flap and the
flashing of the CHARGE indicator lamp in green
on the control unit.
If this is not the case, charging has not started;
restart the procedure, ensuring that all of the
connections are properly established.
The red indicator lamp in the flap comes on to
indicate that the nozzle is locked.
Accelerated charging (mode 3)
► Follow the accelerated charging unit
(W allbox) user instructions.
►
Remove the protective cover from the
charging nozzle.
►
Insert the nozzle into the vehicle's charging
connector
.
The start of charging is confirmed by the flashing
of the green light guides in the flap.
If this is not the case, charging has not
started; restart the procedure ensuring that all
connections are properly established.
The red indicator lamp in the flap comes on to
indicate that the nozzle is locked.
Disconnection
Before disconnecting the nozzle from the
charging connector:
►
If the vehicle is locked, unlock it.
►
If the vehicle is unlocked, lock it and then
unlock it .
If selective unlocking of the doors is
activated, press the unlocking button on
the remote control twice to disconnect the
nozzle.
The red indicator lamp in the flap goes out to
confirm that the nozzle is unlocked.
►
Within
30 seconds, remove the charging
nozzle.
Domestic charging (mode 2)
The end of charging is confirmed when the
green CHARGE indicator lamp on the control
unit comes on fixed and the green light guides in
the flap come on fixed.
►
After disconnection, replace the protective
cover over the nozzle and close the charging
flap. CarM an uals 2 .c o m
Page 160 of 260
158
Practical information
► Disconnect the control unit's charging cable
from the domestic socket.
Accelerated charging (mode 3)
The end of charging is confirmed by the
accelerated charging unit (Wallbox) and when
the green light guides in the flap come on fixed.
►
After disconnection, replace the nozzle on to
the charging unit and close the charging flap.
Deferred charging
By default, the deferred charging start time is set
to be around midnight.
Depending on equipment, this time can be
changed.
Settings
► In the Energy touch screen
application, select the Charging tab.
►
Set the charging start time.
►
Press
OK.
The setting is saved in the system.
You can also programme the deferred charging function using a smartphone, via
the MYPEUGEOT APP application.
For more information on Remotely operable
additional functions , refer to the corresponding
section.
Activation
► After programming the deferred charging,
connect the vehicle to the desired charging
equipment.
► Press this button in the flap within one
minute to activate the deferred charging
(confirmed by the light guides coming on in
blue).
Towing device
Load distribution
► Distribute the load in the trailer so that the
heaviest items are as close as possible to the
axle, and the nose weight approaches the
maximum permitted without exceeding it.
Air density decreases with altitude, thus reducing
engine performance.
The maximum towable load
must be reduced by 10% per 1,000
metres of
altitude.
Use genuine towing devices and wiring
harnesses approved by PEUGEOT. We
recommend having them fitted by a
PEUGEOT dealer or a qualified workshop.
If not fitted by a PEUGEOT dealer, they must
still be fitted in accordance with the vehicle
manufacturer's instructions.
Important: if the vehicle has a motorised
tailgate and Hands-Free Tailgate Access
function, and a towing device has been fitted
outside the PEUGEOT dealer network, it
is essential to visit a PEUGEOT dealer or
a qualified workshop to have the detection
system recalibrated
- risk of malfunction of the
Hands-Free Tailgate Access function.
Certain driving or manoeuvring aid functions
are automatically deactivated while an
approved towing system is in use.
For more information about driving with a
towing device fitted to a trailer and associated
with the Trailer stability assist, refer to the
corresponding section.
Comply with the maximum authorised
towable weight, as indicated on your
vehicle's registration certificate, on the
manufacturer's label and in the Technical
data section of this guide.
If using accessories attached to the
towing device (e.g. bicycle carriers, tow
boxes):
–
Comply with the maximum authorised nose
weight.
–
Do not transport more than 4 conventional
bicycles or 2 electric bicycles.
When loading bicycles onto a bicycle carrier
on a towball, be sure to place the heaviest
bicycles as close as possible to the vehicle.
Observe the legislation in force in the
country where you are driving. CarM an uals 2 .c o m
Page 188 of 260
186
In the event of a breakdown
4.Foglamps (P21W)
5. Reversing lamps (W16W)
Reversing lamps/Foglamps
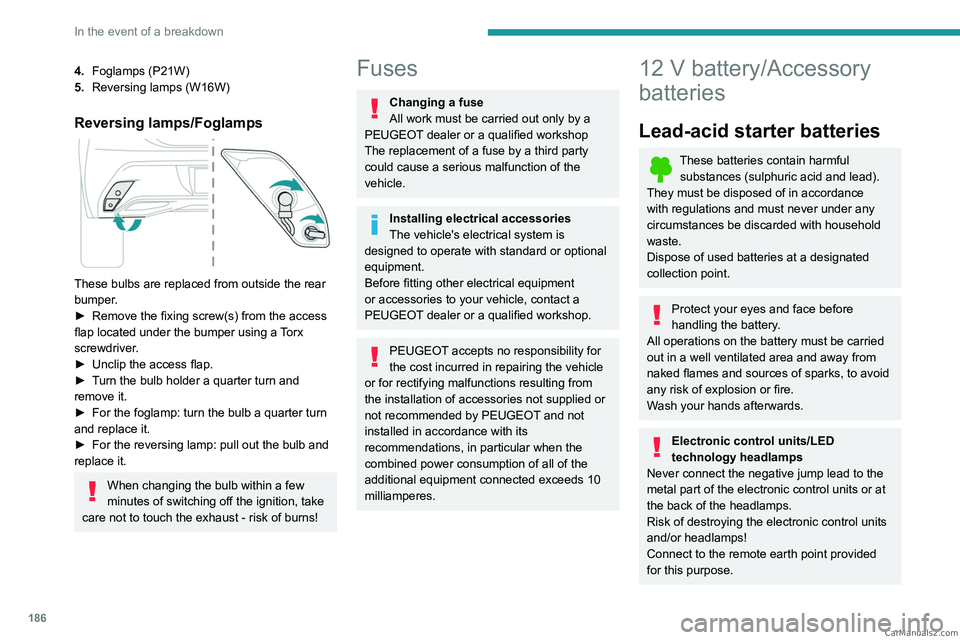
These bulbs are replaced from outside the rear
bumper.
►
Remove the fixing screw(s) from the access
flap located under the bumper using a
Torx
screwdriver.
►
Unclip the access flap.
►
T
urn the bulb holder a quarter turn and
remove it.
►
For the foglamp: turn the bulb a quarter turn
and replace it.
►
For the reversing lamp: pull out the bulb and
replace it.
When changing the bulb within a few
minutes of switching off the ignition, take
care not to touch the exhaust - risk of burns!
Fuses
Changing a fuse
All work must be carried out only by a
PEUGEOT dealer or a qualified workshop
The replacement of a fuse by a third party
could cause a serious malfunction of the
vehicle.
Installing electrical accessories
The vehicle's electrical system is
designed to operate with standard or optional
equipment.
Before fitting other electrical equipment
or accessories to your vehicle, contact a
PEUGEOT dealer or a qualified workshop.
PEUGEOT accepts no responsibility for
the cost incurred in repairing the vehicle
or for rectifying malfunctions resulting from
the installation of accessories not supplied or
not recommended by PEUGEOT and not
installed in accordance with its
recommendations, in particular when the
combined power consumption of all of the
additional equipment connected exceeds 10
milliamperes.
12 V battery/Accessory
batteries
Lead-acid starter batteries
These batteries contain harmful
substances (sulphuric acid and lead).
They must be disposed of in accordance
with regulations and must never under any
circumstances be discarded with household
waste.
Dispose of used batteries at a designated
collection point.
Protect your eyes and face before
handling the battery.
All operations on the battery must be carried
out in a well ventilated area and away from
naked flames and sources of sparks, to avoid
any risk of explosion or fire.
Wash your hands afterwards.
Electronic control units/LED
technology headlamps
Never connect the negative jump lead to the
metal part of the electronic control units or at
the back of the headlamps.
Risk of destroying the electronic control units
and/or headlamps!
Connect to the remote earth point provided
for this purpose. CarM an uals 2 .c o m
Page 193 of 260
191
In the event of a breakdown
8Before disconnecting the accessory batteries:
► Open the driver's door .
►
Close all other doors.
►
Switch off all electrical consumers (audio
system, wipers, lamps, etc.).
►
Switch off the ignition and wait for the
READY
indicator lamp to go out.
►
Observe a waiting time of 4 minutes.
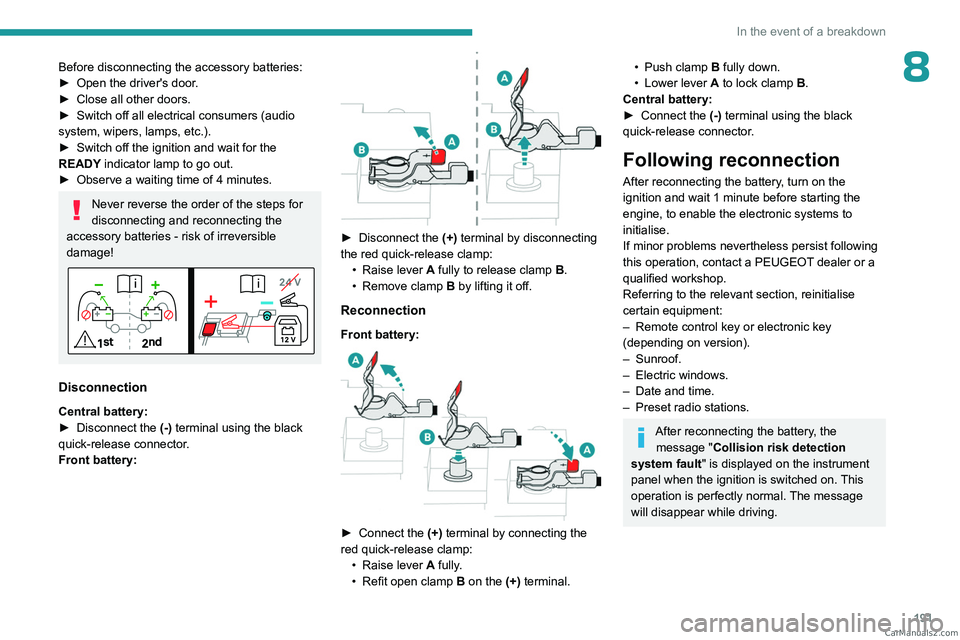
Never reverse the order of the steps for
disconnecting and reconnecting the
accessory batteries - risk of irreversible
damage!
Disconnection
Central battery:
► Disconnect the (-)
terminal using the black
quick-release connector.
Front battery:
► Disconnect the (+) terminal by disconnecting
the red quick-release clamp: •
Raise lever
A
fully to release clamp
B
.
•
Remove clamp
B
by lifting it off.
Reconnection
Front battery:
► Connect the (+) terminal by connecting the
red quick-release clamp: •
Raise lever
A
fully.
•
Refit open clamp
B
on the (+) terminal.
• Push clamp B fully down.
• Lower lever A to lock clamp B.
Central battery:
►
Connect the
(-) terminal using the black
quick-release connector.
Following reconnection
After reconnecting the battery, turn on the
ignition and wait 1 minute before starting the
engine, to enable the electronic systems to
initialise.
If minor problems nevertheless persist following
this operation, contact a PEUGEOT dealer or a
qualified workshop.
Referring to the relevant section, reinitialise
certain equipment:
–
Remote control key or electronic key
(depending on version).
–
Sunroof.
–
Electric windows.
–
Date and time.
–
Preset radio stations.
After reconnecting the battery, the message "Collision risk detection
system fault" is displayed on the instrument
panel when the ignition is switched on. This
operation is perfectly normal. The message
will disappear while driving. CarM an uals 2 .c o m
Page 222 of 260

220
Alphabetical index
A
ABS 79
Accelerated charging unit (Wallbox)
151–152
Accessories
76
Active LED Vision
67, 69
Active Safety Brake
130–131, 133
AdBlue®
18, 170
AdBlue® tank
172
Additive, Diesel
168–169
Adjusting headlamps
66
Adjusting head restraints
43
Adjusting seat
43–44
Adjusting the air distribution
52–53
Adjusting the air flow
52–53
Adjusting the headlamp beam height
66
Adjusting the height and reach
of the steering wheel
47
Adjusting the lumbar support
44
Adjusting the seat angle
44
Adjusting the temperature
52
Adjusting the time
215
Advice on care and maintenance
149, 173
Advice on driving
8, 94–95
Airbags
84–87
Airbags, curtain
85–86
Airbags, front
84–85, 88
Airbags, lateral
85–86
Air conditioning
51–52, 54
Air conditioning, automatic
55
Air conditioning, dual-zone automatic
52
Air intake
54
Air vents 51
Alarm
37–38
Amplifier, audio
59
Anti-lock braking system (ABS)
79
Antitheft / Immobiliser
27
Applications
23–24
Armrest, front
58–59
Armrest, rear
60
Assistance call
77–78
Assistance, emergency braking
80, 132
Audio streaming (Bluetooth)
212
B
Battery, 12 V 165, 169, 186–190
Battery, ancillaries
186
Battery, charging
187–188, 190
Battery, remote control
31–32
Blanking screen (snow shield)
163
Blind
40
BlueHDi
18, 168, 176
Bluetooth (hands-free)
209
Bluetooth (telephone)
209–210
Bodywork
174
Bonnet
165–166
Boot
33, 36, 64
Brake discs
170
Brake lamps
185
Brakes
169–170
Braking
102
Braking assistance system
79–80
Braking, automatic emergency 130–131, 133
Braking, dynamic emergency
98–100
Bulbs (changing)
184–185
C
Capacity, fuel tank 147
Care of the bodywork
174
Central locking
29–30
Changing a bulb
184–185
Changing a fuse
186
Changing a wheel
177, 181
Changing a wiper blade
74
Changing the remote control battery
31
Changing to free-wheeling
172
Charge level indicator
(Rechargeable hybrid)
20
Charger, induction
57
Charger, wireless
57
Charging cable
153
Charging cable
(Rechargeable hybrid)
151–152, 157
Charging connector
(Rechargeable hybrid)
150, 155, 157
Charging flap
(Rechargeable hybrid)
150, 155, 157
Charging the traction battery
(Rechargeable hybrid)
20, 149, 155, 157
CHECK
20
Checking the engine oil level
18
Checking the levels
167–168 CarM an uals 2 .c o m