2023 PEUGEOT 308 tyre pressure
[x] Cancel search: tyre pressurePage 180 of 260
178
In the event of a breakdown
The jack meets European standards, as
defined in the Machinery Directive 2006/42/
CE.
The jack does not require any maintenance.
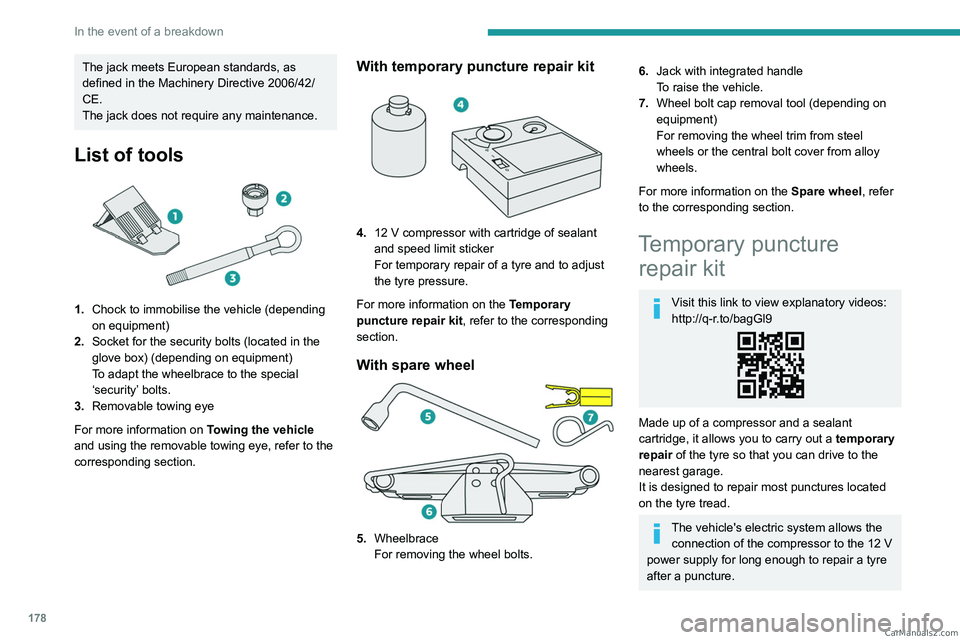
List of tools
1.Chock to immobilise the vehicle (depending
on equipment)
2. Socket for the security bolts (located in the
glove box) (depending on equipment)
To adapt the wheelbrace to the special
‘security’ bolts.
3. Removable towing eye
For more information on Towing the vehicle
and using the removable towing eye, refer to the
corresponding section.
With temporary puncture repair kit
4. 12 V compressor with cartridge of sealant
and speed limit sticker
For temporary repair of a tyre and to adjust
the tyre pressure.
For more information on the Temporary
puncture repair kit, refer to the corresponding
section.
With spare wheel
5. Wheelbrace
For removing the wheel bolts.
6.Jack with integrated handle
To raise the vehicle.
7. Wheel bolt cap removal tool (depending on
equipment)
For removing the wheel trim from steel
wheels or the central bolt cover from alloy
wheels.
For more information on the Spare wheel, refer
to the corresponding section.
Temporary puncture repair kit
Visit this link to view explanatory videos:
http://q-r.to/bagGl9
Made up of a compressor and a sealant
cartridge,
it allows you to carry out a temporary
repair of the tyre so that you can drive to the
nearest garage.
It is designed to repair most punctures located
on the tyre tread.
The vehicle's electric system allows the connection of the compressor to the 12 V
power supply for long enough to repair a tyre
after a puncture. CarM an uals 2 .c o m
Page 181 of 260
179
In the event of a breakdown
8Only the 12 V socket located at the front
of the vehicle can be used to power the
compressor.
For more information on the Tool kit,
refer to the corresponding section.
Tyre inflation pressures are indicated on this label.
For more information on Identification
markings, particularly this label, refer to the
corresponding section.
Should the pressure of one or more tyres
be adjusted, it is necessary to reinitialise
the under-inflation detection system.
For more information on Tyre under-inflation
detection, refer to the corresponding section.
Repair procedure
Do not remove any foreign body
(e.g. nail, screw) which has penetrated
the tyre.
►
Park the vehicle without obstructing traffic
and apply the parking brake.
►
Follow the safety instructions (hazard
warning lamps, warning triangle, high visibility jacket, etc.) according to the legislation in force
in the country in which you are driving.
►
Switch the ignition off.
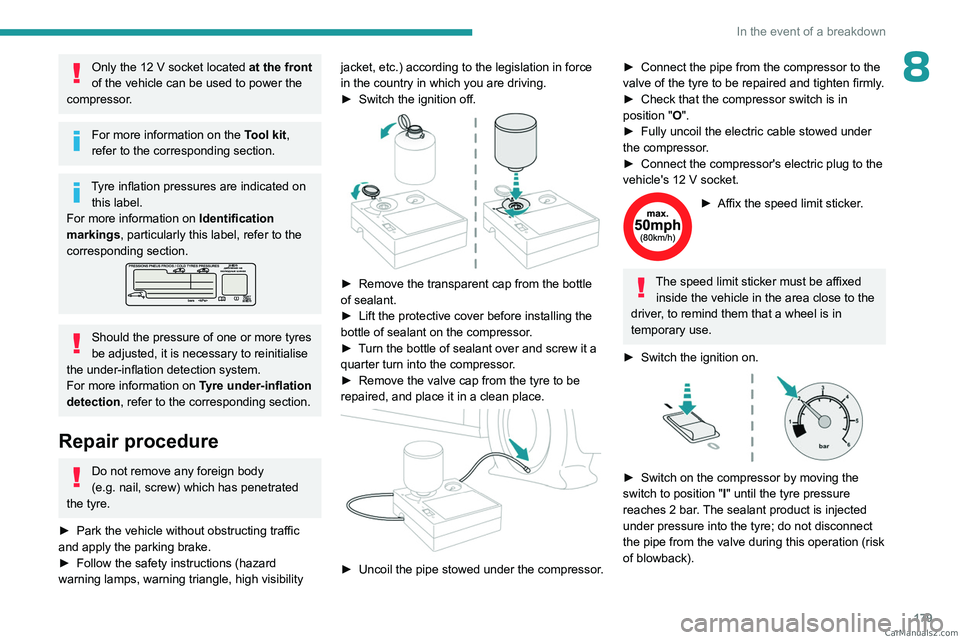
► Remove the transparent cap from the bottle
of sealant.
►
Lift the protective cover before installing the
bottle of sealant on the compressor
.
►
T
urn the bottle of sealant over and screw it a
quarter turn into the compressor.
►
Remove the valve cap from the tyre to be
repaired, and place it in a clean place.
► Uncoil the pipe stowed under the compressor.
► Connect the pipe from the compressor to the
valve of the tyre to be repaired and tighten firmly .
►
Check that the compressor switch is in
position
"O".
►
Fully uncoil the electric cable stowed under
the compressor
.
►
Connect the compressor's electric plug to the
vehicle's 12
V socket.
► Affix the speed limit sticker .
The speed limit sticker must be affixed
inside the vehicle in the area close to the
driver, to remind them that a wheel is in
temporary use.
►
Switch the ignition on.
► Switch on the compressor by moving the
switch to position "I" until the tyre pressure
reaches 2
bar. The sealant product is injected
under pressure into the tyre; do not disconnect
the pipe from the valve during this operation (risk
of blowback). CarM an uals 2 .c o m
Page 182 of 260
180
In the event of a breakdown
If after approximately 7 minutes, the
pressure of 2 bar is not reached, this
indicates that the tyre is not repairable;
contact a PEUGEOT dealer or a qualified
workshop for assistance.
►
Move the switch to position
"O".
►
Disconnect the compressor's electric plug
from the vehicle's 12
V socket.
►
Remove the kit.
►
Refit the cap on the valve.
►
Remove and store the bottle of sealant.
The sealant product is harmful if swallowed and causes irritation to the
eyes.
Keep this product out of the reach of children.
The use-by date of the fluid is marked on the
bottle.
After use, do not discard the bottle into the
environment; take it to a PEUGEOT dealer or
an authorised waste disposal site.
Do not forget to obtain a new bottle of
sealant, available from a PEUGEOT dealer or
a qualified workshop.
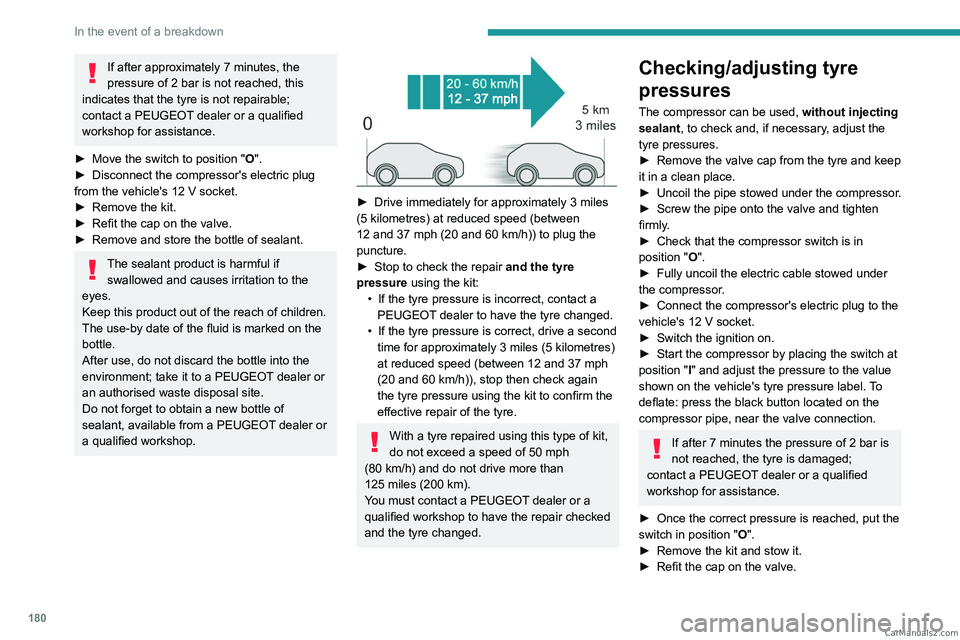
► Drive immediately for approximately 3 miles
(5 kilometres) at reduced speed (between
12 and 37
mph (20 and 60 km/h)) to plug the
puncture.
►
Stop to check the repair
and the tyre
pressure using the kit:
•
If the tyre pressure is incorrect, contact a
PEUGEOT
dealer to have the tyre changed.
•
If the tyre pressure is correct, drive a second
time for approximately 3
miles (5 kilometres)
at reduced speed (between 12 and 37
mph
(20 and 60
km/h)), stop then check again
the tyre pressure using the kit to confirm the
effective repair of the tyre.
With a tyre repaired using this type of kit,
do not exceed a speed of 50 mph
(80
km/h) and do not drive more than
125
miles (200 km).
You must contact a PEUGEOT dealer or a
qualified workshop to have the repair checked
and the tyre changed.
Checking/adjusting tyre
pressures
The compressor can be used, without injecting
sealant, to check and, if necessary, adjust the
tyre pressures.
►
Remove the valve cap from the tyre and keep
it in a clean place.
►
Uncoil
the pipe stowed under the compressor.
►
Screw the pipe onto the valve and tighten
firmly
.
►
Check that the compressor switch is in
position
"O".
►
Fully uncoil the electric cable stowed under
the compressor
.
►
Connect the compressor's electric plug to the
vehicle's 12
V socket.
►
Switch the ignition on.
►
Start the compressor by placing the switch at
position
"I" and adjust the pressure to the value
shown on the vehicle's tyre pressure label. To
deflate: press the black button located on the
compressor pipe, near the valve connection.
If after 7 minutes the pressure of 2 bar is
not reached, the tyre is damaged;
contact a PEUGEOT
dealer or a qualified
workshop for assistance.
►
Once the correct pressure is reached, put the
switch in position
"O".
►
Remove the kit and stow it.
►
Refit the cap on the valve. CarM an uals 2 .c o m
Page 186 of 260
184
In the event of a breakdown
After changing a wheel
The punctured wheel cannot be stored in place
of the spare wheel. Place it in the boot.
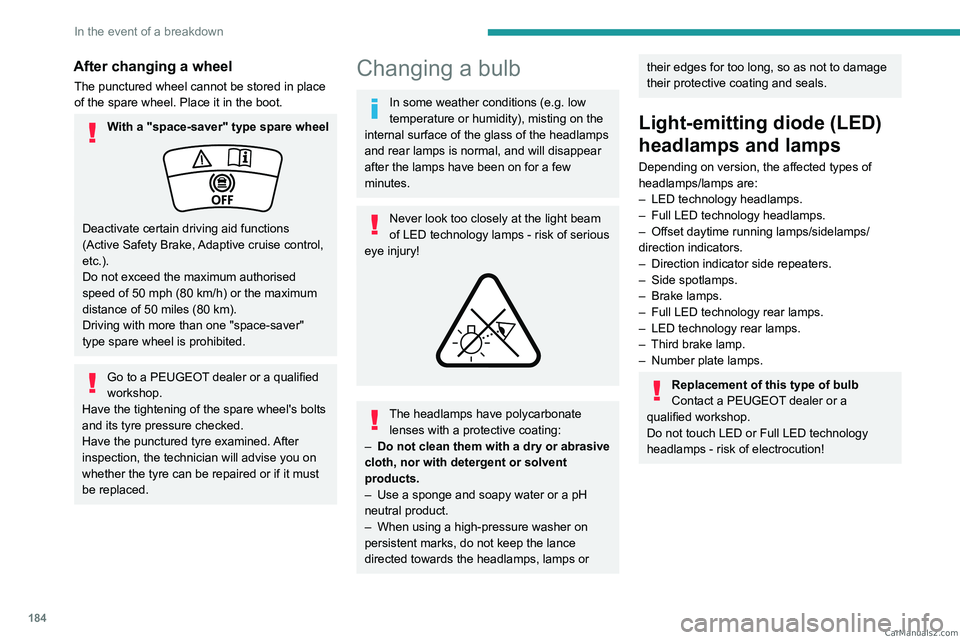
With a "space-saver" type spare wheel
Deactivate certain driving aid functions
(Active Safety Brake, Adaptive cruise control,
etc.).
Do not exceed the maximum authorised
speed of 50 mph (80 km/h) or the maximum
distance of 50 miles (80 km).
Driving with more than one "space-saver"
type spare wheel is prohibited.
Go to a PEUGEOT dealer or a qualified
workshop.
Have the tightening of the spare wheel's bolts
and its tyre pressure checked.
Have the punctured tyre examined. After
inspection, the technician will advise you on
whether the tyre can be repaired or if it must
be replaced.
Changing a bulb
In some weather conditions (e.g. low
temperature or humidity), misting on the
internal surface of the glass of the headlamps
and rear lamps is normal, and will disappear
after the lamps have been on for a few
minutes.
Never look too closely at the light beam
of LED technology lamps - risk of serious
eye injury!
The headlamps have polycarbonate lenses with a protective coating:
–
Do not clean them with a dry or abrasive
cloth, nor with detergent or solvent
products.
–
Use a sponge and soapy water or a pH
neutral product.
–
When using a high-pressure washer on
persistent marks, do not keep the lance
directed towards the headlamps, lamps or
their edges for too long, so as not to damage
their protective coating and seals.
Light-emitting diode (LED)
headlamps and lamps
Depending on version, the affected types of
headlamps/lamps are:
–
LED technology headlamps.
–
Full LED technology headlamps.
–
Offset daytime running lamps/sidelamps/
direction indicators.
–
Direction indicator side repeaters.
–
Side spotlamps.
–
Brake lamps.
–
Full LED technology rear lamps.
–
LED technology rear lamps.
–
Third brake lamp.
–
Number plate lamps.
Replacement of this type of bulb
Contact a PEUGEOT dealer or a
qualified workshop.
Do not touch LED or Full LED
technology
headlamps - risk of electrocution! CarM an uals 2 .c o m
Page 202 of 260
200
Technical data
Identification markings
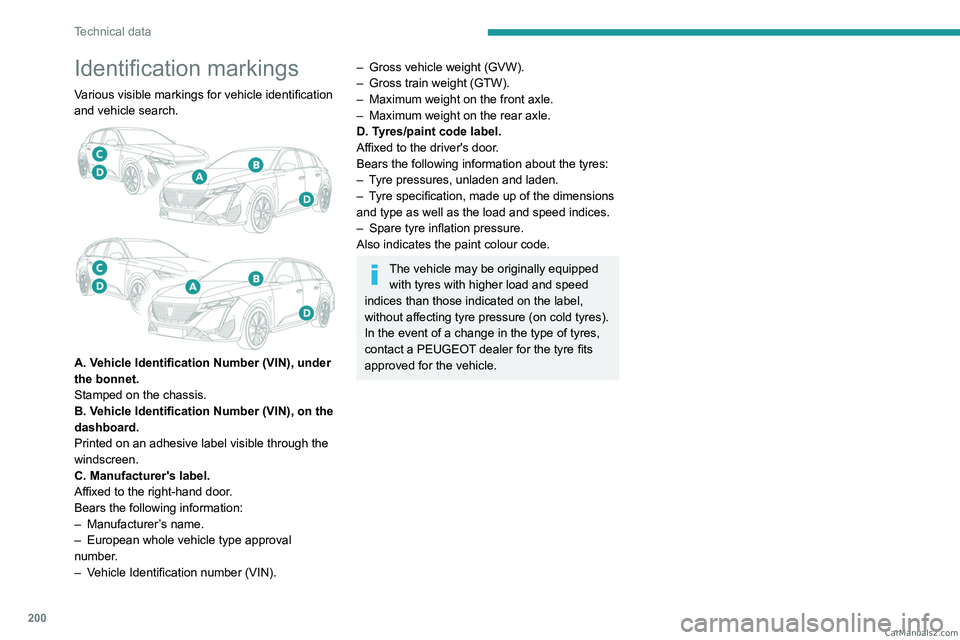
Various visible markings for vehicle identification
and vehicle search.
A. Vehicle Identification Number (VIN), under
the bonnet.
Stamped on the chassis.
B. Vehicle Identification Number (VIN), on the
dashboard.
Printed on an adhesive label visible through the
windscreen.
C. Manufacturer's label.
Affixed to the right-hand door.
Bears the following information:
–
Manufacturer
’s name.
–
European whole vehicle type approval
number
.
–
V
ehicle Identification number (VIN).
– Gross vehicle weight (GVW).
– Gross train weight (GTW).
–
Maximum weight on the front axle.
–
Maximum weight on the rear axle.
D. T
yres/paint code label.
Affixed to the driver's door.
Bears the following information about the tyres:
–
T
yre pressures, unladen and laden.
–
T
yre specification, made up of the dimensions
and type as well as the load and speed indices.
–
Spare tyre inflation pressure.
Also indicates the paint colour code.
The vehicle may be originally equipped with tyres with higher load and speed
indices than those indicated on the label,
without affecting tyre pressure (on cold tyres).
In the event of a change in the type of tyres,
contact a PEUGEOT dealer for the tyre fits
approved for the vehicle. CarM an uals 2 .c o m
Page 219 of 260

217
Vehicle data recording and privacy
11Vehicle data recording
and privacy
Electronic control units are installed in your
vehicle. These control units process data
received from the vehicle's sensors, for example,
or data they generate themselves or exchange
with each other. Some of these control units are
required for the correct operation of your vehicle,
some others assist you while driving (driving or
manoeuvring aids), while others provide comfort
or infotainment functions.
The following contains general information about
how data is processed within the vehicle.
You will find additional information about the
specific data which is downloaded, stored
and transmitted to third parties and what it is
used for in your vehicle under the keyword
"Data protection". This information is directly
associated with the references for the functions
in question contained in the corresponding
vehicle handbook, or in the general terms and
conditions of sale.
This information is also available online.
Vehicle operating data
The control units process the data used for the
operation of the vehicle.
This data includes, for example:
–
Information about the state of the vehicle
(e.g.
speed, travel time, lateral acceleration,
wheel rotation rate, fastened seat belts display). –
Environmental conditions (e.g.
temperature,
rain sensor, distance sensor).
As a general rule, this data is temporary, is
not stored for longer than one operating cycle
and is only used within the vehicle itself. The
control units often record this data (including the
vehicle's key). This function allows either the
temporary or permanent storage of information
about the state of the vehicle, stresses on
components, servicing requirements, as well as
events and technical errors.
Depending on the vehicle's equipment level, the
data stored is as follows:
–
Operating state of system components
(e.g.
filling level, tyre pressures, battery charge
status).
–
Faults and malfunctions in important system
components (e.g.
lamps, brakes).
–
System reactions in specific driving situations
(e.g.
deployment of an airbag, triggering of
stability control and braking systems).
–
Information about events which have
damaged the vehicle.
–
For electric and rechargeable hybrid vehicles,
the traction battery charge level and the
estimated driving range.
In particular circumstances (e.g.
if the vehicle
has detected a malfunction), it may be necessary
to record data which would otherwise simply not
be stored.
When taking your vehicle in for servicing
(e.g.
repairs, maintenance), the stored operating
data may be read along with the vehicle's identification number and used if necessary.
The personnel working for the servicing network
(e.g.
garages, manufacturers) or third parties
(e.g. roadside assistance agents) may read
the vehicle's data. This also applies to work
carried out under warranty and quality assurance
measures.
This data is generally read via the OBD
(On-Board Diagnostics) port fitted by law to
the vehicle. It is used to report on the technical
state of the vehicle or its components and
facilitates the diagnosis of malfunctions, in
compliance with warranty obligations and for
quality improvement. This data, in particular the
information relating to stress on components,
technical events, operator errors and other
malfunctions, is sent to the Manufacturer, if
necessary, along with the vehicle's identification
number. The Manufacturer's liability may also be
engaged. The Manufacturer may also use the
operating data taken from the vehicle for product
recalls. This data may also be used to check the
customer's warranty and any claims made under
warranty.
Any malfunctions stored in the vehicle may be
reset by an after-sales service company during
servicing or repair work, or at your request. CarM an uals 2 .c o m
Page 223 of 260
221
Alphabetical index
Checking tyre pressures
(using the kit)
178, 180
Checks
167, 168–170
Checks, routine
168–170
Child lock
93
Children
83, 89–90
Children (safety)
93
Child seats
83, 86–88
Child seats, conventional
88, 91–92
Child seats, i-Size
90–92
Child seats, ISOFIX
89–92
Cleaning (advice)
149, 173–175
Closing the boot
29, 33
Closing the doors
29, 33
Collision Risk Alert
130–132
Configuration, vehicle
10, 23
Connection, Bluetooth
209–210
Connectivity
214
Consumptions
23
Container, AdBlue®
171
Control, emergency boot release
33
Control, emergency door
31
Control, heated seats
45–46
Controls, steering mounted
101–102
Control stalk, lighting
65–66
Control stalk, wipers
71–73
Control unit
151–153, 157
Courtesy lamps
60–61
Cruise control
113–114, 116–117
Cruise control, adaptive
113–114, 118–119
Cruise control by
speed limit recognition
113–114Cup holder 56
D
Date (setting) 215
Daytime running lamps
66
Deactivating the passenger airbag
84, 88–89
Deadlocking
27, 29
Deferred charging
24, 158
Deferred charging
(Rechargeable hybrid)
23–24, 150, 155
Defrosting
47, 55
Defrosting, front
55
Defrosting, rear screen
55
Demisting
47, 55
Demisting, front
55
Demisting, rear
55
Diagnosis, vehicle
20
Dials and gauges
10
Digital instrument panel
10
Dimensions
199
Dipstick
18, 167
Direction indicators (turn signals)
66, 185
Display screen, instrument panel
10
Domestic charging
153
Domestic charging (Rechargeable hybrid)
157
Door pockets
56
Doors
33
Drive Assist Plus
11 8
Driver’s attention warning
134–135
Driving
42–43, 94–95, 110
Driving abroad 70
Driving aids camera (warnings)
109
Driving aid shortcuts
11 0
Driving aids (recommendations)
108
Driving economically
8
Driving modes
103
Driving positions (storing)
45
Dynamic stability control (DSC)
80
E
EBFD 79
Eco-driving (advice)
8
ECO mode
103
Electric automatic gearbox
(Rechargeable hybrid)
100
Electronic brake force distribution (EBFD)
79
Emergency braking assistance (EBA)
80
Emergency call
77–78
Emergency switching off
97
Emergency warning lamps
76, 176
Emissions control system, SCR
19, 170
Energy economy (mode)
165
Energy economy mode
165
Energy flows
23
Energy recovery
20, 102
Engine
170
Engine compartment
165–166
Engine, Diesel
147, 167, 176, 197
Engine, petrol
104, 166, 195
Engines
194–195, 197 CarM an uals 2 .c o m
Page 226 of 260

224
Alphabetical index
P
Pads, brake 169–170
Paint
174, 200
Paint colour code
200
Parking brake, electric
98–100, 170
Parking (sensors)
139
Parking sensors, audible and visual
139
Parking sensors, front
140
Parking sensors, rear
139
Passenger compartment temperature
pre-conditioning (Rechargeable hybrid)
24, 55
Pedestrian horn (Rechargeable hybrid)
77
Personalisation
10, 24
Plates, identification
200
Port, USB
57, 60
Post Collision Safety Brake
80
Power
20
Power indicator (Rechargeable hybrid)
9, 20
Pressures, tyres
170, 179, 200
Pre-tensioning (seat belts)
83
Priming the fuel system
176
Profiles
202
Protecting children
84, 86–90
Proximity Keyless Entry and Start
28
Puncture
178–179, 181
R
Radar (warnings) 109
Radio
211–212
Range, AdBlue® 18, 168
Reading lamps
60
READY (warning lamp)
165
Rear bench seat
49
Rear cross traffic alert
144
Rear screen (demisting)
55
Rechargeable
hybrid engine
9, 23, 165, 192, 198
Rechargeable
hybrid system
6, 9, 23, 96, 104, 149
Recharging the battery
187–188, 190
Recharging the traction battery
153
Recharging the traction battery
(Rechargeable hybrid)
149, 155, 157
Recirculation, air
54
Recorder, trip distance
21
Reduction of electrical load (mode)
165
Regeneration of the particle filter
169
Regenerative braking
(deceleration by engine braking)
102
Reinitialising the remote control
32
Reinitialising the under-inflation
detection system
108
Reminder, lighting on
65
Remote control
26–29, 31
Remote functions
158
Remotely operable functions
(Rechargeable hybrid)
24, 55
Removing a wheel
182–183
Removing the mat
59
Replacing bulbs
184–185
Replacing fuses
186Replacing the air filter 169
Replacing the oil filter
169
Replacing the passenger
compartment filter
169
Reservoir, screenwash
168
Resetting the trip
21
Reversing camera
109, 140–142
Reversing lamps
185–186
Roof bars
162–163
Roof, opening
40
Running out of fuel (Diesel)
176
S
Safety, children 84, 86–90
Saturation of the particle filter (Diesel)
169
Screens, very cold conditions
163
Screenwash
72
Screenwash, front
72
Screenwash, rear
72
SCR (Selective Catalytic Reduction)
19, 170
Seat angle
44
Seat belts
82–83, 88
Seat belts, rear
82
Seats, electric
44–45
Seats, front
43–45
Seats, heated
45–46
Seats, rear
49–50, 87
Selector, gear
100, 102–103
Semi-automatic lane changing
126
Sensors (warnings)
109 CarM an uals 2 .c o m