2023 PEUGEOT 308 ABS
[x] Cancel search: ABSPage 137 of 260
135
Driving
6– The ignition has been switched off for a few
minutes.
–
The driver's seat belt is unfastened and their
door is opened.
As soon as the speed of the vehicle drops below 43 mph (70 km/h), the
system goes into standby.
Driving time starts being counted again once
the speed reaches above 43
mph (70 km/h).
Driver Attention Warning by
Camera
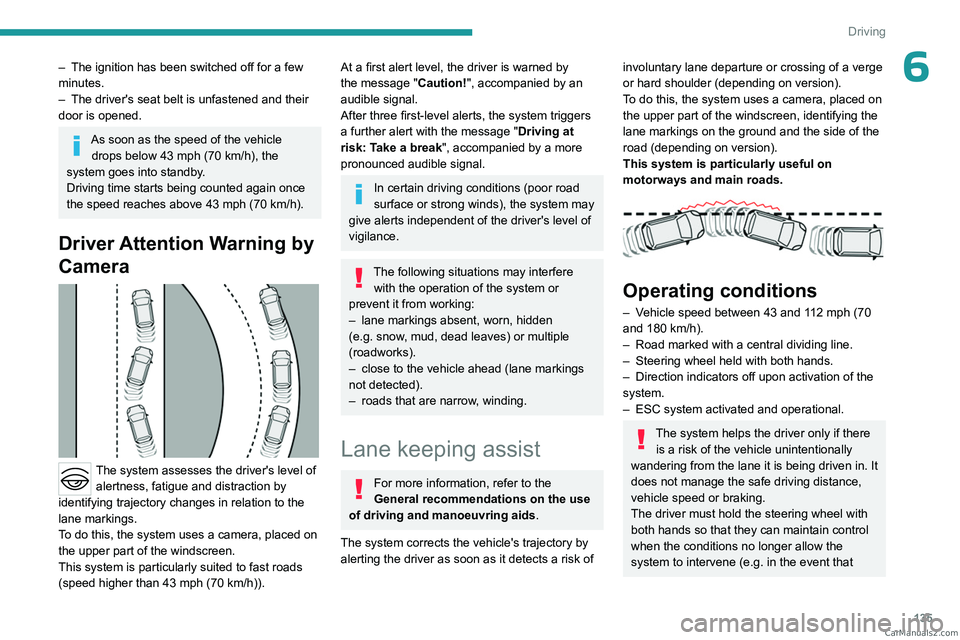
The system assesses the driver's level of alertness, fatigue and distraction by
identifying trajectory changes in relation to the
lane markings.
To do this, the system uses a camera, placed on
the upper part of the windscreen.
This system is particularly suited to fast roads
(speed higher than 43 mph (70
km/h)).
At a first alert level, the driver is warned by
the message "Caution!", accompanied by an
audible signal.
After three first-level alerts, the system triggers
a further alert with the message " Driving at
risk: Take a break", accompanied by a more
pronounced audible signal.
In certain driving conditions (poor road
surface or strong winds), the system may
give alerts independent of the driver's level of
vigilance.
The following situations may interfere with the operation of the system or
prevent it from working:
–
lane markings absent, worn, hidden
(e.g.
snow, mud, dead leaves) or multiple
(roadworks).
–
close to the vehicle ahead (lane markings
not detected).
–
roads that are narrow
, winding.
Lane keeping assist
For more information, refer to the
General recommendations on the use
of driving and manoeuvring aids .
The system corrects the vehicle's trajectory by
alerting the driver as soon as it detects a risk of
involuntary lane departure or crossing of a verge
or hard shoulder (depending on version).
To do this, the system uses a camera, placed on
the upper part of the windscreen, identifying the
lane markings on the ground and the side of the
road (depending on version).
This system is particularly useful on
motorways and main roads.
Operating conditions
– Vehicle speed between 43 and 112 mph (70
and 180 km/h).
–
Road marked with a central dividing line.
–
Steering wheel held with both hands.
–
Direction indicators off upon activation of the
system.
–
ESC system activated and operational.
The system helps the driver only if there is a risk of the vehicle unintentionally
wandering from the lane it is being driven in. It
does not manage the safe driving distance,
vehicle speed or braking.
The driver must hold the steering wheel with
both hands so that they can maintain control
when
the conditions no longer allow the
system to intervene (e.g.
in the event that CarM an uals 2 .c o m
Page 172 of 260
170
Practical information
necessary to have the condition of the brakes
checked, even between vehicle services.
Unless there is a leak in the circuit, a drop in the
brake fluid level indicates that the brake pads
are worn.
After washing the vehicle, moisture, or in wintry conditions, ice can form on the
brake discs and pads: braking efficiency may
be reduced. Gently dab the brakes to dry and
defrost them.
Brake disc wear
For information on checking brake disc
wear, contact a PEUGEOT dealer or a
qualified workshop.
Electric parking brake
This system does not require any routine servicing. However, in the event of a
problem, do not hesitate to have the system
checked by a PEUGEOT dealer or a qualified
workshop.
For more information on the Electric
parking brake, refer to the
corresponding section.
Wheels and tyres
The inflation pressure of all tyres, including the spare wheel, must be
checked on "cold” tyres.
The pressures indicated on the tyre pressure
label are valid for "cold" tyres. If you have driven
for more than 10 minutes or more than 6 miles
(10 kilometres) at over 31 mph (50
km/h), add
0.3 bar (30 kPa) to the values indicated on the
label.
Under-inflation increases energy
consumption. Non-compliant tyre
pressures cause tyres to wear prematurely
and have an adverse effect on the vehicle's
road holding - risk of accident!
Driving with worn or damaged tyres reduces the
braking and road holding performance of the
vehicle. Regularly check the condition of the
tyres (tread and sidewalls) and rims as well as
the presence of the valve caps.
When the wear indicators no longer appear set
back from the tread, the depth of the grooves is
less than 1.6 mm; replace the tyres as soon as
possible.
Using different size wheels and tyres from those
specified can affect the lifetime of tyres, wheel
rotation, ground clearance, the speedometer
reading and have an adverse effect on road
holding.
Fitting different tyres on the front and rear axles
can cause the ESC to mistime.
Always mark the direction of rotation on the tyres
that will be stored when fitting winter or summer
tyres. Store them in a cool, dry place and away
from direct exposure to the sun's rays.
Winter or 4-seasons tyres can be
identified by this symbol on their
sidewalls.
Shock absorbers
It is not easy for drivers to detect when
shock absorbers are worn. Nevertheless,
the shock absorbers have a major impact on
road holding and braking performance.
For your safety and driving comfort, it is
important to have them regularly checked by a
PEUGEOT dealer or a qualified workshop.
Timing and accessory kits
The timing and accessory kits are used
from the time the engine is started until it
is switched off. It is normal for them to wear over
time.
A
faulty timing or accessory kit can damage
the engine, rendering it unusable. Observe the
recommended replacement frequency, stated in
distance travelled or time elapsed, whichever is
reached first.
AdBlue® (BlueHDi)
To respect the environment and ensure compliance with the Euro 6 standard, without
adversely affecting the performance or fuel
consumption of its Diesel engines, PEUGEOT
has taken the decision to equip its vehicles with
a system that combines SCR (Selective Catalytic CarM an uals 2 .c o m
Page 176 of 260
174
Practical information
To clean instrument panels, touch screens
or other displays, wipe gently with a soft,
dry cloth. Do not use products (e.g. alcohol,
disinfectant) or soapy water directly on these
surfaces - risk of damage!
Bodywork
High-gloss paint
Do not use abrasive products, solvents,
petrol or oil to clean the bodywork.
Never use an abrasive sponge to clean
stubborn stains - risk of scratching the
paintwork!
Do not apply polish in strong sunshine, or to
plastic or rubber parts.
Use a soft cloth and soapy water or a pH
neutral product.
Gently wipe the bodywork with a clean
microfibre cloth.
Apply polish with the vehicle clean and dry.
Comply with the instructions for use stated on
the product.
Decals
(Depending on version)
Do not use a high-pressure washer to
clean the vehicle - risk of damaging or
detaching the decals!
Use a high-flow hose (temperature
between 25°C and 40°C).
Place the jet of water perpendicular to the
surface to be cleaned.
Rinse the vehicle with demineralised water.
Textile
The dashboard, door panels and seats may
contain parts made of textile material.
Maintenance
Do not use aggressive cleaning products
(e.g. alcohol, solvent or ammonia).
Do not use steam-cleaning systems - risk of
affecting the adhesion of the fabrics!
Remove dust from the textile parts
regularly with a dry cloth, soft brush or
vacuum cleaner
.
Rub down the
textile parts once per year with
a clean, damp cloth. After leaving overnight to
dry, brush with a soft-bristled brush.
Stain removal
Do not rub the stain or it may spread or
you may cause the substance to
penetrate the surface.
Act quickly by reducing the stain from its edges inwards.
Remove as much substance or solids as
possible using a spoon or spatula, and
remove
as much liquid as possible using
absorbent paper.
Product/Procedure to use depending
on the type of stain:
–
Grease, oil and ink: clean with a pH-neutral
detergent.
–
V
omit: clean with sparkling mineral water.
–
Blood: spread flour over the stain and allow
to dry; remove with a slightly damp cloth.
–
Mud: allow to dry and then remove with a
slightly damp cloth.
–
Cake, chocolate, ice cream: clean with
lukewarm water
.
–
Sugary and/or alcoholic drinks: clean with
lukewarm water
, or lemon juice if the stain is
persistent.
–
Hair gel, coffee, tomato sauce, vinegar:
clean with lukewarm water and lemon juice.
For solid substances, then use a soft brush or
vacuum cleaner
.
For liquid substances, then use a damp
microfibre cloth and then dry with another
cloth.
Alcantara®
Alcantara® is an elegant and practical material
which is very resistant and easy to maintain. CarM an uals 2 .c o m
Page 177 of 260
175
Practical information
7Do not use printed cloths or
printed absorbent paper.
Do not use steam-cleaning systems.
Remove dust from the Alcantara® parts
regularly with a dry cloth, soft brush or
vacuum cleaner.
Clean the Alcantara
®, without rubbing too
vigorously, with a white cotton cloth which is
slightly damp.
To find out which products and procedures to
use on different types of stains, refer to the
"Textile - Stain removal" section.
For more information, go to the Alcantara
®
trademark website: www.alcantara.com.
Leather
Leather is a natural product. Appropriate regular
care is essential for its durability.
It must be protected and nourished using a
specific leather product, to keep it supple and
preserve its original appearance.
Do not use maintenance products which
are not suitable for cleaning leather
(e.g.
solvent, detergent, petrol, pure alcohol).
Do not use bleaching or colour-removal
products (e.g.
perchloroethylene).
When cleaning items partly made from
leather, take care not to damage the other
materials with the specific leather product.
Before cleaning greasy stains or liquids,
quickly mop up any surplus.
Before cleaning, wipe off any residues liable
to scuff the leather, using a cloth that has
been dampened with demineralised water
and thoroughly wrung out.
Clean the leather, without rubbing too
vigorously, using a soft cloth moistened with
soapy water or a pH-neutral product.
Dry with a soft, dry cloth. CarM an uals 2 .c o m
Page 195 of 260
193
In the event of a breakdown
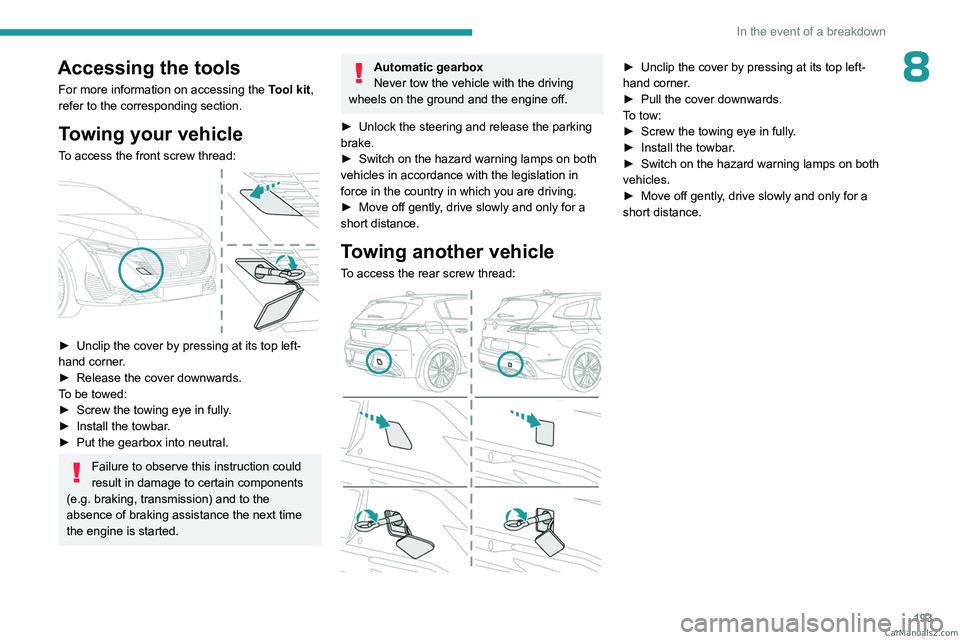
8Accessing the tools
For more information on accessing the Tool kit,
refer to the corresponding section.
Towing your vehicle
To access the front screw thread:
► Unclip the cover by pressing at its top left-
hand corner .
►
Release the cover downwards.
T
o be towed:
►
Screw the towing eye in fully
.
►
Install the towbar
.
►
Put the gearbox into neutral.
Failure to observe this instruction could
result in damage to certain components
(e.g. braking, transmission) and to the
absence of braking assistance the next time
the engine is started.
Automatic gearbox
Never tow the vehicle with the driving
wheels on the ground and the engine off.
►
Unlock the steering and release the parking
brake.
►
Switch on the hazard warning lamps on both
vehicles in accordance with the legislation in
force in the country in which you are driving.
►
Move off gently
, drive slowly and only for a
short distance.
Towing another vehicle
To access the rear screw thread:
► Unclip the cover by pressing at its top left-
hand corner .
►
Pull the cover downwards.
T
o tow:
►
Screw the towing eye in fully
.
►
Install the towbar
.
►
Switch on the hazard warning lamps on both
vehicles.
►
Move off gently
, drive slowly and only for a
short distance. CarM an uals 2 .c o m
Page 222 of 260

220
Alphabetical index
A
ABS 79
Accelerated charging unit (Wallbox)
151–152
Accessories
76
Active LED Vision
67, 69
Active Safety Brake
130–131, 133
AdBlue®
18, 170
AdBlue® tank
172
Additive, Diesel
168–169
Adjusting headlamps
66
Adjusting head restraints
43
Adjusting seat
43–44
Adjusting the air distribution
52–53
Adjusting the air flow
52–53
Adjusting the headlamp beam height
66
Adjusting the height and reach
of the steering wheel
47
Adjusting the lumbar support
44
Adjusting the seat angle
44
Adjusting the temperature
52
Adjusting the time
215
Advice on care and maintenance
149, 173
Advice on driving
8, 94–95
Airbags
84–87
Airbags, curtain
85–86
Airbags, front
84–85, 88
Airbags, lateral
85–86
Air conditioning
51–52, 54
Air conditioning, automatic
55
Air conditioning, dual-zone automatic
52
Air intake
54
Air vents 51
Alarm
37–38
Amplifier, audio
59
Anti-lock braking system (ABS)
79
Antitheft / Immobiliser
27
Applications
23–24
Armrest, front
58–59
Armrest, rear
60
Assistance call
77–78
Assistance, emergency braking
80, 132
Audio streaming (Bluetooth)
212
B
Battery, 12 V 165, 169, 186–190
Battery, ancillaries
186
Battery, charging
187–188, 190
Battery, remote control
31–32
Blanking screen (snow shield)
163
Blind
40
BlueHDi
18, 168, 176
Bluetooth (hands-free)
209
Bluetooth (telephone)
209–210
Bodywork
174
Bonnet
165–166
Boot
33, 36, 64
Brake discs
170
Brake lamps
185
Brakes
169–170
Braking
102
Braking assistance system
79–80
Braking, automatic emergency 130–131, 133
Braking, dynamic emergency
98–100
Bulbs (changing)
184–185
C
Capacity, fuel tank 147
Care of the bodywork
174
Central locking
29–30
Changing a bulb
184–185
Changing a fuse
186
Changing a wheel
177, 181
Changing a wiper blade
74
Changing the remote control battery
31
Changing to free-wheeling
172
Charge level indicator
(Rechargeable hybrid)
20
Charger, induction
57
Charger, wireless
57
Charging cable
153
Charging cable
(Rechargeable hybrid)
151–152, 157
Charging connector
(Rechargeable hybrid)
150, 155, 157
Charging flap
(Rechargeable hybrid)
150, 155, 157
Charging the traction battery
(Rechargeable hybrid)
20, 149, 155, 157
CHECK
20
Checking the engine oil level
18
Checking the levels
167–168 CarM an uals 2 .c o m