2023 NISSAN TITAN wheel
[x] Cancel search: wheelPage 269 of 644
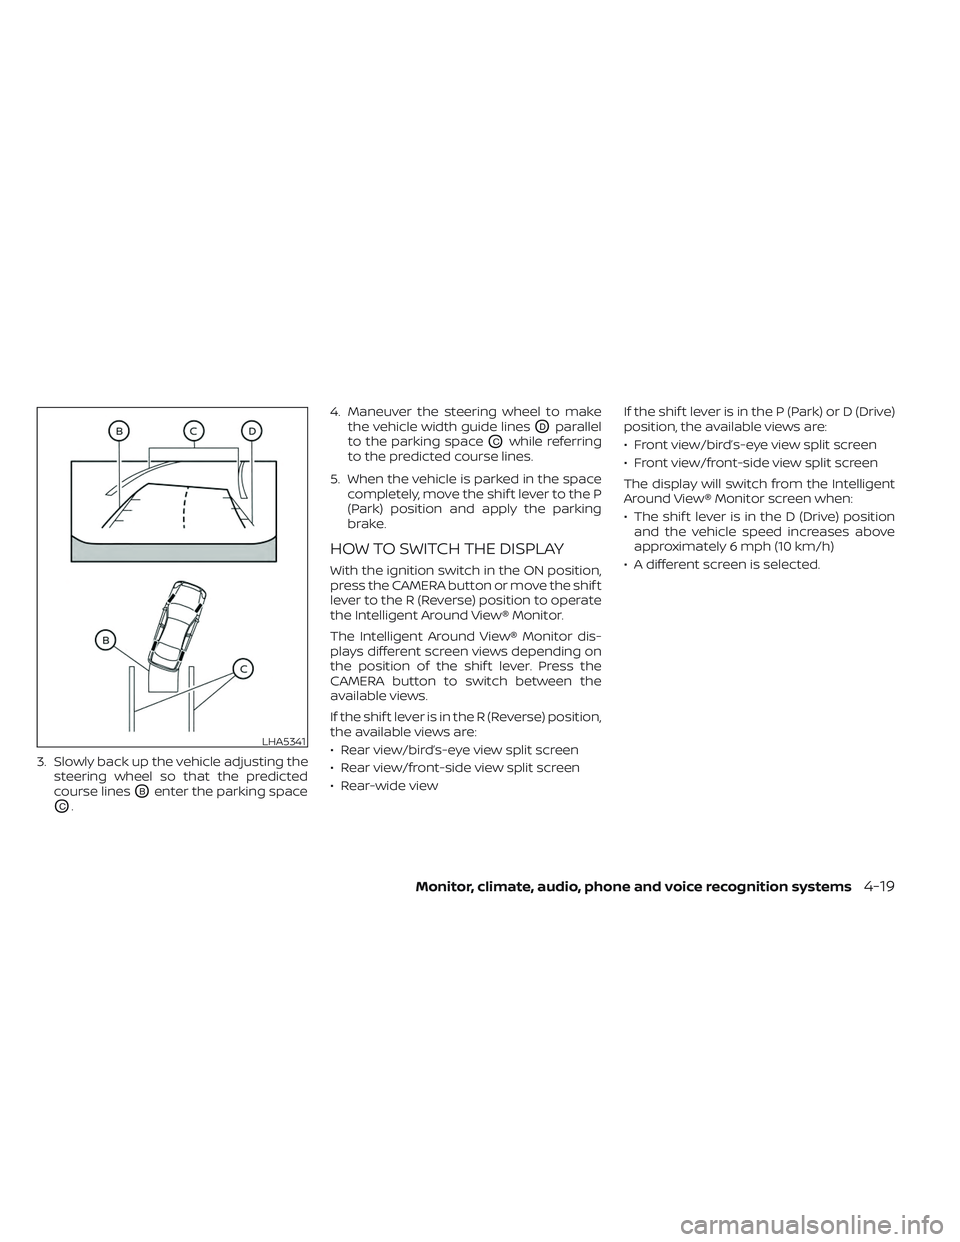
3. Slowly back up the vehicle adjusting thesteering wheel so that the predicted
course lines
OBenter the parking space
OC. 4. Maneuver the steering wheel to make
the vehicle width guide lines
ODparallel
to the parking space
OCwhile referring
to the predicted course lines.
5. When the vehicle is parked in the space completely, move the shif t lever to the P
(Park) position and apply the parking
brake.
HOW TO SWITCH THE DISPLAY
With the ignition switch in the ON position,
press the CAMERA button or move the shif t
lever to the R (Reverse) position to operate
the Intelligent Around View® Monitor.
The Intelligent Around View® Monitor dis-
plays different screen views depending on
the position of the shif t lever. Press the
CAMERA button to switch between the
available views.
If the shif t lever is in the R (Reverse) position,
the available views are:
• Rear view/bird’s-eye view split screen
• Rear view/front-side view split screen
• Rear-wide view If the shif t lever is in the P (Park) or D (Drive)
position, the available views are:
• Front view/bird’s-eye view split screen
• Front view/front-side view split screen
The display will switch from the Intelligent
Around View® Monitor screen when:
• The shif t lever is in the D (Drive) position
and the vehicle speed increases above
approximately 6 mph (10 km/h)
• A different screen is selected.
LHA5341
Monitor, climate, audio, phone and voice recognition systems4-19
Page 276 of 644
If the MOD system is turned off, the MOD
icon
O3is not displayed.
TURNING MOD ON AND OFF (if so
equipped)
Some vehicles include the option to allow
the MOD system to be turned on or off.
To turn the MOD system on or off:
1. Press the
orbutton on the
steering wheel to navigate to the “Set-
tings” screen.
2. Using the
buttons, select “Driver
Assistance” and press the ENTER button.
3. Select “Parking Aids” and press the EN- TER button.
4. Toggle ON or OFF “Moving Object” using the ENTER button.
You can also turn the MOD on or off by
pressing the Parking Aids system switch (if
so equipped).
MOD SYSTEM LIMITATIONS
WARNING
Listed below are the system limitations
for MOD. Failure to operate the vehicle
in accordance with these system limi-
tations could result in serious injury or
death.
• Do not use the MOD system when
towing a trailer. The system may not
function properly.
• Excessive noise (for example, audio
system volume or open vehicle win-
dow) will interfere with the chime
sound, and it may not be heard.
• The MOD system performance will be
limited according to environmental
conditions and surrounding objects
such as:
– When there is low contrast be-
tween background and the mov-
ing objects.
– When there is a blinking source of
light.
– When strong light such as another
vehicle’s headlight or sunlight is
present. –
When camera orientation is not in
its usual position, such as when a
mirror is folded.
– When there is dirt, water drops or
snow on the camera lens.
– When the position of the moving
objects in the display is not
changed.
• The MOD system might detect flow-
ing water droplets on the camera
lens, white smoke from the muffler,
moving shadows, etc.
• The MOD system may not function
properly depending on the speed, di-
rection, distance or shape of the
moving objects.
• If your vehicle sustains damage to
the parts where the camera is in-
stalled, leaving it misaligned or bent,
the sensing zone may be altered and
the MOD system may not detect ob-
jects properly.
• When the temperature is extremely
high or low, the screen may not dis-
play objects clearly. This is not a
malfunction.
4-26Monitor, climate, audio, phone and voice recognition systems
Page 289 of 644
3. Turn the temperature dial to the lef t orright to set the desired temperature.
• To quickly remove ice from the outside of the windows, press the
fan speed
control button to the maximum position.
• As soon as possible af ter the windshield is clean, press the AUTO button to return
to the auto mode.
• When the
control is activated, the air
conditioner will automatically be turned
on at outside temperatures approxi-
mately at or below freezing. This dehu-
midifies the air which helps defog the
windshield. Under this condition, the indi-
cator light on the A/C button indicator will
not turn on if the user had selected A/C
off prior to entering this mode. Turning off
the air condition via the A/C button is not
allowed in this mode. If the A/C button
indicator was on when entering this
mode, and the A/C button is selected in
this mode, the A/C compressor will still be
automatically enabled. The air recircula-
tion mode automatically turns off, allow-
ing outside air to be drawn into the pas-
senger compartment to further improve
the defogging performance.
Remote Engine Start with
Intelligent Climate Control (if so
equipped)
Vehicles equipped with automatic climate
controls and Remote Engine Start function
may go into automatic heating or cooling
mode when Remote Engine Start is acti-
vated depending on outside and cabin
temperatures. During this period, the cli-
mate control display and buttons will be
inoperable until the ignition switch is
placed in the ON position. In Remote En-
gine Start defrosting mode, the rear win-
dow defroster (if so equipped), heated
seats (if so equipped) and heated steering
wheel (if so equipped) may be activated
automatically.
Voice Recognition logic (if so
equipped)
When the climate control system is on, the
front fan speeds may be automatically
lowered so that commands are more eas-
ily recognized. Fan speed can be adjusted
using the fan speed
decrease andincrease buttons, if desired.
MANUAL OPERATION
Fan speed control
Press thefan speed control buttons
to manually control the fan speed.
Press the AUTO button to return to auto-
matic control of the fan speed.
When adjusting the manual fan from auto
mode, the outlet direction (floor, floor/
defrost, vent, bi-level) will still automatically
change. To fix the outlet to a manual mode,
select the desired air flow location using
the MODE button.
Temperature control dial
The temperature control dial allows you to
adjust the temperature of the outlet air. To
lower the temperature, turn the dial to the
lef t. To increase the temperature, turn the
dial to the right. Temperature can be ad-
justed on the driver’s and passenger’s side.
Air recirculation
Press theair recirculation button to
recirculate interior air inside the vehicle
when:
• driving on a dusty road
• to prevent traffic fumes from entering passenger compartment.
Monitor, climate, audio, phone and voice recognition systems4-39
Page 301 of 644
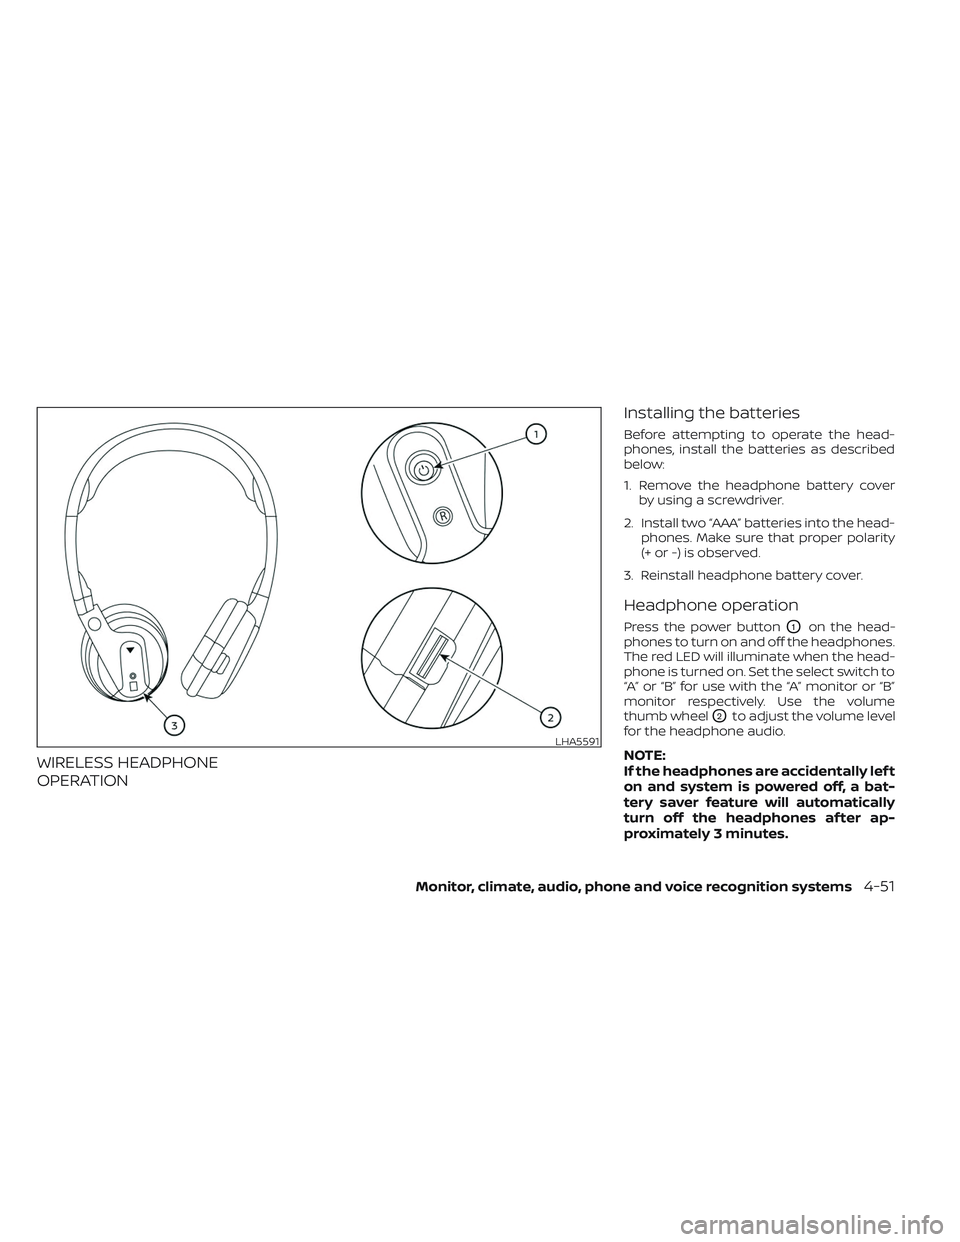
WIRELESS HEADPHONE
OPERATIONInstalling the batteries
Before attempting to operate the head-
phones, install the batteries as described
below:
1. Remove the headphone battery cover
by using a screwdriver.
2. Install two “AAA” batteries into the head- phones. Make sure that proper polarity
(+ or -) is observed.
3. Reinstall headphone battery cover.
Headphone operation
Press the power buttonO1on the head-
phones to turn on and off the headphones.
The red LED will illuminate when the head-
phone is turned on. Set the select switch to
“A” or “B” for use with the “A” monitor or “B”
monitor respectively. Use the volume
thumb wheel
O2to adjust the volume level
for the headphone audio.
NOTE:
If the headphones are accidentally lef t
on and system is powered off, a bat-
tery saver feature will automatically
turn off the headphones af ter ap-
proximately 3 minutes.LHA5591
Monitor, climate, audio, phone and voice recognition systems4-51
Page 337 of 644
Intelligent Driver Alertness (I-DA)
system limitations......................... 5-102
Break-in schedule ............................. 5-103
Fuel efficient driving tips .......................5-104
Increasing fuel economy ......................5-105
Using 4–Wheel Drive (4WD) (if so equipped) ....5-105
Transfer case shif ting procedures ..........5-106
Electronic locking rear differential (E-Lock)
system (if so equipped) ......................... 5-111
Parking/parking on hills .......................5-112
Power steering ................................ 5-113
Brake system ................................. 5-114
Brake precautions .......................... 5-114
Anti-lock Braking System (ABS) .............5-114
Brake Assist ................................ 5-115
Active Brake Limited Slip (ABLS) system .......5-116
Vehicle Dynamic Control (VDC) system .........5-117
Brake force distribution ....................5-118Hill descent control system (if so equipped) . . . 5-119
Hill start assist system
........................5-120
Front and rear sonar system (if so equipped) . . 5-121 System operation .......................... 5-122
How to enable/disable the sonar
system ..................................... 5-124
Sonar limitations ........................... 5-125
System maintenance ......................5-126
Cold weather driving .......................... 5-126
Freeing a frozen door lock ..................5-126
Antifreeze .................................. 5-126
Battery..................................... 5-126
Draining of coolant water ..................5-126
Tire equipment ............................. 5-127
Special winter equipment ..................5-127
Driving on snow or ice ......................5-127
Engine block heater (if so equipped) ........5-128
Page 339 of 644
WARNING
• The exhaust gas and the exhaust
system are very hot. Keep people,
animals or flammable materials
away from the exhaust system
components.
• Do not stop or park the vehicle over
flammable materials such as dry
grass, waste paper or rags. They may
ignite and cause a fire.
CAUTION
• Do not use leaded gasoline. Deposits
from leaded gasoline will seriously
reduce the three-way catalyst's abil-
ity to help reduce exhaust pollutants.
• Keep your engine tuned up. Malfunc-
tions in the ignition, fuel injection, or
electrical systems can cause overrich
fuel flow into the three-way catalyst,
causing it to overheat. Do not keep
driving if the engine misfires, or if no-
ticeable loss of performance or other
unusual operating conditions are de-
tected. Have the vehicle inspected
promptly. It is recommended that
you visit a NISSAN dealer for this
service. •
Avoid driving with an extremely low
fuel level. Running out of fuel could
cause the engine to misfire, damag-
ing the three-way catalyst.
• Do not race the engine while warm-
ing it up.
• Do not push or tow your vehicle to
start the engine.
TIRE PRESSURE MONITORING
SYSTEM (TPMS)
Each tire, including the spare (if provided),
should be checked monthly when cold and
inflated to the inflation pressure recom-
mended by the vehicle manufacturer on
the vehicle placard or tire inflation pressure
label. (If your vehicle has tires of a different
size than the size indicated on the vehicle
placard or tire inflation pressure label, you
should determine the proper tire inflation
pressure for those tires.)
As an added safety feature, your vehicle
has been equipped with a Tire Pressure
Monitoring System (TPMS) that illuminates
a low tire pressure telltale when one or
more of your tires is significantly under-
inflated. Accordingly, when the low tire
pressure telltale illuminates, you should
stop and check all your tires as soon as
possible, and inflate them to the proper pressure. Driving on a significantly under-
inflated tire causes the tire to overheat and
can lead to tire failure. Under-inflation also
reduces fuel efficiency and tire tread life,
and may affect the vehicle’s handling and
stopping ability.
Please note that the TPMS is not a substi-
tute for proper tire maintenance, and it is
the driver’s responsibility to maintain cor-
rect tire pressure, even if under-inflation
has not reached the level to trigger illumi-
nation of the TPMS low tire pressure telltale.
Your vehicle has also been equipped with a
TPMS malfunction indicator to indicate
when the system is not operating properly.
The TPMS malfunction indicator is com-
bined with the low tire pressure telltale.
When the system detects a malfunction,
the telltale will flash for approximately one
minute and then remain continuously illu-
minated. This sequence will continue upon
subsequent vehicle start-ups as long as
the malfunction exists. When the malfunc-
tion indicator is illuminated, the system
may not be able to detect or signal low tire
pressure as intended. TPMS malfunctions
may occur for a variety of reasons, includ-
ing the installation of replacement or alter-
nate tires or wheels on the vehicle that
Starting and driving5-5
Page 340 of 644
prevent the TPMS from functioning prop-
erly. Always check the TPMS malfunction
telltale af ter replacing one or more tires or
wheels on your vehicle to ensure that the
replacement or alternate tires and wheels
allow the TPMS to continue to function
properly.
Additional information:
• When using a wheel without the TPMSsuch as the spare tire, the TPMS does not
monitor the tire pressure of the spare tire.
• The TPMS will activate only when the ve- hicle is driven at speeds above 16 mph (25
km/h). Also, this system may not detect a
sudden drop in tire pressure (for example,
a flat tire while driving).
• The low tire pressure warning light does not automatically turn off when the tire
pressure is adjusted. Af ter your tires are
inflated to the recommended pressure,
the vehicle must be driven at speeds
above 16 mph (25 km/h) to activate the
TPMS and turn off the low tire pressure
warning light. Use a tire pressure gauge
to check the tire pressure. • The “Tire Pressure Low – Add Air” warning
appears in the vehicle information dis-
play when the low tire pressure warning
light is illuminated and low tire pressure is
detected. The “Tire Pressure Low – Add
Air” warning turns off when the low tire
pressure warning light turns off.
• The “Tire Pressure Low – Add Air” warning does not appear if the low tire pressure
warning light illuminates to indicate a
TPMS malfunction.
• Tire pressure rises and falls depending on the heat caused by the vehicle’s opera-
tion and the outside temperature. Do not
reduce the tire pressure af ter driving be-
cause the tire pressure rises af ter driving.
Low outside temperature can lower the
temperature of the air inside the tire
which can cause a lower tire inflation
pressure. This may cause the low tire
pressure warning light to illuminate. If the
warning light illuminates, check the tire
pressure for all four tires.
• The Tire and Loading Information label is located in the driver's door opening.
For additional information, see “Low tire
pressure warning light” (P. 2-20) and “Tire
Pressure Monitoring System (TPMS)” (P. 6-3).WARNING
• Radio waves could adversely affect
electric medical equipment. Those
who use a pacemaker should contact
the electric medical equipment
manufacturer for the possible influ-
ences before use.
• If the low tire pressure warning light
illuminates while driving, avoid sud-
den steering maneuvers or abrupt
braking, reduce vehicle speed, pull
off the road to a safe location and
stop the vehicle as soon as possible.
Driving with under-inflated tires may
permanently damage the tires and
increase the likelihood of tire failure.
Serious vehicle damage could occur
and may lead to an accident and
could result in serious personal in-
jury. Check the tire pressure for all
four tires. Adjust the tire pressure to
the recommended COLD tire pres-
sure shown on the Tire and Loading
Information label to turn the low tire
pressure warning light off. If you have
a flat tire, replace it with a spare tire
as soon as possible. (For additional
information, see “Flat tire” (P. 6-3) for
changing a flat tire.)
5-6Starting and driving
Page 341 of 644

•When using a wheel without the
TPMS such as the spare tire, when a
spare tire is mounted or a wheel is
replaced, tire pressure will not be in-
dicated, the TPMS will not function
and the low tire pressure warning
light will flash for approximately 1
minute. The light will remain on af ter
1 minute. Have your tires replaced
and/or TPMS system reset as soon as
possible. It is recommended that you
visit a NISSAN dealer for this service.
• Replacing tires with those not origi-
nally specified by NISSAN could af-
fect the proper operation of the
TPMS.
• Do not inject any tire liquid or aerosol
tire sealant into the tires, as this may
cause a malfunction of the tire pres-
sure sensors.
CAUTION
Do not place metalized film or any
metal parts (antenna, etc.) on the win-
dows. This may cause poor reception of
the signals from the tire pressure sen-
sors, and the TPMS will not function
properly. Some devices and transmitters may tem-
porarily interfere with the operation of the
TPMS and cause the low tire pressure
warning light to illuminate.
Some examples are:
• Facilities or electric devices using similar
radio frequencies are near the vehicle.
• If a transmitter set to similar frequencies is being used in or near the vehicle.
• If a computer (or similar equipment) or a DC/AC converter is being used in or near
the vehicle.
The low tire pressure warning light may
illuminate in the following cases:
• If the vehicle is equipped with a wheel and tire without TPMS.
• If the TPMS has been replaced and the ID has not been registered.
• If the wheel is not originally specified by NISSAN. FCC Notice:
For USA:
This device complies with Part 15 of the
FCC Rules. Operation is subject to the fol-
lowing two conditions: (1) This device
may not cause harmful interference, and
(2) this device must accept any interfer-
ence received, including interference
that may cause undesired operation.
NOTE:
Changes or modifications not ex-
pressly approved by the party respon-
sible for compliance could void the us-
er's authority to operate the
equipment.
For Canada:
This device contains license-exempt
transmitter(s)/receiver(s) that comply
with Innovation, Science and Economic
Development Canada’s licence-exempt
RSS(s). Operation is subject to the fol-
lowing two conditions: (1) This device
may not cause interference. (2) This de-
vice must accept any interference, in-
cluding interference that may cause un-
desired operation of the device.
Starting and driving5-7