2023 NISSAN TITAN check engine
[x] Cancel search: check enginePage 139 of 644
This indicator means that the engine will
start by pushing the ignition switch with
the brake pedal depressed. You can start
the engine from any position of the ignition
switch.
Range XX miles
This warning appears to indicate the ap-
proximate distance remaining before the
fuel reaches 0 (Empty).
Check Rear Seat For All Articles
When the system is enabled, this message
appears when the vehicle comes to a com-
plete stop, the vehicle is transitioned from
the D (Drive) position to P (Park) position,
and the driver exits the vehicle. This mes-
sage alerts the driver, af ter a period of time,
to check for items in the rear seat af ter the
audible alert has been provided.
NOTE:
This system is disabled until a driver en-
ables it using the vehicle information
display. For additional information, see
“How to use the vehicle information dis-
play ” (P. 2-25).
For additional information, see “Rear Door
Alert” (P. 2-66).
Rear Door Alert is activated
When the system is enabled, this message
appears when the Rear Door Alert system
is active and can remind the driver to check
the back seat.
• Using the steering wheel switch, a drivercan select “Dismiss Message” to clear the
display for a period of time. If no selection
is made, this message automatically
turns off af ter a period of time.
• Using the steering wheel switch, a driver can select “Disable Alert” to disable the
horn alert for the remainder of the cur-
rent trip.
WARNING
Selecting “Dismiss Message” during a
stop within a trip temporarily dis-
misses the message for that stop with-
out turning the system off. Alerts can
be provided for other stops during the
trip. Selecting “Disable Alert” turns off
the Rear Door Alert system for the re-
mainder of a trip and no audible alert
will be provided.
NOTE:
This system is disabled until a driver en-
ables it using the vehicle information
display. For additional information, “How
to use the vehicle information display ”
(P. 2-25).
For additional information, “Rear Door Alert”
(P. 2-66).
Rear seat belt warning
• This warning includes display of the seat belts for rear positions only. Rear seat
belts that are unfastened will appear red.
• If any rear seat belts are unfastened when the ignition switch is pushed to the
ON position, this warning will display for
about one minute, or until dismissed.
• When a rear seat belt is changed from fastened to unfastened, this warning will
display for over one minute, or until
dismissed.
• If the vehicle is driven above 9 mph (15 km/h) during or af ter the status change,
this warning will display and the chime
will sound for over one minute. During
this time, the warning and chime cannot
be dismissed unless the rear seat belt is
fastened again.
Instruments and controls2-35
Page 140 of 644
NOTE:
Opening and closing a rear door while
stopped will reset this warning, similar to
pushing the ignition switch to ON again.
NOTE:
In vehicles with only 2 seats in the rear
row, only 2 seats will be displayed.
Release Parking Brake
This warning appears in the message area
of the vehicle information display when the
parking brake is set and the vehicle is
driven. Press the brake pedal to release the
parking brake.
Reminder: Turn OFF
Headlights
This warning appears when the headlights
are lef t in the ON position when exiting the
vehicle. Place the headlight switch in the
OFF or AUTO position. For additional infor-
mation, see “Headlight control switch”
(P. 2-45).
Remote Engine Start Mode
This warning appears in the vehicle infor-
mation display when the vehicle has been
started using the remote start function. Tostart the vehicle, apply the brake and place
the ignition switch in the ON position.
Shif t to Park
This warning appears when the ignition
switch is in the ACC or OFF position and the
shif t lever is not in the P (Park) position. Also,
a chime sounds when the ignition switch is
in the ACC or OFF position.
If this warning appears, move the shif t lever
to the P (Park) position and start the engine.
Shipping Mode On Push Storage Fuse
This warning may appear if the extended
storage switch is not pushed in. When this
warning appears, push in the extended
storage switch to turn off the warning. For
additional information, see “Extended stor-
age switch” (P. 2-71).
Tire Pressure Low - Add Air
This warning appears when the low tire
pressure warning light in the meter illumi-
nates and low tire pressure is detected. The
warning appears each time the ignition
switch is placed in the ON position as long
as the low tire pressure warning light re-
mains illuminated. If this warning appears,
stop the vehicle and adjust the tire pres-
sures of all four tires to the recommended
COLD tire pressure shown on the Tire and
Loading Information label. For additional
information, see “Low tire pressure warning
light” (P. 2-20) and “Tire Pressure Monitoring
System (TPMS)” (P. 5-5).
TPMS Error: See Owner’s Manual
This warning appears when there is an er-
ror with your TPMS. If this warning appears,
have the system checked. It is recom-
mended that you visit a NISSAN dealer for
this service.
When parked apply parking
brake
This message appears when a malfunc-
tion occurs in the electric shif t control sys-
tem below 3 mph (5 km/h).
Have the system checked. It is recom-
mended that you visit a NISSAN dealer for
this service.
4WD Error: See Owner’s
Manual
This warning appears when the 4-wheel
drive system is not functioning properly
while the engine is running.
2-36Instruments and controls
Page 141 of 644
Tire Size Incorrect: See
Owner’s Manual
This warning appears when the 4-wheel
drive system is not functioning properly
while the engine is running.
4WD shif t indicators
These indicators show which 4WD mode is
selected. For additional information, see
“Using 4–wheel drive (4WD)” (P. 5-105).
4WD MODE SHIFTING
This message appears when the vehicle is
shif ting into 4WD. For additional informa-
tion, see “Using 4–wheel drive (4WD)”
(P. 5-105).
AT (Automatic
Transmission) CHECK
If the service warning appears while the
engine is running, or while driving, it may
indicate that the AT is not functioning prop-
erly and may need servicing. Have the sys-
tem checked, and if necessary, repaired
promptly. It is recommended that you visit
a NISSAN dealer for this service.
AT (Automatic Transmission) Error:
See Owner’s Manual
If this message appears while the engine is
running, or while driving, it may indicate
that the AT is not functioning properly and
may need servicing. Have the system
checked, and if necessary, repaired
promptly. It is recommended that you visit
a NISSAN dealer for this service.
Service AT
This transmission has a high fluid tem-
perature protection mode. If the fluid tem-
perature becomes too high (for example,
climbing steep grades in high tempera-
tures with heavy loads, such as when tow-
ing a trailer), engine power and, under
some conditions, vehicle speed will be de-
creased automatically to reduce the
chance of transmission damage. Vehicle
speed can be controlled with the accelera-
tor pedal, but the engine and vehicle speed
may be reduced.
WARNING
When the high fluid temperature pro-
tection mode operation occurs, vehicle
speed may be gradually reduced. The
reduced speed may be lower than
other traffic, which could increase the
chance of a collision. Be especially
careful when driving. If necessary, pull
to the side of the road at a safe place
and allow the transmission to return to
normal operation; or have it repaired if
necessary.
Automatic Emergency
Braking (AEB) with
Pedestrian Detection
emergency warning
indicator
This indicator appears along, with an au-
dible warning, when the system detects
the possibility of a forward collision.
For additional information, see “Automatic
Emergency Braking (AEB) with Pedestrian
Detection” (P. 5-78).
Instruments and controls2-37
Page 158 of 644
WARNING
Do not use or allow occupants to use
the climate controlled seats if you or
the occupants cannot monitor seat
temperatures or have an inability to
feel pain in those body parts in contact
with the seat. Use of the climate con-
trolled seats by such people could re-
sult in serious injury.
CAUTION
• The battery could run down if the cli-
mate control seat is operated while
the engine is not running.
• Do not use the climate control seat
for extended periods or when no one
is using the seat.
• Do not put anything on the seat
which insulates heat, such as a blan-
ket, cushion, seat cover, etc. Other-
wise, the seat may become
overheated.
• Do not place anything hard or heavy
on the seat or pierce it with a pin or
similar objects. This may result in
damage to the climate controlled
seat. •
Any liquid spilled on the seat should
be removed immediately with a dry
cloth.
• The climate controlled seat has an air
filter. Do not operate the climate con-
trolled seat without an air filter. This
may result in damage to the system.
• When cleaning the seat, never use
gasoline, benzine, thinner, or any
similar materials.
• If any malfunctions are found or the
climate controlled seat does not op-
erate, turn the switch off and have
the system checked. It is recom-
mended that you visit a NISSAN
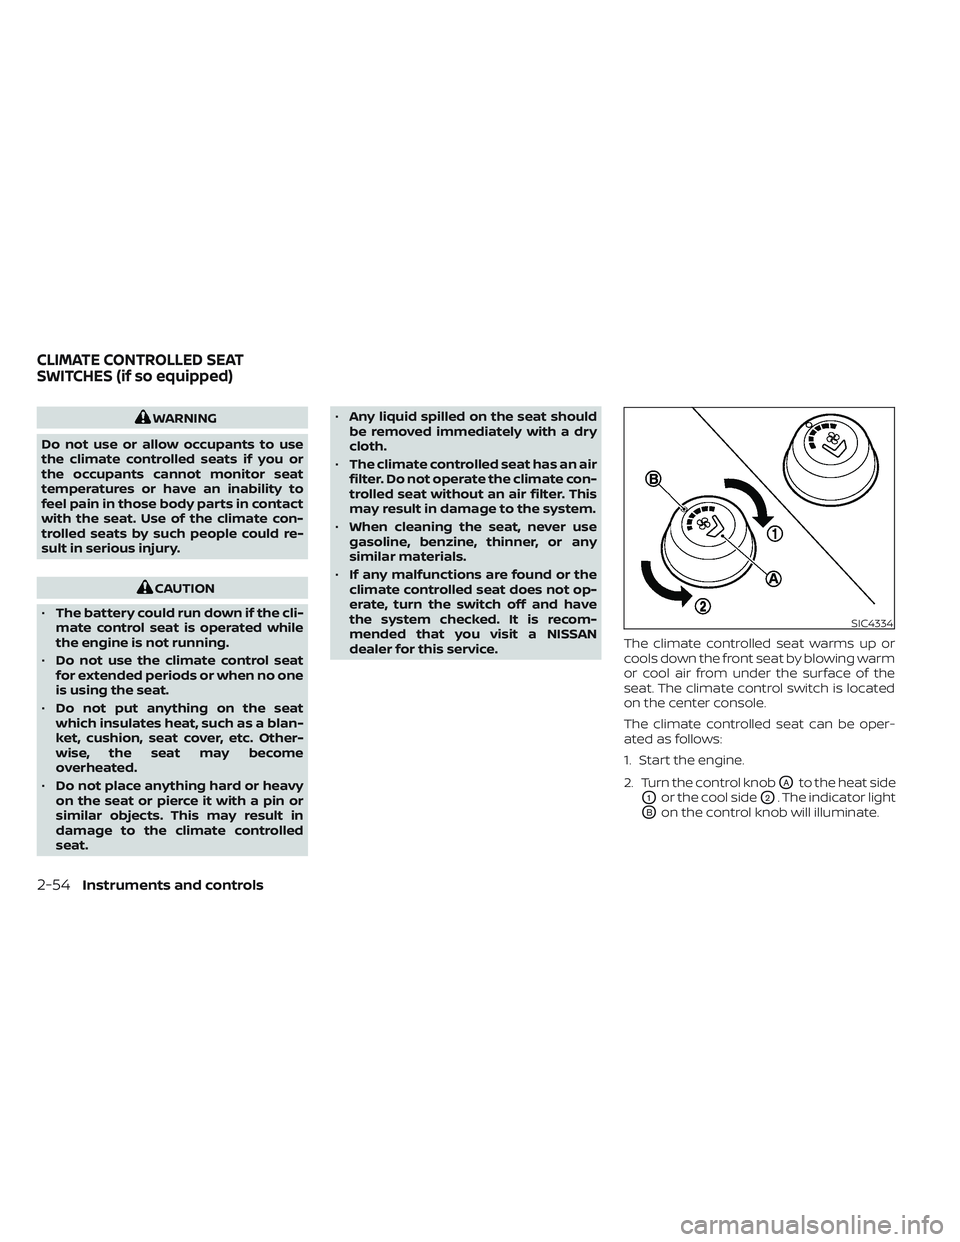
dealer for this service. The climate controlled seat warms up or
cools down the front seat by blowing warm
or cool air from under the surface of the
seat. The climate control switch is located
on the center console.
The climate controlled seat can be oper-
ated as follows:
1. Start the engine.
2. Turn the control knob
OAto the heat side
O1or the cool sideO2. The indicator light
OBon the control knob will illuminate.
SIC4334
CLIMATE CONTROLLED SEAT
SWITCHES (if so equipped)
2-54Instruments and controls
Page 160 of 644
1. Start the engine.
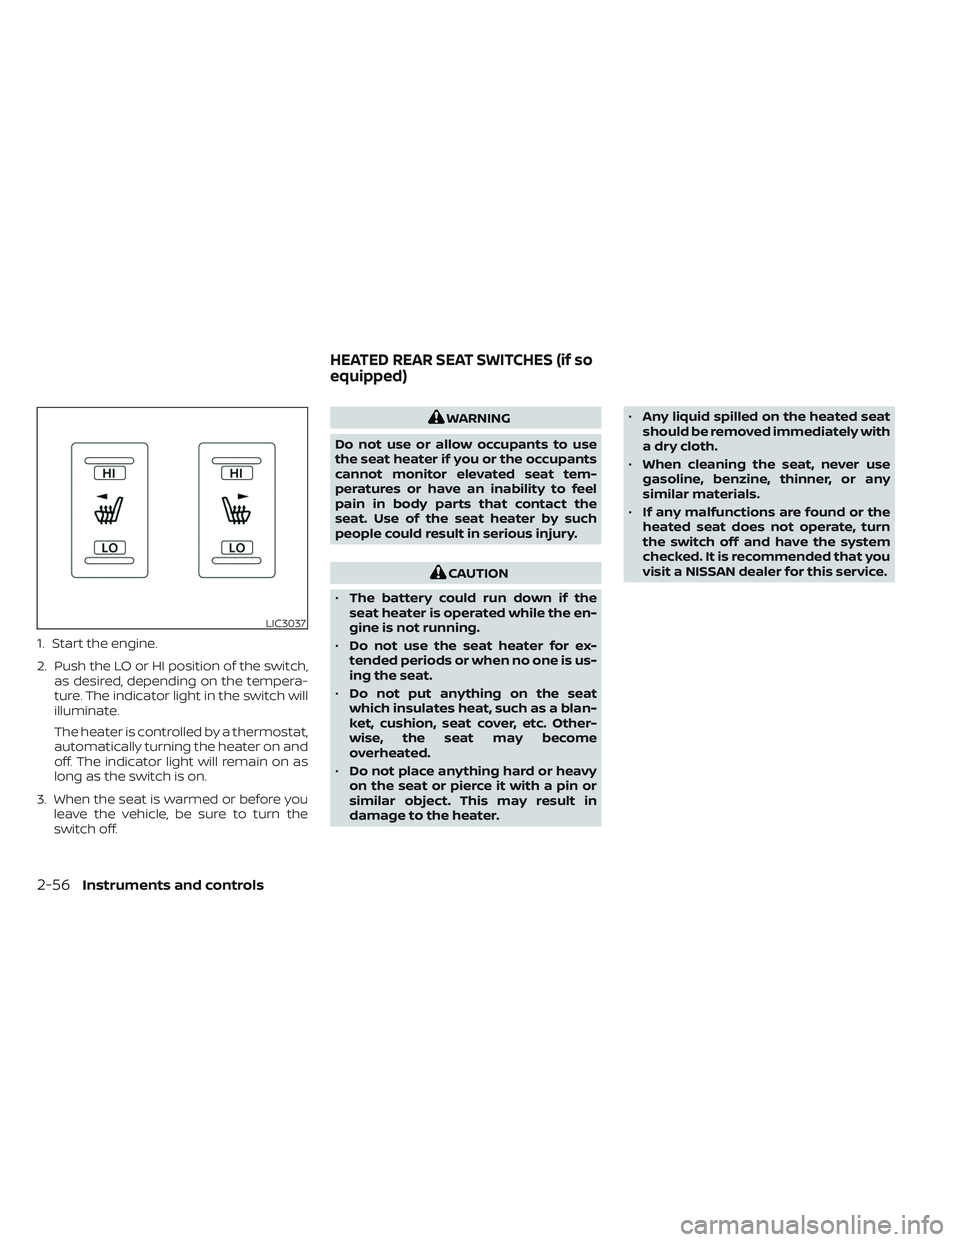
2. Push the LO or HI position of the switch,as desired, depending on the tempera-
ture. The indicator light in the switch will
illuminate.
The heater is controlled by a thermostat,
automatically turning the heater on and
off. The indicator light will remain on as
long as the switch is on.
3. When the seat is warmed or before you leave the vehicle, be sure to turn the
switch off.
WARNING
Do not use or allow occupants to use
the seat heater if you or the occupants
cannot monitor elevated seat tem-
peratures or have an inability to feel
pain in body parts that contact the
seat. Use of the seat heater by such
people could result in serious injury.
CAUTION
• The battery could run down if the
seat heater is operated while the en-
gine is not running.
• Do not use the seat heater for ex-
tended periods or when no one is us-
ing the seat.
• Do not put anything on the seat
which insulates heat, such as a blan-
ket, cushion, seat cover, etc. Other-
wise, the seat may become
overheated.
• Do not place anything hard or heavy
on the seat or pierce it with a pin or
similar object. This may result in
damage to the heater. •
Any liquid spilled on the heated seat
should be removed immediately with
a dry cloth.
• When cleaning the seat, never use
gasoline, benzine, thinner, or any
similar materials.
• If any malfunctions are found or the
heated seat does not operate, turn
the switch off and have the system
checked. It is recommended that you
visit a NISSAN dealer for this service.
LIC3037
HEATED REAR SEAT SWITCHES (if so
equipped)
2-56Instruments and controls
Page 207 of 644
3 Pre-driving checks and adjustments
Keys.............................................3-2NISSAN Intelligent Key® .......................3-2
NISSAN Vehicle Immobilizer System
keys..........................................3-4
Doors ...........................................3-4
Locking with key .............................3-5
Locking with inside lock knob ................3-6
Locking with power door lock switch .........3-6
Rear doors (King Cab® models) ............... 3-7
Automatic door locks ........................3-8
Child safety rear door lock
(if so equipped) ...............................3-9
NISSAN Intelligent Key® system ..................3-9
Operating range ............................. 3-11
Door locks/unlocks precaution ...............3-11
NISSAN Intelligent Key® Operation ...........3-12
How to use the remote keyless entry
function ..................................... 3-16
Warning signals ............................. 3-19
Troubleshooting guide ......................3-20
Remote Engine Start (if so equipped) ...........3-22
Remote Engine Start operating range .......3-22
Remote starting the vehicle .................3-23
Extending engine run time ..................3-23
Canceling a Remote Engine Start ...........3-23 Conditions the Remote Engine Start will
notwork ....................................
3-24
Hood ........................................... 3-25
Fuel-filler door .................................. 3-25
Gasoline fuel engines .......................3-26
Steering wheel ................................. 3-28
Manual operation (if so equipped) ...........3-28
Automatic operation (if so equipped) ........3-29
Sun visors ...................................... 3-30
Vanity mirrors (if so equipped) ...............3-30
Card holder (driver’s side only) ...............3-31
Mirrors ......................................... 3-31
Manual anti-glare rearview mirror
(if so equipped) .............................. 3-31
Automatic anti-glare rearview mirror
(if so equipped) .............................. 3-31
Outside mirrors ............................. 3-33
Truck box ...................................... 3-37
Tailgate ..................................... 3-37
Tie down hooks ............................. 3-41
Memor
y Seat (if so equipped) ..................3-41
Memory storage function ...................3-42
Entry/exit function .......................... 3-43
System operation ........................... 3-43
Page 222 of 644
HOW TO USE THE REMOTE
KEYLESS ENTRY FUNCTION
The remote keyless entry function can op-
erate all door locks using the remote key-
less function of the Intelligent Key. The re-
mote keyless function can operate at a
distance of 33 f t (10 m) away from the ve-
hicle. The operating distance depends
upon the conditions around the vehicle.
The remote keyless entry function will not
function under the following conditions:
• When the Intelligent Key is not within theoperational range.
• When the Intelligent Key battery is discharged.
• When the doors are open or not closed securely.
CAUTION
When locking the doors using the Intel-
ligent Key, be sure not to leave the key
in the vehicle.
Type A (if so equipped)
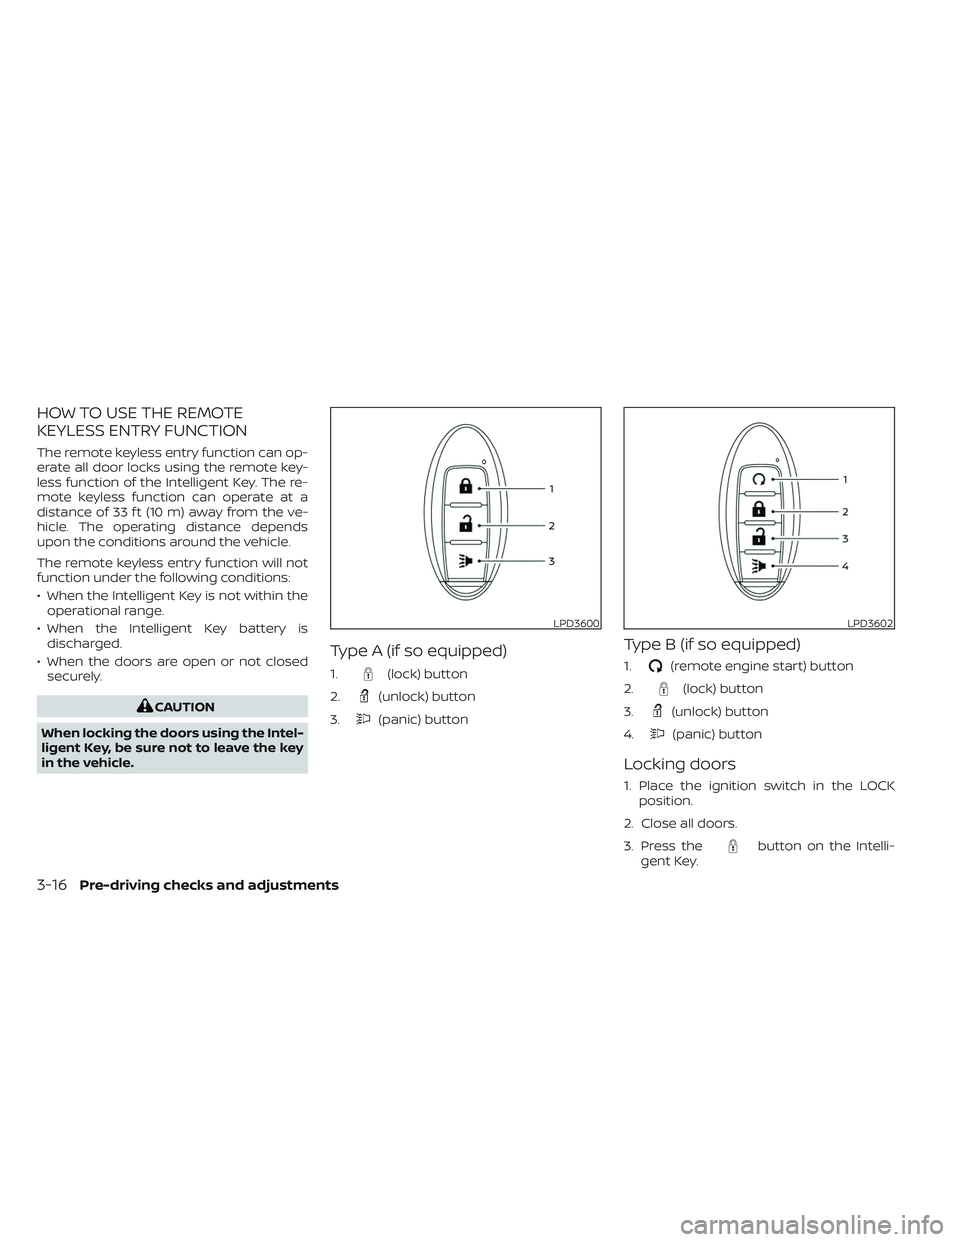
1.(lock) button
2.
(unlock) button
3.
(panic) button
Type B (if so equipped)
1.(remote engine start) button
2.
(lock) button
3.
(unlock) button
4.
(panic) button
Locking doors
1. Place the ignition switch in the LOCK position.
2. Close all doors.
3. Press the
button on the Intelli-
gent Key.
LPD3600LPD3602
3-16Pre-driving checks and adjustments
Page 226 of 644
TROUBLESHOOTING GUIDE
Verif y the location of all Intelligent Keys that are programmed for the vehicle. If another Intelligent Key is in range or inside the vehicle, the
vehicle system may respond differently than expected.
SymptomPossible CauseRemedy
When pushing the ignition switch to
stop the engine The “Shif t to Park” warning appears on
the vehicle information display and the
inside warning chime sounds continu-
ously. The shif t lever is not in the P (Park) po-
sition.
Move the shif t lever to the P (Park) po-
sition.
When opening the driver's door to get
out of the vehicle The Door Open warning appears on
the display and the inside warning
chime sounds continuously. The ignition switch is in the ACC posi-
tion.
Place the ignition switch in the ON po-
sition or close the driver’s door.
When closing the door af ter getting
out of the vehicle The “No Key Detected” warning ap-
pears on the vehicle information dis-
play, the outside chime sounds three
times and the inside warning chime
sounds for approximately three sec-
onds.
The Intelligent Key is not detected in-
side of the vehicle.
Place the ignition switch in the OFF
position.
The Rear Door Alert warning message
appears on the display, the horn
sounds three times twice, or a Check
Back Seat For All Articles warning ap-
pears on the display. The Rear Door Alert is activated.
Check the back seat for all articles,
press the ENTER button to clear the
Rear Door Alert warning message.
When closing the door with the inside
lock knob turned to LOCK The outside chime sounds for approxi-
mately three seconds and all the doors
unlock.
The Intelligent Key is inside the vehicle. Carry the Intelligent Key with you.
3-20Pre-driving checks and adjustments