2023 NISSAN SENTRA battery
[x] Cancel search: batteryPage 262 of 556
One Shot Call (if so equipped)
To use the system faster, you may speak
the second level commands with the main
menu command on the main menu. For
example, press the
button and af ter
the tone say, “Call Redial”.
INDICATORS
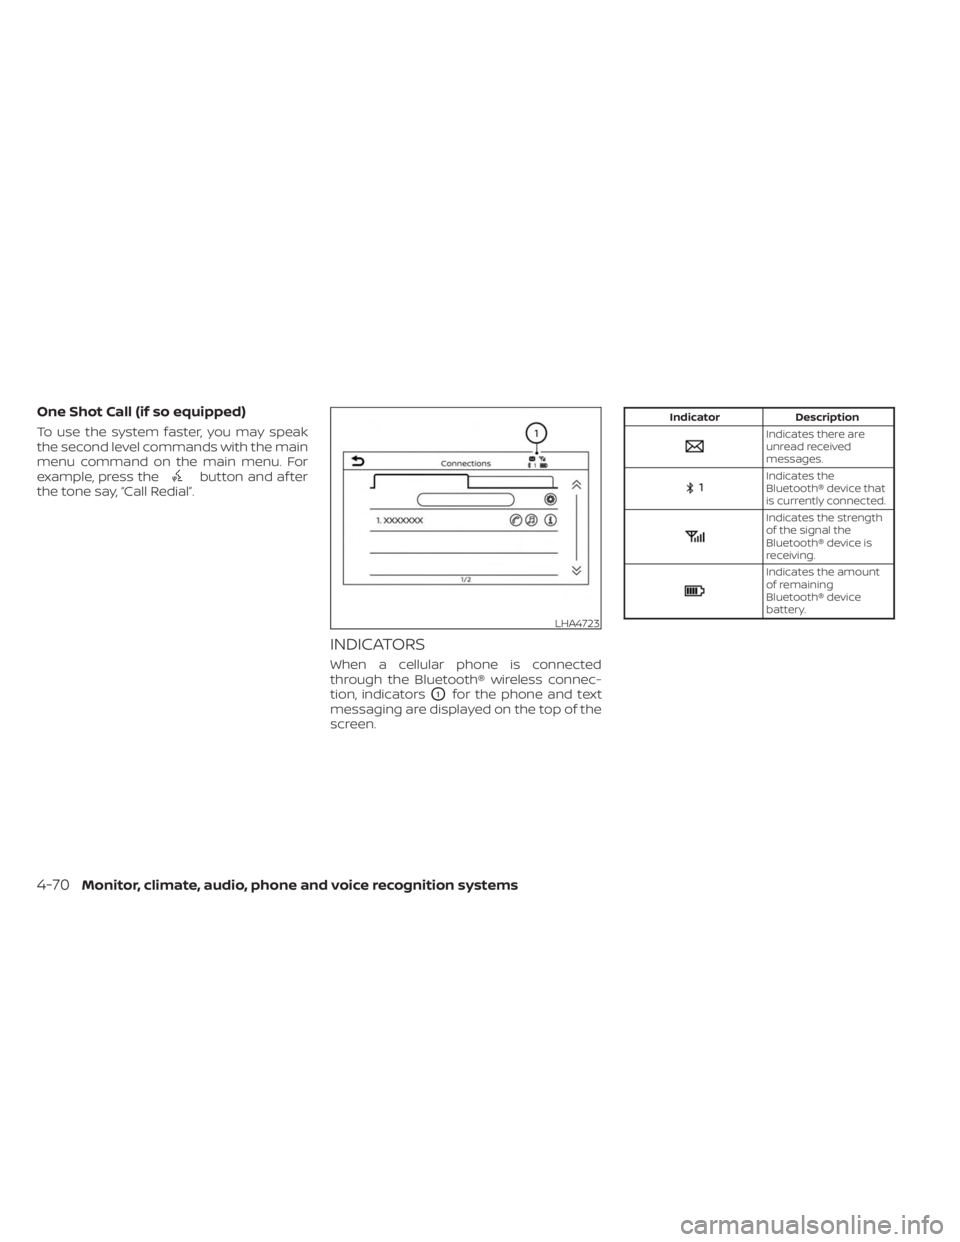
When a cellular phone is connected
through the Bluetooth® wireless connec-
tion, indicators
O1for the phone and text
messaging are displayed on the top of the
screen.
Indicator Description
Indicates there are
unread received
messages.
Indicates the
Bluetooth® device that
is currently connected.
Indicates the strength
of the signal the
Bluetooth® device is
receiving.
Indicates the amount
of remaining
Bluetooth® device
battery.
LHA4723
4-70Monitor, climate, audio, phone and voice recognition systems
Page 277 of 556
5 Starting and driving
Precautions when starting and driving..........5-4
Exhaust gas (carbon monoxide) ..............5-4
Three-way catalyst ...........................5-4
Tire Pressure Monitoring System
(TPMS) .......................................5-5
Avoiding collision and rollover ................5-9
Off-roadrecovery ............................5-9
Rapid air pressure loss .......................5-9
Drinking alcohol/drugs and driving ..........5-10
Push-button ignition switch .....................5-11
Operating range ............................ 5-12
Push-button ignition switch positions .......5-12
Emergency engine shut off ..................5-13
NISSAN Intelligent Key® battery
discharge ................................... 5-13
NISSAN Vehicle Immobilizer System .........5-14
Before starting the engine .....................5-14
Starting the engine ............................. 5-14
Remote Engine Start (if so equipped) ........5-15
Driving the vehicle .............................. 5-16
Continuously Variable Transmission
(CVT) (if so equipped) ........................ 5-16
Manual transmission (if so equipped) ........5-21
Parking brake .................................. 5-22
Hand type (if so equipped) ...................5-23
Pedal type (if so equipped) ..................5-23ECO mode switch
.............................. 5-24
Shif t lever indicator (2.0L 4 cylinder
(MR20DD engine model) Manual
Transmission models only)
(if so equipped) .............................. 5-24
Traffic Sign Recognition (TSR) (if so equipped) . . . 5-25 System operation ........................... 5-26
Turning the Traffic Sign Recognition
(TSR) system on and off .....................5-27
System temporarily unavailable .............5-28
System malfunction ......................... 5-28
System maintenance .......................5-28
Lane Departure Warning (LDW) .................5-29
LDW system operation ......................5-30
How to enable/disable the LDW system .....5-32
LDW system limitations .....................5-33
System temporarily unavailable .............5-34
System malfunction ......................... 5-35
System maintenance .......................5-35
Blind Spot Warning (BSW) .......................5-36
BS
W system operation ...................... 5-38
How to enable/disable the BSW system .....5-39
BSW system limitations .....................5-41
BSW driving situations .......................5-42
System temporarily unavailable .............5-45
System maintenance .......................5-47
Page 279 of 556
Intelligent Driver Alertness (I-DA)...............5-121
Intelligent Driver Alertness system
operation .................................. 5-121
How to enable/disable the Intelligent
Driver Alertness (I-DA) system ..............5-122
Intelligent Driver Alertness (I-DA)
system limitations ......................... 5-123
Break-in schedule ............................. 5-125
Fuel efficient driving tips .......................5-125
Increasing fuel economy ......................5-126
Parking/parking on hills .......................5-127
Power steering ................................ 5-128
Brake system ................................. 5-129
Brake precautions .......................... 5-129
Anti-lock Braking System (ABS) .............5-129
Brake Assist ................................ 5-131
Vehicle Dynamic Control (VDC) system ........5-131
Rise-up and build-up ....................... 5-132
Brake force distribution ....................5-132
Chassis Control ............................... 5-133Intelligent Trace Control
....................5-133
Active Ride Control ......................... 5-134
Intelligent Engine Brake ....................5-134
Hill start assist system ........................5-135
Rear Sonar System (RSS) ......................5-135
System operation .......................... 5-136
How to enable/disable the sonar
system ..................................... 5-138
Sonar limitations ........................... 5-140
System temporarily unavailable ............5-140
System maintenance ......................5-140
Cold weather driving .......................... 5-141
Freeing a frozen door lock ..................5-141
Antifreeze .................................. 5-141
Battery..................................... 5-141
Draining of coolant water ..................5-141
Tire equipment ............................. 5-141
Special winter equipment ..................5-142
Driving on snow or ice ......................5-142
Engine
block heater (if so equipped) ........5-142
Page 284 of 556
FCC Notice:
For USA:
This device complies with Part 15 of the
FCC Rules. Operation is subject to the fol-
lowing two conditions: (1) This device
may not cause harmful interference, and
(2) this device must accept any interfer-
ence received, including interference
that may cause undesired operation.
NOTE:
Changes or modifications not ex-
pressly approved by the party respon-
sible for compliance could void the us-
er's authority to operate the
equipment.
For Canada:
This device contains licence-exempt
transmitter(s)/receiver(s) that comply
with Innovation, Science and Economic
Development Canada’s licence-exempt
RSS(s). Operation is subject to the fol-
lowing two conditions: (1) This device
may not cause interference. (2) This de-
vice must accept any interference, in-
cluding interference that may cause un-
desired operation of the device.
TPMS with Easy-Fill Tire Alert
When adding air to an under-inflated tire,
the TPMS with Easy-Fill Tire Alert provides
visual and audible signals outside the ve-
hicle to help you inflate the tires to the rec-
ommended COLD tire pressure.
Vehicle set-up:
1. Park the vehicle in a safe and level place.
2. Apply the parking brake and place theshif t lever in the P (Park) position (if so
equipped).
3. Place the ignition switch in the ON posi- tion. Do not start the engine.
Operation:
1. Add air to the tire.
2. Af ter a few seconds, the hazard indica- tors will start flashing.
3. When the designated pressure is reached, the horn beeps once and the
hazard indicators stop flashing.
4. Perform the above steps for each tire. • If the tire is over-inflated more thanapproximately 4 psi (30 kPa), the horn
beeps and the hazard indicators flash
three times. To correct the pressure,
push the core of the valve stem on the tire briefly to release pressure. When
the pressure reaches the designated
pressure, the horn beeps once.
• If the hazard indicator does not flash within approximately 15 seconds af ter
starting to inflate the tire, it indicates
that the Easy-Fill Tire Alert is not
operating.
• The TPMS will not activate the Easy-Fill Tire Alert under the following condi-
tions:
– If there is interference from an ex- ternal device or transmitter.
– The air pressure from the inflation device is not sufficient to inflate the
tire.
– There is a malfunction in the TPMS system.
– There is a malfunction in the horn or hazard indicators.
– The identification code of the tire’s pressure sensor is not registered to
the system.
– The battery of the tire pressure sensor is low.
• If the Easy-Fill Tire Alert does not oper- ate due to TPMS interference, move
the vehicle about 3 f t (1 m) backward
or forward and try again.
5-8Starting and driving
Page 287 of 556

WARNING
Do not operate the push-button igni-
tion switch while driving the vehicle ex-
cept in an emergency. (The engine will
stop when the ignition switch is pushed
three consecutive times in quick suc-
cession or the ignition switch is pushed
and held for more than 2 seconds.) If
the engine stops while the vehicle is
being driven, this could lead to a crash
and serious injury. When the ignition switch is pushed without
depressing the brake pedal, the ignition
switch position will illuminate as follows:
Push center:
• Once to change to the ON position.
• Two times to change to the OFF position.
The ignition switch will automatically re-
turn to the LOCK position when any door is
either opened or closed with the switch in
the OFF position.
The ignition lock is designed so that the
ignition switch position cannot be placed
in the OFF position until the shif t lever is
moved to the P (Park) position.
When the ignition switch cannot be pushed
toward the OFF position, proceed as fol-
lows:
1. Move the shif t lever to the P (Park)
position.
2. Push the ignition switch. The ignition switch position will change to the ON
position.
3. Push the ignition switch again to the OFF position. The shif t lever can be moved from the P
(Park) position if the ignition switch is in
the ON position and the brake pedal is
depressed.
If the battery of the vehicle is discharged,
the ignition switch cannot be moved
from the LOCK position.
Some indicators and warnings for opera-
tion are displayed in the meter. For addi-
tional information, see “Warning lights, indi-
cator lights and audible reminders” (P. 2-9).
LSD2645
PUSH-BUTTON IGNITION SWITCH
Starting and driving5-11
Page 288 of 556
OPERATING RANGE
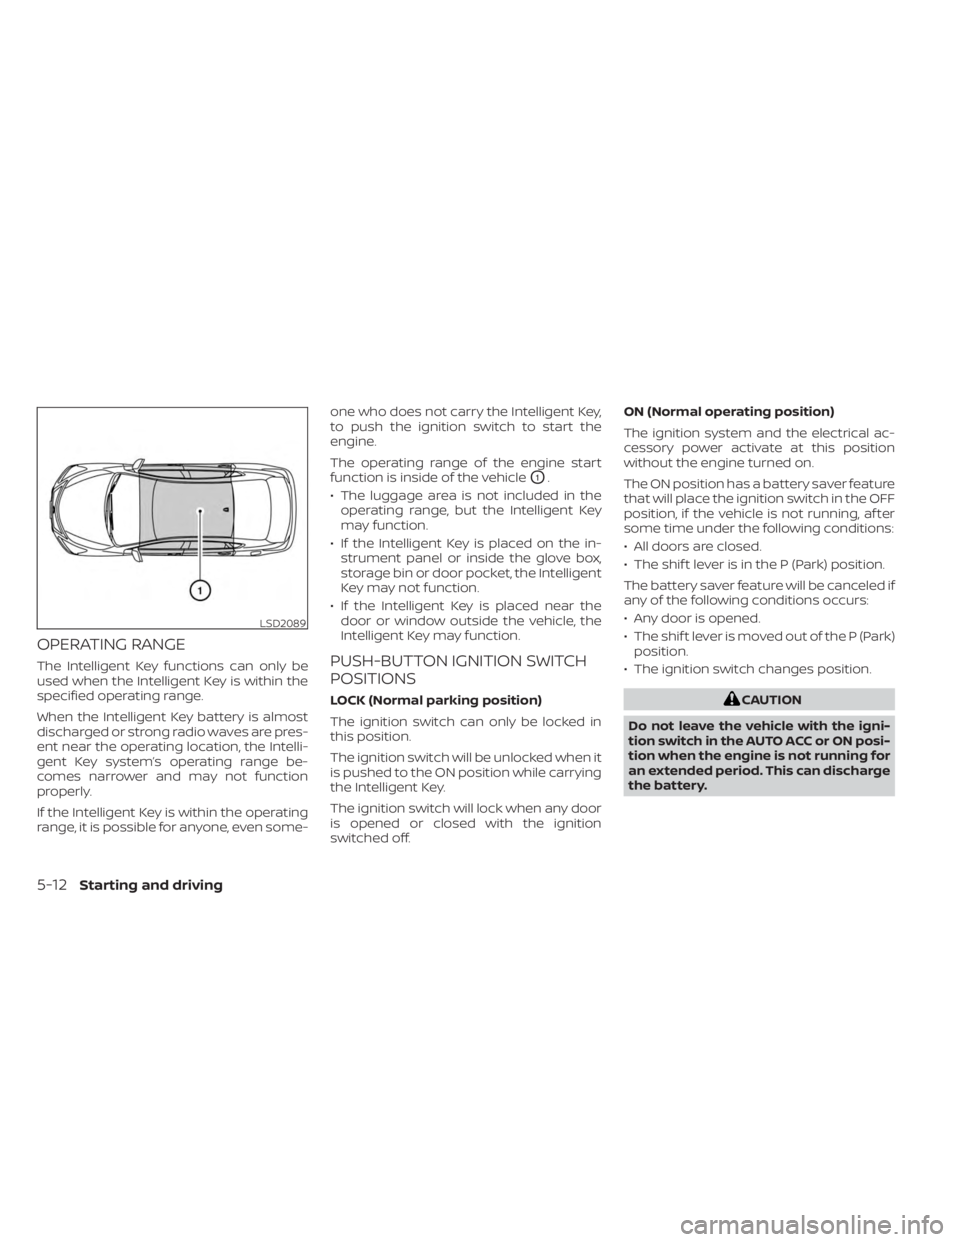
The Intelligent Key functions can only be
used when the Intelligent Key is within the
specified operating range.
When the Intelligent Key battery is almost
discharged or strong radio waves are pres-
ent near the operating location, the Intelli-
gent Key system’s operating range be-
comes narrower and may not function
properly.
If the Intelligent Key is within the operating
range, it is possible for anyone, even some-one who does not carry the Intelligent Key,
to push the ignition switch to start the
engine.
The operating range of the engine start
function is inside of the vehicle
O1.
• The luggage area is not included in the operating range, but the Intelligent Key
may function.
• If the Intelligent Key is placed on the in- strument panel or inside the glove box,
storage bin or door pocket, the Intelligent
Key may not function.
• If the Intelligent Key is placed near the door or window outside the vehicle, the
Intelligent Key may function.
PUSH-BUTTON IGNITION SWITCH
POSITIONS
LOCK (Normal parking position)
The ignition switch can only be locked in
this position.
The ignition switch will be unlocked when it
is pushed to the ON position while carrying
the Intelligent Key.
The ignition switch will lock when any door
is opened or closed with the ignition
switched off. ON (Normal operating position)
The ignition system and the electrical ac-
cessory power activate at this position
without the engine turned on.
The ON position has a battery saver feature
that will place the ignition switch in the OFF
position, if the vehicle is not running, af ter
some time under the following conditions:
• All doors are closed.
• The shif t lever is in the P (Park) position.
The battery saver feature will be canceled if
any of the following conditions occurs:
• Any door is opened.
• The shif t lever is moved out of the P (Park)
position.
• The ignition switch changes position.CAUTION
Do not leave the vehicle with the igni-
tion switch in the AUTO ACC or ON posi-
tion when the engine is not running for
an extended period. This can discharge
the battery.
LSD2089
5-12Starting and driving
Page 289 of 556
OFF
The ignition switch is in the OFF position
when the engine is turned off using the
ignition switch. No lights will illuminate on
the ignition switch.
AUTO ACC:
With the vehicle in the P (Park) position, the
Intelligent Key with you, and the ignition
switch placed from the ON to the OFF po-
sition, the radio can still be used for a period
of time, or until the driver’s door is opened.
Af ter a period of time, functions such as
radio, navigation, and Bluetooth® Hands-
Free Phone System may be restarted by
pressing the “POWER button/VOLUME con-
trol knob” or the key fob unlock button. For
additional information, see the “Monitor, cli-
mate, audio, phone and voice recognition
systems” section of this manual.
EMERGENCY ENGINE SHUT OFF
To shut off the engine in an emergency
situation while driving, perform the follow-
ing procedure:
• Rapidly push the ignition switch threeconsecutive times in less than 1.5 sec-
onds, or
• Push and hold the ignition switch for more than 2 seconds.
NISSAN INTELLIGENT KEY®
BATTERY DISCHARGE
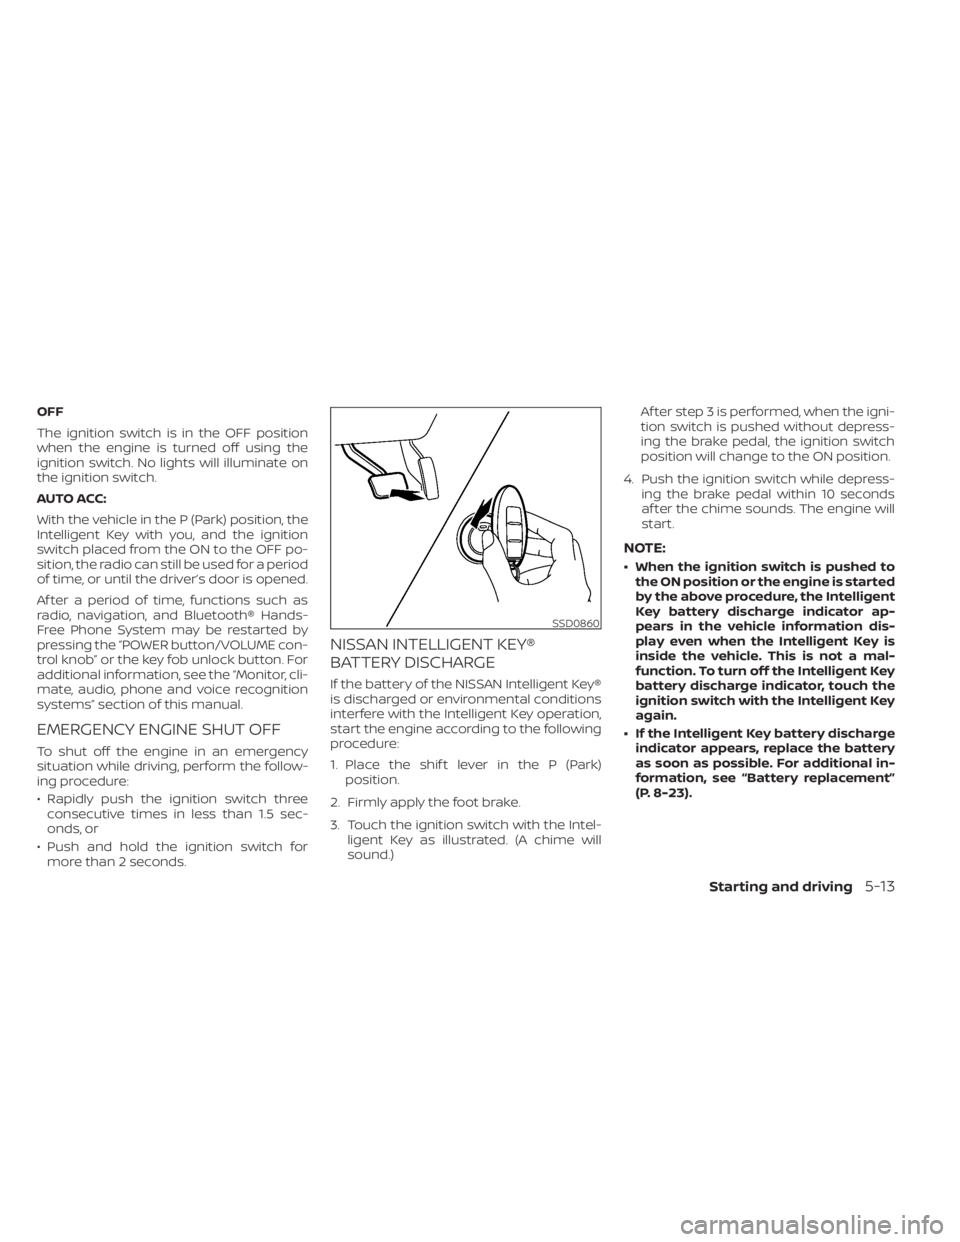
If the battery of the NISSAN Intelligent Key®
is discharged or environmental conditions
interfere with the Intelligent Key operation,
start the engine according to the following
procedure:
1. Place the shif t lever in the P (Park) position.
2. Firmly apply the foot brake.
3. Touch the ignition switch with the Intel- ligent Key as illustrated. (A chime will
sound.) Af ter step 3 is performed, when the igni-
tion switch is pushed without depress-
ing the brake pedal, the ignition switch
position will change to the ON position.
4. Push the ignition switch while depress- ing the brake pedal within 10 seconds
af ter the chime sounds. The engine will
start.
NOTE:
• When the ignition switch is pushed tothe ON position or the engine is started
by the above procedure, the Intelligent
Key battery discharge indicator ap-
pears in the vehicle information dis-
play even when the Intelligent Key is
inside the vehicle. This is not a mal-
function. To turn off the Intelligent Key
battery discharge indicator, touch the
ignition switch with the Intelligent Key
again.
• If the Intelligent Key battery discharge indicator appears, replace the battery
as soon as possible. For additional in-
formation, see “Battery replacement”
(P. 8-23).
SSD0860
Starting and driving5-13
Page 291 of 556
• If the engine is very hard to start inextremely cold weather or when re-
starting, depress the accelerator
pedal a little (approximately 1/3 to the
floor) and while holding, crank the en-
gine. Release the accelerator pedal
when the engine starts.
•
If the engine is very hard to start be-
cause it is flooded, depress the accel-
erator pedal all the way to the floor and
hold it. Push the ignition switch to the
ON position to start cranking the engine.
Af ter 5 or 6 seconds, stop cranking by
pushing the ignition switch to the LOCK
position. Af ter cranking the engine, re-
lease the accelerator pedal. Crank the
engine with your foot off the accelerator
pedal by depressing the brake pedal
and pushing the ignition switch to start
the engine. If the engine starts, but fails
to run, repeat the above procedure.
CAUTION
Do not operate the starter for more
than 15 seconds at a time. If the engine
does not start, push the ignition switch
to the OFF position and wait 10 seconds
before cranking again, otherwise the
starter could be damaged. 4.
Warm-up
Allow the engine to idle for at least 30
seconds af ter starting. Do not race the
engine while warming it up. Drive at a
moderate speed for a short distance
first, especially in cold weather. In cold
weather, keep the engine running for a
minimum of2-3minutes before shut-
ting it off. Starting and stopping the en-
gine over a short period of time may
make the vehicle more difficult to start.
5. To stop the engine, with the Intelligent Key inside the vehicle, move the shif t
lever to the P (Park) position or to N (Neu-
tral) and apply the parking brake (M/T)
and push the ignition switch to the OFF
position.
NOTE:
Care should be taken to avoid situa-
tions that can lead to potential battery
discharge and potential no-start con-
ditions such as:
1. Installation or extended use of elec- tronic accessories that consume bat-
tery power when the engine is not
running (phone chargers, GPS, DVD
players, etc.). 2. The vehicle is not driven regularly
and/or only driven short distances.
In these cases, the battery may need to
be charged to maintain battery health.
REMOTE ENGINE START (if so
equipped)
Vehicles started with the Remote Engine
Start require the ignition switch to be
placed in the ON position before the shif t
lever can be moved from the P (Park) posi-
tion. To place the ignition switch in the ON
position, follow these steps:
1. Make sure that the Intelligent Key is on you.
2. Apply the brake.
3. Push the ignition switch once to the ON position.
For additional information, see “NISSAN In-
telligent Key®” (P. 3-2).
Starting and driving5-15