2023 NISSAN SENTRA Run lights
[x] Cancel search: Run lightsPage 177 of 556

Using the interior lights
The interior lights illuminate for a period of
time when a door is unlocked and the inte-
rior lights switch is not in the OFF position.
The interior lights can be turned off without
waiting by performing one of the following
operations:
• Placing the ignition switch in the ONposition.
• Locking the doors with the request switch (if so equipped) or the Intelligent
Key.
• Switching the interior light switch to the OFF position.
For additional information, see “Interior
lights” (P. 2-74).
Releasing the trunk lid
Press thebutton for 0.5 seconds to
open the trunk lid. The trunk release button
will not operate when the ignition switch is
placed in the ON position.
Using the panic alarm
If you are near your vehicle and feel threat-
ened, you may activate the panic alarm to
call attention by pressing and holding the
button on the Intelligent Key for lon-
ger than 0.5 seconds.
The panic alarm and headlights will stay on
for a period of time.
The panic alarm stops when:
• It has run for a period of time.
•
(unlock) button is pressed on the
Intelligent Key.
Silencing the horn beep feature
If desired, the horn beep feature can be
deactivated using the Intelligent Key.
To deactivate: Press and hold the
andbuttonsfor at least 4 seconds.
The hazard warning lights will flash three
times to confirm that the horn beep fea-
ture has been deactivated.
To activate: Press and hold the
andbuttonsfor at least 4 seconds once
more.
The hazard warning lights will flash once
and the horn will sound once to confirm
that the horn beep feature has been
reactivated.
Deactivating the horn beep feature does
not silence the horn if the alarm is
triggered.
WARNING SIGNALS
To help prevent the vehicle from moving
unexpectedly by erroneous operation of
the Intelligent Key or to help prevent the
vehicle from being stolen, a chime or
buzzer sounds from inside and outside the
vehicle and a warning is displayed in the
instrument panel.
When a chime or beep sounds or a warning
is displayed, be sure to check the vehicle
and the Intelligent Key.
For additional information, see “Trouble-
shooting guide” (P. 3-16) and “Vehicle infor-
mation display 4.2 inch (11 cm) Type A”
(P. 2-18) or “Vehicle information display 7
inch (18 cm) Type B” (P. 2-32)
Pre-driving checks and adjustments3-15
Page 181 of 556
CAUTION
When the Intelligent Key battery is dis-
charged or other strong radio wave
sources are present near the operating
location, the Intelligent Key operating
range becomes narrower, and the Intel-
ligent Key may not function properly.
The Remote Engine Start function can only
be used when the Intelligent Key is within
the specified operating range from the
vehicle.
The Remote Engine Start operating range
is approximately 197 f t (60 m) from the
vehicle.
REMOTE STARTING THE VEHICLE
To use the Remote Engine Start feature to
start the engine perform the following:
1. Aim the Intelligent Key at the vehicle.
2. Press the
button to lock all doors.
3. Within 5 seconds press and hold the
button until the turn signal lights
flash and the tail lamps turn on. If the
vehicle is not within view press and hold
the
button for at least 2 seconds. The following events will occur when the
engine starts:
• The parking lights will turn on and remain
on as long as the engine is running.
• The doors will be locked and the climate control system may come on.
• The engine will continue to run for 10 min- utes. Repeat the steps to extend the time
for an additional 10 minutes. For addi-
tional information, see “Extending engine
run time” (P. 3-19).
Press and hold the brake then push the
push-button ignition switch to the ON po-
sition before driving. For additional infor-
mation, see “Driving the vehicle” (P. 5-16).
EXTENDING ENGINE RUN TIME
The Remote Engine Start feature can be
extended one time by performing the
steps listed in “Remote starting the vehicle”
(P. 3-19). Run time will be calculated as
follows:
• The first 10-minute run time will start when the Remote Engine Start function is
performed. • The second 10 minutes will start af ter the
first Remote Engine Start request ends.
For example, if the engine has been run-
ning for 5 minutes, and 10 minutes are
added, the engine will run for a total of 20
minutes.
• Extending engine run time will bring you to the two Remote Engine Start limit.
A maximum of two Remote Engine Starts,
or a single start with an extension, are al-
lowed between ignition cycles.
The vehicle needs to be driven at speeds of
4 mph (7 km/h) before the Remote Engine
Start procedure can be used again.
CANCELING A REMOTE ENGINE
START
To cancel a Remote Engine Start, perform
one of the following:
• Aim the Intelligent Key at the vehicle and press
until the parking lights turn off.
• Turn on the hazard warning flashers.
• Cycle the ignition switch on and then off.
• The extended engine run time has expired.
• The first 10 minute timer has expired.
• The engine hood has been opened.
• The shif t lever is moved out of park.
Pre-driving checks and adjustments3-19
Page 182 of 556

• The alarm sounds due to illegal entry intothe vehicle.
• The ignition switch is pushed without an Intelligent Key in the vehicle.
• The ignition switch is pushed with an In- telligent Key in the vehicle but the brake
pedal is not depressed.
• The accelerator pedal is depressed.
• The vehicle moves af ter a remote engine start. (The hazard indicator flashers blink
once and the engine is stopped).
CONDITIONS THE REMOTE ENGINE
START WILL NOT WORK
The Remote Engine Start will not operate if
any of the following conditions are present:
• The ignition switch is placed in the ONposition.
• The hood is not securely closed.
• The hazard indicator lights are on.
• The engine is still running. The engine must be completely stopped. Wait at
least 6 seconds if the engine goes from
running to off. This is not applicable when
extending engine run time.
• The
button is not pressed and held
for at least 2 seconds. • The
button is not pressed and held
within 5 seconds of pressing the lock
button.
• The brake is pressed.
• The doors are not closed and locked.
• The trunk is open.
• The I-Key System Error warning or any engine-related warning shows in the ve-
hicle information display.
• The alarm sounds due to illegal entry into the vehicle.
• Two Remote Engine Starts, or a single Remote Engine Start with an extension,
have already been used. (To use the Re-
mote Engine Start function again, the ve-
hicle needs to be driven at speeds of 4
mph (7 km/h)).
• The vehicle is not in P (Park).
• There is a detected registered key already inside of the vehicle.
The Remote Engine Start may display a
warning or indicator in the vehicle informa-
tion display. For additional information, see
“Vehicle information display 4.2 inch (11 cm)
Type A” (P. 2-18) or “Vehicle information dis-
play 7 inch (18 cm) Type B” (P. 2-32).
3-20Pre-driving checks and adjustments
Page 295 of 556

Shif t lock release
If the battery charge is low or discharged,
the shif t lever may not be moved from the
P (Park) position even with the brake pedal
depressed and the shif t lever button
pressed.
It will be necessary to jump start or have
your battery charged. For additional infor-
mation, see “Jump starting” (P. 6-9). It is rec-
ommended that you contact a NISSAN
dealer or a professional towing service.To move the shif t lever, complete the fol-
lowing procedure:
1. Push the ignition switch to the LOCK
position.
2. Apply the parking brake.
3. Using a protective cloth on the tip of a 3 mm screwdriver, remove the shif t lock
release cover.
• If available, a plastic trim tool can also be used.
4. Insert the small screwdriver in the shif t lock release slot and push down.
5. Move the shif t lever to the N (Neutral) position while holding down the shif t
lock release.
6. Push the ignition switch to the ON posi- tion to unlock the steering wheel. Now
the vehicle may be moved to the desired
location.
If the shif t lever cannot be moved out of P
(Park), have the transmission checked as
soon as possible. It is recommended that
you visit a NISSAN dealer for this service.
WARNING
If the shif t lever cannot be moved from
the P (Park) position while the engine is
running and the brake pedal is de-
pressed, the stop lights may not work.
Malfunctioning stop lights could cause
an accident injuring yourself and
others.
LSD3739
Starting and driving5-19
Page 401 of 556
CAUTION
During the first 1,200 miles (2,000 km),
follow these recommendations to ob-
tain maximum engine performance
and ensure the future reliability and
economy of your new vehicle. Failure to
follow these recommendations may
result in shortened engine life and re-
duced engine performance.
• Avoid driving for long periods at constant speed, either fast or slow, and do not run
the engine over 4,000 rpm.
• Do not accelerate at full throttle in any gear.
• Avoid quick starts.
• Avoid hard braking as much as possible. Follow these easy-to-use Fuel Efficient
Driving Tips to help you achieve the most
fuel economy from your vehicle.
1.
Use Smooth Accelerator and Brake
Pedal Application
• Avoid rapid starts and stops
• Use smooth, gentle accelerator and brake application whenever possible
• Maintain constant speed while com- muting and coast whenever possible
2. Maintain Constant Speed
• Look ahead to try and anticipate and minimize stops
• Synchronizing your speed with traffic lights allows you to reduce your num-
ber of stops
• Maintaining a steady speed can mini- mize red light stops and improve fuel
efficiency
3. Use Air Conditioning (A/C) at Higher
Vehicle Speeds
• Below 40 mph (64 km/h), it is more efficient to open windows to cool the
vehicle due to reduced engine load
• Above 40 mph (64 km/h), it is more efficient to use A/C to cool the vehicle
due to increased aerodynamic drag • Recirculating the cool air in the cabin
when the A/C is on reduces cooling
load
4. Drive at Economical Speeds and
Distances
• Observing the speed limit and not ex- ceeding 60 mph (97 km/h) (where le-
gally allowed) can improve fuel effi-
ciency due to reduced aerodynamic
drag
• Maintaining a safe following distance behind other vehicles reduces unnec-
essary braking
• Safely monitoring traffic to anticipate changes in speed permits reduced
braking and smooth acceleration
changes
• Select a gear range suitable to road conditions
5. Use Cruise Control
• Using cruise control during highway driving helps maintain a steady speed
• Cruise control is particularly effective in providing fuel savings when driving
on flat terrains
6. Plan for the Shortest Route
• Utilize a map or navigation system to determine the best route to save time
BREAK-IN SCHEDULE FUEL EFFICIENT DRIVING TIPS
Starting and driving5-125
Page 430 of 556
WARNING
Always follow the instructions below.
Failure to do so could result in damage
to the charging system and cause per-
sonal injury.
1. If the booster battery is in another ve- hicle, position the two vehicles to bring
their batteries near each other.
Do not allow the two vehicles to touch. 2. Apply the parking brake. Move the shif t
lever to N (Neutral) (manual transmis-
sion) or to P (Park) (Continuously Variable
Transmission (CVT)). Switch off all un-
necessary electrical systems (lights,
heater, air conditioner, etc.).
3. Place the ignition switch to the LOCK or OFF position.
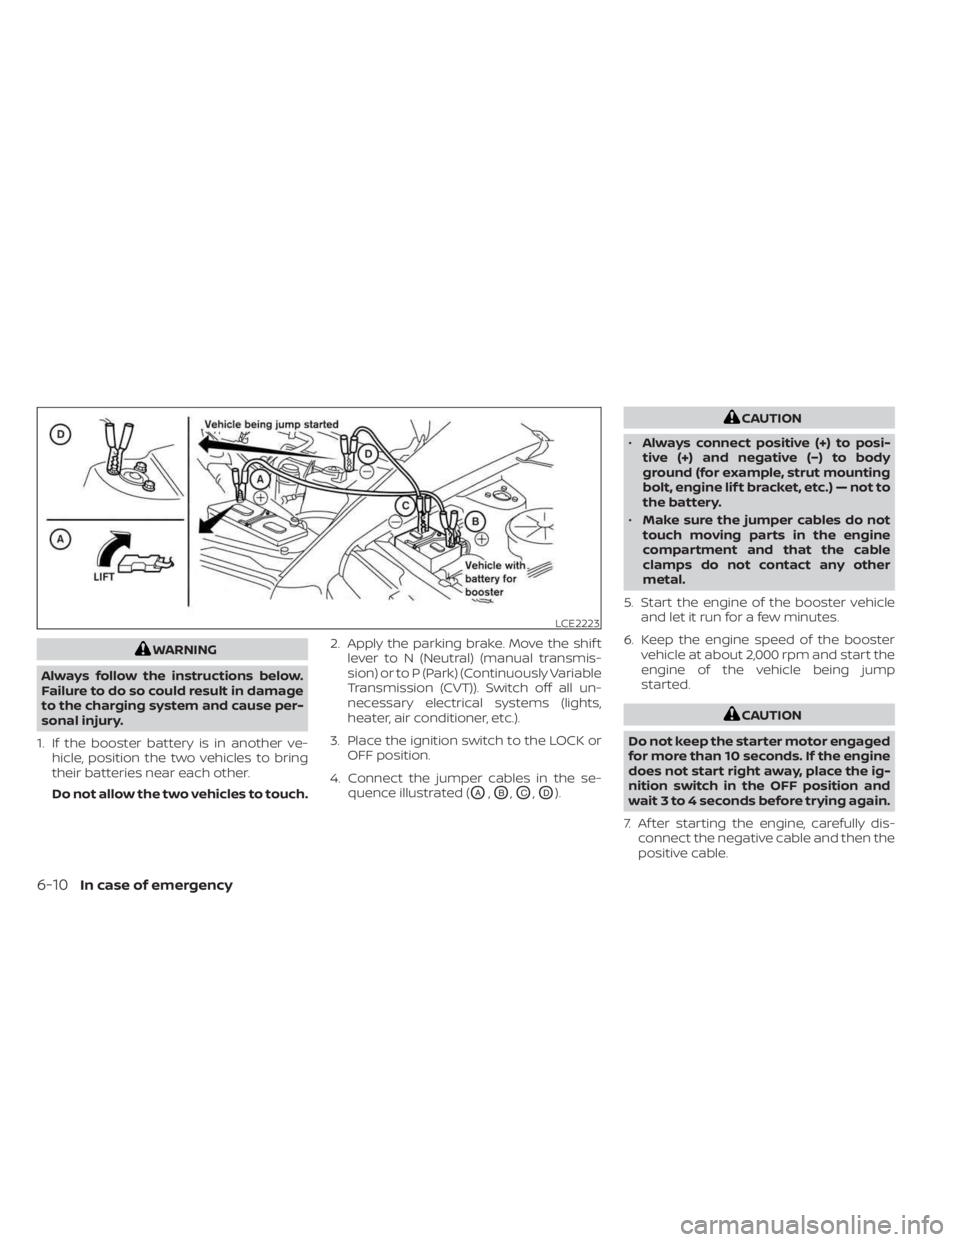
4. Connect the jumper cables in the se- quence illustrated (
OA,OB,OC,OD).
CAUTION
• Always connect positive (+) to posi-
tive (+) and negative (−) to body
ground (for example, strut mounting
bolt, engine lif t bracket, etc.) — not to
the battery.
• Make sure the jumper cables do not
touch moving parts in the engine
compartment and that the cable
clamps do not contact any other
metal.
5. Start the engine of the booster vehicle and let it run for a few minutes.
6. Keep the engine speed of the booster vehicle at about 2,000 rpm and start the
engine of the vehicle being jump
started.
CAUTION
Do not keep the starter motor engaged
for more than 10 seconds. If the engine
does not start right away, place the ig-
nition switch in the OFF position and
wait 3 to 4 seconds before trying again.
7. Af ter starting the engine, carefully dis- connect the negative cable and then the
positive cable.
LCE2223
6-10In case of emergency
Page 473 of 556
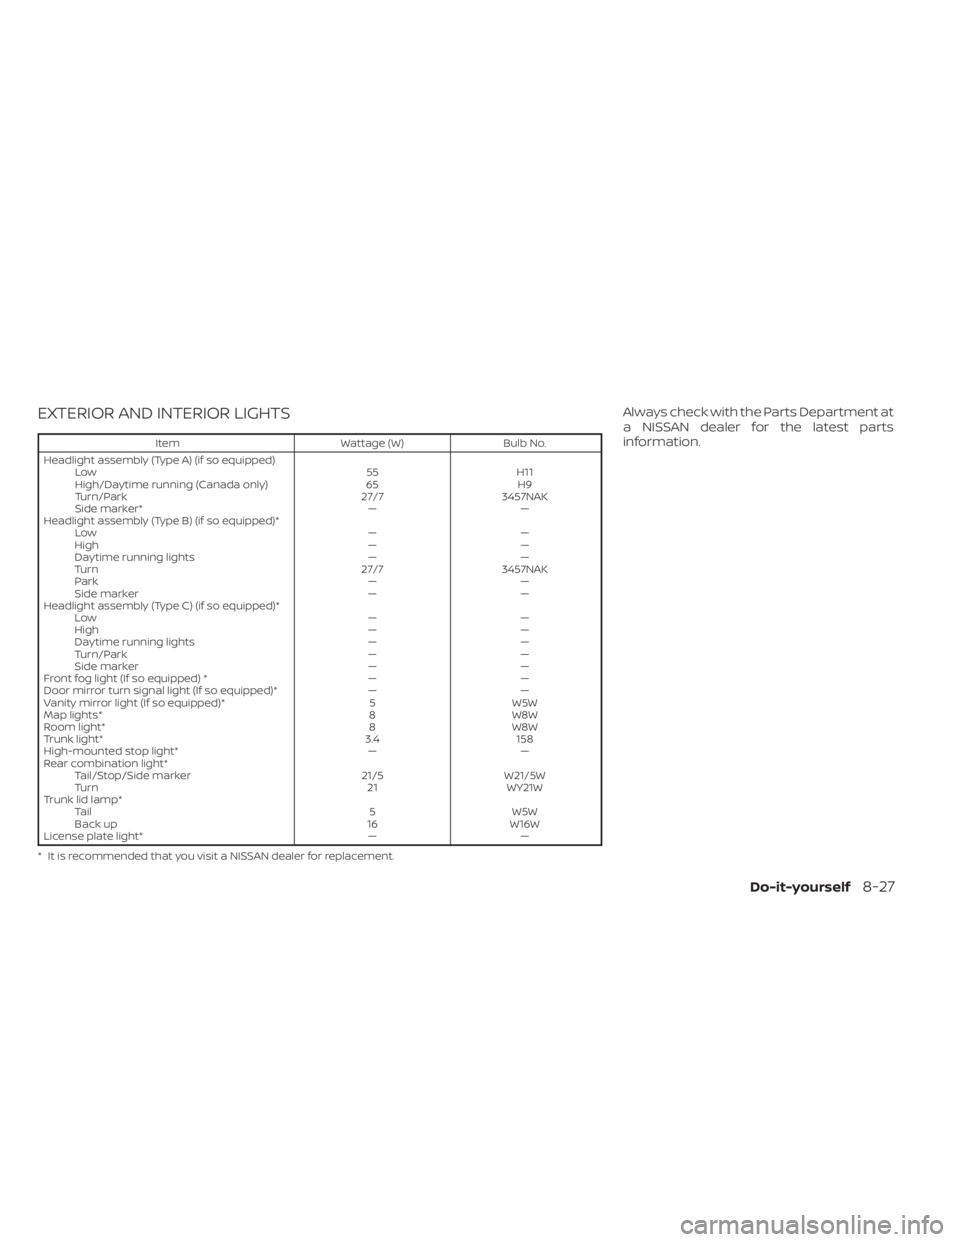
EXTERIOR AND INTERIOR LIGHTS
ItemWattage (W)Bulb No.
Headlight assembly (Type A) (if so equipped) Low 55H11
High/Daytime running (Canada only) 65H9
Turn/Park 27/73457NAK
Side marker* ——
Headlight assembly (Type B) (if so equipped)* Low ——
High ——
Daytime running lights ——
Turn 27/73457NAK
Park ——
Side marker ——
Headlight assembly (Type C) (if so equipped)* Low ——
High ——
Daytime running lights ——
Turn/Park ——
Side marker ——
Front fog light (If so equipped) * ——
Door mirror turn signal light (If so equipped)* ——
Vanity mirror light (If so equipped)* 5W5W
Map lights* 8W8W
Room light* 8W8W
Trunk light* 3.4158
High-mounted stop light* ——
Rear combination light* Tail/Stop/Side marker 21/5W21/5W
Turn 21WY21W
Trunk lid lamp* Tail 5W5W
Back up 16W16W
License plate light* ——
* It is recommended that you visit a NISSAN dealer for replacement.
Always check with the Parts Department at
a NISSAN dealer for the latest parts
information.
Do-it-yourself8-27
Page 474 of 556
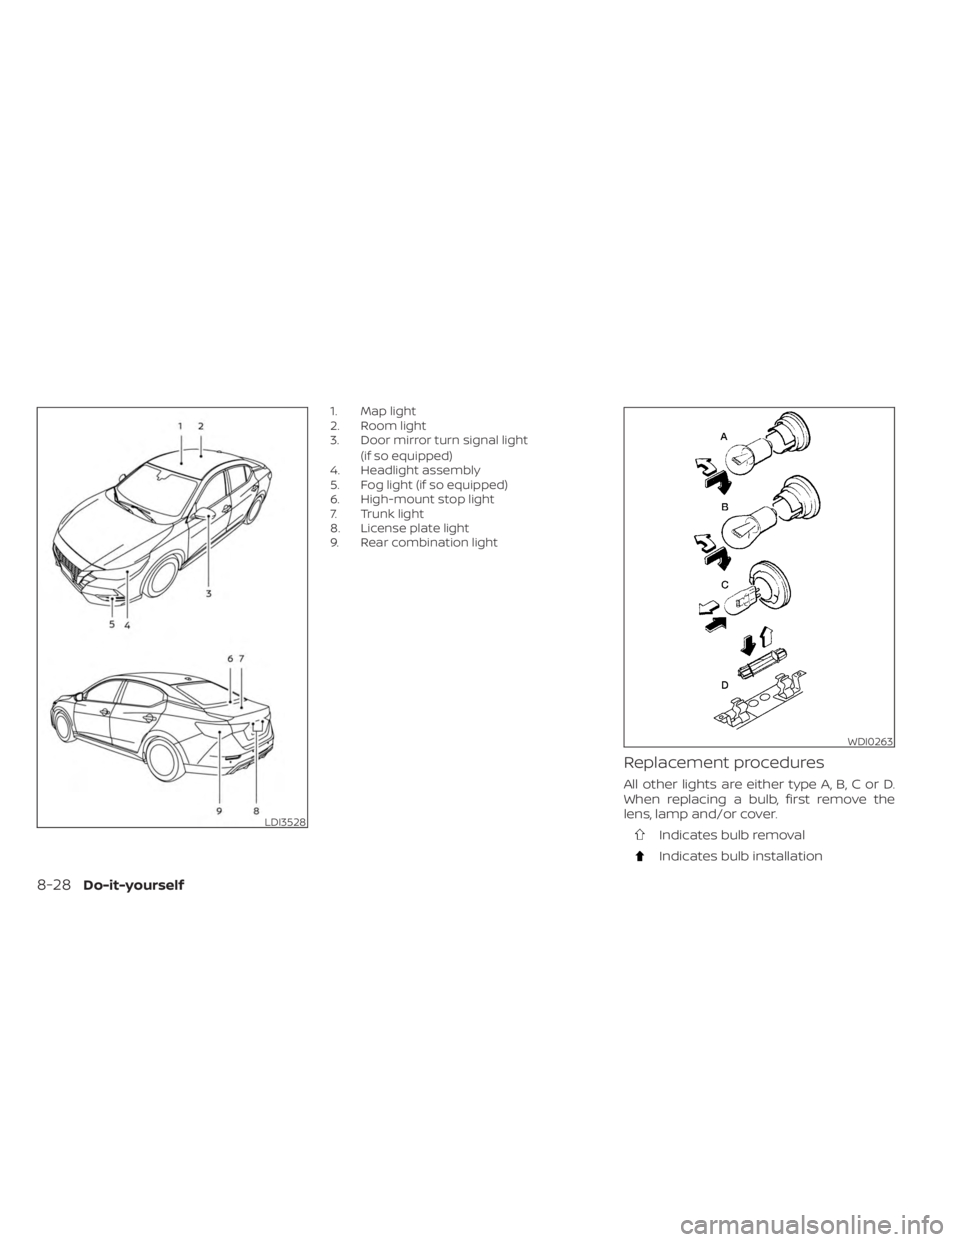
1. Map light
2. Room light
3. Door mirror turn signal light(if so equipped)
4. Headlight assembly
5. Fog light (if so equipped)
6. High-mount stop light
7. Trunk light
8. License plate light
9. Rear combination light
Replacement procedures
All other lights are either type A, B, C or D.
When replacing a bulb, first remove the
lens, lamp and/or cover.
Indicates bulb removal
Indicates bulb installation
LDI3528
WDI0263
8-28Do-it-yourself