Page 269 of 508

NOTE:
.A buzzer will sound if the vehicle is
driven without releasing the parking
brake. See “Audible reminders” (P.2-
18).
. While the electronic parking brake is
applied or released, an operating
sound is heard from the lower side
of the rear seat. This is normal and
does not indicate a malfunction.
. When the electronic parking brake is
frequently applied and released in a
short period of time, the parking
brake may not operate in order to
prevent the parking brake system
from overheating. If this occurs,
operate the electronic parking brake
switch again after waiting approxi-
mately 1 minute.
. If the electronic parking brake must
be applied while driving in an emer-
gency, pull up and hold the parking
brake switch. When you release the
parking brake switch, the parking
brake will be released.
. While pulling up the electronic park-
ing brake switch during driving, the
parking brake is applied and a chime
sounds. The electronic parking
brake indicator light in the meter
and in the parking brake switch
illuminate. This does not indicate a
malfunction. The electronic parking brake indicator light in the meter
and in the parking brake switch turn
off when the parking brake is re-
leased.
. When pulling the electronic parking
brake switch up with the ignition
switch in the OFF or ACC position,
the parking brake switch indicator
light will continue to illuminate for a
short period of time.The automatic brake hold function main-
tains the braking force without the driver
having to depress the brake pedal when
the vehicle is stopped at a traffic light or
intersection. As soon as the driver de-
presses the accelerator pedal again, the
automatic brake hold function is deacti-
vated and the braking force is released.
The operating status of the automatic
brake hold can be displayed on the
vehicle information display.
WARNING
.The automatic brake hold func-
tion is not designed to hold the
vehicle on a steep hill or slippery
road. Never use the automatic
brake hold when the vehicle is
stopped on a steep hill or slippery
road. Failure to do so may cause
the vehicle to move.
. When the automatic brake hold
function is activated but fails to
maintain the vehicle at a stand-
still, depress the brake pedal to
stop the vehicle. If the vehicle
unexpectedly moves due to out-
side conditions, the chime may
sound and automatic brake hold
warning may illuminate in the
vehicle information display.
Starting and driving5-29
AUTOMATIC BRAKE HOLD (if so equipped)
Page 270 of 508

5-30Starting and driving
.Be sure to deactivate the auto-
matic brake hold function when
using a car wash or towing your
vehicle.
. Make sure to place the shift lever
in the P (Park) position and apply
the parking brake when parking
your vehicle, riding on or off the
vehicle, or loading luggage. Fail-
ure to do so could cause the
vehicle to move or roll away
unexpectedly and result in ser-
ious personal injury or property
damage.
. If any of the following conditions
occur, the automatic brake hold
function may not function. Have
the system checked promptly. It
is recommended that you visit a
NISSAN dealer for this service.
Failure to operate the vehicle in
accordance with these conditions
could cause the vehicle to move
or roll away unexpectedly and
result in serious personal injury
or property damage.
— A warning message appears
in the vehicle information dis-
play.
— The indicator light on the automatic brake hold switch does not illuminate when the
switch is pushed.
. The automatic brake hold func-
tion will not be activated if the
Vehicle Dynamic Control (VDC)
OFF indicator light, electronic
parking brake warning light or
master warning light illuminate
and the Chassis Control System
Error message appears in the
vehicle information display.
. To maintain the braking force to
keep the vehicle to a standstill, a
noise may be heard. This is not a
malfunction.
JVP0497X
HOW TO ACTIVATE/DEACTIVATE
THE AUTOMATIC BRAKE HOLD
FUNCTION
How to activate the automatic
brake hold function
1. With the ignition switch in the ON
position, push the automatic brake
hold switch
. The indicator light on
the automatic brake hold switch
illuminates.
2. When the automatic brake hold func- tion goes into standby, the automatic
brake hold indicator light (white) illu-
minates.
To use the automatic brake hold function,
Page 272 of 508

5-32Starting and driving
applied and the brake force of the
automatic brake hold will be re-
leased:
—The braking force is applied by
the automatic brake hold function
for 3 minutes or longer.
— The driver’s seat belt is unfas-
tened.
— The ignition switch is placed in
the OFF position.
— If a malfunction occurs in the
automatic brake hold function.
. When the vehicle stops, but the
brake force is not automatically
applied, depress the brake pedal
firmly until the automatic brake hold
indicator light (green) illuminates.
Automatic brake hold function dis-
play
The automatic brake hold function status
can be checked in the “Chassis Control”
mode in the vehicle information display.
For additional information, see “Trip com-
puter” (P.2-40).
WAF0037X
The SPORT mode switch adjusts the
engine and transmission points to en-
hance performance. Push the SPORT
mode switch on the instrument panel to
activate the SPORT mode. The SPORT
mode indicator (drive mode indicator)
appears in the vehicle information dis-
play.
NOTE:
In the SPORT mode, fuel economy may
be reduced.
JVS0185X
The ECO mode system helps to enhance
the fuel economy by controlling the
engine and CVT operation (for CVT mod-
els) automatically to avoid rapid accelera-
tion.
To turn on the ECO mode system, push
the ECO switch. The ECO mode indicator
appears on the meter.
To turn off the ECO mode, push the ECO
switch again. The ECO mode indicator will
turn off.
.The ECO mode system cannot be
turned off while the accelerator pedal
is depressed even if the ECO switch is
pushed to OFF. Release the accelera-
tor pedal to turn off the ECO mode
SPORT MODE SWITCH (if so equipped)ECO MODE SYSTEM
Page 273 of 508

system.
. The ECO mode system will turn off
automatically if a malfunction occurs
in the system.
. Turn off the ECO mode system when
acceleration is required such as when:
— driving with a heavy load of pas-
sengers or cargo in the vehicle
— driving on a steep uphill slope
WAF0142X
ECO PEDAL GUIDE FUNCTION
Use the ECO Pedal Guide function for
improving fuel economy.
When the ECO Pedal Guide bar is in the
green range
, it indicates that the
vehicle is driven within range of economy
drive.
If the ECO Pedal Guide bar is out of the
green range, it indicates that the accel-
erator pedal is depressed over the range
of economy drive.
The ECO Pedal Guide bar is not displayed
when:
. The cruise control system (if so
equipped) is operating. .
The Intelligent Cruise Control (ICC)
system (if so equipped) is operating.
. The vehicle speed is less than approxi-
mately 2 MPH (4 km/h).
. The shift lever is in the P (Park) (CVT
model), N (Neutral) or R (Reverse)
position.
To activate or deactivate the ECO Pedal
Guide function, see “Settings” (P.2-21).
Starting and driving5-33
Page 274 of 508

5-34Starting and driving
WAF0143X
AMBIENT ECO
The ambient ECOis displayed accord-
ing to the accelerator pedal operation,
while driving the vehicle in ECO mode.
The ambient ECO will illuminate in the
directions of
as the driving pattern
becomes more ECO friendly.
To activate or deactivate the ambient
ECO, see “Settings” (P.2-21).
The ambient ECO is not displayed in the
following conditions
. The vehicle speed is under 6 MPH (10
km/h).
. The shift lever is in the P (Park) (CVT
model), N (Neutral) or R (Reverse) position.
. The cruise control system (if so
equipped) is operating.
. The Intelligent Cruise Control (ICC)
system (if so equipped) is operating.
JVS1083X
ECO DRIVE REPORT
When the ignition switch is in the OFF
position, ECO management display ap-
pears.
ECO evaluationPrevious 5 times (History)Current fuel economyBest fuel economy
The result of ECO evaluation is displayed
when the vehicle is driven for about 10
minutes or more.
: The more economically you drive, the
moreappear.
: The average fuel economy for the
previous 5 times will be displayed.
Page 275 of 508
: The average fuel economy since the
last reset will be displayed.
: The best fuel economy of the past
history will be displayed.WARNING
Failure to follow the warnings and
instructions for proper use of the
LDW system could result in serious
injury or death.
. This system is only a warning
device to inform the driver of a
potential unintended lane depar-
ture. It will not steer the vehicle or
prevent loss of control. It is the
driver’s responsibility to stay
alert, drive safely, keep the vehi-
cle in the traveling lane, and be in
control of the vehicle at all times.
WAC0198X
The LDW system warns the driver with an
indicator on the vehicle information dis-
play and chime that the vehicle is begin-
ning to leave the driving lane.
The LDW system monitors the lane mar-
kers on the traveling lane using the
camera unit
located above the inside
mirror.
Starting and driving5-35
LANE DEPARTURE WARNING (LDW)
Page 276 of 508
5-36Starting and driving
JVS1087X
LDW indicator (on the vehicle information
display)
Steering-wheel-mounted controls (left
side)
Vehicle information display
LDW SYSTEM OPERATION
The LDW system operates at speeds of
approximately 37 MPH (60 km/h) and
above and when the lane markings are
clear. When the vehicle approaches either
the left or the right side of the traveling
lane, a warning chime will sound and theLDW indicator on the vehicle information
display will blink to alert the driver.
The warning function will stop when the
vehicle returns inside of the lane markers.
Page 277 of 508

JVS1088X
Vehicle information displaySteering-wheel-mounted controls (left
side)
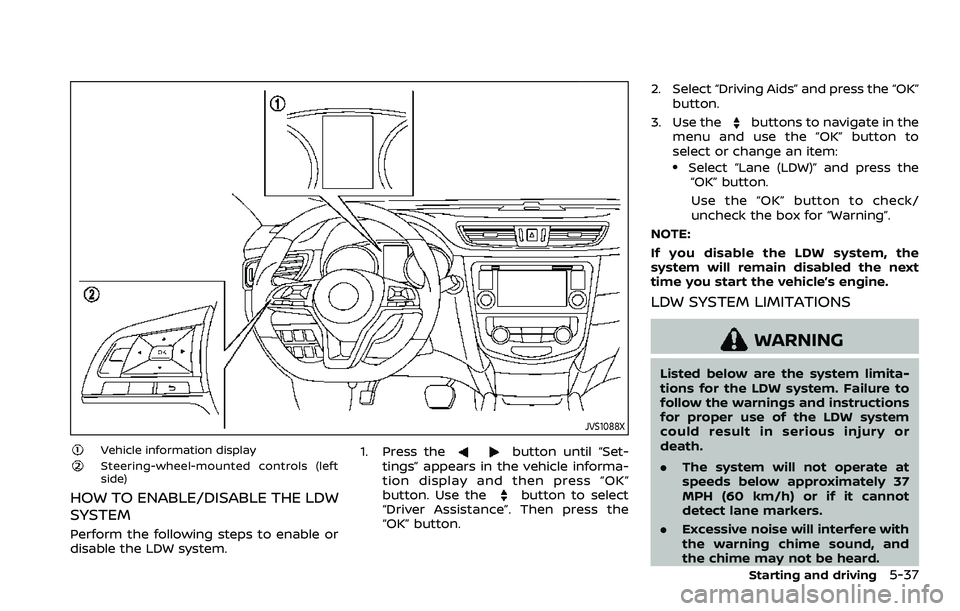
HOW TO ENABLE/DISABLE THE LDW
SYSTEM
Perform the following steps to enable or
disable the LDW system.1. Press the
button until “Set-
tings” appears in the vehicle informa-
tion display and then press “OK”
button. Use the
button to select
“Driver Assistance”. Then press the
“OK” button. 2. Select “Driving Aids” and press the “OK”
button.
3. Use the
buttons to navigate in the
menu and use the “OK” button to
select or change an item:
.Select “Lane (LDW)” and press the “OK” button.
Use the “OK” button to check/
uncheck the box for “Warning”.
NOTE:
If you disable the LDW system, the
system will remain disabled the next
time you start the vehicle’s engine.
LDW SYSTEM LIMITATIONS
WARNING
Listed below are the system limita-
tions for the LDW system. Failure to
follow the warnings and instructions
for proper use of the LDW system
could result in serious injury or
death.
. The system will not operate at
speeds below approximately 37
MPH (60 km/h) or if it cannot
detect lane markers.
. Excessive noise will interfere with
the warning chime sound, and
the chime may not be heard.
Starting and driving5-37