2023 NISSAN QASHQAI Drive shift
[x] Cancel search: Drive shiftPage 273 of 508
system.
. The ECO mode system will turn off
automatically if a malfunction occurs
in the system.
. Turn off the ECO mode system when
acceleration is required such as when:
— driving with a heavy load of pas-
sengers or cargo in the vehicle
— driving on a steep uphill slope
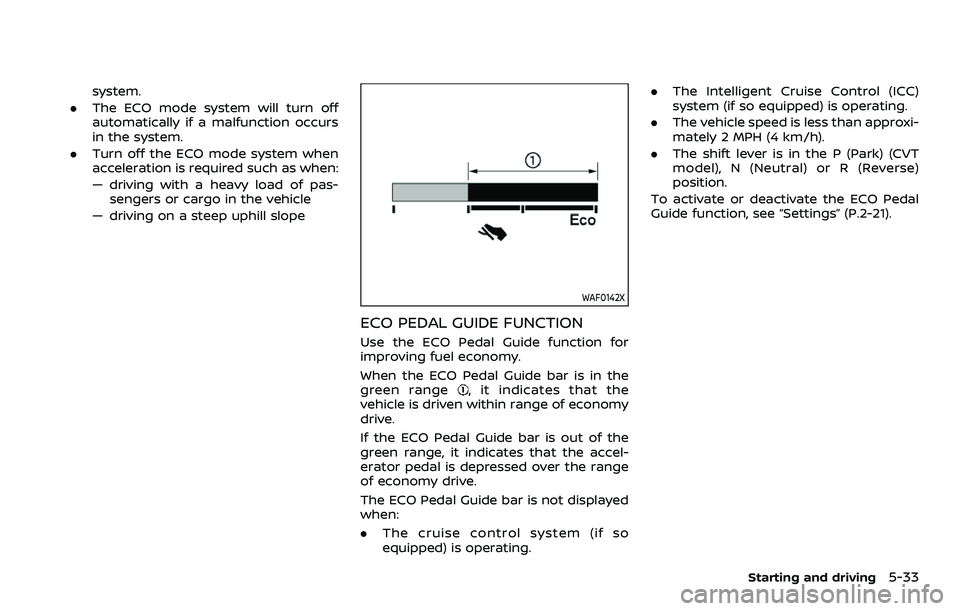
WAF0142X
ECO PEDAL GUIDE FUNCTION
Use the ECO Pedal Guide function for
improving fuel economy.
When the ECO Pedal Guide bar is in the
green range
, it indicates that the
vehicle is driven within range of economy
drive.
If the ECO Pedal Guide bar is out of the
green range, it indicates that the accel-
erator pedal is depressed over the range
of economy drive.
The ECO Pedal Guide bar is not displayed
when:
. The cruise control system (if so
equipped) is operating. .
The Intelligent Cruise Control (ICC)
system (if so equipped) is operating.
. The vehicle speed is less than approxi-
mately 2 MPH (4 km/h).
. The shift lever is in the P (Park) (CVT
model), N (Neutral) or R (Reverse)
position.
To activate or deactivate the ECO Pedal
Guide function, see “Settings” (P.2-21).
Starting and driving5-33
Page 274 of 508
5-34Starting and driving
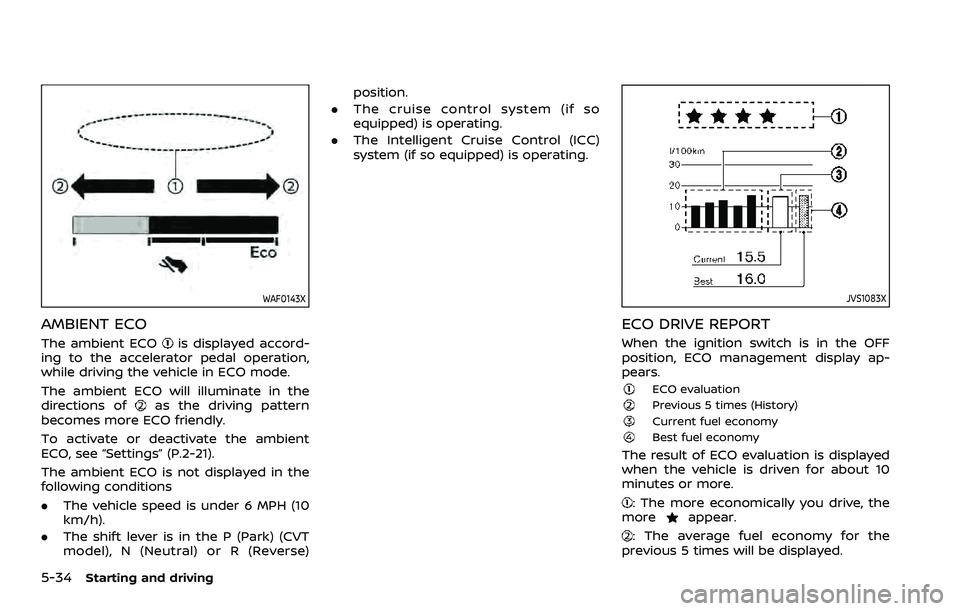
WAF0143X
AMBIENT ECO
The ambient ECOis displayed accord-
ing to the accelerator pedal operation,
while driving the vehicle in ECO mode.
The ambient ECO will illuminate in the
directions of
as the driving pattern
becomes more ECO friendly.
To activate or deactivate the ambient
ECO, see “Settings” (P.2-21).
The ambient ECO is not displayed in the
following conditions
. The vehicle speed is under 6 MPH (10
km/h).
. The shift lever is in the P (Park) (CVT
model), N (Neutral) or R (Reverse) position.
. The cruise control system (if so
equipped) is operating.
. The Intelligent Cruise Control (ICC)
system (if so equipped) is operating.
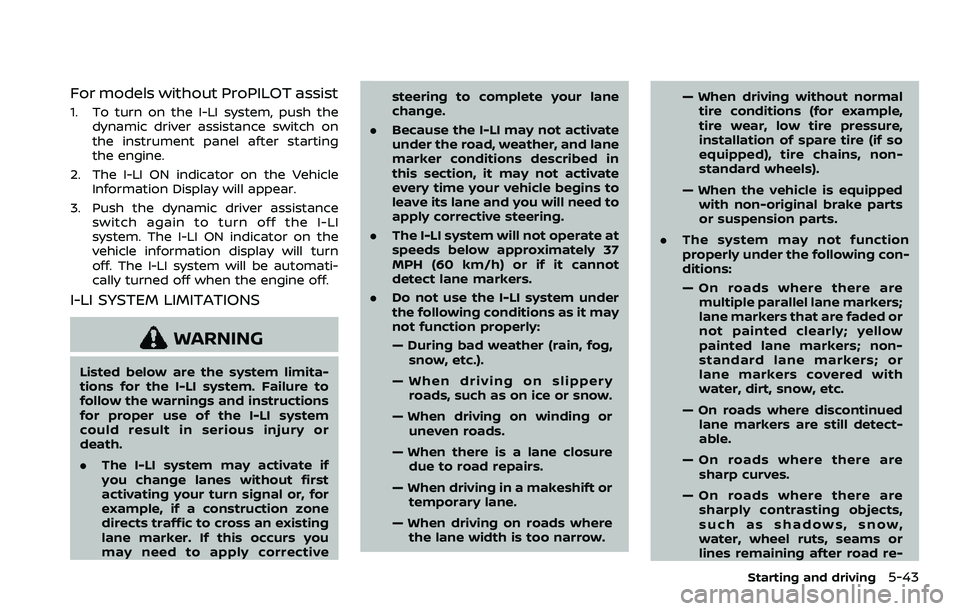
JVS1083X
ECO DRIVE REPORT
When the ignition switch is in the OFF
position, ECO management display ap-
pears.
ECO evaluationPrevious 5 times (History)Current fuel economyBest fuel economy
The result of ECO evaluation is displayed
when the vehicle is driven for about 10
minutes or more.
: The more economically you drive, the
moreappear.
: The average fuel economy for the
previous 5 times will be displayed.
Page 283 of 508
For models without ProPILOT assist
1. To turn on the I-LI system, push thedynamic driver assistance switch on
the instrument panel after starting
the engine.
2. The I-LI ON indicator on the Vehicle Information Display will appear.
3. Push the dynamic driver assistance switch again to turn off the I-LI
system. The I-LI ON indicator on the
vehicle information display will turn
off. The I-LI system will be automati-
cally turned off when the engine off.
I-LI SYSTEM LIMITATIONS
WARNING
Listed below are the system limita-
tions for the I-LI system. Failure to
follow the warnings and instructions
for proper use of the I-LI system
could result in serious injury or
death.
.The I-LI system may activate if
you change lanes without first
activating your turn signal or, for
example, if a construction zone
directs traffic to cross an existing
lane marker. If this occurs you
may need to apply corrective steering to complete your lane
change.
. Because the I-LI may not activate
under the road, weather, and lane
marker conditions described in
this section, it may not activate
every time your vehicle begins to
leave its lane and you will need to
apply corrective steering.
. The I-LI system will not operate at
speeds below approximately 37
MPH (60 km/h) or if it cannot
detect lane markers.
. Do not use the I-LI system under
the following conditions as it may
not function properly:
— During bad weather (rain, fog,
snow, etc.).
— When driving on slippery roads, such as on ice or snow.
— When driving on winding or uneven roads.
— When there is a lane closure due to road repairs.
— When driving in a makeshift or temporary lane.
— When driving on roads where the lane width is too narrow. — When driving without normal
tire conditions (for example,
tire wear, low tire pressure,
installation of spare tire (if so
equipped), tire chains, non-
standard wheels).
— When the vehicle is equipped with non-original brake parts
or suspension parts.
. The system may not function
properly under the following con-
ditions:
— On roads where there are
multiple parallel lane markers;
lane markers that are faded or
not painted clearly; yellow
painted lane markers; non-
standard lane markers; or
lane markers covered with
water, dirt, snow, etc.
— On roads where discontinued lane markers are still detect-
able.
— On roads where there are sharp curves.
— On roads where there are sharply contrasting objects,
such as shadows, snow,
water, wheel ruts, seams or
lines remaining after road re-
Starting and driving5-43
Page 295 of 508
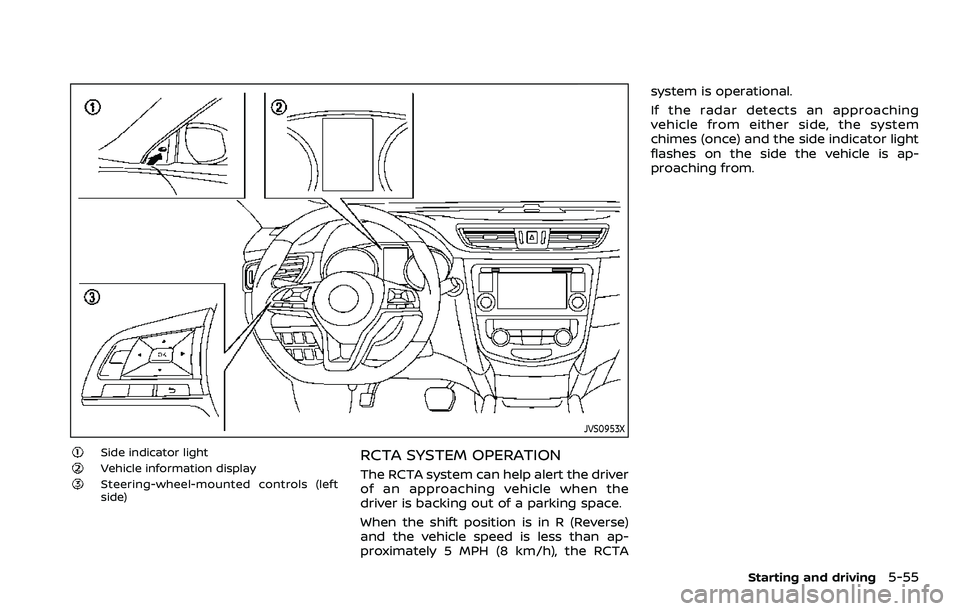
JVS0953X
Side indicator lightVehicle information displaySteering-wheel-mounted controls (left
side)
RCTA SYSTEM OPERATION
The RCTA system can help alert the driver
of an approaching vehicle when the
driver is backing out of a parking space.
When the shift position is in R (Reverse)
and the vehicle speed is less than ap-
proximately 5 MPH (8 km/h), the RCTAsystem is operational.
If the radar detects an approaching
vehicle from either side, the system
chimes (once) and the side indicator light
flashes on the side the vehicle is ap-
proaching from.
Starting and driving5-55
Page 303 of 508

PRECAUTIONS ON CRUISE CON-
TROL
.If the cruise control system malfunc-
tions, it will cancel automatically. The
CRUISE indicator in the vehicle infor-
mation display will then blink to warn
the driver.
. If the CRUISE indicator blinks, turn the
Cruise ON/OFF switch off and have
the system checked. It is recom-
mended that you visit a NISSAN dealer
for this service.
. The CRUISE indicator may blink when
the Cruise ON/OFF switch is turned
ON while pushing the RES/+, SET/-, or
CANCEL switch. To properly set the
cruise control system, perform the
following procedures.
CRUISE CONTROL OPERATIONS
The cruise control allows driving at
speeds above 25 MPH (40 km/h) without
keeping your foot on the accelerator
pedal.
The cruise control will automatically be
canceled if the vehicle slows down more
than approximately 8 MPH (13 km/h)
below the set speed.
Moving the shift lever to the N (Neutral)
position will cancel the cruise control.
Turning on cruise control
Push the Cruise ON/OFF switch. The
CRUISE indicator in the vehicle informa-
tion display will appear.
Setting cruising speed
1. Accelerate to the desired speed.
2. Push the SET/- switch and release it.
3. Take your foot off the accelerator
pedal.
The vehicle will maintain the set speed.
Passing another vehicle:
Depress the accelerator pedal to accel-
erate. After releasing the accelerator
pedal, the vehicle will return to the pre-
viously set speed.
The vehicle may not maintain the set
speed when going up or down steep hills.
In such cases, drive without the cruise
control.
Resetting to slower speed:
Use any one of the following methods to
reset to a slower speed.
. Lightly tap the foot brake pedal. When
the vehicle reaches the desired speed,
push and release the SET/- switch.
. Push and hold the SET/- switch. When
the vehicle reaches the desired speed,
release the SET- switch. .
Quickly push and release the SET/-
switch. This will reduce the vehicle
speed by about 1 MPH (1.6 km/h).
Resetting to faster speed:
Use any one of the following methods to
reset to a faster speed.
. Depress the accelerator pedal. When
the vehicle reaches the desired speed,
push and release the SET/- switch.
. Push and hold the RES/+switch. When
the vehicle reaches the desired speed,
release the RES/+ switch.
. Quickly push and release the RES/+
switch. This will increase the vehicle
speed by about 1 MPH (1.6 km/h).
Resuming at preset speed:
Push and release the RES/+ switch.
The vehicle will resume the last set
cruising speed when the vehicle speed is
over 25 MPH (40 km/h).
Cancelling cruising speed
Use any one of the following methods to
cancel the set speed.
. Push the CANCEL switch.
. Tap the foot brake pedal.
. Push the Cruise ON/OFF switch. The
CRUISE indicator will turn off.
Starting and driving5-63
Page 311 of 508
WAF0052X
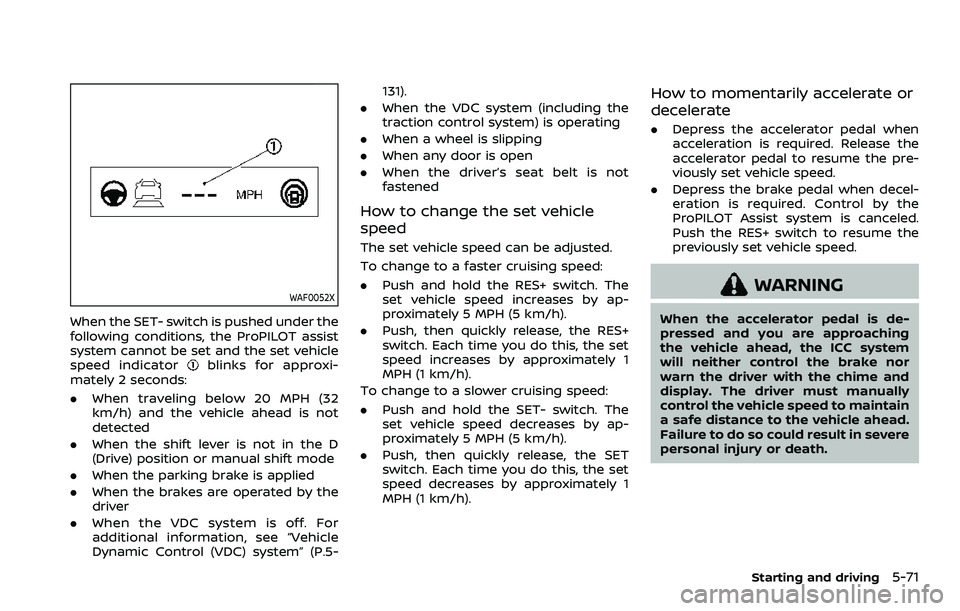
When the SET- switch is pushed under the
following conditions, the ProPILOT assist
system cannot be set and the set vehicle
speed indicator
blinks for approxi-
mately 2 seconds:
. When traveling below 20 MPH (32
km/h) and the vehicle ahead is not
detected
. When the shift lever is not in the D
(Drive) position or manual shift mode
. When the parking brake is applied
. When the brakes are operated by the
driver
. When the VDC system is off. For
additional information, see “Vehicle
Dynamic Control (VDC) system” (P.5- 131).
. When the VDC system (including the
traction control system) is operating
. When a wheel is slipping
. When any door is open
. When the driver’s seat belt is not
fastened
How to change the set vehicle
speed
The set vehicle speed can be adjusted.
To change to a faster cruising speed:
.Push and hold the RES+ switch. The
set vehicle speed increases by ap-
proximately 5 MPH (5 km/h).
. Push, then quickly release, the RES+
switch. Each time you do this, the set
speed increases by approximately 1
MPH (1 km/h).
To change to a slower cruising speed:
. Push and hold the SET- switch. The
set vehicle speed decreases by ap-
proximately 5 MPH (5 km/h).
. Push, then quickly release, the SET
switch. Each time you do this, the set
speed decreases by approximately 1
MPH (1 km/h).
How to momentarily accelerate or
decelerate
. Depress the accelerator pedal when
acceleration is required. Release the
accelerator pedal to resume the pre-
viously set vehicle speed.
. Depress the brake pedal when decel-
eration is required. Control by the
ProPILOT Assist system is canceled.
Push the RES+ switch to resume the
previously set vehicle speed.
WARNING
When the accelerator pedal is de-
pressed and you are approaching
the vehicle ahead, the ICC system
will neither control the brake nor
warn the driver with the chime and
display. The driver must manually
control the vehicle speed to maintain
a safe distance to the vehicle ahead.
Failure to do so could result in severe
personal injury or death.
Starting and driving5-71
Page 315 of 508
HOW TO CANCEL THE PROPILOT
ASSIST SYSTEM
To cancel the ProPILOT assist system, use
one of the following methods:
.Push the CANCEL switch.
. Tap the brake pedal (except at a
standstill).
. Push the ProPILOT assist switch to
turn the system off. The ProPILOT
assist status indicator will turn off.
When the ProPILOT assist system is
canceled while the vehicle is stopped,
the electronic parking brake is automati-
cally activated.
WARNING
To prevent the vehicle from moving
or rolling unexpectedly, which could
result in serious personal injury or
property damage, before exiting the
vehicle make sure to push the Pro-
PILOT assist switch to turn the sys-
tem off, place the shift lever in the P
(Park) position, and turn the engine
off.
INTELLIGENT CRUISE CONTROL
(ICC)
WARNING
Failure to follow the warnings and
instructions for proper use of the ICC
system could result in serious injury
or death.
. The ICC system is only an aid to
assist the driver and is not a
collision warning or avoidance
device. It is recommended for
highway use only and it is not
intended for city driving. It is the
driver’s responsibility to stay
alert, drive safely, and be in con-
trol of the vehicle at all times.
. There are limitations to the ICC
system capability. The ICC system
does not function in all driving,
traffic, weather, and road condi-
tions. It is the driver’s responsi-
bility to stay alert, drive safely,
keep the vehicle in the traveling
lane, and be in control of the
vehicle at all times.
. Always observe posted speed
limits and do not set the speed
over them. .
The ICC system does not react to
stationary and slow moving vehi-
cles.
. Always drive carefully and atten-
tively when using the ICC system.
Read and understand the Owner’s
Manual thoroughly before using
the ICC system. To avoid serious
injury or death, do not rely on the
system to prevent accidents or to
control the vehicle’s speed in
emergency situations. Do not
use the ICC system except in
appropriate road and traffic con-
ditions.
ICC system operation
The ICC system is designed to maintain a
selected distance from the vehicle in front
of you and can reduce the speed to
match a slower vehicle ahead. The sys-
tem decelerates the vehicle as necessary
and if the vehicle ahead comes to a stop,
the vehicle decelerates to a standstill.
However, the ICC system can only apply
up to 40% of the vehicle’s total braking
power. This system should only be used
when traffic conditions allow vehicle
speeds to remain fairly constant or when
vehicle speeds change gradually. If a
vehicle moves into the traveling lane
Starting and driving5-75
Page 323 of 508

.Any door is open.
. The driver’s seat belt is not fastened.
. The vehicle ahead is not detected and
your vehicle is traveling below the
speed of 15 MPH (24 km/h).
. Your vehicle has been stopped by the
ICC system for approximately 3 min-
utes or longer.
. The shift lever is not in the D (Drive)
position or manual shift mode.
. The electronic parking brake is ap-
plied.
. The VDC system is turned off.
. The AEB applies harder braking
. VDC (including the traction control
system) operates.
. A wheel slips.
. When distance measurement be-
comes impaired due to adhesion of
dirt or obstruction to the sensor.
. When the radar signal is temporarily
interrupted.
Action to take:
When the conditions listed above are no
longer present, turn the system off using
the ProPILOT Assist switch. Turn the
ProPILOT Assist system back on to use
the system. NOTE:
When the ICC system is canceled under
the following conditions at a standstill,
the electronic parking brake is automa-
tically activated:
.
Any door is open.
. The driver’s seat belt is not fastened.
. Your vehicle has been stopped by
the ICC system for approximately 3
minutes or longer.
. The shift lever is not in the D (Drive)
position or manual shift mode.
. The VDC system is turned off.
. When distance measurement be-
comes impaired due to adhesion of
dirt or obstruction to the sensor.
. When the radar signal is temporarily
interrupted.
Condition B:
When the radar sensor of the front
bumper is covered with dirt or is ob-
structed, the ICC system will automati-
cally be canceled.
The chime will sound and the “Forward
Driving Aids Temporarily Disabled Front
Sensor Blocked” or “Unavailable: Front
Radar Obstruction” warning message will
appear in the vehicle information display. Action to take:
If the warning message appears, stop the
vehicle in a safe place, place the shift lever
in the P (Park) position, and turn the
engine off. When the radar signal is
temporarily interrupted, clean the sensor
area of the front bumper and restart the
engine. If the “Forward Driving Aids Tem-
porarily Disabled Front Sensor Blocked” or
“Unavailable: Front Radar Obstruction”
warning message continues to be dis-
played, have the system checked. It is
recommended that you visit a NISSAN
dealer for this service.
Condition C:
When driving on roads with limited road
structures or buildings (for example, long
bridges, deserts, snow fields, driving next
to long walls), the system may illuminate
the system warning light and display the
“Forward Driving Aids Temporarily Dis-
abled Front Sensor Blocked” or “Unavail-
able: Front Radar Obstruction” warning
message.
Action to take:
When the above driving conditions no
longer exist, turn the system back on.
Starting and driving5-83