2023 NISSAN QASHQAI warning lights
[x] Cancel search: warning lightsPage 99 of 508

commended you visit a NISSAN dealer
for this service. You do not need to
have your vehicle towed to the dealer.
CAUTION
Continued vehicle operation without
having the emission control system
and/or CVT system checked and
repaired as necessary could lead to
poor driveability, reduced fuel econ-
omy, and possible damage to the
emission control system.
Rear Automatic Braking (RAB)
system warning light
This light comes on when the ignition
switch is placed in the ON position. It
turns off after the engine is started.
This light illuminates when the RAB sys-
tem is turned off in the vehicle informa-
tion display.
If the light illuminates when the RAB
system is on, it may indicate that the
system is unavailable. For additional in-
formation, see “Rear Automatic Braking
(RAB)” (P.5-116).
Vehicle Dynamic Control (VDC)
off indicator light
When the ignition switch is in the ON
position, the Vehicle Dynamic Control
(VDC) off indicator light illuminates and
then turns off.
The light comes on when the Vehicle
Dynamic Control (VDC) off switch is
pushed to OFF. This indicates that the
VDC system and traction control system
are not operating.
Vehicle Dynamic Control (VDC)
warning light
When the ignition switch is in the ON
position, the Vehicle Dynamic Control
(VDC) warning light illuminates and then
turns off.
The light will blink when the Vehicle
Dynamic Control (VDC) system or the
traction control system is operating, thus
alerting the driver that the vehicle is
nearing its traction limits. The road sur-
face may be slippery.
If the VDC warning light illuminates while
the VDC system is on, this light alerts the
driver to the fact that the VDC system’s
fail-safe mode is operating, for example
the VDC system may not be functioning
properly. Have the system checked. It is recommended you visit a NISSAN dealer
for this service. If a malfunction occurs in
the system, the VDC system function will
be canceled but the vehicle is still drive-
able. For additional information, see “Ve-
hicle Dynamic Control (VDC) system” (P.5-
131) of this manual.
WARNING/INDICATOR LIGHTS
(other)
See “Vehicle information display” (P.2-19).
Automatic brake hold indica-
tor light (green) (if so equipped)
The automatic brake hold indicator light
(green) illuminates while the automatic
brake hold system is operating. (See
“Automatic brake hold” (P.5-29).)
Automatic brake hold indica-
tor light (white) (if so equipped)
The automatic brake hold indicator light
(white) illuminates when the automatic
brake hold system is on standby. (See
“Automatic brake hold” (P.5-29).)
Instruments and controls2-17
Page 100 of 508

2-18Instruments and controls
Exterior light indicator
This indicator illuminates when the head-
light switch is turned to the AUTO,orposition and the front parking lights,
rear combination lights, license plate
lights or headlights are on. The indicator
turns off when these lights are turned off.
Front fog light indicator light
(if so equipped)
The front fog light indicator light illumi-
nates when the front fog lights are on.
(See “Fog light switch” (P.2-59).)
High beam assist indicator
light
This indicator light illuminates when the
headlights come on while the headlight
switch is in the AUTO position or
position (Type B) with the high beam
selected. This indicates that the high
beam assist system is operational. (See
“High beam assist” (P.2-55).)
High beam indicator light
This light illuminates when the headlight
high beam is on and goes out when the
low beam is selected.
Turn signal/hazard indicator
lights
The light flashes when the turn signal
switch lever or hazard switch is turned on.
AUDIBLE REMINDERS
Door lock warning chime
Models with Intelligent Key system:
When the chime sounds, be sure to check
both the vehicle and the Intelligent Key.
(See “Troubleshooting guide” (P.3-17).)
Models without Intelligent Key system:
A chime sounds if the driver’s side door is
opened while the key is left in the ignition
switch and the ignition switch is in the
OFF or LOCK position. Be sure to remove
the key and carry it with you when you
leave the vehicle.
Light reminder chime
The light reminder chime will sound when
the driver side door is opened with the
headlight switch in the
orposi-
tion, and the ignition switch is in the ACC,
OFF or LOCK position.
Turn the light switch to the OFF (if so
equipped) or the AUTO position when you
leave the vehicle.
Driving aid chimes (if so equipped)
An audible alert/chime may be heard if
any of the following systems are active:
. Automatic Emergency Braking (AEB)
with Pedestrian Detection
. Intelligent Forward Collision Warning
(I-FCW)
. Blind Spot Warning (BSW)
. Rear Cross Traffic Alert (RCTA)
. Intelligent Lane Intervention (I-LI)
. Lane Departure Warning (LDW)
. ProPILOT Assist
. Rear Automatic Braking (RAB)
. Rear Sonar System (RSS)
For additional information, refer to the
“Starting and driving” section of this
manual.
Page 115 of 508

CAUTION
Running the engine with the engine
oil pressure warning displayed could
cause serious damage to the engine.
17. AWD Error: See Owner’s Manual
warning (if so equipped)
This warning appears when the All-Wheel
Drive (AWD) system is not functioning
properly while the engine is running.
Reduce vehicle speed and have the sys-
tem checked. It is recommended that you
visit a NISSAN dealer for this service. See
“Intelligent 4x4” (P.5-123).
18. AWD High Temp. Stop vehicle
warning (if so equipped)
This warning may appear while trying to
free a stuck vehicle due to increased oil
temperature. The driving mode may
change to Two-Wheel Drive (2WD). If this
warning is displayed, stop the vehicle with
the engine idling, as soon as it is safe to
do so. Then if the warning turns off, you
can continue driving. See “Intelligent 4x4”
(P.5-123).
19. Tire Size Incorrect: See Owner’s
Manual warning (if so equipped)
This warning may appear if there is a
large difference between the diameters of
the front and rear wheels and tires. Pull
off the road in a safe area, with the engine
idling. Check that all the tire sizes are the
same, that the tire pressure is correct and
that the tires are not excessively worn.
See “Intelligent 4x4” (P.5-123).
20. Battery Voltage Low Charge
Battery warning
This warning appears when the battery
voltage is low and the battery needs to be
charged.
21. Shipping Mode On Push Storage
Fuse warning (if so equipped)
This warning may appear if the extended
storage fuse switch is not pushed in
(switched on). When this warning ap-
pears, push in (switch on) the extended
storage fuse switch to turn off the warn-
ing. For more information, see “Extended
storage fuse switch” (P.8-21).
22. Power will turn off to save the
battery warning
This warning appears after the ignition
switch is in the ON position for a certain
period of time.
23. Power turned off to save the
battery warning
This warning appears after the ignition
switch is automatically turned OFF to
save the battery.
24. Reminder: Turn OFF Headlights
warning
This warning appears when the driver
side door is opened with the headlight
switch is left ON and the ignition switch is
placed in the OFF or LOCK position. Place
the headlight switch in OFF (if so
equipped) or AUTO position. For addi-
tional information, see “Headlight and
turn signal switch” (P.2-52).
25. Headlight System Error: See
Owner’s Manual warning (if so
equipped)
This warning appears if the LED head-
lights are malfunctioning. Have the sys-
tem checked. It is recommended that you
visit a NISSAN dealer for this service.
Instruments and controls2-33
Page 137 of 508

JVI1617X
Example
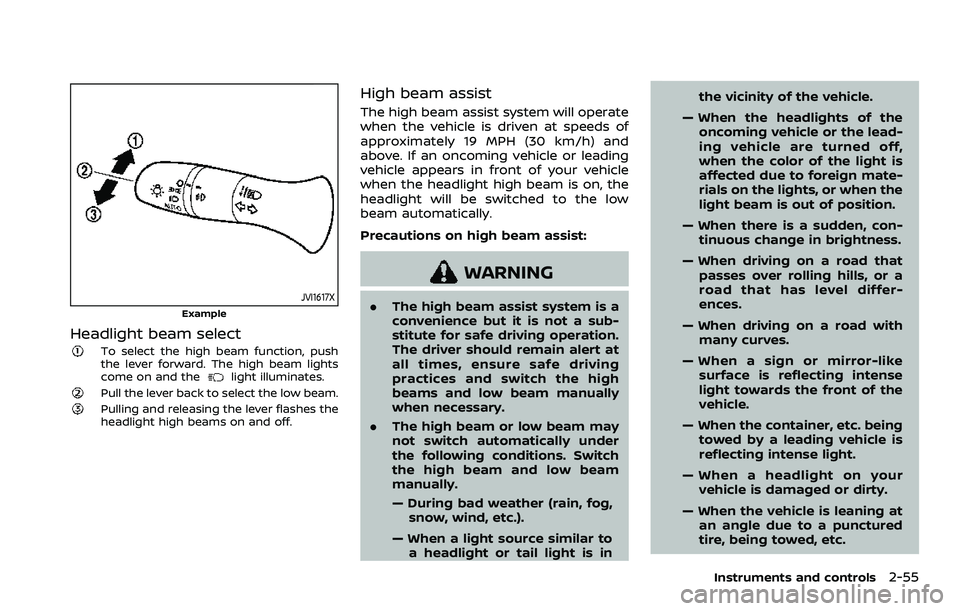
Headlight beam select
To select the high beam function, push
the lever forward. The high beam lights
come on and the
light illuminates.
Pull the lever back to select the low beam.Pulling and releasing the lever flashes the
headlight high beams on and off.
High beam assist
The high beam assist system will operate
when the vehicle is driven at speeds of
approximately 19 MPH (30 km/h) and
above. If an oncoming vehicle or leading
vehicle appears in front of your vehicle
when the headlight high beam is on, the
headlight will be switched to the low
beam automatically.
Precautions on high beam assist:
WARNING
.The high beam assist system is a
convenience but it is not a sub-
stitute for safe driving operation.
The driver should remain alert at
all times, ensure safe driving
practices and switch the high
beams and low beam manually
when necessary.
. The high beam or low beam may
not switch automatically under
the following conditions. Switch
the high beam and low beam
manually.
— During bad weather (rain, fog,
snow, wind, etc.).
— When a light source similar to a headlight or tail light is in the vicinity of the vehicle.
— When the headlights of the oncoming vehicle or the lead-
ing vehicle are turned off,
when the color of the light is
affected due to foreign mate-
rials on the lights, or when the
light beam is out of position.
— When there is a sudden, con- tinuous change in brightness.
— When driving on a road that passes over rolling hills, or a
road that has level differ-
ences.
— When driving on a road with many curves.
— When a sign or mirror-like surface is reflecting intense
light towards the front of the
vehicle.
— When the container, etc. being towed by a leading vehicle is
reflecting intense light.
— When a headlight on your vehicle is damaged or dirty.
— When the vehicle is leaning at an angle due to a punctured
tire, being towed, etc.
Instruments and controls2-55
Page 140 of 508

2-58Instruments and controls
WARNING
When the LED DRL system is active,
tail lights on your vehicle are not on.
It is necessary at dusk to turn on
your headlights. Failure to do so
could cause an accident injuring
yourself and others.
Type B:
The LED portion of the headlights auto-
matically illuminate at 100% intensity
when the engine is started and the
parking brake released. The DRL operate
with the headlight switch in the AUTO
position or
position, the headlight
must be off. When you turn the headlight
switch to the
position for full illumi-
nation, the LED lights switch from LED
DRL to the park function.
If the parking brake is applied before the
engine is started, the LED DRL do not
illuminate. The LED DRL illuminate when
the parking brake is released. The LED
DRL will remain on until the ignition
switch is placed in the OFF position or
the headlight turns on.
JVI1591X
Example
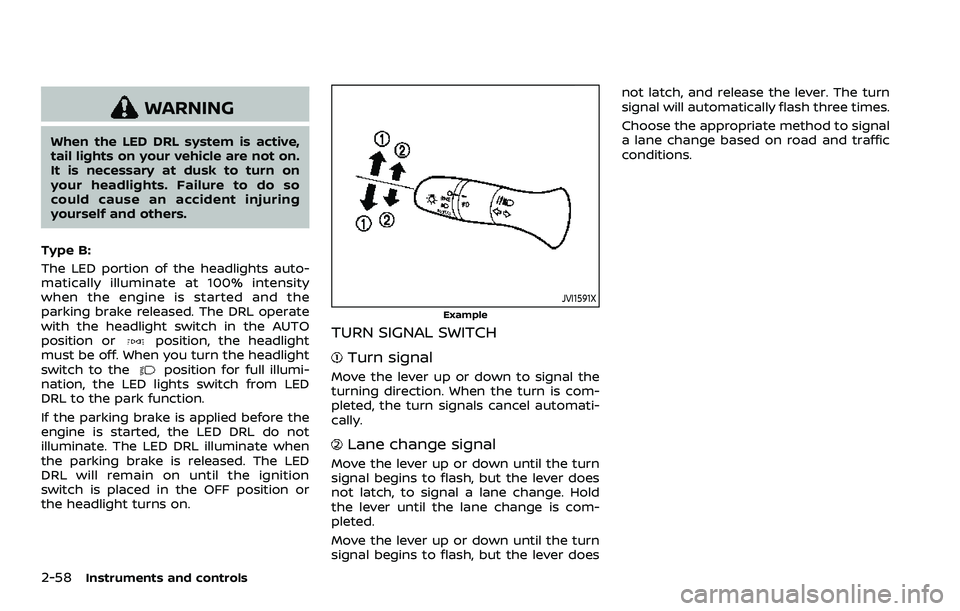
TURN SIGNAL SWITCH
Turn signal
Move the lever up or down to signal the
turning direction. When the turn is com-
pleted, the turn signals cancel automati-
cally.
Lane change signal
Move the lever up or down until the turn
signal begins to flash, but the lever does
not latch, to signal a lane change. Hold
the lever until the lane change is com-
pleted.
Move the lever up or down until the turn
signal begins to flash, but the lever does not latch, and release the lever. The turn
signal will automatically flash three times.
Choose the appropriate method to signal
a lane change based on road and traffic
conditions.
Page 141 of 508

JVI0980X
Example
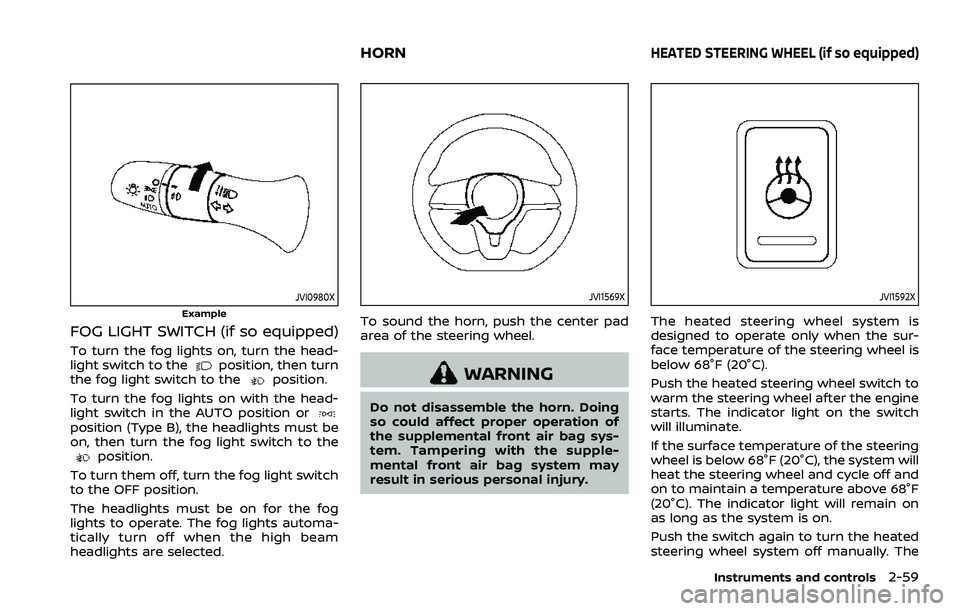
FOG LIGHT SWITCH (if so equipped)
To turn the fog lights on, turn the head-
light switch to theposition, then turn
the fog light switch to theposition.
To turn the fog lights on with the head-
light switch in the AUTO position or
position (Type B), the headlights must be
on, then turn the fog light switch to the
position.
To turn them off, turn the fog light switch
to the OFF position.
The headlights must be on for the fog
lights to operate. The fog lights automa-
tically turn off when the high beam
headlights are selected.
JVI1569X
To sound the horn, push the center pad
area of the steering wheel.
WARNING
Do not disassemble the horn. Doing
so could affect proper operation of
the supplemental front air bag sys-
tem. Tampering with the supple-
mental front air bag system may
result in serious personal injury.
JVI1592X
The heated steering wheel system is
designed to operate only when the sur-
face temperature of the steering wheel is
below 68°F (20°C).
Push the heated steering wheel switch to
warm the steering wheel after the engine
starts. The indicator light on the switch
will illuminate.
If the surface temperature of the steering
wheel is below 68°F (20°C), the system will
heat the steering wheel and cycle off and
on to maintain a temperature above 68°F
(20°C). The indicator light will remain on
as long as the system is on.
Push the switch again to turn the heated
steering wheel system off manually. The
Instruments and controls2-59
HORNHEATED STEERING WHEEL (if so equipped)
Page 165 of 508

CARGO LIGHT
The cargo lights illuminate when the
liftgate is opened. When the liftgate is
closed, the lights will turn off.
The light will also turn off after a period
of time when the light remains illumi-
nated after the ignition switch has been
pushed to the OFF position to prevent
the battery from becoming discharged.
The HomeLink® Universal Transceiver
provides a convenient way to consolidate
the functions of up to three individual
hand-held transmitters into one built-in
device.
HomeLink® Universal Transceiver:
.Will operate most Radio Frequency
(RF) devices such as garage doors,
gates, home and office lighting, entry
door locks and security systems.
. Is powered by your vehicle’s battery.
No separate batteries are required. If
the vehicle’s battery is discharged or is
disconnected, HomeLink® will retain
all programming.
When the HomeLink® Universal Trans-
ceiver is programmed, retain the origi-
nal transmitter for future programming
procedures (Example: new vehicle pur-
chases). Upon sale of the vehicle, the
programmed HomeLink® Universal
Transceiver buttons should be erased
for security purposes. For additional
information, refer to “Programming
HomeLink®” (P.2-84).
WARNING
. Do not use the HomeLink® Uni-
versal Transceiver with any gar-
age door opener that lacks safety stop and reverse features as re-
quired by federal safety stan-
dards. (These standards became
effective for opener models man-
ufactured after April 1, 1982.) A
garage door opener which cannot
detect an object in the path of a
closing garage door and then
automatically stop and reverse,
does not meet current federal
safety standards. Using a garage
door opener without these fea-
tures increases the risk of serious
injury or death.
. During the programming proce-
dure your garage door or security
gate will open and close (if the
transmitter is within range). Make
sure that people or objects are
clear of the garage door, gate,
etc. that you are programming.
. Your vehicle’s engine should be
turned off while programming
the HomeLink® Universal Trans-
ceiver. Do not breathe exhaust
gases; they contain colorless
and odorless carbon monoxide.
Carbon monoxide is dangerous. It
can cause unconsciousness or
death.
Instruments and controls2-83
HomeLink® UNIVERSAL
TRANSCEIVER (if so equipped)
Page 171 of 508

3 Pre-driving checks and adjustments
Keys ........................................................................\
................................. 3-2NISSAN Vehicle Immobilizer System key (if
so equipped) ........................................................................\
...... 3-2
Intelligent Key (if so equipped) ................................... 3-3
Doors ........................................................................\
.............................. 3-5 Locking with key .................................................................... 3-5
Locking with inside lock knob ..................................... 3-6
Locking with power door lock switch ................... 3-6
Automatic door locks ......................................................... 3-7
Child safety rear door lock ............................................. 3-7
Remote keyless entry system (if so equipped) ...... 3-7 How to use remote keyless entry system ......... 3-8
Intelligent Key system (if so equipped) .................... 3-11
Intelligent Key operating range .............................. 3-13
Door locks/unlocks precaution ............................... 3-13
Intelligent Key operation .............................................. 3-14
Battery saver system ....................................................... 3-16
Warning lights and audible reminders .............. 3-16
Troubleshooting guide ................................................... 3-17
How to use remote keyless entry function ...... 3-19
Remote engine start (if so equipped) ....................... 3-23 Remote engine start operating range ............... 3-23 Remote starting the engine .................................... 3-23
Extending engine run time ....................................... 3-24
Canceling a remote engine start ........................ 3-24
Conditions the remote engine start will
not work ........................................................................\
.......... 3-24
Hood ........................................................................\
............................ 3-25
Liftgate ........................................................................\
...................... 3-26 Liftgate release lever ..................................................... 3-27
Fuel-filler door ........................................................................\
..... 3-28 Opening the fuel-filler door ...................................... 3-28
Fuel-filler cap ....................................................................... 3-28
Tilt/telescopic steering ........................................................ 3-30 Tilt or telescopic operation ...................................... 3-31
Sun visors ........................................................................\
................ 3-31
Mirrors ........................................................................\
...................... 3-32 Inside mirror ........................................................................\
. 3-32
Outside mirrors .................................................................. 3-33
Vanity mirror ........................................................................\
3-34
Memory Seat (if so equipped) ......................................... 3-34 Memory storage function .......................................... 3-35
Entry/Exit function .......................................................... 3-35
System operation ............................................................. 3-36