2023 NISSAN QASHQAI Front
[x] Cancel search: FrontPage 364 of 508
5-124Starting and driving
to increased oil temperature. The driving
mode may change to Two-Wheel Drive
(2WD). If this warning is displayed, stop
the vehicle with the engine idling, as soon
as it is safe to do so. Then if the warning
turns off, you can continue driving.
The “Tire Size Incorrect” warning
may
appear if there is a large difference
between the diameters of front and rear
wheels. Pull off the road in a safe area,
with the engine idling. Check that all tire
sizes are the same, that the tire pressure
is correct and that the tires are not
excessively worn. Turn off the Intelligent
4x4 LOCK switch and do not drive fast.
If any warning message continues to be
displayed, have your vehicle checked by a
NISSAN dealer as soon as possible.
WARNING
. For AWD equipped vehicles, do
not attempt to raise two wheels
off the ground and shift the
transmission to any drive or re-
verse position with the engine
running. Doing so may result in
drivetrain damage or unexpected
vehicle movement which could
result in serious vehicle damage
or personal injury. .
Do not attempt to test an AWD
equipped vehicle on a 2–wheel
dynamometer (such as the dy-
namometers used by some
states for emissions testing) or
similar equipment even if the
other two wheels are raised off
the ground. Make sure that you
inform the test facility personnel
that your vehicle is equipped with
AWD before it is placed on a
dynamometer. Using the wrong
test equipment may result in
drive train damage or unex-
pected vehicle movement which
could result in serious vehicle
damage or personal injury.
CAUTION
.Do not operate the engine on a
free roller when any of the wheels
raised.
. The power train may be damaged
if you continue driving with the
“AWD Error” warning on.
. If the warning message remains
on after the above operation,
have your vehicle checked as
soon as possible. It is recom- mended that you visit a NISSAN
dealer for this service.
. If the “AWD Error” warning ap-
pears while driving, there may be
a malfunction in the AWD system.
Reduce the vehicle speed and
have your vehicle checked as
soon as possible. It is recom-
mended that you visit a NISSAN
dealer for this service.
. Never drive on dry, hard surface
roads in the LOCK mode, as this
will overload the powertrain and
may cause a serious malfunction.
Page 366 of 508
5-126Starting and driving
AWD modeWheels driven AWD LOCK indicator light Use conditions
AUTO Distribution of torque to
the front and rear wheels
changes automatically,
depending on road condi-
tions encountered [ratio;
100 : 0
/?50 : 50]. This
results in improved driving
stability.*1 -
For driving on paved
or slippery roads
LOCK All-Wheel Drive (AWD) *2*3*
For driving on rough
roads
*1: When the rotation difference between the front and rear wheels is large, the AWD
mode may change from AUTO to LOCK
for a while, however, this is not a mal-
function.
*2: The LOCK mode will change to the AUTO mode automatically when the vehicle has
been driven at a high speed. The AWD
LOCK indicator light turns off.
*3: The LOCK mode will automatically be cancelled when the ignition switch is
placed in the OFF position.
.The AWD torque distribution between
the front and rear wheels can be
displayed in the vehicle information
display. See “Vehicle information dis-
play” (P.2-19).
. If the Intelligent 4x4 LOCK switch is
operated while accelerating or decel-
erating, or if the ignition switch is
turned off, you may feel a jolt. This is
normal. .
The oil temperature of the powertrain
parts will increase if the vehicle is
continuously operated under condi-
tions where the difference in rotation
between the front and rear wheels is
large (wheel slip), such as when driving
the vehicle on rough roads, through
sand or mud, or freeing a stuck
vehicle. In these cases, the master
warning light illuminates and the
AWD mode changes to 2WD to protect
the powertrain parts. Stop driving
with the engine idling and wait until
the warning light turns off and the
AWD returns to the AUTO mode. If the
warning light remains on, have your
vehicle checked as soon as possible. It
is recommended that you visit a
NISSAN dealer for this service.
WARNING
.When driving straight, shift the
Intelligent 4x4 LOCK switch to
AUTO. Do not operate the Intelli-
gent 4x4 LOCK switch when mak-
ing a turn or backing up.
. Do not operate the Intelligent 4x4
LOCK switch with the front wheel
spinning.
. Engine idling speed is high while
warming up the engine. Be espe-
cially careful when starting or
driving on slippery surfaces.
. When turning the vehicle in LOCK
mode on paved roads, you may
feel a braking effect. This is a
normal condition of the AWD
model.
Page 370 of 508

5-130Starting and driving
BRAKE ASSIST
When the force applied to the brake pedal
exceeds a certain level, the Brake Assist is
activated generating greater braking
force than a conventional brake booster
even with light pedal force.
WARNING
The Brake Assist is only an aid to
assist braking operation and is not a
collision warning or avoidance de-
vice. It is the driver’s responsibility to
stay alert, drive safely and be in
control of the vehicle at all times.
ANTI-LOCK BRAKING SYSTEM (ABS)
WARNING
.The Anti-lock Braking System
(ABS) is a sophisticated device,
but it cannot prevent accidents
resulting from careless or dan-
gerous driving techniques. It can
help maintain vehicle control dur-
ing braking on slippery surfaces.
Remember that stopping dis-
tances on slippery surfaces will
be longer than on normal sur- faces even with ABS. Stopping
distances may also be longer on
rough, gravel or snow covered
roads, or if you are using tire
chains. Always maintain a safe
distance from the vehicle in front
of you. Ultimately, the driver is
responsible for safety.
. Tire type and condition may also
affect braking effectiveness.
— When replacing tires, install
the specified size of tires on
all four wheels.
— When installing a spare tire (if so equipped), make sure that
it is the proper size and type
as specified on the Tire and
Loading Information label.
See “Tire and Loading Infor-
mation label” (P.10-10) of this
manual.
— For detailed information, see “Wheels and tires” (P.8-29) of
this manual.
The Anti-lock Braking System (ABS) con-
trols the brakes so the wheels do not lock
during hard braking or when braking on
slippery surfaces. The system detects the
rotation speed at each wheel and varies
the brake fluid pressure to prevent each wheel from locking and sliding. By pre-
venting each wheel from locking, the
system helps the driver maintain steering
control and helps to minimize swerving
and spinning on slippery surfaces.
Using the system
Depress the brake pedal and hold it down.
Depress the brake pedal with firm steady
pressure, but do not pump the brakes.
The ABS will operate to prevent the
wheels from locking up. Steer the vehicle
to avoid obstacles.
WARNING
Do not pump the brake pedal. Doing
so may result in increased stopping
distances.
Self-test feature
The ABS includes electronic sensors, elec-
tric pumps, hydraulic solenoids and a
computer. The computer has a built-in
diagnostic feature that tests the system
each time you start the engine and move
the vehicle at a low speed in forward or
reverse. When the self-test occurs, you
may hear a “clunk” noise and/or feel a
pulsation in the brake pedal. This is
normal and does not indicate a malfunc-
BRAKE ASSIST
Page 387 of 508
MCE0001A
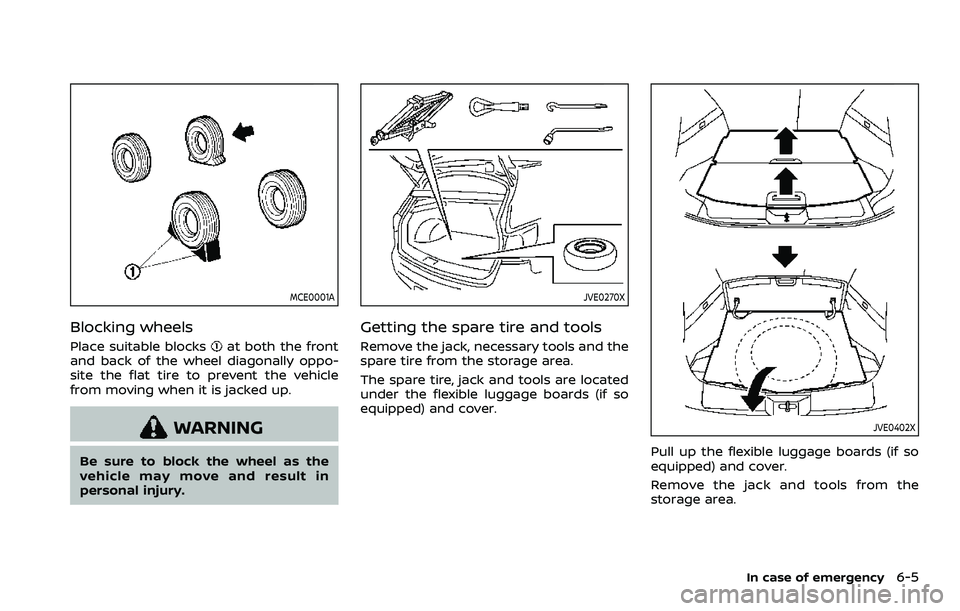
Blocking wheels
Place suitable blocksat both the front
and back of the wheel diagonally oppo-
site the flat tire to prevent the vehicle
from moving when it is jacked up.
WARNING
Be sure to block the wheel as the
vehicle may move and result in
personal injury.
JVE0270X
Getting the spare tire and tools
Remove the jack, necessary tools and the
spare tire from the storage area.
The spare tire, jack and tools are located
under the flexible luggage boards (if so
equipped) and cover.
JVE0402X
Pull up the flexible luggage boards (if so
equipped) and cover.
Remove the jack and tools from the
storage area.
In case of emergency6-5
Page 389 of 508
jack.
Carefully read the caution label at-
tached to the jack body and the follow-
ing instructions.
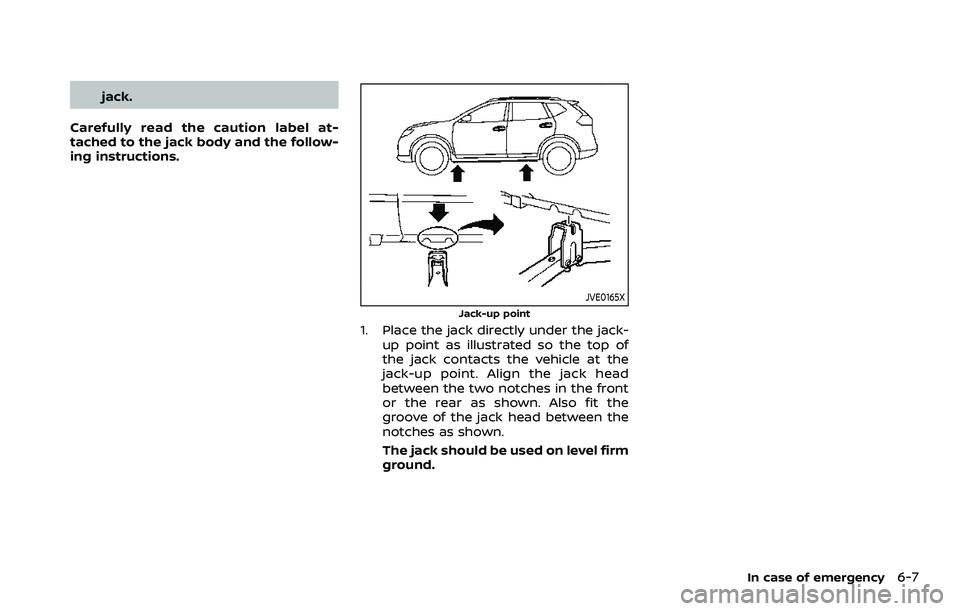
JVE0165X
Jack-up point
1. Place the jack directly under the jack- up point as illustrated so the top of
the jack contacts the vehicle at the
jack-up point. Align the jack head
between the two notches in the front
or the rear as shown. Also fit the
groove of the jack head between the
notches as shown.
The jack should be used on level firm
ground.
In case of emergency6-7
Page 401 of 508
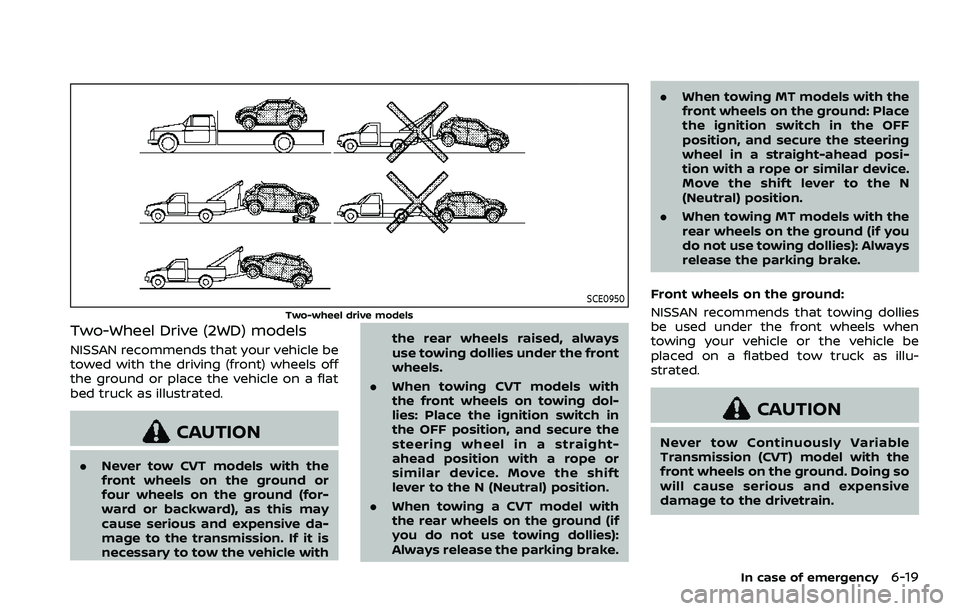
SCE0950
Two-wheel drive models
Two-Wheel Drive (2WD) models
NISSAN recommends that your vehicle be
towed with the driving (front) wheels off
the ground or place the vehicle on a flat
bed truck as illustrated.
CAUTION
.Never tow CVT models with the
front wheels on the ground or
four wheels on the ground (for-
ward or backward), as this may
cause serious and expensive da-
mage to the transmission. If it is
necessary to tow the vehicle with the rear wheels raised, always
use towing dollies under the front
wheels.
. When towing CVT models with
the front wheels on towing dol-
lies: Place the ignition switch in
the OFF position, and secure the
steering wheel in a straight-
ahead position with a rope or
similar device. Move the shift
lever to the N (Neutral) position.
. When towing a CVT model with
the rear wheels on the ground (if
you do not use towing dollies):
Always release the parking brake. .
When towing MT models with the
front wheels on the ground: Place
the ignition switch in the OFF
position, and secure the steering
wheel in a straight-ahead posi-
tion with a rope or similar device.
Move the shift lever to the N
(Neutral) position.
. When towing MT models with the
rear wheels on the ground (if you
do not use towing dollies): Always
release the parking brake.
Front wheels on the ground:
NISSAN recommends that towing dollies
be used under the front wheels when
towing your vehicle or the vehicle be
placed on a flatbed tow truck as illu-
strated.
CAUTION
Never tow Continuously Variable
Transmission (CVT) model with the
front wheels on the ground. Doing so
will cause serious and expensive
damage to the drivetrain.
In case of emergency6-19
Page 402 of 508
6-20In case of emergency
Manual Transmission (MT) model:
1. Place the ignition switch in the OFFposition.
2. Secure the steering wheel in a straight-ahead position with rope or
a similar device.
3. Move the shift lever to the N (Neutral) position.
4. Release the parking brake.
5. Attach the safety chains whenever towing.
Rear wheels on the ground:
1. Place the ignition switch in the OFF position.
2. Move the shift lever to the N (Neutral) position.
3. Release the parking brake.
4. Attach safety chains whenever tow- ing.
All four wheels on the ground:
NISSAN recommends that the vehicle be
placed on a flatbed tow truck as illu-
strated.
CAUTION
Never tow CVT model with all four
wheels on the ground. Doing so will
cause serious and expensive da-
mage to the drivetrain.
Manual Transmission (MT) model:
1. Place the ignition switch in the OFF position.
2. Move the shift lever to the N (Neutral) position.
3. Release the parking brake.
VEHICLE RECOVERY (freeing a stuck
vehicle)
WARNING
To avoid vehicle damage, serious
personal injury or death when reco-
vering a stuck vehicle:
. Contact a professional towing
service to recover the vehicle if
you have any questions regard-
ing the recovery procedure.
. Tow chains or cables must be
attached only to main structural
members of the vehicle. .
Do not use the vehicle tie-downs
to tow or free a stuck vehicle.
. Only use devices specifically de-
signed for vehicle recovery and
follow the manufacturer’s in-
structions.
. Always pull the recovery device
straight out from the front of the
vehicle. Never pull at an angle.
. Route recovery devices so they
do not touch any part of the
vehicle except the attachment
point.
If your vehicle is stuck in sand, snow, mud,
etc., use a tow strap or other device
designed specifically for vehicle recovery.
Always follow the manufacturer’s instruc-
tions for the recovery device.Rocking a stuck vehicle
WARNING
. Stand clear of a stuck vehicle.
. Do not spin your tires at high
speed. This could cause them to
explode and result in serious in-
jury. Parts of your vehicle could
also overheat and be damaged.
Page 403 of 508
If your vehicle is stuck in sand, snow, mud,
etc., use the following procedure:
1. Turn off the Vehicle Dynamic Control(VDC) system.
2. Make sure the area in front and behind the vehicle is clear of obstruc-
tions.
3. Turn the steering wheel right and left to clear an area around the front tires.
4. Slowly rock the vehicle forward and backward.
.Shift back and forth between R(Reverse) and D (Drive) (Continu-
ously Variable Transmission (CVT)
models) or 1st and R (Reverse)
(Manual Transmission (MT) models).
.Apply the accelerator as little as possible to maintain the rocking
motion.
.Release the accelerator pedal be-fore shifting between R and D (CVT
models) or 1st and R (MT models).
.Do not spin the tires above 35 MPH(55 km/h).
5. If the vehicle cannot be freed after a few tries, contact a professional tow-
ing service to remove the vehicle.
WARNING
.Stand clear of a stuck vehicle.
. Do not spin your tires at high
speed. This could cause them to
explode and result in serious in-
jury. Parts of your vehicle could
also overheat and be damaged.
In case of emergency6-21