2023 NISSAN QASHQAI Drive
[x] Cancel search: DrivePage 179 of 508

the welcome light and farewell light
function, see “Vehicle Settings” (P.2-23).
Locking doors
1. Remove the key from the ignitionswitch.
2. Close all the doors.
3. Push the LOCK
buttonon the
key fob.
4. All the doors will lock. All of the doors will lock when the
LOCK
button is pushed even
though a door remains open.
5. The hazard indicator flashes twice and the horn chirps once.
. When the LOCK
button is pushed
with all doors locked, the hazard
indicator flashes twice and the horn
chirps once as a reminder that the
doors are already locked.
. Operate the door handles to confirm
that the doors have been securely
locked.
Unlocking doors
1. Push the UNLOCKbuttonon
the key fob.
.The driver’s door unlocks..The hazard indicator flashes once if
all doors are completely closed. 2. Push the UNLOCK
button again
within 5 seconds.
.All the doors and the liftgate unlock..The hazard indicator flashes once if all doors are completely closed.
All doors will be locked automatically
unless one of the following operations is
performed within 1 minute of pushing the
UNLOCK
button.
. Any door or liftgate is opened.
. The ignition switch is placed in the ON
position.
NOTE:
The unlocking operation can be chan-
ged in selective unlock in the Vehicle
Settings of the vehicle information dis-
play. For additional information, refer to
“Vehicle Settings” (P.2-23).
Using panic alarm
If you are near your vehicle and feel
threatened, you may activate the alarm
to call attention as follows:
1. Push the PANIC
buttonon the
key fob for more than 0.5 seconds.
2. The theft warning alarm and head- lights will stay on for 25 seconds.
3. The panic alarm stops when:
.It has run for 25 seconds, or
.Any of the buttons on the key fob is pushed. (Note: the PANIC button
must be pushed for more than 1
second.)
Battery indicator light
The battery indicator lightilluminates
when you push any button. If the light
does not illuminate, the battery is weak or
needs replacement. For information re-
garding replacement of a battery, see
“Key fob battery replacement” (P.8-21).
Setting hazard indicator and horn
mode
This vehicle is set in hazard indicator and
horn mode when you first receive the
vehicle.
In hazard indicator and horn mode, when
the LOCK
buttonis pushed, the
hazard indicator flashes twice and the
horn chirps once. When the UNLOCK
buttonis pushed, the hazard indicator
flashes once.
If the horn chirp is not necessary, you can
switch to hazard indicator only mode by
following the switching procedure.
In hazard indicator only mode, when the
LOCK
button is pushed, the hazard
indicator flashes twice. When the UNLOCK
button is pushed, neither the hazard
indicator nor the horn operates.
Pre-driving checks and adjustments3-9
Page 184 of 508
3-14Pre-driving checks and adjustments
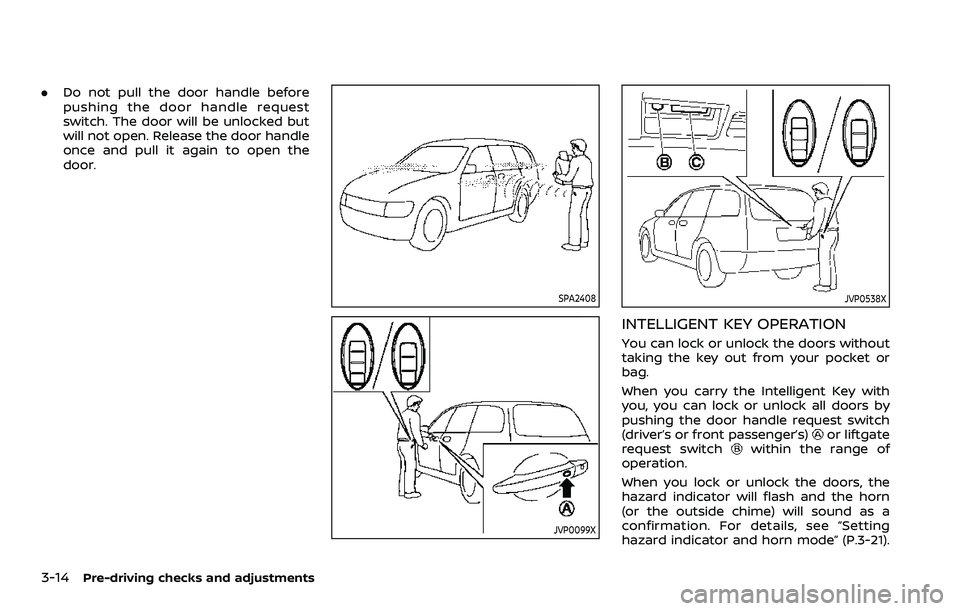
.Do not pull the door handle before
pushing the door handle request
switch. The door will be unlocked but
will not open. Release the door handle
once and pull it again to open the
door.
SPA2408
JVP0099X
JVP0538X
INTELLIGENT KEY OPERATION
You can lock or unlock the doors without
taking the key out from your pocket or
bag.
When you carry the Intelligent Key with
you, you can lock or unlock all doors by
pushing the door handle request switch
(driver’s or front passenger’s)
or liftgate
request switchwithin the range of
operation.
When you lock or unlock the doors, the
hazard indicator will flash and the horn
(or the outside chime) will sound as a
confirmation. For details, see “Setting
hazard indicator and horn mode” (P.3-21).
Page 185 of 508

Welcome light and farewell light
function
When you lock or unlock the doors or the
liftgate, the daytime running lights, park-
ing lights and the tail lights will illuminate
for a period of time. The welcome light
and farewell light function can be dis-
abled. For information about disabling
the welcome light and farewell light
function, see “Vehicle Settings” (P.2-23).
Locking doors
1. Move the shift lever to the P (Park)position (Continuously Variable Trans-
mission (CVT) models), or the shift
lever in the N (Neutral) position (Man-
ual Transmission (MT) models), place
the ignition switch in the OFF position
and make sure you carry the Intelli-
gent Key with you.
2. Close all doors.
3. Push any door handle request switch while carrying the Intelligent Key with
you.
4. All doors and the liftgate will lock.
5. The hazard indicator lights flash twice and the outside buzzer sounds twice.
NOTE:
. Request switches for all doors and
the liftgate can be deactivated when
the I-Key Door Lock setting is turned off in the Vehicle Settings of the
vehicle information display. For ad-
ditional information, see “Vehicle
Settings” (P.2-23).
. Doors lock with the door handle
request switch while the ignition
switch is not in the LOCK position.
. Doors do not lock by pushing the
door handle request switch while
any door is open. However, doors
lock by pushing the driver’s side
door handle request switch while
the driver’s door is closed.
. Doors do not lock with the door
handle request switch with the In-
telligent Key inside the vehicle and a
beep sounds to warn you. However,
when an Intelligent Key is inside the
vehicle, doors can be locked with
another Intelligent Key.
CAUTION
.After locking the doors using the
request switch, make sure that
the doors have been securely
locked by operating the door
handles or the liftgate opener
switch.
. When locking the doors using the
request switch, make sure to have the Intelligent Key in your
possession before operating the
request switch to prevent the
Intelligent Key from being left in
the vehicle.
. The request switch is operational
only when the Intelligent Key has
been detected by the Intelligent
Key system.
Unlocking doors
1. Push the door handle request switchor the liftgate request switchwhile carrying the Intelligent Key with
you.
2. The hazard indicator flashes once and outside chime sounds once. The cor-
responding door or the liftgate will
unlock.
3. Push the request switch again within 1 minute.
4. The hazard indicator flashes once and outside chime sounds once again. All
the doors and the liftgate will unlock.
All doors will be locked automatically
unless one of the following operations is
performed within 1 minute after pushing
the request switch while the doors are
locked.
Pre-driving checks and adjustments3-15
Page 187 of 508
TROUBLESHOOTING GUIDE
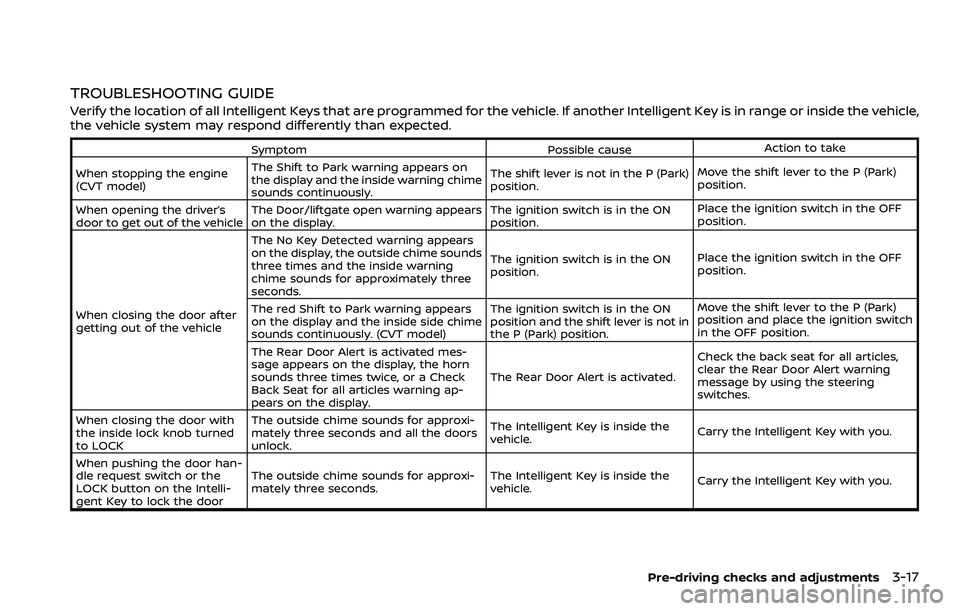
Verify the location of all Intelligent Keys that are programmed for the vehicle. If another Intelligent Key is in range or inside the vehicle,
the vehicle system may respond differently than expected.
SymptomPossible causeAction to take
When stopping the engine
(CVT model) The Shift to Park warning appears on
the display and the inside warning chime
sounds continuously. The shift lever is not in the P (Park)
position.
Move the shift lever to the P (Park)
position.
When opening the driver’s
door to get out of the vehicle The Door/liftgate open warning appears
on the display. The ignition switch is in the ON
position.Place the ignition switch in the OFF
position.
When closing the door after
getting out of the vehicle The No Key Detected warning appears
on the display, the outside chime sounds
three times and the inside warning
chime sounds for approximately three
seconds.
The ignition switch is in the ON
position.
Place the ignition switch in the OFF
position.
The red Shift to Park warning appears
on the display and the inside side chime
sounds continuously. (CVT model) The ignition switch is in the ON
position and the shift lever is not in
the P (Park) position.Move the shift lever to the P (Park)
position and place the ignition switch
in the OFF position.
The Rear Door Alert is activated mes-
sage appears on the display, the horn
sounds three times twice, or a Check
Back Seat for all articles warning ap-
pears on the display. The Rear Door Alert is activated.
Check the back seat for all articles,
clear the Rear Door Alert warning
message by using the steering
switches.
When closing the door with
the inside lock knob turned
to LOCK The outside chime sounds for approxi-
mately three seconds and all the doors
unlock.
The Intelligent Key is inside the
vehicle.
Carry the Intelligent Key with you.
When pushing the door han-
dle request switch or the
LOCK button on the Intelli-
gent Key to lock the door The outside chime sounds for approxi-
mately three seconds.
The Intelligent Key is inside the
vehicle.
Carry the Intelligent Key with you.
Pre-driving checks and adjustments3-17
Page 190 of 508
3-20Pre-driving checks and adjustments
JVP0541X
Type A
JVP0542XType B
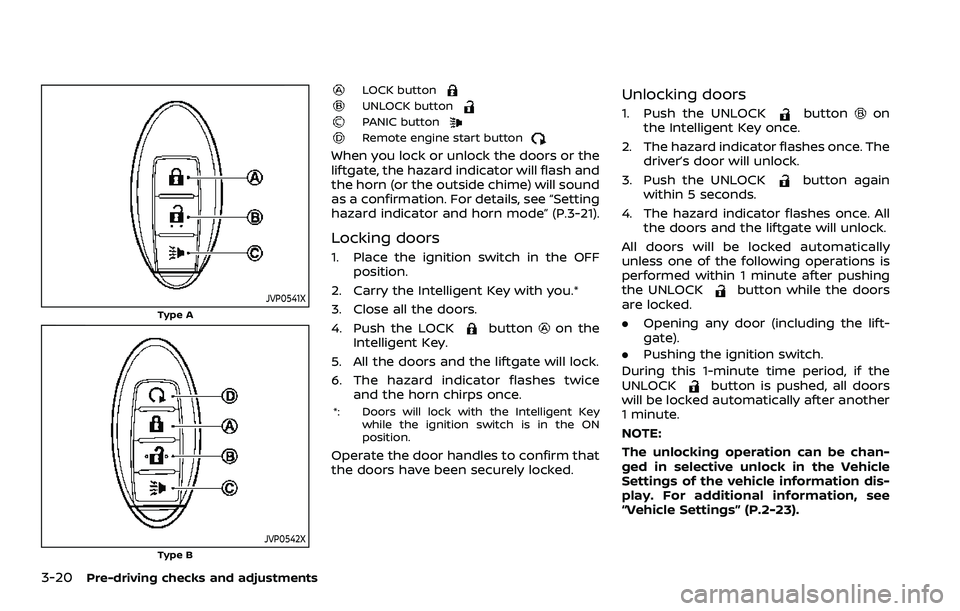
LOCK buttonUNLOCK buttonPANIC buttonRemote engine start button
When you lock or unlock the doors or the
liftgate, the hazard indicator will flash and
the horn (or the outside chime) will sound
as a confirmation. For details, see “Setting
hazard indicator and horn mode” (P.3-21).
Locking doors
1. Place the ignition switch in the OFFposition.
2. Carry the Intelligent Key with you.*
3. Close all the doors.
4. Push the LOCK
buttonon the
Intelligent Key.
5. All the doors and the liftgate will lock.
6. The hazard indicator flashes twice and the horn chirps once.
*: Doors will lock with the Intelligent Key
while the ignition switch is in the ON
position.
Operate the door handles to confirm that
the doors have been securely locked.
Unlocking doors
1. Push the UNLOCKbuttonon
the Intelligent Key once.
2. The hazard indicator flashes once. The driver’s door will unlock.
3. Push the UNLOCK
button again
within 5 seconds.
4. The hazard indicator flashes once. All the doors and the liftgate will unlock.
All doors will be locked automatically
unless one of the following operations is
performed within 1 minute after pushing
the UNLOCK
button while the doors
are locked.
. Opening any door (including the lift-
gate).
. Pushing the ignition switch.
During this 1-minute time period, if the
UNLOCK
button is pushed, all doors
will be locked automatically after another
1 minute.
NOTE:
The unlocking operation can be chan-
ged in selective unlock in the Vehicle
Settings of the vehicle information dis-
play. For additional information, see
“Vehicle Settings” (P.2-23).
Page 196 of 508
3-26Pre-driving checks and adjustments
WAD0090X
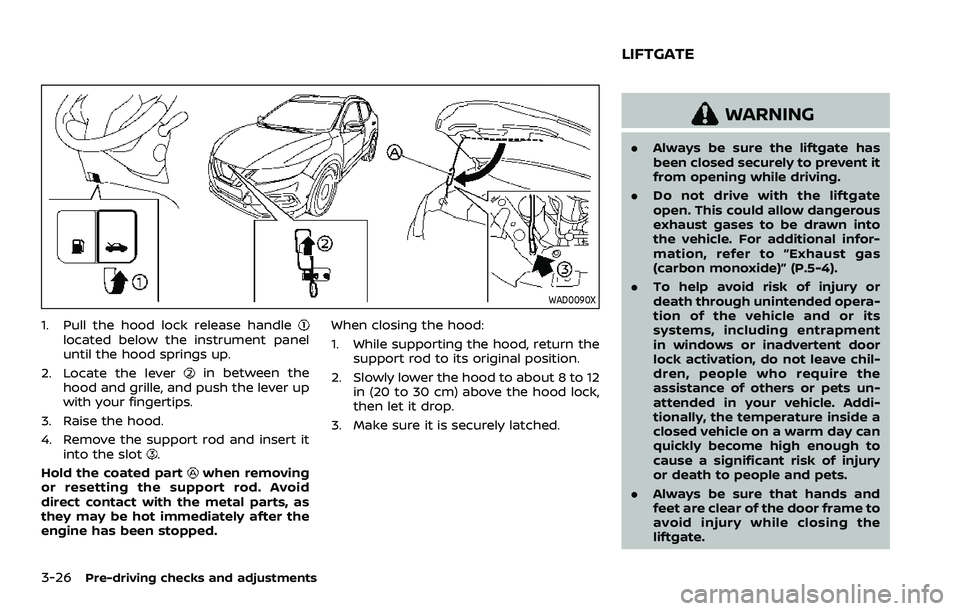
1. Pull the hood lock release handlelocated below the instrument panel
until the hood springs up.
2. Locate the lever
in between the
hood and grille, and push the lever up
with your fingertips.
3. Raise the hood.
4. Remove the support rod and insert it into the slot
.
Hold the coated part
when removing
or resetting the support rod. Avoid
direct contact with the metal parts, as
they may be hot immediately after the
engine has been stopped. When closing the hood:
1. While supporting the hood, return the
support rod to its original position.
2. Slowly lower the hood to about 8 to 12 in (20 to 30 cm) above the hood lock,
then let it drop.
3. Make sure it is securely latched.
WARNING
. Always be sure the liftgate has
been closed securely to prevent it
from opening while driving.
. Do not drive with the liftgate
open. This could allow dangerous
exhaust gases to be drawn into
the vehicle. For additional infor-
mation, refer to “Exhaust gas
(carbon monoxide)” (P.5-4).
. To help avoid risk of injury or
death through unintended opera-
tion of the vehicle and or its
systems, including entrapment
in windows or inadvertent door
lock activation, do not leave chil-
dren, people who require the
assistance of others or pets un-
attended in your vehicle. Addi-
tionally, the temperature inside a
closed vehicle on a warm day can
quickly become high enough to
cause a significant risk of injury
or death to people and pets.
. Always be sure that hands and
feet are clear of the door frame to
avoid injury while closing the
liftgate.
LIFTGATE
Page 199 of 508
WARNING
.Gasoline is extremely flammable
and highly explosive under cer-
tain conditions. You could be
burned or seriously injured if it is
misused or mishandled. Always
stop engine and do not smoke or
allow open flames or sparks near
the vehicle when refueling.
. Do not attempt to top off the fuel
tank after the fuel pump nozzle
shuts off automatically. Contin-
ued refueling may cause fuel
overflow, resulting in fuel spray
and possibly a fire.
. Use only an original equipment
type fuel-filler cap as a replace-
ment. It has a built-in safety valve
needed for proper operation of
the fuel system and emission
control system. An incorrect cap
can result in a serious malfunc-
tion and possible injury. It could
also cause the malfunction indi-
cator light to come on.
. Never pour fuel into the throttle
body to attempt to start your
vehicle. .
Do not fill a portable fuel contain-
er in the vehicle or trailer. Static
electricity can cause an explosion
of flammable liquid, vapor or gas
in any vehicle or trailer. To reduce
the risk of serious injury or death
when filling portable fuel contain-
ers:
— Always place the container on
the ground when filling.
— Do not use electronic devices when filling.
— Keep the pump nozzle in con- tact with the container while
you are filling it.
— Use only approved portable fuel containers for flammable
liquid.
CAUTION
. If fuel is spilled on the vehicle
body, flush it away with water to
avoid paint damage.
. Insert the cap straight into the
fuel-filler tube, then tighten until
the fuel-filler cap clicks. Failure to
tighten the fuel-filler cap properly
may cause the
malfunction indicator light (MIL) to illuminate.
If the
light illuminates be-
cause the fuel-filler cap is loose
or missing, tighten or install the
cap and continue to drive the
vehicle. The
light should turn
off after a few driving trips. If the
light does not turn off after a
few driving trips, have the vehicle
inspected. It is recommended you
visit a NISSAN dealer for this
service.
For additional information, see
“Malfunction Indicator Light
(MIL)” (P.2-16).
. The LOOSE FUEL CAP warning
message will be displayed if the
fuel-filler cap is not properly tigh-
tened. It may take a few driving
trips for the message to be dis-
played. Failure to tighten the fuel-
filler cap properly after the LOOSE
FUEL CAP warning message is
displayed may cause the
Malfunction Indicator Light (MIL)
to illuminate.
Pre-driving checks and adjustments3-29
Page 203 of 508
indicator light will turn off. Push the “I”
switchto turn the system on.
Do not allow any object to cover the
sensors
or apply glass cleaner on
them. Doing so will reduce the sensitiv-
ity of the sensor, resulting in improper
operation.
For the HomeLink® Universal Transceiver
operation, see “HomeLink® Universal
Transceiver” (P.2-83).
OUTSIDE MIRRORS
WARNING
Objects viewed in the outside mirror
on the passenger side are closer
than they appear. Be careful when
moving to the right. Using only this
mirror could cause an accident. Use
the inside mirror or glance over your
shoulder to properly judge distances
to other objects.
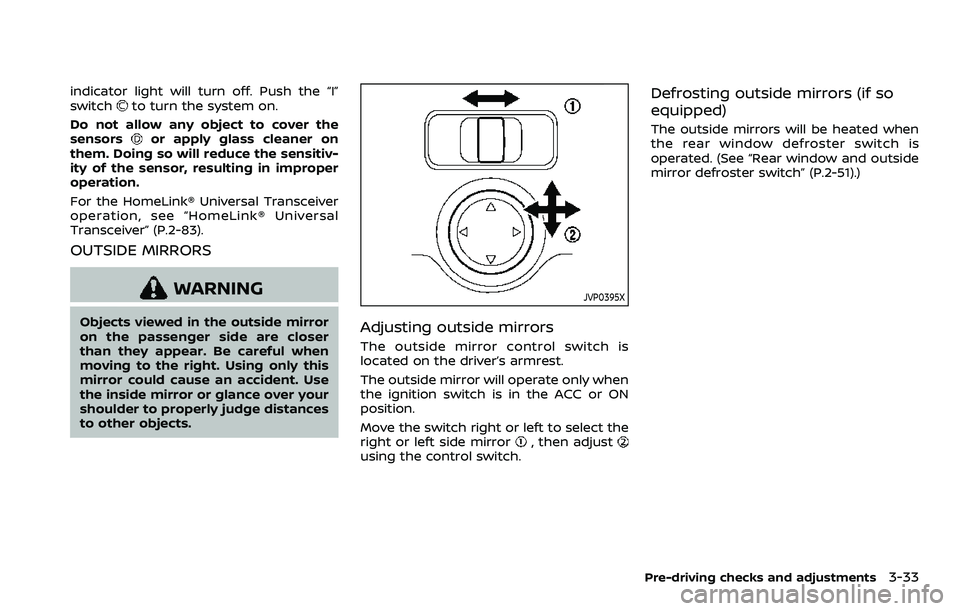
JVP0395X
Adjusting outside mirrors
The outside mirror control switch is
located on the driver’s armrest.
The outside mirror will operate only when
the ignition switch is in the ACC or ON
position.
Move the switch right or left to select the
right or left side mirror
, then adjustusing the control switch.
Defrosting outside mirrors (if so
equipped)
The outside mirrors will be heated when
the rear window defroster switch is
operated. (See “Rear window and outside
mirror defroster switch” (P.2-51).)
Pre-driving checks and adjustments3-33