Page 29 of 665
Seat lif ter (driver's seat)
Pull up or push down the adjusting lever to
adjust the seat height until the desired po-
sition is achieved.
FRONT POWER SEAT ADJUSTMENT
(if so equipped)
Operating tips
• The power seat motor has an auto-resetoverload protection circuit. If the motor
stops during operation, wait 30 seconds
then reactivate the switch. • Do not operate the power seat switch for
a long period of time when the engine is
off. This will discharge the battery.
For additional information, see “Memory
seat” (P. 3-40).
Forward and backward
Moving the switch as shown will slide the
seat forward or backward to the desired
position.
LRS3354LRS3599
1-4Safety-Seats, seat belts and supplemental restraint system
Page 30 of 665

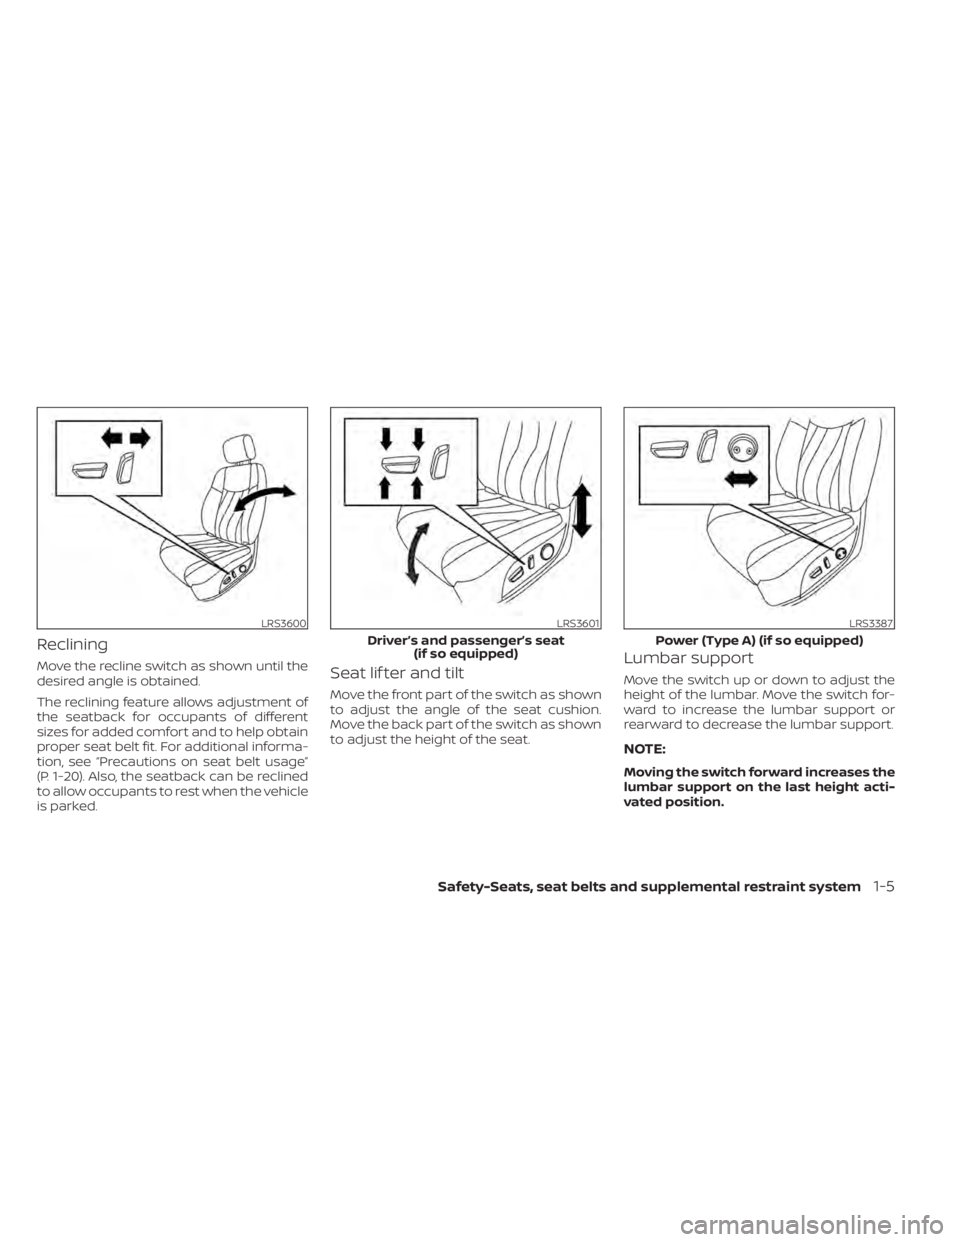
Reclining
Move the recline switch as shown until the
desired angle is obtained.
The reclining feature allows adjustment of
the seatback for occupants of different
sizes for added comfort and to help obtain
proper seat belt fit. For additional informa-
tion, see “Precautions on seat belt usage”
(P. 1-20). Also, the seatback can be reclined
to allow occupants to rest when the vehicle
is parked.Seat lif ter and tilt
Move the front part of the switch as shown
to adjust the angle of the seat cushion.
Move the back part of the switch as shown
to adjust the height of the seat.
Lumbar support
Move the switch up or down to adjust the
height of the lumbar. Move the switch for-
ward to increase the lumbar support or
rearward to decrease the lumbar support.
NOTE:
Moving the switch forward increases the
lumbar support on the last height acti-
vated position.
LRS3600LRS3601
Driver’s and passenger’s seat(if so equipped)
LRS3387
Power (Type A) (if so equipped)
Safety-Seats, seat belts and supplemental restraint system1-5
Page 53 of 665

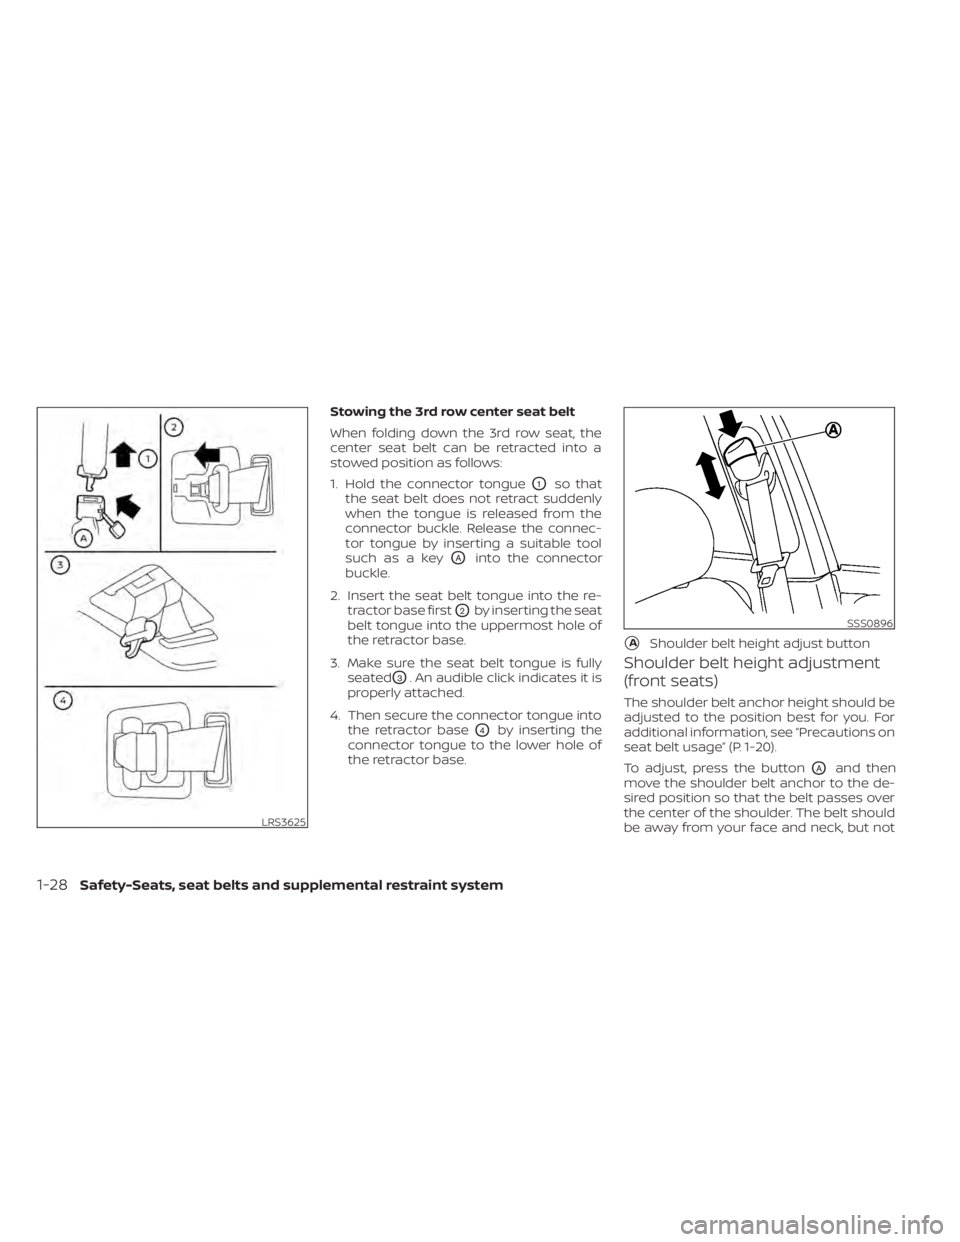
Stowing the 3rd row center seat belt
When folding down the 3rd row seat, the
center seat belt can be retracted into a
stowed position as follows:
1. Hold the connector tongue
O1so that
the seat belt does not retract suddenly
when the tongue is released from the
connector buckle. Release the connec-
tor tongue by inserting a suitable tool
such as a key
OAinto the connector
buckle.
2. Insert the seat belt tongue into the re- tractor base first
O2by inserting the seat
belt tongue into the uppermost hole of
the retractor base.
3. Make sure the seat belt tongue is fully seated
O3. An audible click indicates it is
properly attached.
4. Then secure the connector tongue into the retractor base
O4by inserting the
connector tongue to the lower hole of
the retractor base.
Shoulder belt height adjustment
(front seats)
The shoulder belt anchor height should be
adjusted to the position best for you. For
additional information, see “Precautions on
seat belt usage” (P. 1-20).
To adjust, press the button
OAand then
move the shoulder belt anchor to the de-
sired position so that the belt passes over
the center of the shoulder. The belt should
be away from your face and neck, but not
LRS3625
SSS0896
�AShoulder belt height adjust button
1-28Safety-Seats, seat belts and supplemental restraint system
Page 54 of 665

falling off of your shoulder. Release the ad-
justment button to lock the shoulder belt
anchor into position.
WARNING
• Af ter adjustment, release the adjust-
ment button and try to move the
shoulder belt anchor up and down to
make sure it is securely fixed in
position.
• The shoulder belt anchor height
should be adjusted to the position
best for you. Failure to do so may re-
duce the effectiveness of the entire
restraint system and increase the
chance or severity of injury in an
accident.
• The shoulder belt should rest on the
middle of the shoulder. It must not
rest against the neck.
• Be sure that the seat belt is not
twisted in any way.
• Be sure that the shoulder belt anchor
is secured by trying to move the
shoulder belt anchor up and down
af ter adjustment.
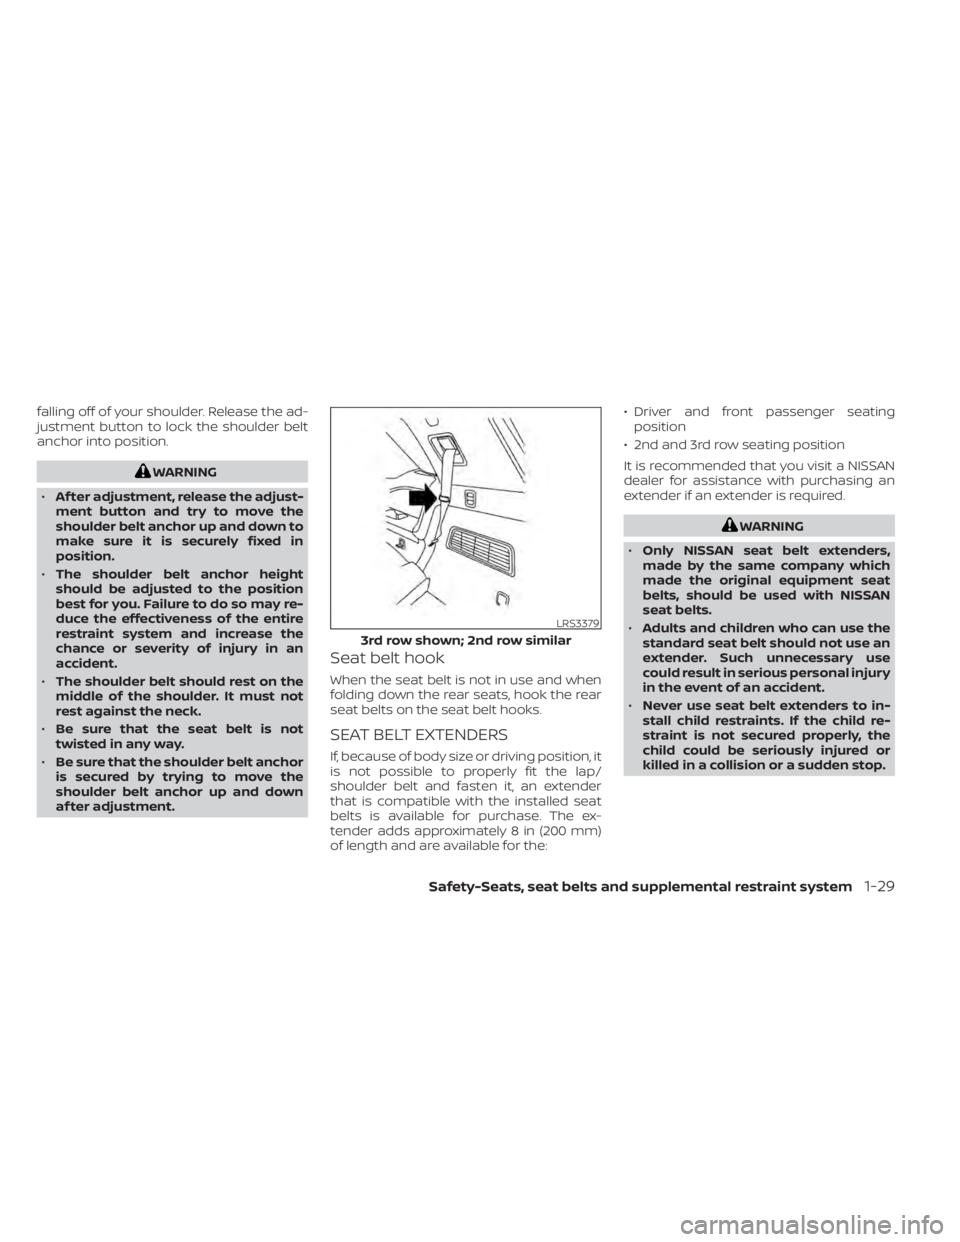
Seat belt hook
When the seat belt is not in use and when
folding down the rear seats, hook the rear
seat belts on the seat belt hooks.
SEAT BELT EXTENDERS
If, because of body size or driving position, it
is not possible to properly fit the lap/
shoulder belt and fasten it, an extender
that is compatible with the installed seat
belts is available for purchase. The ex-
tender adds approximately 8 in (200 mm)
of length and are available for the: • Driver and front passenger seating
position
• 2nd and 3rd row seating position
It is recommended that you visit a NISSAN
dealer for assistance with purchasing an
extender if an extender is required.
WARNING
• Only NISSAN seat belt extenders,
made by the same company which
made the original equipment seat
belts, should be used with NISSAN
seat belts.
• Adults and children who can use the
standard seat belt should not use an
extender. Such unnecessary use
could result in serious personal injury
in the event of an accident.
• Never use seat belt extenders to in-
stall child restraints. If the child re-
straint is not secured properly, the
child could be seriously injured or
killed in a collision or a sudden stop.
LRS3379
3rd row shown; 2nd row similar
Safety-Seats, seat belts and supplemental restraint system1-29
Page 267 of 665

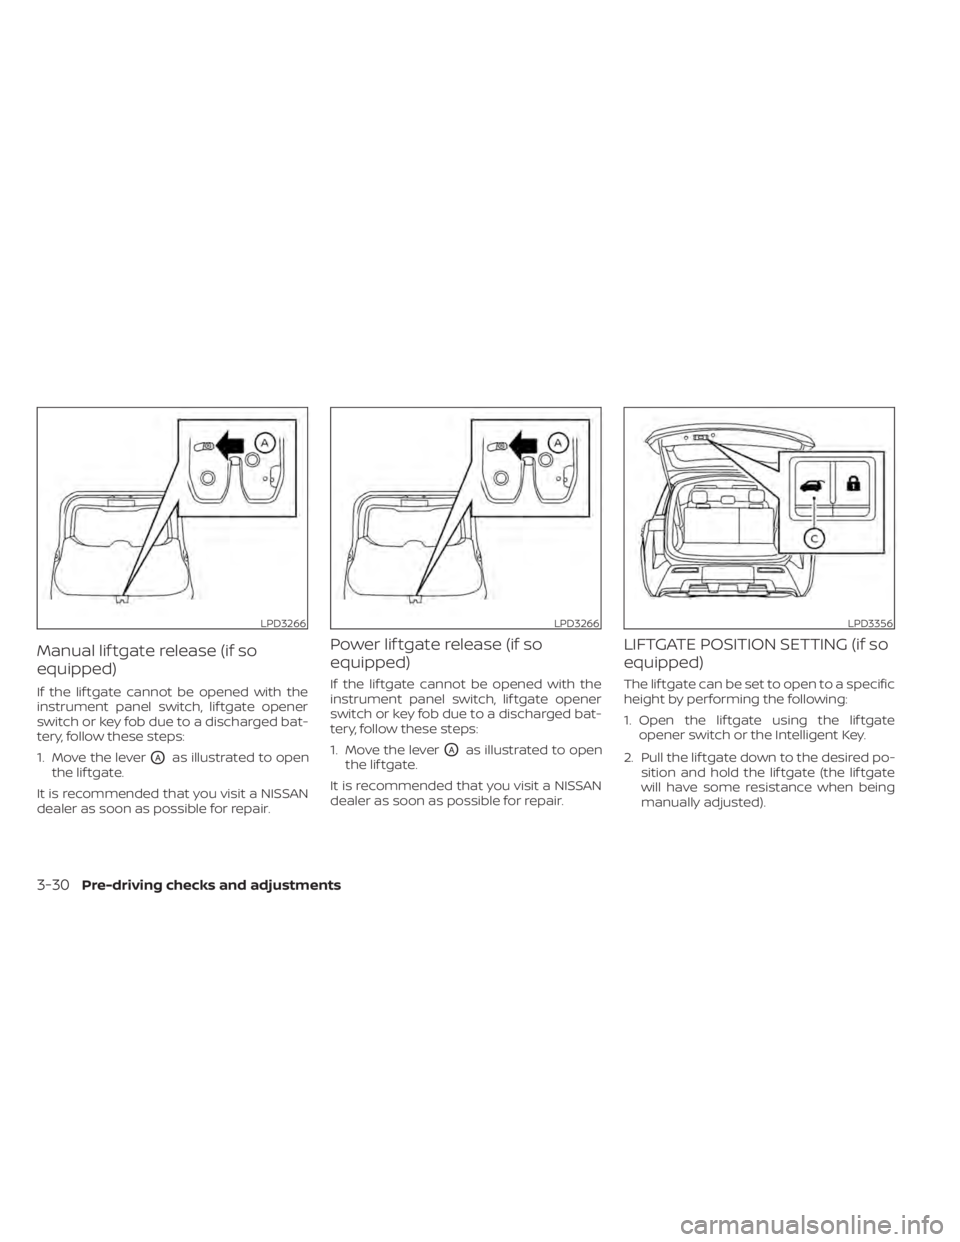
Manual lif tgate release (if so
equipped)
If the lif tgate cannot be opened with the
instrument panel switch, lif tgate opener
switch or key fob due to a discharged bat-
tery, follow these steps:
1. Move the lever
OAas illustrated to open
the lif tgate.
It is recommended that you visit a NISSAN
dealer as soon as possible for repair.
Power lif tgate release (if so
equipped)
If the lif tgate cannot be opened with the
instrument panel switch, lif tgate opener
switch or key fob due to a discharged bat-
tery, follow these steps:
1. Move the lever
OAas illustrated to open
the lif tgate.
It is recommended that you visit a NISSAN
dealer as soon as possible for repair.
LIFTGATE POSITION SETTING (if so
equipped)
The lif tgate can be set to open to a specific
height by performing the following:
1. Open the lif tgate using the lif tgate opener switch or the Intelligent Key.
2. Pull the lif tgate down to the desired po- sition and hold the lif tgate (the lif tgate
will have some resistance when being
manually adjusted).
LPD3266LPD3266LPD3356
3-30Pre-driving checks and adjustments