2023 NISSAN KICKS transmission
[x] Cancel search: transmissionPage 124 of 558
WARNING
The tire replacement indicator is not
a substitute for regular tire checks,
including tire pressure checks. For ad-
ditional information, see “Changing
wheels and tires” (P. 8-37). Many factors
including tire inflation, alignment, driv-
ing habits and road conditions affect
tire wear and when tires should be re-
placed. Setting the tire replacement in-
dicator for a certain driving distance
does not mean your tires will last that
long. Use the tire replacement indicator
as a guide only and always perform
regular tire checks. Failure to perform
regular tire checks, including tire pres-
sure checks could result in tire failure.
Serious vehicle damage could occur
and may lead to a collision, which could
result in serious personal injury or
death.
Tire Pressure Low - Add Air
This warning appears when the low tire
pressure warning light in the meter illumi-
nates and low tire pressure is detected. The
warning appears each time the ignition
switch is placed in the ON position as long
as the low tire pressure warning light re- mains illuminated. If this warning appears,
stop the vehicle and adjust the tire pres-
sures of all four tires to the recommended
COLD tire pressure shown on the Tire and
Loading Information label. For additional
information, see “Low tire pressure warning
light” (P. 2-18) and “Tire Pressure Monitoring
System (TPMS)” (P. 5-5).
TPMS Error: See Owner’s Manual
This warning appears when there is an er-
ror with your TPMS. If this warning comes
on, have the system checked. It is recom-
mended that you visit a NISSAN dealer for
this service.
Transmission Shif t Position
indicator
This indicator shows the transmission shif t
position.
CVT Error: See Owner's
Manual
This warning appears when there is a
problem with the CVT system. If this
warning appears, have the system
checked. It is recommended that you visit a
NISSAN dealer for this service.
Automatic Emergency
Braking (AEB) emergency
warning indicator
This indicator appears along, with an au-
dible warning, when the system detects
the possibility of a forward collision.
For additional information, see “Automatic
Emergency Braking (AEB)” (P. 5-88), “Auto-
matic Emergency Braking (AEB) with Pe-
destrian Detection” (P. 5-98) and “Intelligent
Forward Collision Warning (I-FCW)” (P. 5-110).
Blind Spot Warning (BSW)
indicator
This indicator appears when the BSW sys-
tem is engaged.
For additional information, see “Blind Spot
Warning (BSW)” (P. 5-35).
Cruise control indicator
This indicator shows the cruise control sys-
tem status.
For additional information, see “Cruise con-
trol” (P. 5-56).
2-36Instruments and controls
Page 169 of 558
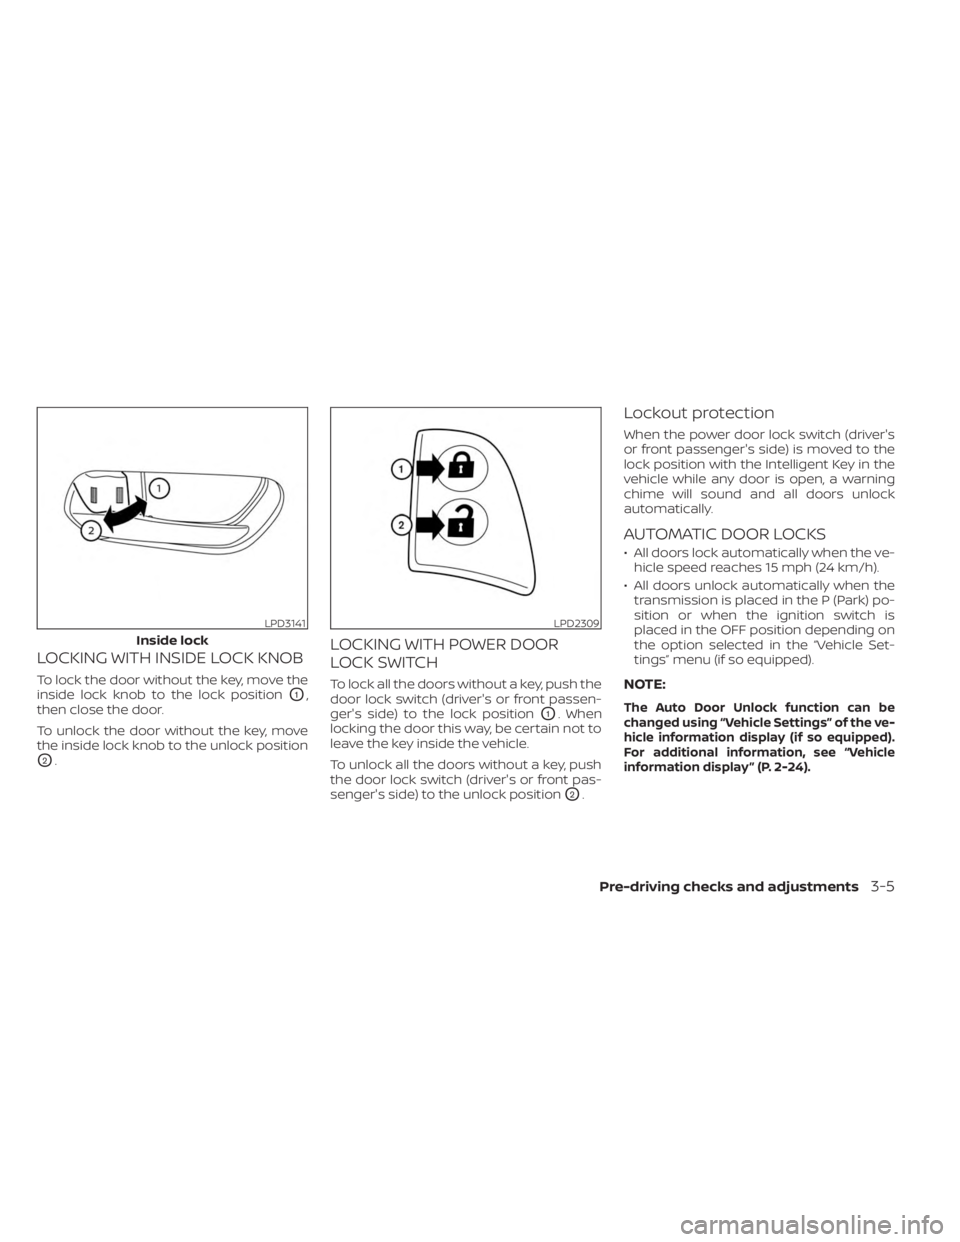
LOCKING WITH INSIDE LOCK KNOB
To lock the door without the key, move the
inside lock knob to the lock position
O1,
then close the door.
To unlock the door without the key, move
the inside lock knob to the unlock position
O2.
LOCKING WITH POWER DOOR
LOCK SWITCH
To lock all the doors without a key, push the
door lock switch (driver's or front passen-
ger's side) to the lock position
O1. When
locking the door this way, be certain not to
leave the key inside the vehicle.
To unlock all the doors without a key, push
the door lock switch (driver's or front pas-
senger's side) to the unlock position
O2.
Lockout protection
When the power door lock switch (driver's
or front passenger's side) is moved to the
lock position with the Intelligent Key in the
vehicle while any door is open, a warning
chime will sound and all doors unlock
automatically.
AUTOMATIC DOOR LOCKS
• All doors lock automatically when the ve- hicle speed reaches 15 mph (24 km/h).
• All doors unlock automatically when the transmission is placed in the P (Park) po-
sition or when the ignition switch is
placed in the OFF position depending on
the option selected in the “Vehicle Set-
tings” menu (if so equipped).
NOTE:
The Auto Door Unlock function can be
changed using “Vehicle Settings” of the ve-
hicle information display (if so equipped).
For additional information, see “Vehicle
information display ” (P. 2-24).
LPD3141
Inside lock
LPD2309
Pre-driving checks and adjustments3-5
Page 279 of 558
5 Starting and driving
Precautions when starting and driving..........5-4
Exhaust gas (carbon monoxide) ..............5-4
Three-way catalyst ...........................5-4
Tire Pressure Monitoring System
(TPMS) .......................................5-5
On-pavement and off-road driving
precautions ..................................5-9
Avoiding collision and rollover ................5-9
Off-roadrecovery ............................5-9
Rapid air pressure loss ......................5-10
Drinking alcohol/drugs and driving ..........5-10
Push-button ignition switch .....................5-11
Operating range ............................ 5-12
Push-button ignition switch positions .......5-12
Emergency engine shut off ..................5-13
NISSAN Intelligent Key® battery
discharge ................................... 5-13
NISSAN Anti-Thef t System (NATS)
(if so equipped) .............................. 5-14
NISSAN Vehicle Immobilizer System .........5-14
Before starting the engine .....................5-15
Starting the engine ............................. 5-15
Remote Engine Start (if so equipped) ........5-16
Driving the vehicle .............................. 5-17
Continuously Variable Transmission
(CVT) ........................................ 5-17Parking brake
.................................. 5-22
Hand type ................................... 5-22
Electronic parking brake (switch type) .......5-23
Automatic brake hold (if so equipped) ..........5-25
How to activate/deactivate the
automatic brake hold function ..............5-26
How to use the automatic brake hold
function ..................................... 5-26
Lane Departure Warning (LDW)
(if so equipped) ................................. 5-28
LDW system operation ......................5-29
How to enable/disable the LDW system .....5-31
LDW system limitations .....................5-32
System temporarily unavailable .............5-33
System malfunction ......................... 5-34
System maintenance .......................5-34
Blind Spot Warning (BSW) (if so equipped) .......5-35
BSW system operation ......................5-37
How to enable/disable the BSW system .....5-38
BSW system limitations .....................5-40
BS
W driving situations ....................... 5-41
System temporarily unavailable .............5-44
System maintenance .......................5-45
Rear Cross Traffic Alert (RCTA) (if so equipped) . . 5-46 RCTA system operation .....................5-47
Page 295 of 558
CONTINUOUSLY VARIABLE
TRANSMISSION (CVT)
WARNING
• Do not depress the accelerator pedal
while shif ting from P (Park) or N (Neu-
tral) to R (Reverse), D (Drive) or L (Low).
Always depress the brake pedal until
shif ting is completed. Failure to do so
could cause you to lose control and
have an accident.
• Cold engine idle speed is high, so use
caution when shif ting into a forward
or reverse gear before the engine has
warmed up.
• Do not downshif t abruptly on slip-
pery roads. This may cause a loss of
control.
• Never shif t to either the P (Park) or R
(Reverse) position while the vehicle is
moving forward and P (Park) or D
(Drive) position while the vehicle is
reversing. This could cause an acci-
dent or damage the transmission.
CAUTION
• Except in an emergency, do not shif t
to the N (Neutral) position while driv-
ing. Coasting with the transmission
in the N (Neutral) position may cause
serious damage to the transmission.
• To avoid possible damage to your ve-
hicle, when stopping the vehicle on
an uphill grade, do not hold the ve-
hicle by depressing the accelerator
pedal. The foot brake should be used
for this purpose.
The CVT in your vehicle is electronically
controlled to produce maximum power
and smooth operation.
The recommended operating procedures
for this transmission are shown on the fol-
lowing pages. Follow these procedures for
maximum vehicle performance and driv-
ing enjoyment.
NOTE:
Engine power may be automatically re-
duced to protect the CVT if the engine
speed increases quickly when driving on
slippery roads or while being tested on
some dynamometers.
Starting the vehicle
1. Af ter starting the engine, fully depress the foot brake pedal before moving the
shif t lever out of the P (Park) position.
This Continuously Variable Transmis-
sion is designed so that the foot brake
pedal must be depressed before shif t-
ing from P (Park) to any driving posi-
tion while the ignition switch is in the
ON position.
The shif t lever cannot be shif ted out of
the P (Park) position and into any of
the other positions if the ignition
switch is placed in the LOCK or OFF
position.
2. Keep the foot brake pedal depressed and move the shif t lever to a driving
position.
3. Release the parking brake and foot brake pedal, and then gradually start the
vehicle in motion.
DRIVING THE VEHICLE
Starting and driving5-17
Page 296 of 558
WARNING
• Do not depress the accelerator pedal
while shif ting from P (Park) or N (Neu-
tral) to R (Reverse), D (Drive) or L (Low)
position. Always depress the brake
pedal until shif ting is completed.
Failure to do so could cause you to
lose control and have an accident.
• Cold engine idle speed is high, so use
caution when shif ting into a forward
or reverse gear before the engine has
warmed up.
• Do not downshif t abruptly on slip-
pery roads. This may cause a loss of
control.
• Never shif t to either the P (Park) or R
(Reverse) position while the vehicle is
moving forward and P (Park) or D
(Drive) position while the vehicle is
reversing. This could cause an acci-
dent or damage the transmission.CAUTION
• To avoid possible damage to your ve-
hicle, when stopping the vehicle on
an uphill grade, do not hold the ve-
hicle by depressing the accelerator
pedal. The foot brake should be used
for this purpose.
• Except in an emergency, do not shif t
to the N (Neutral) position while driv-
ing. Coasting with the transmission
in the N (Neutral) position may cause
serious damage to the transmission.
Shif ting
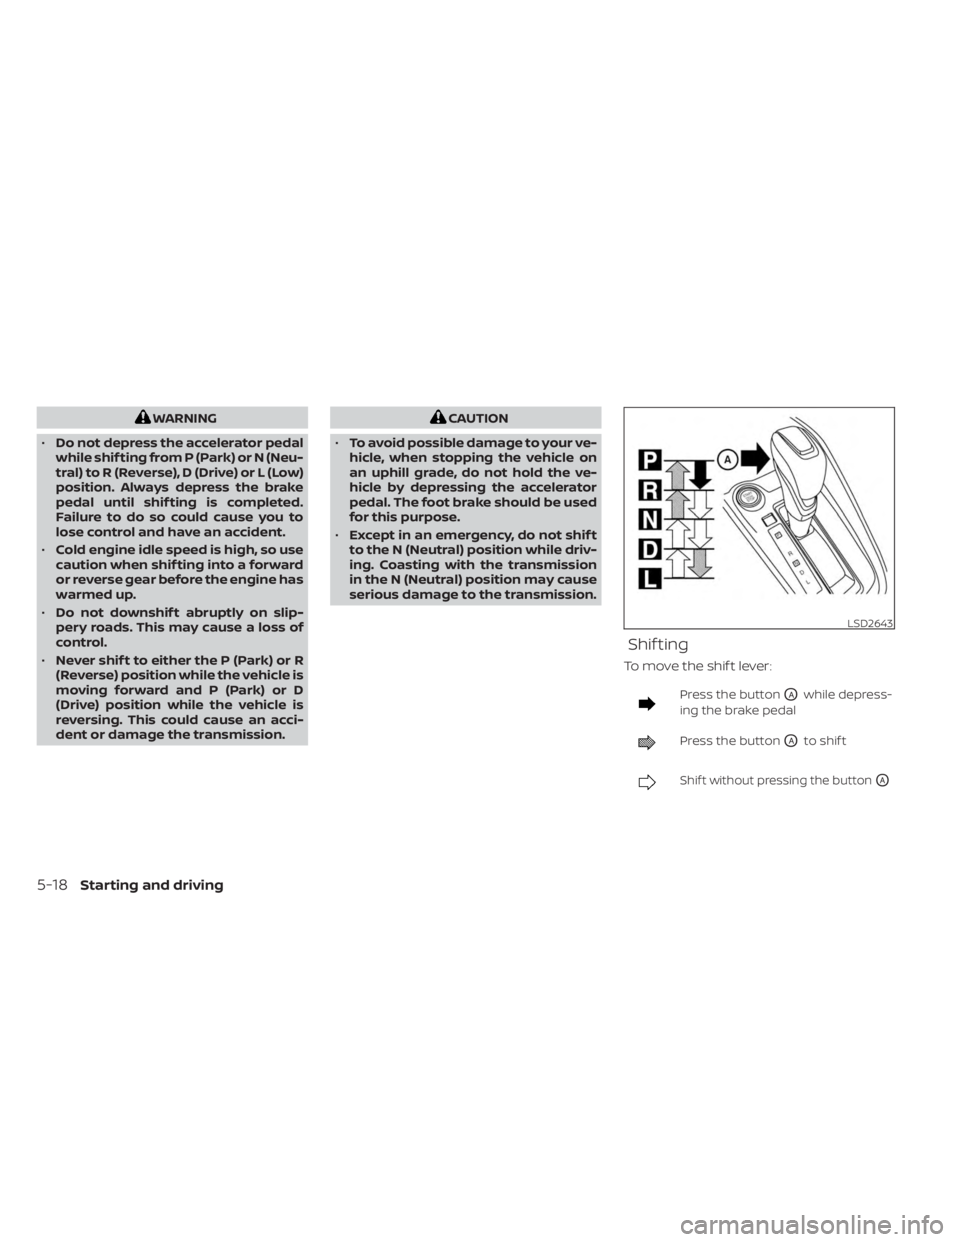
To move the shif t lever:
Press the buttonOAwhile depress-
ing the brake pedal
Press the buttonOAto shif t
Shif t without pressing the buttonOA
LSD2643
5-18Starting and driving
Page 297 of 558
Af ter starting the engine, fully depress the
brake pedal and move the shif t lever from P
(Park) to any of the desired shif t positions.
WARNING
Apply the parking brake if the shif t le-
ver is in any position while the engine is
not running. Failure to do so could
cause the vehicle to move unexpect-
edly or roll away and result in serious
personal injury or property damage.
P (Park)
CAUTION
To prevent transmission damage, use
the P (Park) position only when the ve-
hicle is completely stopped.
Use the P (Park) shif t lever position when
the vehicle is parked or when starting the
engine. Make sure the vehicle is completely
stopped.
The brake pedal should be depressed to
move the shif t lever from N (Neutral) or
any drive position to P (Park). The P (Park) position is automatically en-
gaged if you switch off the ignition.
Apply the parking brake. When parking on a
hill, apply the parking brake first, then move
the shif t lever into the P (Park) position.
R (Reverse)
CAUTION
To prevent transmission damage, use
the R (Reverse) position only when the
vehicle is completely stopped.
Use the R (Reverse) position to back up.
Make sure the vehicle is completely
stopped before selecting the R (Reverse)
position. The brake pedal must be de-
pressed in to move the shif t lever from P
(Park) or the shif t lever button pressed in
from N (Neutral) or any drive position to R
(Reverse).
N (Neutral)
Neither forward nor reverse gear is en-
gaged. The engine can be started in this
position. You may shif t to N (Neutral) and
restart a stalled engine while the vehicle is
moving.
D (Drive)
Use this position for all normal forward
driving.
L(Low)
Use this position for engine braking on
steep downhill gradients/climbing steep
slopes and whenever approaching sharp
bends. Do not use the L (Low) position in
any other circumstances.
Starting and driving5-19
Page 298 of 558
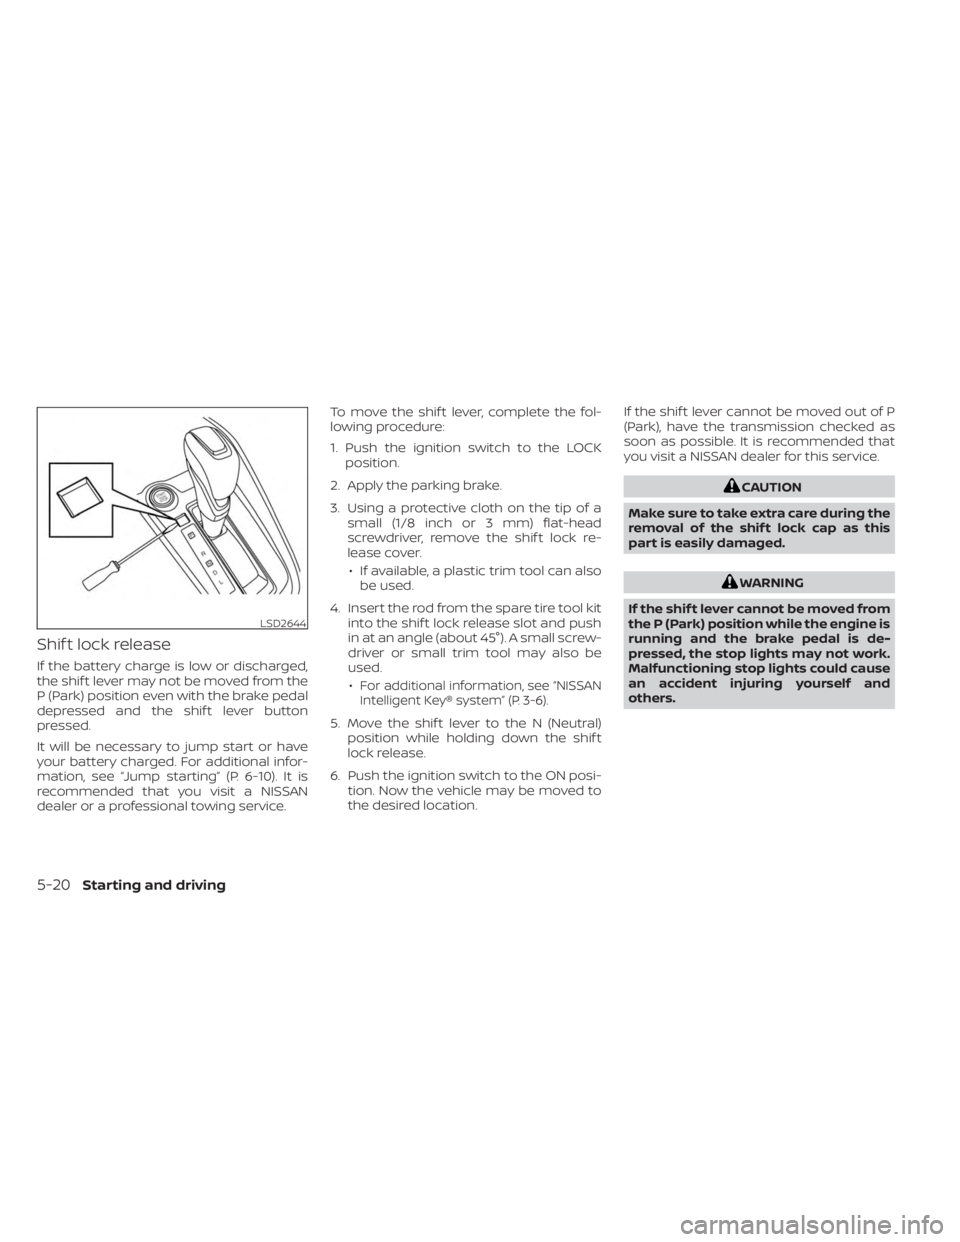
Shif t lock release
If the battery charge is low or discharged,
the shif t lever may not be moved from the
P (Park) position even with the brake pedal
depressed and the shif t lever button
pressed.
It will be necessary to jump start or have
your battery charged. For additional infor-
mation, see “Jump starting” (P. 6-10). It is
recommended that you visit a NISSAN
dealer or a professional towing service.To move the shif t lever, complete the fol-
lowing procedure:
1. Push the ignition switch to the LOCK
position.
2. Apply the parking brake.
3. Using a protective cloth on the tip of a small (1/8 inch or 3 mm) flat-head
screwdriver, remove the shif t lock re-
lease cover.
• If available, a plastic trim tool can also be used.
4. Insert the rod from the spare tire tool kit into the shif t lock release slot and push
in at an angle (about 45°). A small screw-
driver or small trim tool may also be
used.
•
For additional information, see “NISSAN
Intelligent Key® system” (P. 3-6).
5. Move the shif t lever to the N (Neutral) position while holding down the shif t
lock release.
6. Push the ignition switch to the ON posi- tion. Now the vehicle may be moved to
the desired location. If the shif t lever cannot be moved out of P
(Park), have the transmission checked as
soon as possible. It is recommended that
you visit a NISSAN dealer for this service.
CAUTION
Make sure to take extra care during the
removal of the shif t lock cap as this
part is easily damaged.
WARNING
If the shif t lever cannot be moved from
the P (Park) position while the engine is
running and the brake pedal is de-
pressed, the stop lights may not work.
Malfunctioning stop lights could cause
an accident injuring yourself and
others.
LSD2644
5-20Starting and driving
Page 299 of 558
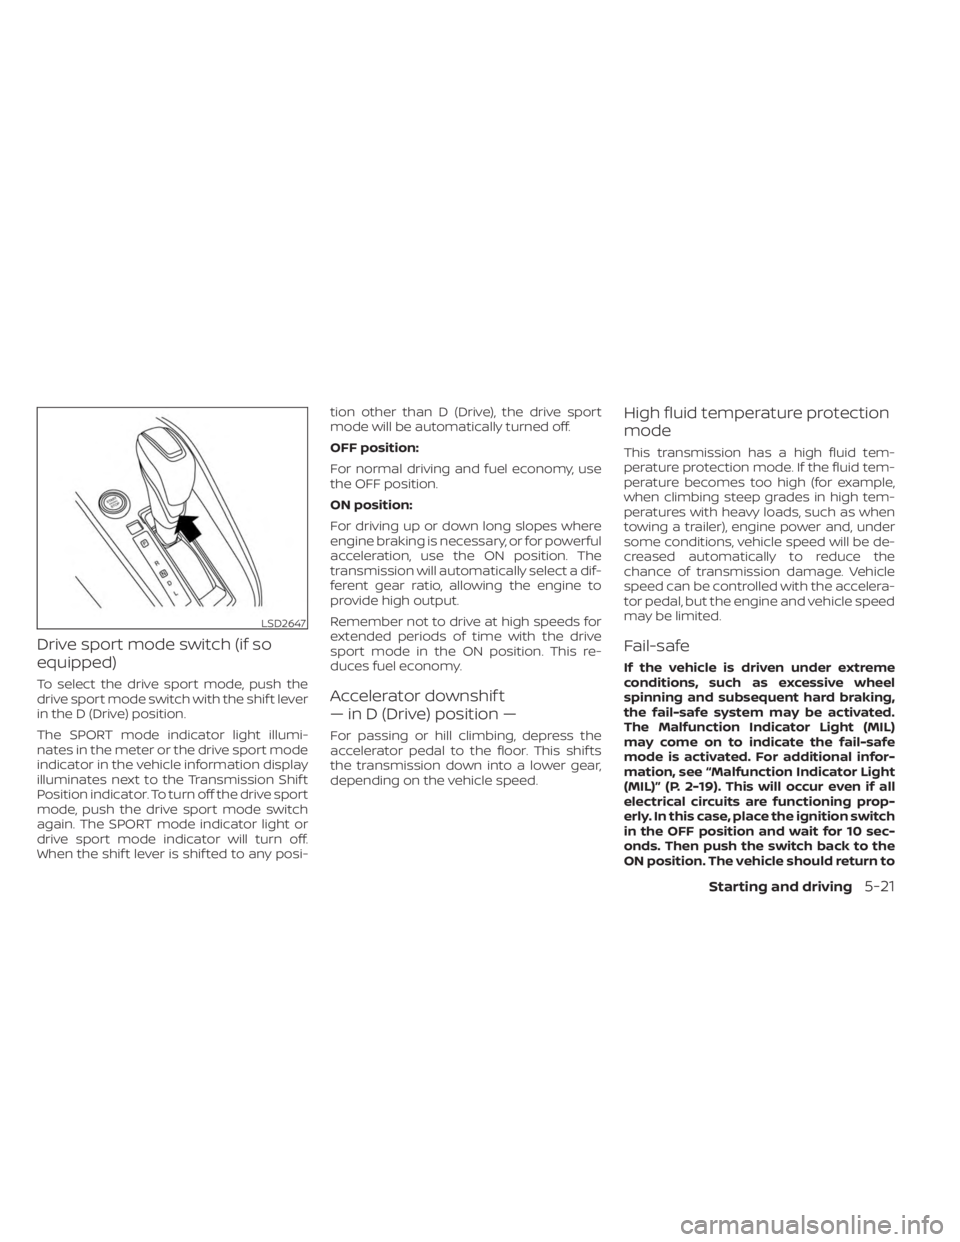
Drive sport mode switch (if so
equipped)
To select the drive sport mode, push the
drive sport mode switch with the shif t lever
in the D (Drive) position.
The SPORT mode indicator light illumi-
nates in the meter or the drive sport mode
indicator in the vehicle information display
illuminates next to the Transmission Shif t
Position indicator. To turn off the drive sport
mode, push the drive sport mode switch
again. The SPORT mode indicator light or
drive sport mode indicator will turn off.
When the shif t lever is shif ted to any posi-tion other than D (Drive), the drive sport
mode will be automatically turned off.
OFF position:
For normal driving and fuel economy, use
the OFF position.
ON position:
For driving up or down long slopes where
engine braking is necessary, or for powerful
acceleration, use the ON position. The
transmission will automatically select a dif-
ferent gear ratio, allowing the engine to
provide high output.
Remember not to drive at high speeds for
extended periods of time with the drive
sport mode in the ON position. This re-
duces fuel economy.Accelerator downshif t
— in D (Drive) position —
For passing or hill climbing, depress the
accelerator pedal to the floor. This shif ts
the transmission down into a lower gear,
depending on the vehicle speed.
High fluid temperature protection
mode
This transmission has a high fluid tem-
perature protection mode. If the fluid tem-
perature becomes too high (for example,
when climbing steep grades in high tem-
peratures with heavy loads, such as when
towing a trailer), engine power and, under
some conditions, vehicle speed will be de-
creased automatically to reduce the
chance of transmission damage. Vehicle
speed can be controlled with the accelera-
tor pedal, but the engine and vehicle speed
may be limited.
Fail-safe
If the vehicle is driven under extreme
conditions, such as excessive wheel
spinning and subsequent hard braking,
the fail-safe system may be activated.
The Malfunction Indicator Light (MIL)
may come on to indicate the fail-safe
mode is activated. For additional infor-
mation, see “Malfunction Indicator Light
(MIL)” (P. 2-19). This will occur even if all
electrical circuits are functioning prop-
erly. In this case, place the ignition switch
in the OFF position and wait for 10 sec-
onds. Then push the switch back to the
ON position. The vehicle should return to
LSD2647
Starting and driving5-21