2023 NISSAN KICKS engine coolant
[x] Cancel search: engine coolantPage 18 of 558
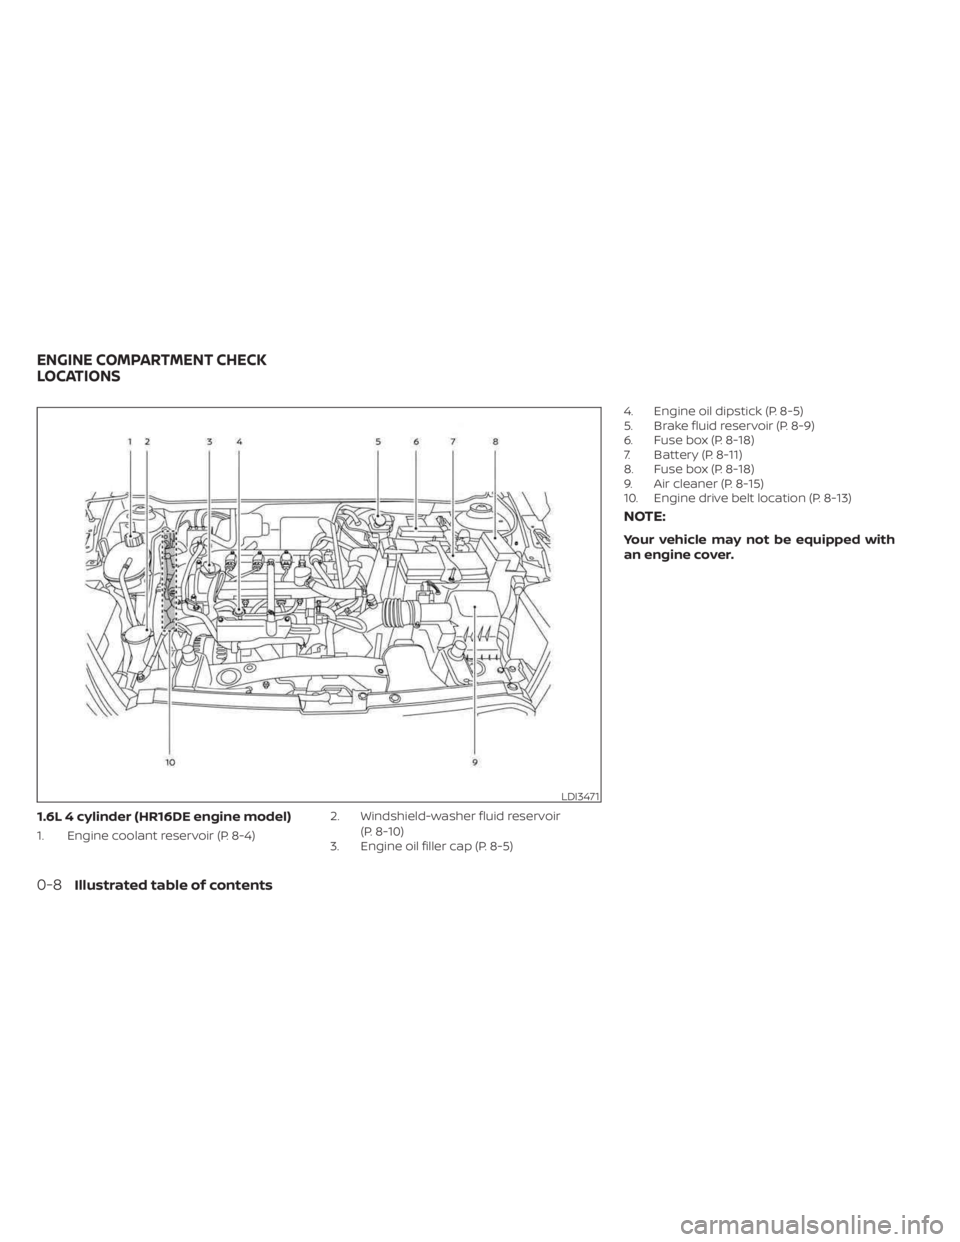
1.6L 4 cylinder (HR16DE engine model)
1. Engine coolant reservoir (P. 8-4)2. Windshield-washer fluid reservoir
(P. 8-10)
3. Engine oil filler cap (P. 8-5) 4. Engine oil dipstick (P. 8-5)
5. Brake fluid reservoir (P. 8-9)
6. Fuse box (P. 8-18)
7. Battery (P. 8-11)
8. Fuse box (P. 8-18)
9. Air cleaner (P. 8-15)
10. Engine drive belt location (P. 8-13)
NOTE:
Your vehicle may not be equipped with
an engine cover.
LDI3471
ENGINE COMPARTMENT CHECK
LOCATIONS
0-8Illustrated table of contents
Page 103 of 558
High temperature warning
light (if so equipped)
When the ignition switch is placed in the
ON position, the high temperature warning
light illuminates and then turns off. This
indicates that the high temperature
sensor in the engine coolant system is
operational.
When driving, the high temperature
warning light may turn off. This indicates
that the engine coolant temperature is
within the normal range.
CAUTION
If the high temperature warning light
illuminates while the engine is running,
it may indicate the engine temperature
is extremely high. Stop the vehicle
safely as soon as possible. If the vehicle
is overheated, continuing vehicle op-
eration may seriously damage the en-
gine. For additional information, see “If
your vehicle overheats” (P. 6-12).
LED Headlight system
warning light (if so
equipped)
This light illuminates when there is an error
with the system.
For additional information, see “Headlight
and turn signal switch” (P. 2-44).
Master warning light (if so
equipped)
This light illuminates red when various ve-
hicle information display warnings appear.
For additional information, see “Vehicle in-
formation display” (P. 2-24).
Rear seat belt warning light
and chime (if so equipped)
This warning light appears for 65 seconds
af ter the ignition is placed in the ON posi-
tion and the engine is started.
This warning light shows the status of the
three rear seat belts. When one of the rear
seat belts are buckled, the corresponding
rear seat belt indicator will appear white or
not illuminate for models with a trip com-
puter. When one of the rear seat belts are
unbuckled, the corresponding rear seat
belt indicator will appear red. Af ter a change in buckle status, a chime will
sound and the warning will appear for an-
other 65 seconds.
Seat belt warning light and
chime
The light and chime remind you to fasten
the driver and front passenger seat belts.
For additional information, see “Seat belts”
(P. 1-9).
Security indicator light
This light blinks when the ignition switch is
placed in the OFF or LOCK position.
The blinking security indicator light indi-
cates that the security systems equipped
on the vehicle are operational.
For additional information, see “Security
systems” (P. 2-38).
Supplemental air bag
warning light
When the ignition switch is placed in the ON
position, the supplemental air bag warning
light illuminates for about 7 seconds and
then turns off. This means the system is
operational.
Instruments and controls2-15
Page 115 of 558
Menu itemExplanation
Timer Alert Allows user to set or reset an alert at a specific time interval.
Low Temperature Alert Allows user to turn the low temperature alert on or off.
Chassis Control Displays the available chassis control options.
Active Trace Control Allows the user to turn the Intelligent Trace Control (I-TC) feature on or off. For additional information, see
“Chassis Control” (P. 5-137).
Active Engine Brake Allows the user to turn the Intelligent Engine Brake (I-EB) feature on or off. For additional information, see
“Chassis Control” (P. 5-137).
Customize Display
The customize display menu allows the user to customize the information that appears in the vehicle information display.
Some menu items shown below may not be equipped on your vehicle.
Menu item Explanation
Main Menu Selection Displays available screens that can be shown in the vehicle information display.
Status Allows user to turn the status screen on or off in the vehicle information display.
Drive Computer Allows user to turn the drive computer screen on or off in the vehicle information display.
Driving Aids Allows user to turn the driving aids screen on or off in the vehicle information display.
Tire Pressures Allows user to turn the tire pressures screen on or off in the vehicle information display.
Coolant Temp. Allows user to turn the coolant temp. screen on or off in the vehicle information display.
Chassis Control Allows user to turn the chassis control screen on or off in the vehicle information display.
ECO Info Settings Displays the available ECO info settings.
ECO Drive Report Select to display this report when the ignition in switch is placed in the ON position.
View History Select to view the vehicle’s history.
Welcome Effect Displays the available welcome effect settings.
Gauges Allows user to turn the gauges effect on or off.
Animation Allows user to turn the animation effect on or off.
Instruments and controls2-27
Page 121 of 558
WARNING
Selecting “Dismiss Message” during a
stop within a trip temporarily dis-
misses the message for that stop with-
out turning the system off. Alerts can
be provided for other stops during the
trip. Selecting “Disable Alert” turns off
the Rear Door Alert system for the re-
mainder of a trip and no audible alert
will be provided.
NOTE:
This system is disabled until a driver en-
ables it using the vehicle information
display. For additional information, see
“How to use the vehicle information dis-
play ” (P. 2-24).
For additional information, see “Rear Door
Alert” (P. 2-58).
Check Back Seat For All Articles
When the system is enabled, this message
appears when the vehicle comes to a com-
plete stop, the vehicle is transitioned from
the D (Drive) position to P (Park) position,
and the driver exits the vehicle. This mes-
sage alerts the driver, af ter a period of time,
to check for items in the rear seat af ter the
audible alert has been provided.
NOTE:
This system is disabled until a driver en-
ables it using the vehicle information
display. For additional information, see
“How to use the vehicle information dis-
play ” (P. 2-24).
For additional information, see “Rear Door
Alert” (P. 2-58).
Door/lif tgate Open
This warning appears when a door or the
lif tgate has been opened.
Headlight System Error: See Owner’s
Manual
This warning appears when there is an er-
ror with the system. For additional informa-
tion, see “Headlight and turn signal switch”
(P. 2-44).
High Coolant Temp: See
Owner’s Manual
This warning appears when the tempera-
ture of the engine coolant is too high. Stop
the vehicle in a safe location as soon as
possible. Avoid quick starting or abrupt ac-
celeration. When the warning turns off, the
vehicle can be driven. If the warning appears again soon af ter it
turns off, have the vehicle checked. It is rec-
ommended that you visit a NISSAN dealer
for this service.
Illumination indicator
This indicator shows the illumination ad-
justment of the instrument panel. For addi-
tional information, see “Instrument bright-
ness control” (P. 2-50).
Low Fuel
This warning appears when the fuel level in
the fuel tank is getting low. Refuel as soon
as it is convenient, preferably before the
fuel gauge reaches 0 (Empty).
There will be
a small reserve of fuel in the tank when
the fuel gauge needle reaches 0 (Empty).
Low Outside Temperature
This warning appears if the outside tem-
perature is below 37°F (3°C). The tempera-
ture can be changed to display in Celsius or
Fahrenheit. For additional information, see
“Settings” (P. 2-25).
Instruments and controls2-33
Page 238 of 558
Temperature control dial
The temperature control dial allows you to
adjust the temperature of the outlet air. To
lower the temperature, turn the dial to the
lef t. To increase the temperature, turn the
dial to the right.
Air recirculation
Press theair recirculation button to
recirculate interior air inside the vehicle.
A/C (air conditioner) button
Start the engine, turn thefan speed
control dial to the desired position and
press the
button to turn on the air
conditioner. To turn off the air conditioner,
press the
button again.
The air conditioner cooling function op-
erates only when the engine is running.
Air flow control
Press thebutton to manually control
air flow and select the air outlet.
— Air flows from center and side
vents.
— Air flows from center and sidevents and foot outlets.
— Air flows mainly from footoutlets.
— Air flows from defroster andfoot outlets.
To turn system off
To turn off the heater and air conditioner,
press the ON-OFF button. Press the ON-
OFF button again, the system will turn on in
the mode which was used immediately
before the system was turned off.
Rear window and outside mirror
(if so equipped) defroster switch
For additional information, see “Rear win-
dow and outside mirror (if so equipped)
defroster switch” (P. 2-43).
Heated seat switches (if so
equipped)
For additional information, see “Heated
seat switches” (P. 2-52).
Heated steering wheel switch
(if so equipped)
For additional information, see “Heated
steering wheel switch” (P. 2-53).
OPERATING TIPS
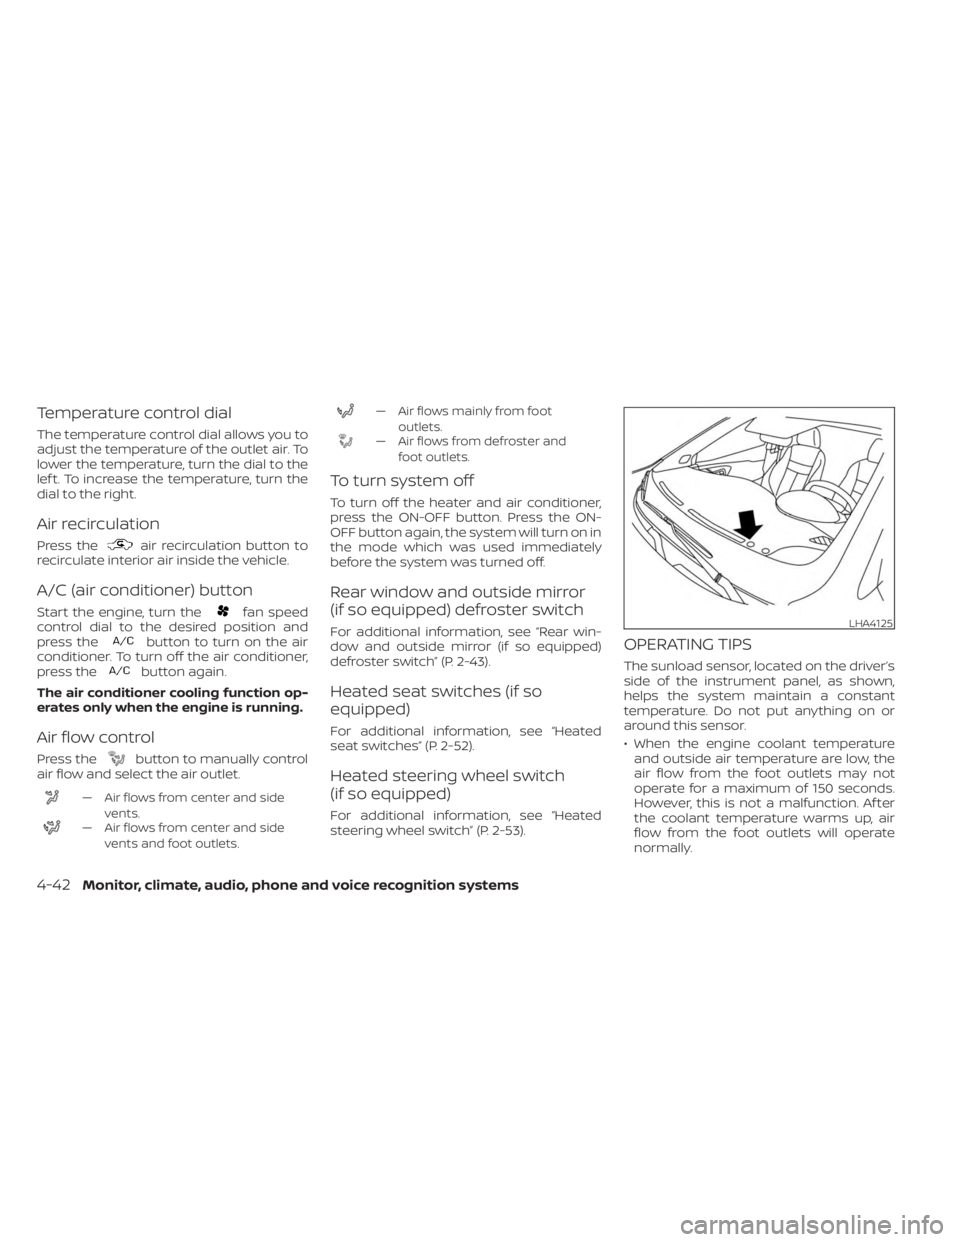
The sunload sensor, located on the driver’s
side of the instrument panel, as shown,
helps the system maintain a constant
temperature. Do not put anything on or
around this sensor.
• When the engine coolant temperatureand outside air temperature are low, the
air flow from the foot outlets may not
operate for a maximum of 150 seconds.
However, this is not a malfunction. Af ter
the coolant temperature warms up, air
flow from the foot outlets will operate
normally.
LHA4125
4-42Monitor, climate, audio, phone and voice recognition systems
Page 281 of 558
I-FCW system limitations...................5-116
System temporarily unavailable ............5-121
System malfunction ........................ 5-123
System maintenance ......................5-124
Intelligent Driver Alertness (I-DA)
(if so equipped) ................................ 5-125
Intelligent Driver Alertness system
operation .................................. 5-126
How to enable/disable the Intelligent
Driver Alertness (I-DA) system ..............5-126
Intelligent Driver Alertness (I-DA)
system limitations ......................... 5-127
Break-in schedule ............................. 5-128
Fuel efficient driving tips .......................5-128
Increasing fuel economy ......................5-129
Parking/parking on hills .......................5-130
Power steering ................................ 5-131
Brake system ................................. 5-132
Brake precautions .......................... 5-132
Anti-lock Braking System (ABS) .............5-132
Brake Assist ................................ 5-134
Vehicle Dynamic Control (VDC) system ........5-134
Brake force distribution ....................5-136Chassis Control (if so equipped)
...............5-137
Intelligent Trace Control (I-TC) ..............5-137
Intelligent Engine Brake (I-EB) ...............5-138
Active Ride Control (ARC) ...................5-138
Hill Start Assist ................................ 5-139
Rear Sonar System (RSS) (if so equipped) ......5-140
System operation .......................... 5-141
How to enable/disable the sonar
system ..................................... 5-142
Sonar limitations ........................... 5-144
System temporarily unavailable ............5-144
System maintenance ......................5-144
Cold weather driving .......................... 5-145
Freeing a frozen door lock ..................5-145
Antifreeze .................................. 5-145
Battery..................................... 5-145
Dr
aining of coolant water ..................5-145
Tire equipment ............................. 5-145
Special winter equipment ..................5-146
Driving on snow or ice ......................5-146
Parking brake .............................. 5-146
Engine block heater (if so equipped) ........5-146
Page 423 of 558
Do not attach stickers (including transpar-
ent material), install accessories or apply
additional paint near the sonar sensors.
Do not strike or damage the area around
the sonar sensors. It is recommended that
you visit a NISSAN dealer if the area around
the sonar sensors is damaged due to a
collision.FREEING A FROZEN DOOR LOCK
To prevent a door lock from freezing, apply
de-icer through the key hole. If the lock
becomes frozen, heat the key before in-
serting it into the key hole or use the re-
mote keyless entry function on the Intelli-
gent Key.
ANTIFREEZE
In the winter when it is anticipated that the
temperature will drop below 32°F (0°C),
check the antifreeze to assure proper win-
ter protection. For additional information,
see “Engine cooling system” (P. 8-4).
BATTERY
If the battery is not fully charged during
extremely cold weather conditions, the
battery fluid may freeze and damage the
battery. To maintain maximum efficiency,
the battery should be checked regularly.
This vehicle is equipped with a sealed
maintenance free battery. It is recom-
mended that you visit a NISSAN dealer for
service.
DRAINING OF COOLANT WATER
If the vehicle is to be lef t outside without
antifreeze, drain the cooling system, includ-
ing the engine block. Refill before operating
the vehicle. For additional information, see
“Changing engine coolant” (P. 8-5).
TIRE EQUIPMENT
1. SUMMER tires have a tread designed toprovide superior performance on dry
pavement. However, the performance of
these tires will be substantially reduced
in snowy and icy conditions. If you oper-
ate your vehicle on snowy or icy roads,
NISSAN recommends the use of MUD &
SNOW or ALL SEASON TIRES on all four
wheels. It is recommended that you visit
a NISSAN dealer for the tire type, size,
speed rating and availability information.
2. For additional traction on icy roads, studded tires may be used. However,
some states, provinces and territories
prohibit their use. Check local laws be-
fore installing studded tires.
Skid and traction capabilities of studded
snow tires on wet or dry surfaces may be
poorer than that of non-studded snow
tires.
COLD WEATHER DRIVING
Starting and driving5-145
Page 425 of 558
To use the engine block heater:
1. Turn the engine off.
2. Open the hood and unwrap the engineblock heater cord.
3. Plug the engine block heater cord into a grounded 3-wire, 3-pronged extension
cord.
4. Plug the extension cord into a Ground Fault Interrupt (GFI) protected, grounded
110-volt AC (VAC) outlet.
5. The engine block heater must be plugged in for at least2-4hours, de-
pending on outside temperatures, to
properly warm the engine coolant. Use
an appropriate timer to turn the engine
block heater on.
6. Before starting the engine, unplug and properly store the cord to keep it away
from moving parts.
Starting and driving5-147