2023 NISSAN KICKS AUX
[x] Cancel search: AUXPage 16 of 558
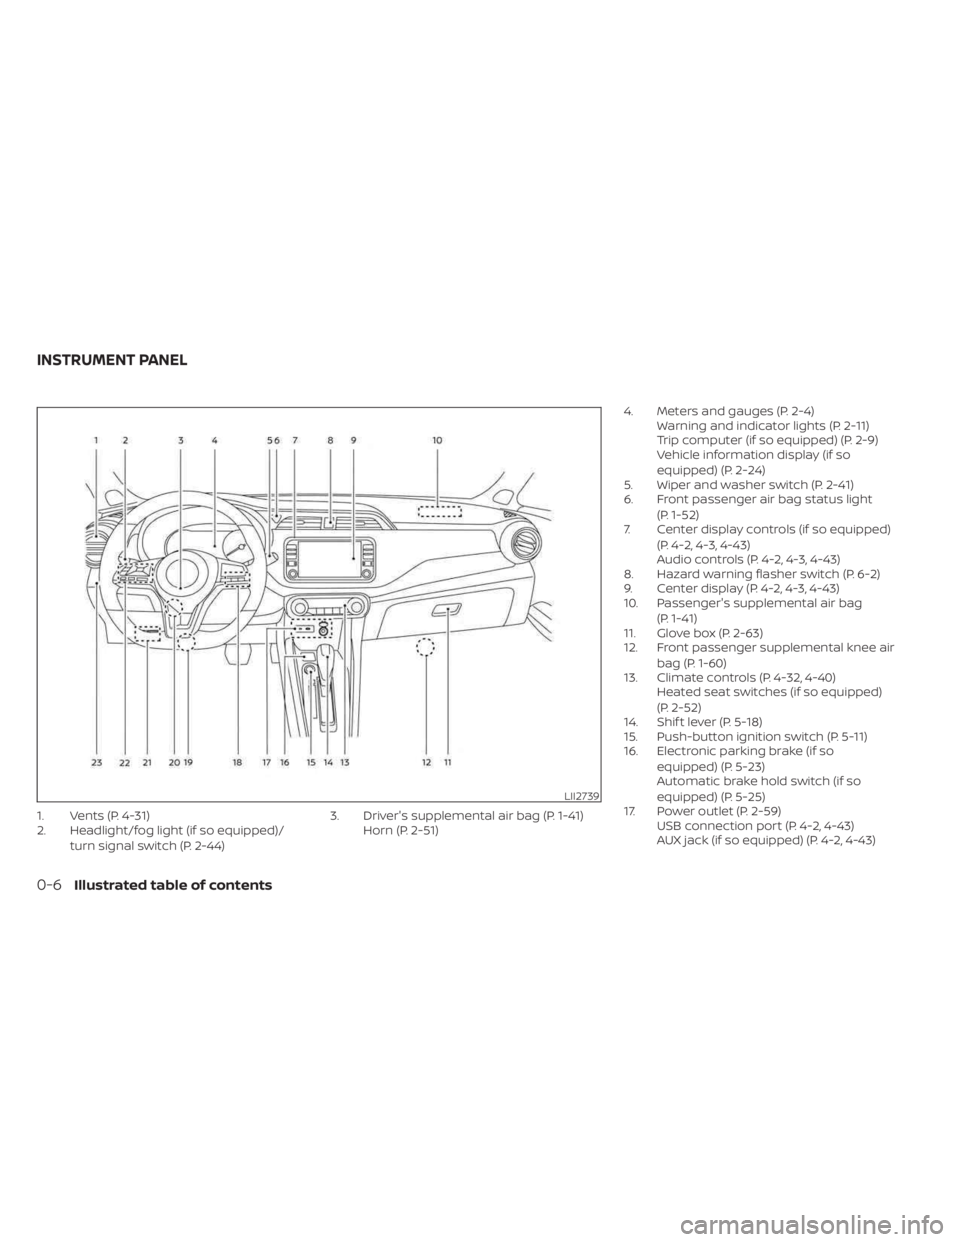
1. Vents (P. 4-31)
2. Headlight/fog light (if so equipped)/turn signal switch (P. 2-44) 3. Driver's supplemental air bag (P. 1-41)
Horn (P. 2-51) 4. Meters and gauges (P. 2-4)
Warning and indicator lights (P. 2-11)
Trip computer (if so equipped) (P. 2-9)
Vehicle information display (if so
equipped) (P. 2-24)
5. Wiper and washer switch (P. 2-41)
6. Front passenger air bag status light
(P. 1-52)
7. Center display controls (if so equipped)
(P. 4-2, 4-3, 4-43)
Audio controls (P. 4-2, 4-3, 4-43)
8. Hazard warning flasher switch (P. 6-2)
9. Center display (P. 4-2, 4-3, 4-43)
10. Passenger's supplemental air bag
(P. 1-41)
11. Glove box (P. 2-63)
12. Front passenger supplemental knee air
bag (P. 1-60)
13. Climate controls (P. 4-32, 4-40) Heated seat switches (if so equipped)
(P. 2-52)
14. Shif t lever (P. 5-18)
15. Push-button ignition switch (P. 5-11)
16. Electronic parking brake (if so
equipped) (P. 5-23)
Automatic brake hold switch (if so
equipped) (P. 5-25)
17. Power outlet (P. 2-59) USB connection port (P. 4-2, 4-43)
AUX jack (if so equipped) (P. 4-2, 4-43)
LII2739
INSTRUMENT PANEL
0-6Illustrated table of contents
Page 90 of 558
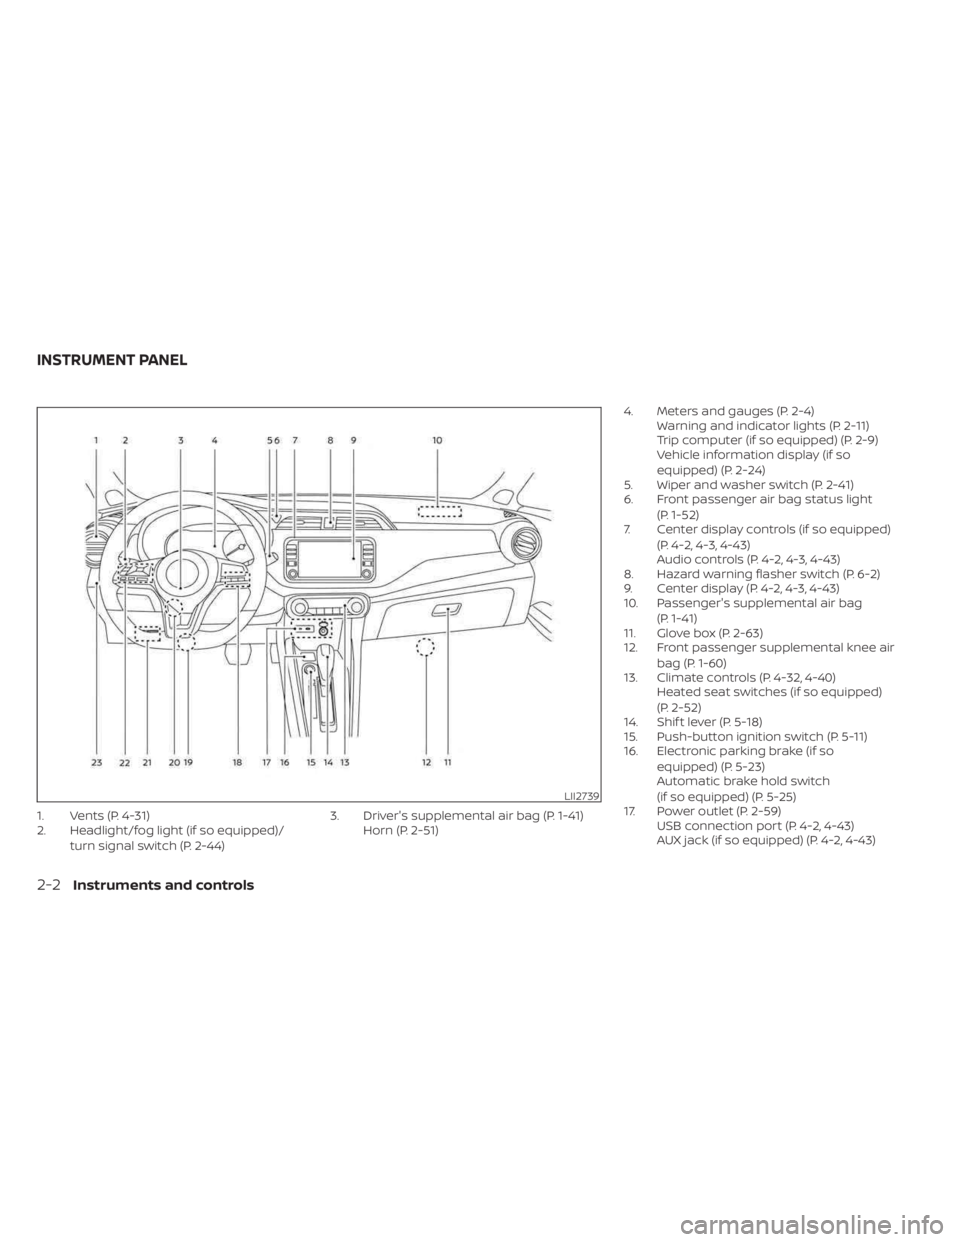
1. Vents (P. 4-31)
2. Headlight/fog light (if so equipped)/turn signal switch (P. 2-44) 3. Driver's supplemental air bag (P. 1-41)
Horn (P. 2-51) 4. Meters and gauges (P. 2-4)
Warning and indicator lights (P. 2-11)
Trip computer (if so equipped) (P. 2-9)
Vehicle information display (if so
equipped) (P. 2-24)
5. Wiper and washer switch (P. 2-41)
6. Front passenger air bag status light
(P. 1-52)
7. Center display controls (if so equipped)
(P. 4-2, 4-3, 4-43)
Audio controls (P. 4-2, 4-3, 4-43)
8. Hazard warning flasher switch (P. 6-2)
9. Center display (P. 4-2, 4-3, 4-43)
10. Passenger's supplemental air bag
(P. 1-41)
11. Glove box (P. 2-63)
12. Front passenger supplemental knee air
bag (P. 1-60)
13. Climate controls (P. 4-32, 4-40) Heated seat switches (if so equipped)
(P. 2-52)
14. Shif t lever (P. 5-18)
15. Push-button ignition switch (P. 5-11)
16. Electronic parking brake (if so
equipped) (P. 5-23)
Automatic brake hold switch
(if so equipped) (P. 5-25)
17. Power outlet (P. 2-59) USB connection port (P. 4-2, 4-43)
AUX jack (if so equipped) (P. 4-2, 4-43)
LII2739
INSTRUMENT PANEL
2-2Instruments and controls
Page 203 of 558
(brightness control) BUTTON
To change the display brightness, press thebutton. Pressing the button again will
change the display to the day or the night
display.
Press and hold the
button for more
than 2 seconds to turn the display off. Press
and hold the button again to turn the dis-
play on.
HOW TO USE THE VOL (volume)
KNOB / PUSH
(power)
BUTTON
Press the PUSH(power) button to turn
audio function on and off. Turn the VOL
(volume) knob to adjust audio volume.
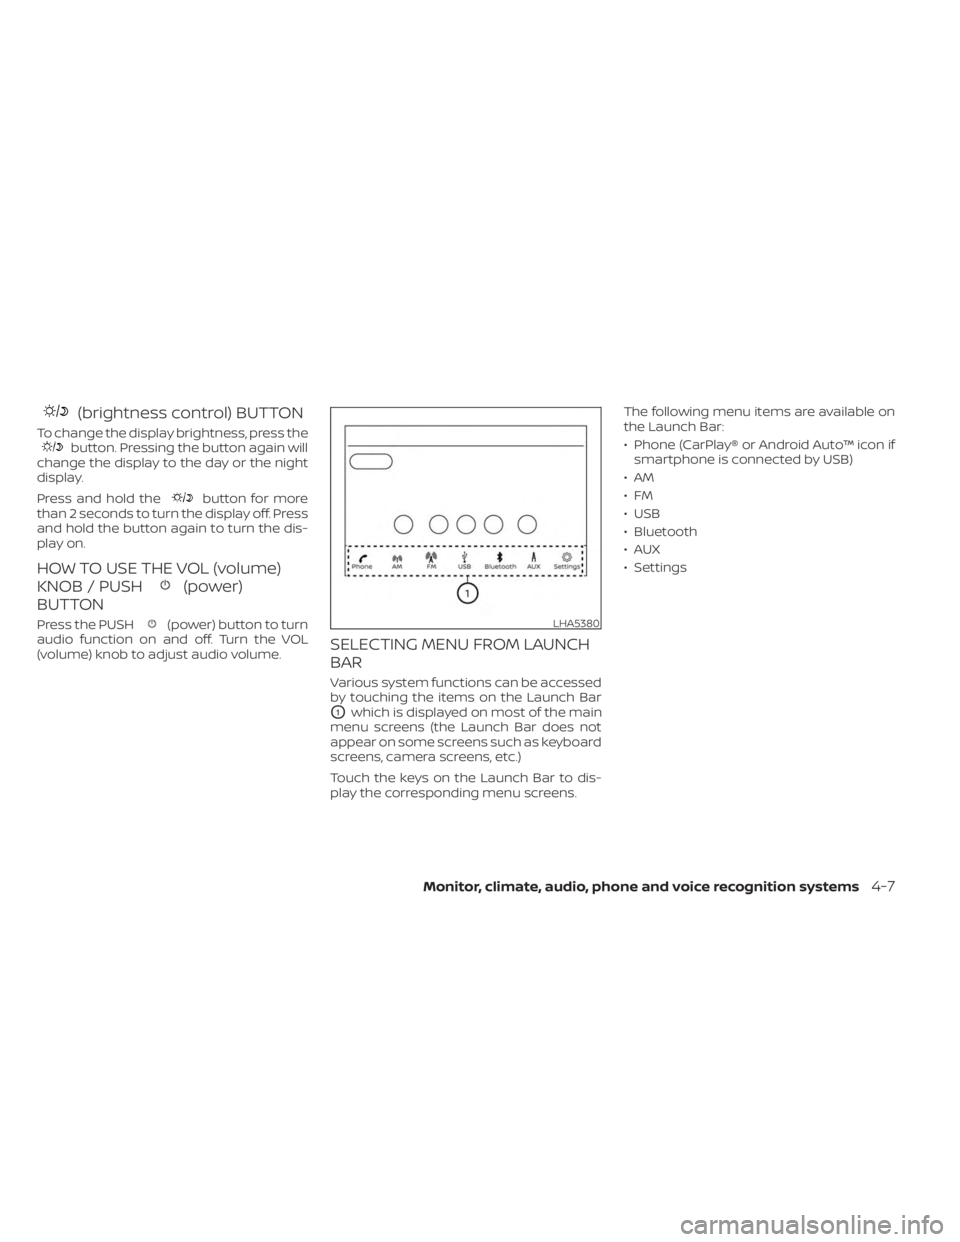
SELECTING MENU FROM LAUNCH
BAR
Various system functions can be accessed
by touching the items on the Launch Bar
O1which is displayed on most of the main
menu screens (the Launch Bar does not
appear on some screens such as keyboard
screens, camera screens, etc.)
Touch the keys on the Launch Bar to dis-
play the corresponding menu screens. The following menu items are available on
the Launch Bar:
• Phone (CarPlay® or Android Auto™ icon if
smartphone is connected by USB)
•AM
•FM
• USB
• Bluetooth
•AUX
• Settings
LHA5380
Monitor, climate, audio, phone and voice recognition systems4-7
Page 244 of 558
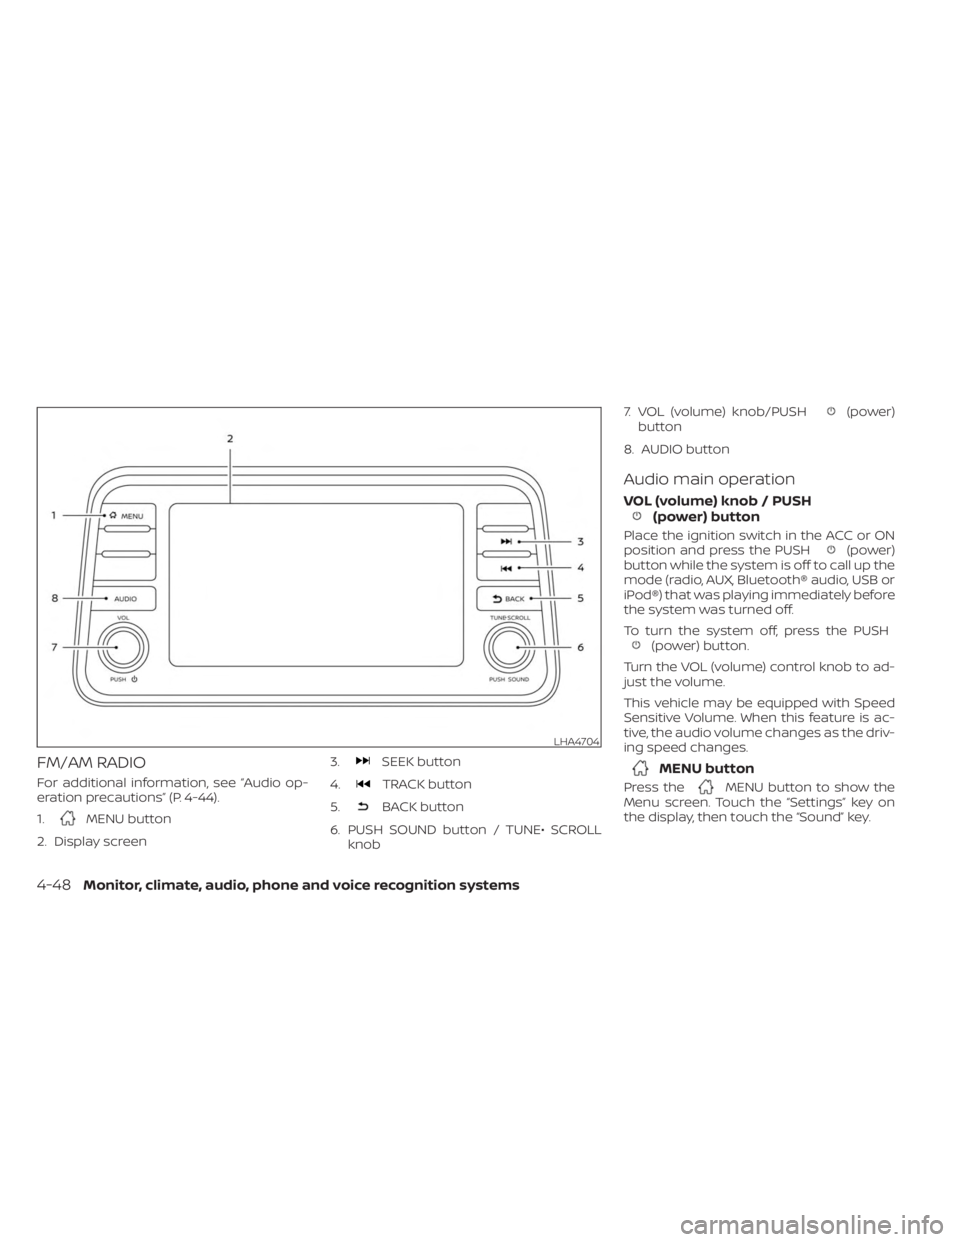
FM/AM RADIO
For additional information, see “Audio op-
eration precautions” (P. 4-44).
1.
MENU button
2. Display screen 3.
SEEK button
4.
TRACK button
5.
BACK button
6. PUSH SOUND button / TUNE• SCROLL knob 7. VOL (volume) knob/PUSH
(power)
button
8. AUDIO button
Audio main operation
VOL (volume) knob / PUSH(power) button
Place the ignition switch in the ACC or ON
position and press the PUSH(power)
button while the system is off to call up the
mode (radio, AUX, Bluetooth® audio, USB or
iPod®) that was playing immediately before
the system was turned off.
To turn the system off, press the PUSH
(power) button.
Turn the VOL (volume) control knob to ad-
just the volume.
This vehicle may be equipped with Speed
Sensitive Volume. When this feature is ac-
tive, the audio volume changes as the driv-
ing speed changes.
MENU button
Press theMENU button to show the
Menu screen. Touch the “Settings” key on
the display, then touch the “Sound” key.
LHA4704
4-48Monitor, climate, audio, phone and voice recognition systems
Page 248 of 558
Auxiliary (AUX) devices operation
(if so equipped)
Connecting auxiliary devices
Connect an AUX device into the AUX input
jack located on the center console below
the heater and air conditioner controls.
The AUX input jack accepts any standard
analog audio input such as from a portable
cassette player, CD player, MP3 player or
phone.
Insert a 1/8 in (3.5 mm) stereo mini plug in
the audio input jack. If a cable with a mono
plug is used, the audio output may not
function normally.
Activation and playing
Turn on the AUX device. Connect an AUX
cable to the AUX device and the AUX input
jack. Select AUX mode from the audio
source menu screen or by pressing the
Source button on the steering wheel.
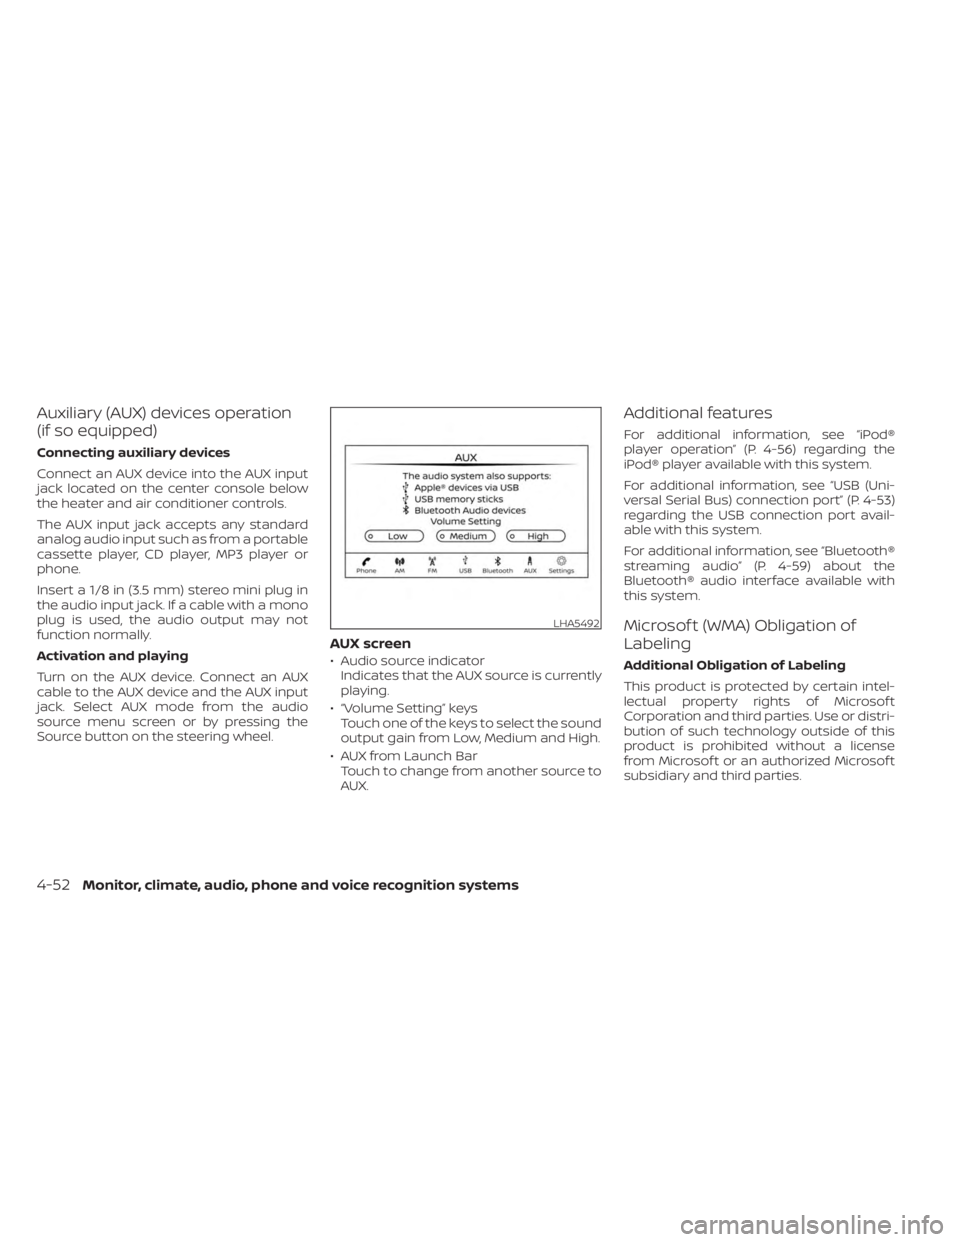
AUX screen
• Audio source indicatorIndicates that the AUX source is currently
playing.
• “Volume Setting” keys Touch one of the keys to select the sound
output gain from Low, Medium and High.
• AUX from Launch Bar Touch to change from another source to
AUX.
Additional features
For additional information, see “iPod®
player operation” (P. 4-56) regarding the
iPod® player available with this system.
For additional information, see “USB (Uni-
versal Serial Bus) connection port” (P. 4-53)
regarding the USB connection port avail-
able with this system.
For additional information, see “Bluetooth®
streaming audio” (P. 4-59) about the
Bluetooth® audio interface available with
this system.
Microsof t (WMA) Obligation of
Labeling
Additional Obligation of Labeling
This product is protected by certain intel-
lectual property rights of Microsof t
Corporation and third parties. Use or distri-
bution of such technology outside of this
product is prohibited without a license
from Microsof t or an authorized Microsof t
subsidiary and third parties.
LHA5492
4-52Monitor, climate, audio, phone and voice recognition systems
Page 258 of 558
STEERING WHEEL SWITCH FOR
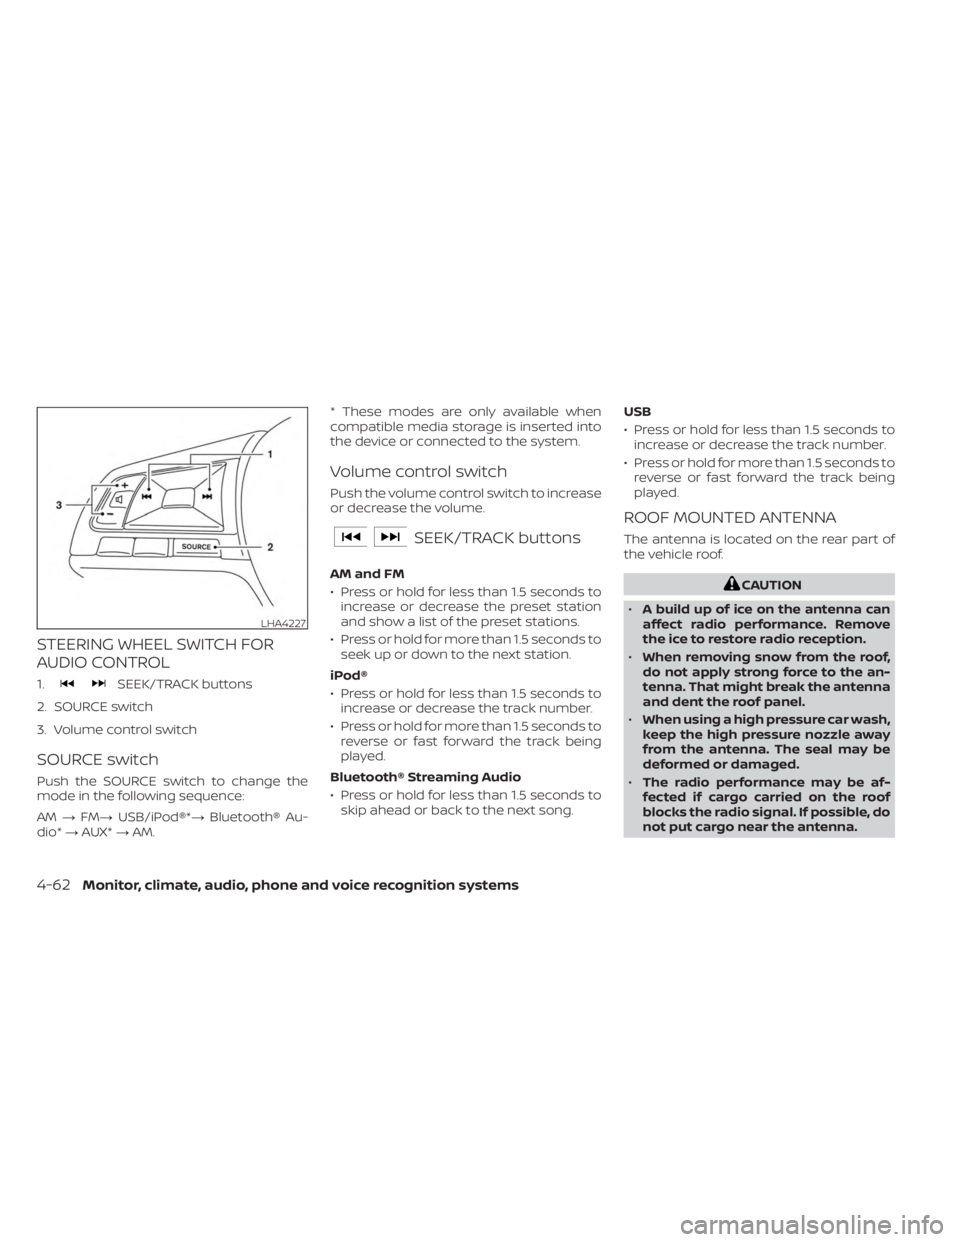
AUDIO CONTROL
1.SEEK/TRACK buttons
2. SOURCE switch
3. Volume control switch
SOURCE switch
Push the SOURCE switch to change the
mode in the following sequence:
AM →FM→ USB/iPod®*→ Bluetooth® Au-
dio* →AUX* →AM. * These modes are only available when
compatible media storage is inserted into
the device or connected to the system.
Volume control switch
Push the volume control switch to increase
or decrease the volume.
SEEK/TRACK buttons
AM and FM
• Press or hold for less than 1.5 seconds to
increase or decrease the preset station
and show a list of the preset stations.
• Press or hold for more than 1.5 seconds to seek up or down to the next station.
iPod®
• Press or hold for less than 1.5 seconds to increase or decrease the track number.
• Press or hold for more than 1.5 seconds to reverse or fast forward the track being
played.
Bluetooth® Streaming Audio
• Press or hold for less than 1.5 seconds to skip ahead or back to the next song. USB
• Press or hold for less than 1.5 seconds to
increase or decrease the track number.
• Press or hold for more than 1.5 seconds to reverse or fast forward the track being
played.
ROOF MOUNTED ANTENNA
The antenna is located on the rear part of
the vehicle roof.
CAUTION
• A build up of ice on the antenna can
affect radio performance. Remove
the ice to restore radio reception.
• When removing snow from the roof,
do not apply strong force to the an-
tenna. That might break the antenna
and dent the roof panel.
• When using a high pressure car wash,
keep the high pressure nozzle away
from the antenna. The seal may be
deformed or damaged.
• The radio performance may be af-
fected if cargo carried on the roof
blocks the radio signal. If possible, do
not put cargo near the antenna.
LHA4227
4-62Monitor, climate, audio, phone and voice recognition systems
Page 261 of 558
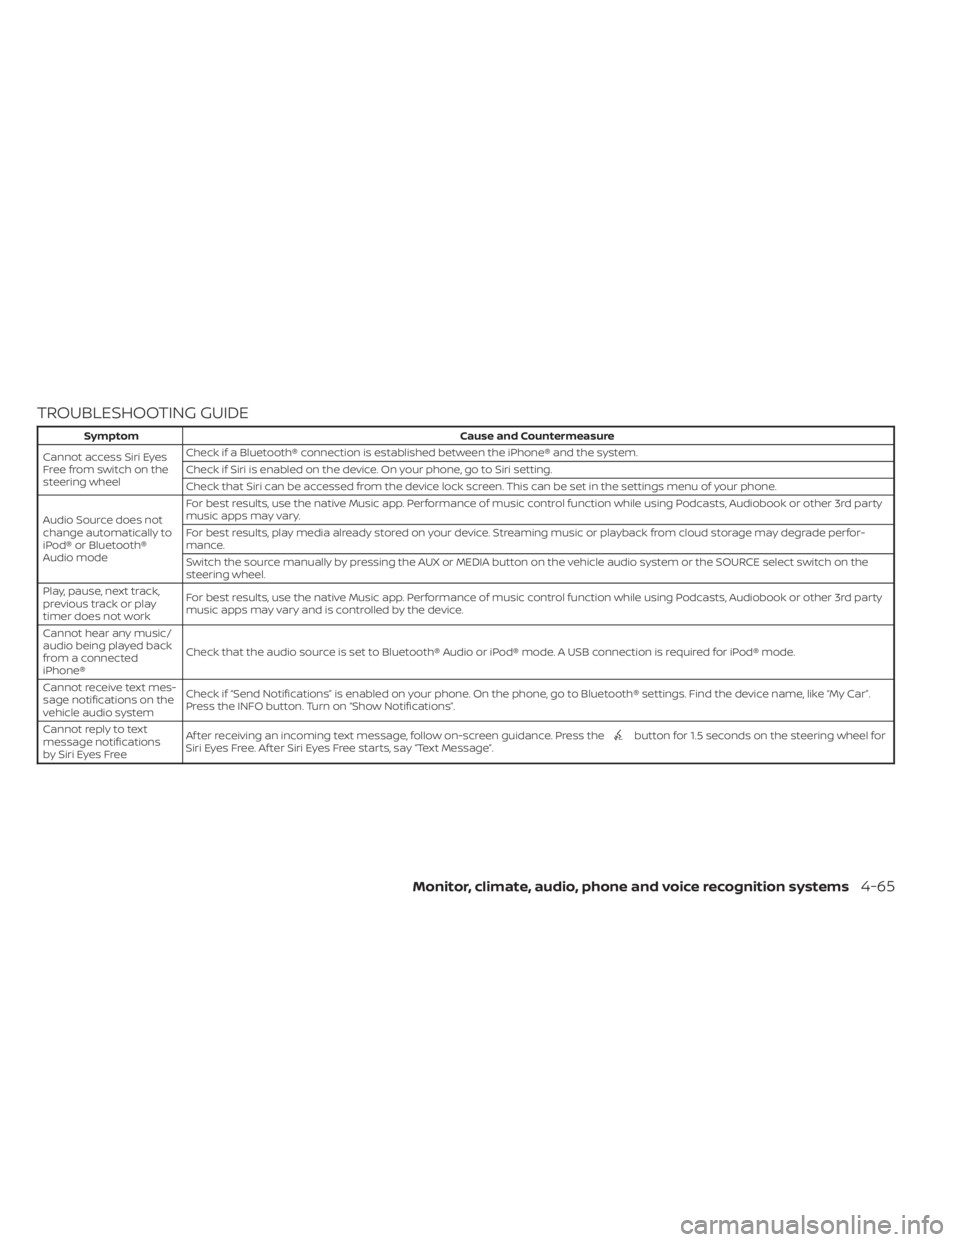
TROUBLESHOOTING GUIDE
SymptomCause and Countermeasure
Cannot access Siri Eyes
Freefromswitchonthe
steering wheel Check if a Bluetooth® connection is established between the iPhone® and the system.
Check if Siri is enabled on the device. On your phone, go to Siri setting.
Check that Siri can be accessed from the device lock screen. This can be set in the settings menu of your phone.
Audio Source does not
change automatically to
iPod® or Bluetooth®
Audio mode For best results, use the native Music app. Performance of music control function while using Podcasts, Audiobook or other 3rd party
music apps may vary.
For best results, play media already stored on your device. Streaming music or playback from cloud storage may degrade perfor-
mance.
Switch the source manually by pressing the AUX or MEDIA button on the vehicle audio system or the SOURCE select switch on the
steering wheel.
Play, pause, next track,
previous track or play
timer does not work For best results, use the native Music app. Performance of music control function while using Podcasts, Audiobook or other 3rd party
music apps may vary and is controlled by the device.
Cannot hear any music/
audio being played back
from a connected
iPhone® Check that the audio source is set to Bluetooth® Audio or iPod® mode. A USB connection is required for iPod® mode.
Cannot receive text mes-
sage notifications on the
vehicle audio system Check if “Send Notifications” is enabled on your phone. On the phone, go to Bluetooth® settings. Find the device name, like “My Car”.
Press the INFO button. Turn on “Show Notifications”.
Cannot reply to text
message notifications
by Siri Eyes Free Af ter receiving an incoming text message, follow on-screen guidance. Press the
button for 1.5 seconds on the steering wheel for
Siri Eyes Free. Af ter Siri Eyes Free starts, say “Text Message”.
Monitor, climate, audio, phone and voice recognition systems4-65
Page 323 of 558
SYSTEM MAINTENANCE
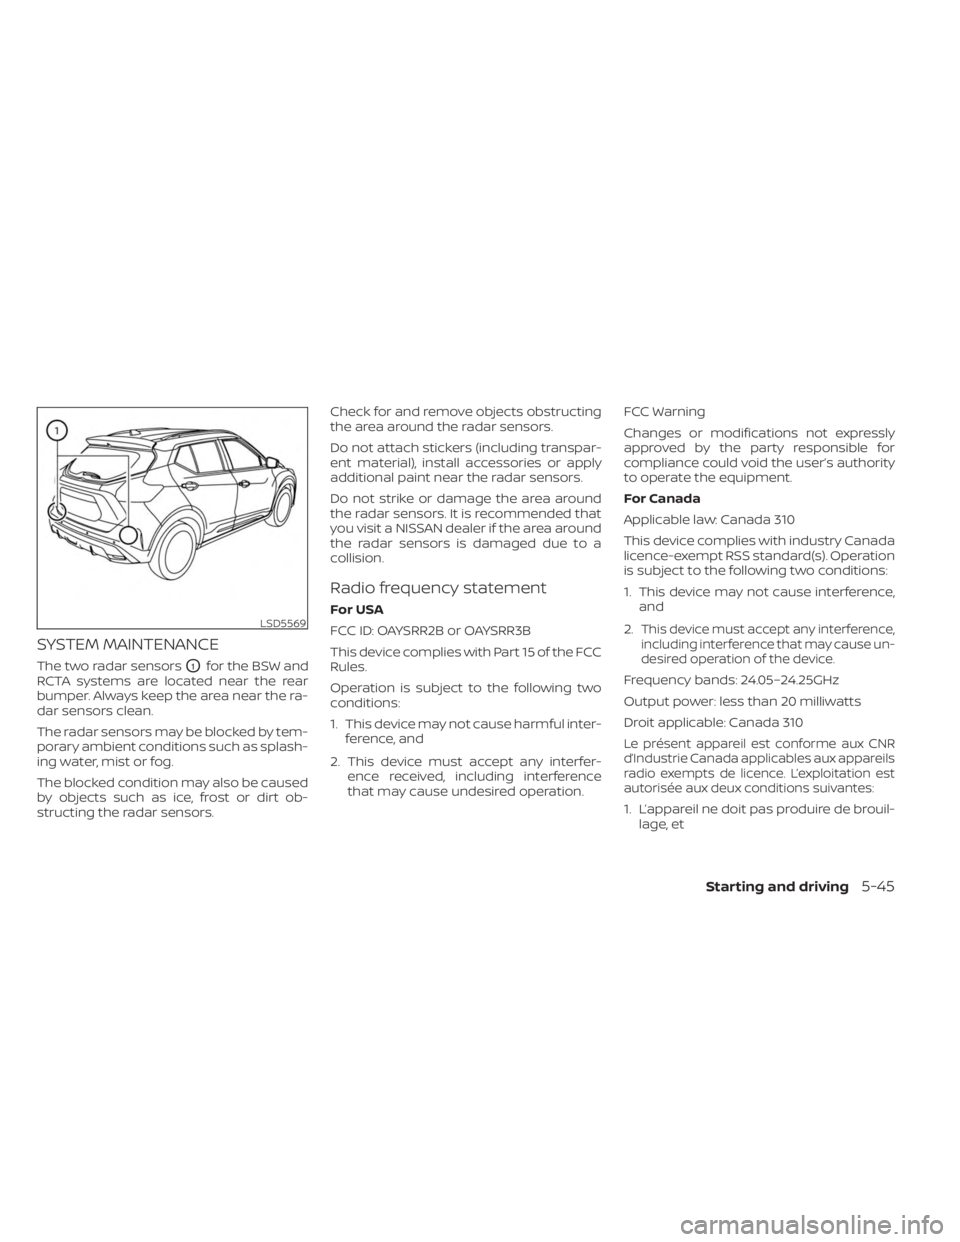
The two radar sensorsO1for the BSW and
RCTA systems are located near the rear
bumper. Always keep the area near the ra-
dar sensors clean.
The radar sensors may be blocked by tem-
porary ambient conditions such as splash-
ing water, mist or fog.
The blocked condition may also be caused
by objects such as ice, frost or dirt ob-
structing the radar sensors. Check for and remove objects obstructing
the area around the radar sensors.
Do not attach stickers (including transpar-
ent material), install accessories or apply
additional paint near the radar sensors.
Do not strike or damage the area around
the radar sensors. It is recommended that
you visit a NISSAN dealer if the area around
the radar sensors is damaged due to a
collision.
Radio frequency statement
For USA
FCC ID: OAYSRR2B or OAYSRR3B
This device complies with Part 15 of the FCC
Rules.
Operation is subject to the following two
conditions:
1. This device may not cause harmful inter-
ference, and
2. This device must accept any interfer- ence received, including interference
that may cause undesired operation. FCC Warning
Changes or modifications not expressly
approved by the party responsible for
compliance could void the user’s authority
to operate the equipment.
For Canada
Applicable law: Canada 310
This device complies with industry Canada
licence-exempt RSS standard(s). Operation
is subject to the following two conditions:
1. This device may not cause interference,
and
2.
This device must accept any interference,
including interference that may cause un-
desired operation of the device.
Frequency bands: 24.05–24.25GHz
Output power: less than 20 milliwatts
Droit applicable: Canada 310
Le présent appareil est conforme aux CNR
d’Industrie Canada applicables aux appareils
radio exempts de licence. L’exploitation est
autorisée aux deux conditions suivantes:
1. L’appareil ne doit pas produire de brouil- lage, et
LSD5569
Starting and driving5-45