Page 118 of 558
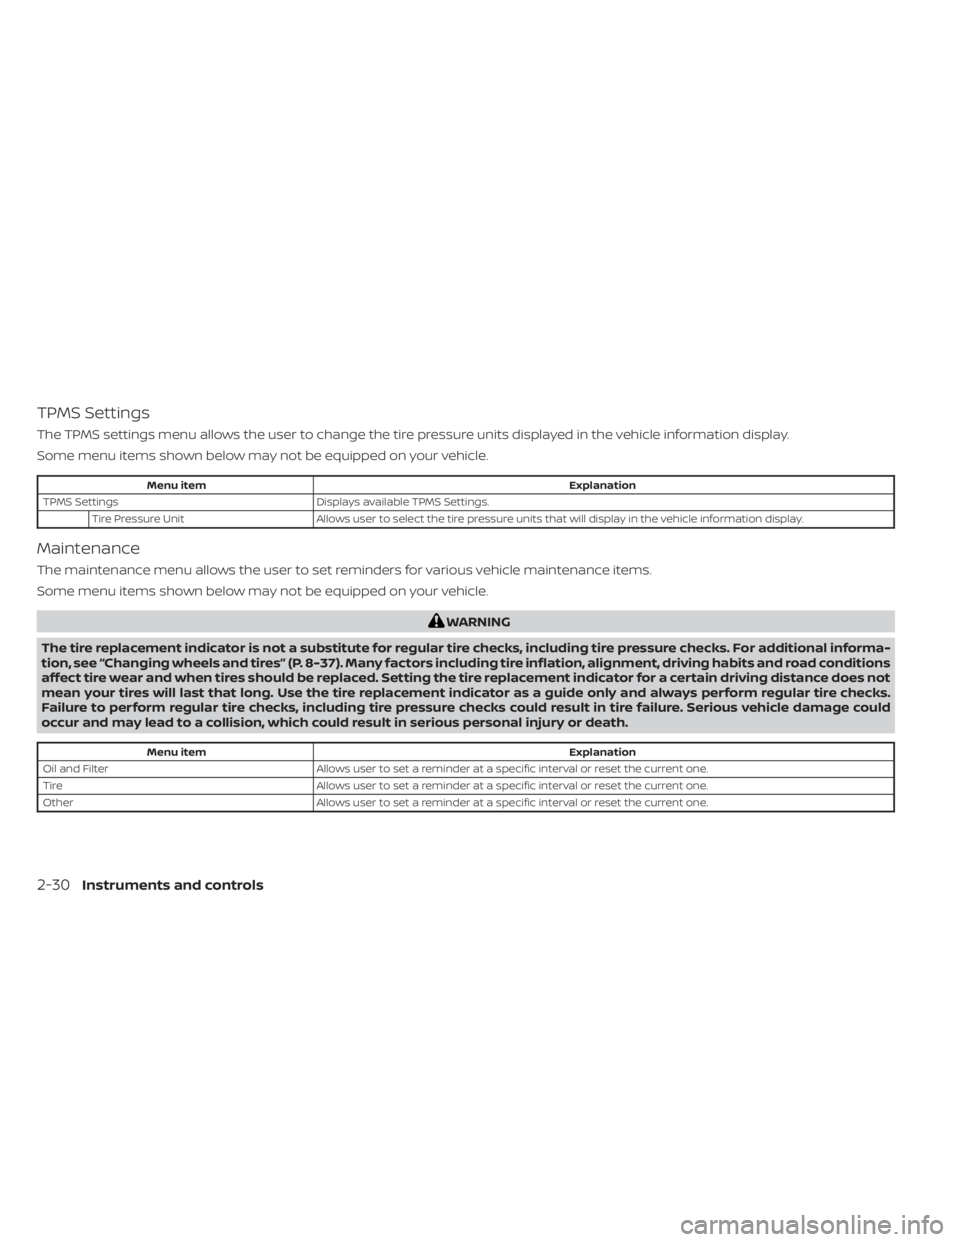
TPMS Settings
The TPMS settings menu allows the user to change the tire pressure units displayed in the vehicle information display.
Some menu items shown below may not be equipped on your vehicle.
Menu itemExplanation
TPMS Settings Displays available TPMS Settings.
Tire Pressure Unit Allows user to select the tire pressure units that will display in the vehicle information display.
Maintenance
The maintenance menu allows the user to set reminders for various vehicle maintenance items.
Some menu items shown below may not be equipped on your vehicle.
WARNING
The tire replacement indicator is not a substitute for regular tire checks, including tire pressure checks. For additional informa-
tion, see “Changing wheels and tires” (P. 8-37). Many factors including tire inflation, alignment, driving habits and road conditions
affect tire wear and when tires should be replaced. Setting the tire replacement indicator for a certain driving distance does not
mean your tires will last that long. Use the tire replacement indicator as a guide only and always perform regular tire checks.
Failure to perform regular tire checks, including tire pressure checks could result in tire failure. Serious vehicle damage could
occur and may lead to a collision, which could result in serious personal injury or death.
Menu item Explanation
Oil and Filter Allows user to set a reminder at a specific interval or reset the current one.
Tire Allows user to set a reminder at a specific interval or reset the current one.
Other Allows user to set a reminder at a specific interval or reset the current one.
2-30Instruments and controls
Page 122 of 558
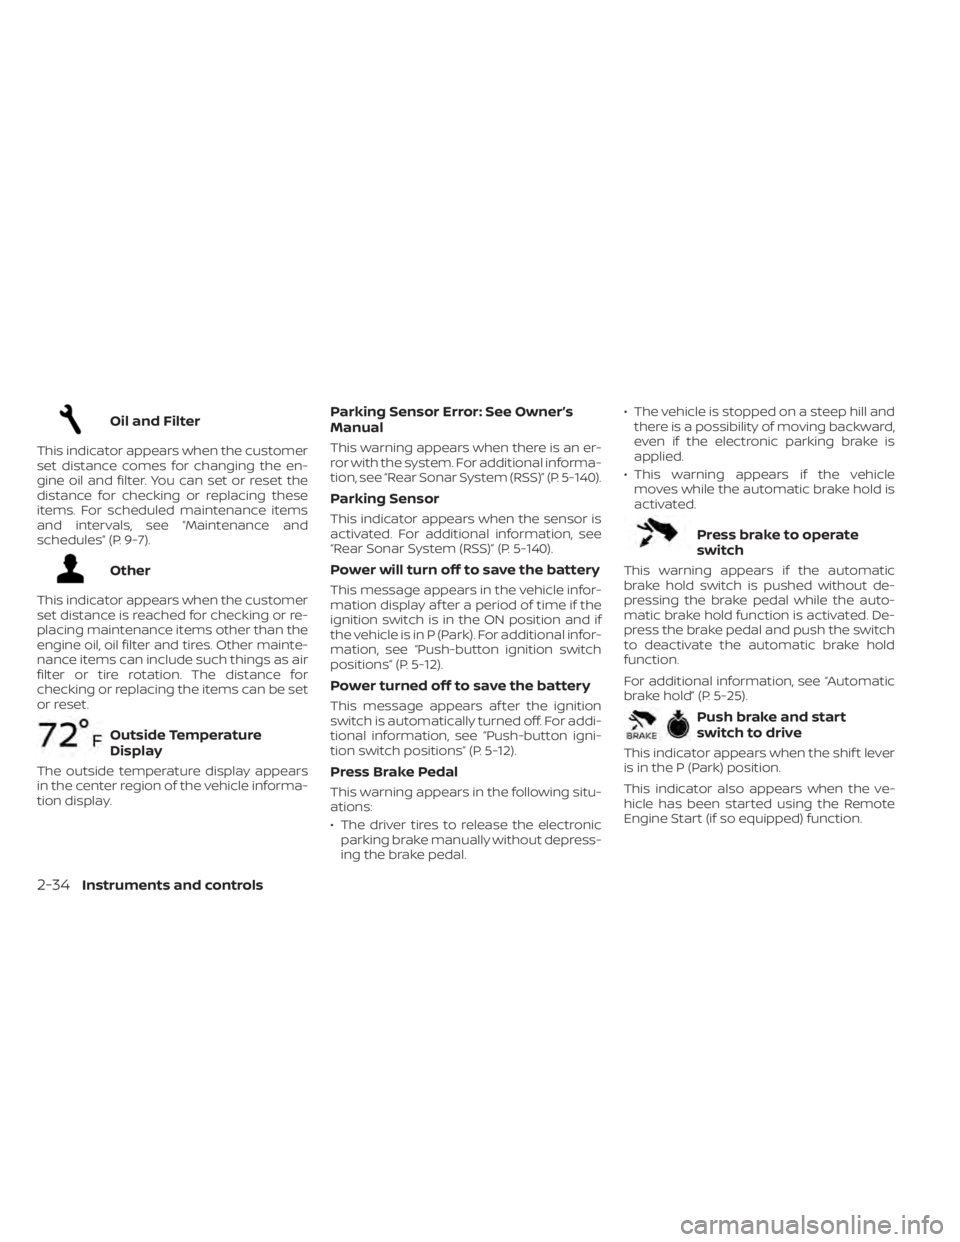
Oil and Filter
This indicator appears when the customer
set distance comes for changing the en-
gine oil and filter. You can set or reset the
distance for checking or replacing these
items. For scheduled maintenance items
and intervals, see “Maintenance and
schedules” (P. 9-7).
Other
This indicator appears when the customer
set distance is reached for checking or re-
placing maintenance items other than the
engine oil, oil filter and tires. Other mainte-
nance items can include such things as air
filter or tire rotation. The distance for
checking or replacing the items can be set
or reset.
Outside Temperature
Display
The outside temperature display appears
in the center region of the vehicle informa-
tion display.
Parking Sensor Error: See Owner’s
Manual
This warning appears when there is an er-
ror with the system. For additional informa-
tion, see “Rear Sonar System (RSS)” (P. 5-140).
Parking Sensor
This indicator appears when the sensor is
activated. For additional information, see
“Rear Sonar System (RSS)” (P. 5-140).
Power will turn off to save the battery
This message appears in the vehicle infor-
mation display af ter a period of time if the
ignition switch is in the ON position and if
the vehicle is in P (Park). For additional infor-
mation, see “Push-button ignition switch
positions” (P. 5-12).
Power turned off to save the battery
This message appears af ter the ignition
switch is automatically turned off. For addi-
tional information, see “Push-button igni-
tion switch positions” (P. 5-12).
Press Brake Pedal
This warning appears in the following situ-
ations:
• The driver tires to release the electronicparking brake manually without depress-
ing the brake pedal. • The vehicle is stopped on a steep hill and
there is a possibility of moving backward,
even if the electronic parking brake is
applied.
• This warning appears if the vehicle moves while the automatic brake hold is
activated.
Press brake to operate
switch
This warning appears if the automatic
brake hold switch is pushed without de-
pressing the brake pedal while the auto-
matic brake hold function is activated. De-
press the brake pedal and push the switch
to deactivate the automatic brake hold
function.
For additional information, see “Automatic
brake hold” (P. 5-25).
Push brake and start
switch to drive
This indicator appears when the shif t lever
is in the P (Park) position.
This indicator also appears when the ve-
hicle has been started using the Remote
Engine Start (if so equipped) function.
2-34Instruments and controls
Page 136 of 558
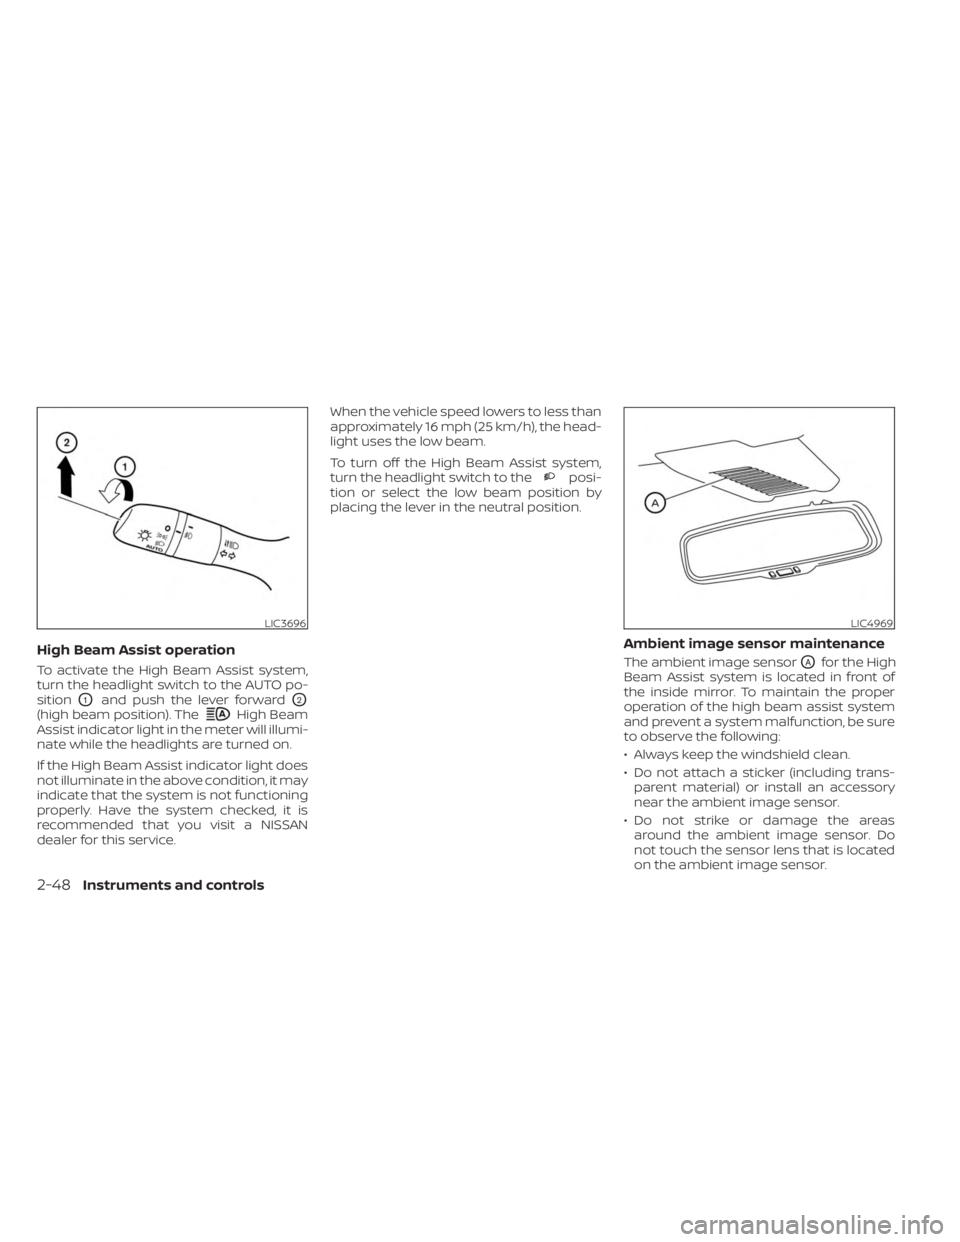
High Beam Assist operation
To activate the High Beam Assist system,
turn the headlight switch to the AUTO po-
sition
O1and push the lever forwardO2
(high beam position). TheHigh Beam
Assist indicator light in the meter will illumi-
nate while the headlights are turned on.
If the High Beam Assist indicator light does
not illuminate in the above condition, it may
indicate that the system is not functioning
properly. Have the system checked, it is
recommended that you visit a NISSAN
dealer for this service. When the vehicle speed lowers to less than
approximately 16 mph (25 km/h), the head-
light uses the low beam.
To turn off the High Beam Assist system,
turn the headlight switch to the
posi-
tion or select the low beam position by
placing the lever in the neutral position.
Ambient image sensor maintenance
The ambient image sensorOAfor the High
Beam Assist system is located in front of
the inside mirror. To maintain the proper
operation of the high beam assist system
and prevent a system malfunction, be sure
to observe the following:
• Always keep the windshield clean.
• Do not attach a sticker (including trans- parent material) or install an accessory
near the ambient image sensor.
• Do not strike or damage the areas around the ambient image sensor. Do
not touch the sensor lens that is located
on the ambient image sensor.
LIC3696LIC4969
2-48Instruments and controls
Page 196 of 558
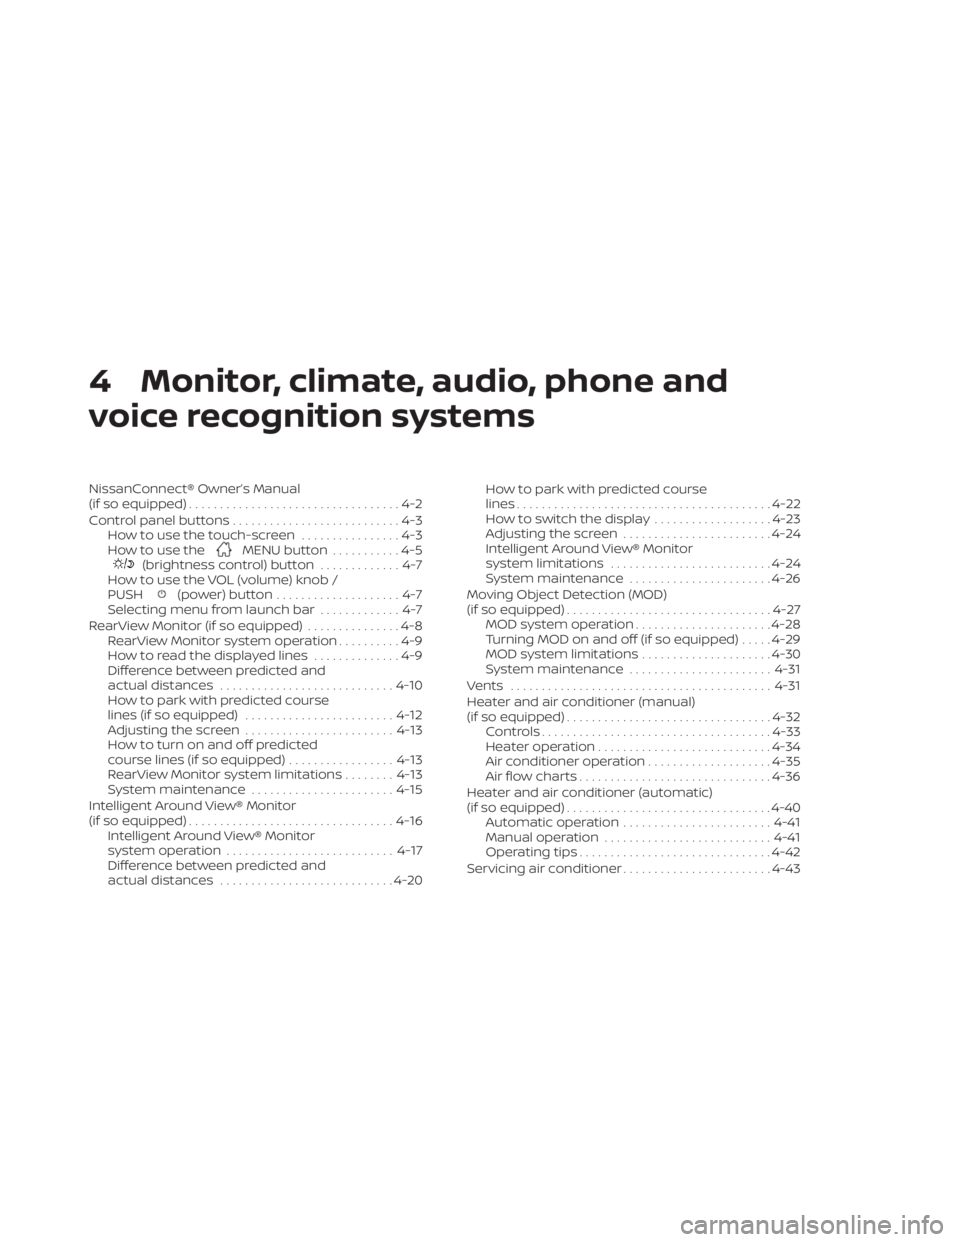
4 Monitor, climate, audio, phone and
voice recognition systems
NissanConnect® Owner’s Manual
(if so equipped)..................................4-2
Control panel buttons ...........................4-3
How to use the touch-screen ................4-3
How to use the
MENU button ...........4-5(brightness control) button .............4-7
How to use the VOL (volume) knob /
PUSH
(power)button....................4-7
Selecting menu from launch bar .............4-7
RearView Monitor (if so equipped) ...............4-8
RearView Monitor system operation ..........4-9
How to read the displayed lines ..............4-9
Difference between predicted and
actual distances ............................ 4-10
How to park with predicted course
lines (if so equipped) ........................ 4-12
Adjusting the screen ........................ 4-13
How to turn on and off predicted
course lines (if so equipped) .................4-13
RearView Monitor system limitations ........4-13
System maintenance ....................... 4-15
Intelligent Around View® Monitor
(if so equipped) ................................. 4-16
Intelligent Around View® Monitor
system operation ........................... 4-17
Difference between predicted and
actual distances ............................ 4-20How to park with predicted course
lines
......................................... 4-22
How to switch the display ...................4-23
Adjusting the screen ........................ 4-24
Intelligent Around View® Monitor
system limitations .......................... 4-24
System maintenance .......................4-26
Moving Object Detection (MOD)
(if so equipped) ................................. 4-27
MOD system operation ......................4-28
Turning MOD on and off (if so equipped) .....4-29
MOD system limitations .....................4-30
System maintenance ....................... 4-31
Vents .......................................... 4-31
Heater and air conditioner (manual)
(if so equipped) ................................. 4-32
Controls ..................................... 4-33
Heater operation ............................ 4-34
Air conditioner operation ....................4-35
Air flow charts ............................... 4-36
Heater and air conditioner (automatic)
(if so equipped) ................................. 4-40
Automatic operation ........................ 4-41
Manual operation ........................... 4-41
Operating tips ............................... 4-42
Servicing air conditioner ........................4-43
Page 201 of 558
Touch-screen maintenance
If you clean the display screen, use a dry,
sof t cloth. If additional cleaning is neces-
sary, use a small amount of neutral deter-
gent with a sof t cloth. Never spray the
screen with water or detergent. Dampen
the cloth first and then wipe the screen.
HOW TO USE THEMENU
BUTTON
To select and/or adjust several functions,
features and modes that are available for
your vehicle:
1. Press the
MENU button.
2. Touch the “Settings” key.
3. Touch the desired item.
LHA5319LHA5318
Monitor, climate, audio, phone and voice recognition systems4-5
Page 211 of 558
SYSTEM MAINTENANCE
CAUTION
• Do not use alcohol, benzine or thin-
ner to clean the camera. This will
cause discoloration.
• Do not damage the camera as the
monitor screen may be adversely
affected. If dirt, rain or snow accumulates on the
camera
O1, the RearView Monitor may not
display objects clearly. Clean the camera
by wiping it with a cloth dampened with a
diluted mild cleaning agent and then wip-
ing it with a dry cloth.
LHA5579
Monitor, climate, audio, phone and voice recognition systems4-15
Page 222 of 558
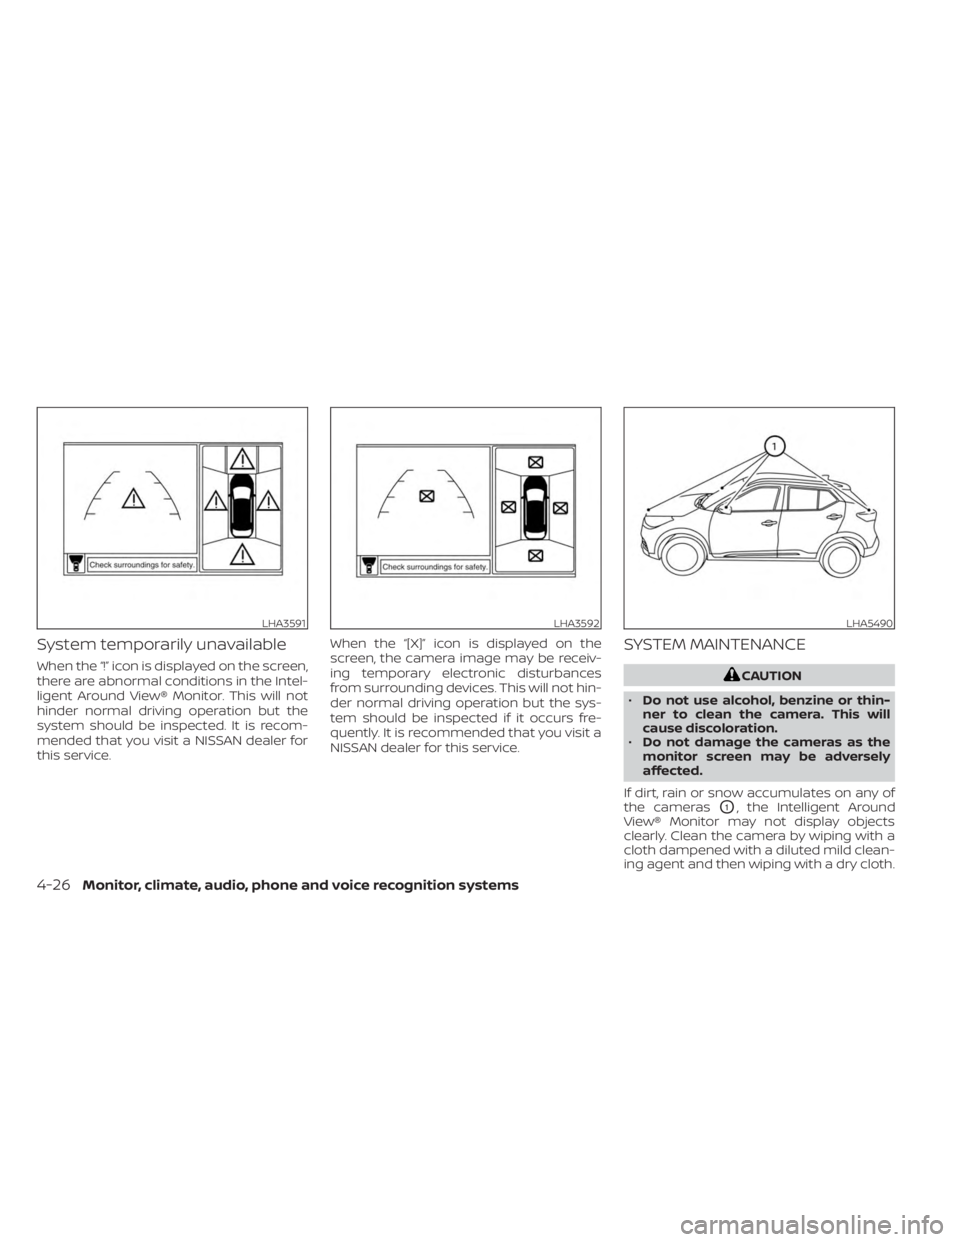
System temporarily unavailable
When the “!” icon is displayed on the screen,
there are abnormal conditions in the Intel-
ligent Around View® Monitor. This will not
hinder normal driving operation but the
system should be inspected. It is recom-
mended that you visit a NISSAN dealer for
this service.When the “[X]” icon is displayed on the
screen, the camera image may be receiv-
ing temporary electronic disturbances
from surrounding devices. This will not hin-
der normal driving operation but the sys-
tem should be inspected if it occurs fre-
quently. It is recommended that you visit a
NISSAN dealer for this service.
SYSTEM MAINTENANCE
CAUTION
• Do not use alcohol, benzine or thin-
ner to clean the camera. This will
cause discoloration.
• Do not damage the cameras as the
monitor screen may be adversely
affected.
If dirt, rain or snow accumulates on any of
the cameras
O1, the Intelligent Around
View® Monitor may not display objects
clearly. Clean the camera by wiping with a
cloth dampened with a diluted mild clean-
ing agent and then wiping with a dry cloth.
LHA3591LHA3592LHA5490
4-26Monitor, climate, audio, phone and voice recognition systems
Page 227 of 558
SYSTEM MAINTENANCE
CAUTION
• Do not use alcohol, benzine or thin-
ner to clean the camera. This will
cause discoloration.
• Do not damage the camera as the
monitor screen may be adversely
affected. If dirt, rain or snow accumulates on any of
the cameras
O1, the MOD system may not
operate properly. Clean the camera by wip-
ing with a cloth dampened with a diluted
mild cleaning agent and then wiping with a
dry cloth.
Adjust air flow direction of side vents by
opening, closing, or rotating.
LHA5490LHA4123
Side vents
VENTS
Monitor, climate, audio, phone and voice recognition systems4-31