Page 14 of 572
1. Rear sliding window (if so equipped)(P. 2-76)
2. Vehicle loading (P. 10-16) Tailgate (P. 3-27)
Truck box (P. 3-27)
3. Towing (if so equipped) (P. 10-27)
4 Rearview camera (P. 4-3, P. 4-11)
5 Rear sonar sensors (if so equipped)
(P. 5-124)
6. Replacing bulbs (P. 8-28)
7. Fuel-filler cap (P. 3-21) Fuel recommendation (P. 10-2)
8. Child safety rear door lock (P. 3-7)
Refer to the page number indicated in
parentheses for operating details.
LII2697
EXTERIOR REAR
0-4Illustrated table of contents
Page 203 of 572
3 Pre-driving checks and adjustments
Keys.............................................3-2NISSAN Intelligent Key® .......................3-2
NISSAN Vehicle Immobilizer System
keys..........................................3-4
Doors ...........................................3-4
Locking with key .............................3-5
Locking with inside lock knob ................3-6
Locking with power door lock switch .........3-6
Rear doors (King Cab® models) ...............3-6
Automatic door locks ........................ 3-7
Child safety rear door lock
(if so equipped) ............................... 3-7
NISSAN Intelligent Key® system ..................3-8
Operating range .............................3-9
Door locks/unlocks precaution ...............3-9
NISSAN Intelligent Key® Operation ...........3-10
How to use the remote keyless entry
function ..................................... 3-13
Warning signals ............................. 3-16
Troubleshooting guide ......................3-16
Remote Engine Start (if so equipped) ...........3-18
Remote Engine Start operating range .......3-18 Remote starting the vehicle
.................3-19
Extending engine run time ..................3-19
Canceling a Remote Engine Start ...........3-19
Conditions the Remote Engine Start will
notwork .................................... 3-20
Hood ........................................... 3-20
Fuel-filler door .................................. 3-21
Fuel-filler cap ................................ 3-21
Steering wheel ................................. 3-23
Tilt operation ................................ 3-23
Sun visors ...................................... 3-24
Vanity mirrors (if so equipped) ...............3-24
Mirrors ......................................... 3-25
Manual anti-glare rearview mirror
(if so equipped) .............................. 3-25
Automatic anti-glare rearview mirror
(if so equipped) .............................. 3-25
Outside mirrors ............................. 3-25
Truck box ...................................... 3-27
Tailgate ..................................... 3-27
Tie down hooks ............................. 3-31
Page 205 of 572
•Wetting may damage the Intelligent
Key. If the Intelligent Key gets wet,
immediately wipe until it is com-
pletely dry.
• Do not place the Intelligent Key for an
extended period in an area where
temperatures exceed 140°F (60°C).
• Do not attach the Intelligent Key with
a key holder that contains a magnet.
• Do not place the Intelligent Key near
equipment that produces a magnetic
field, such as a TV, audio equipment
and personal computers.
If an Intelligent Key is lost or stolen,
NISSAN recommends erasing the ID
code of that Intelligent Key from the
vehicle. This may prevent the unau-
thorized use of the Intelligent Key to
operate the vehicle. For information re-
garding the erasing procedure, it is rec-
ommended that you visit a NISSAN
dealer.
Mechanical key
The Intelligent Key contains the mechani-
cal key.
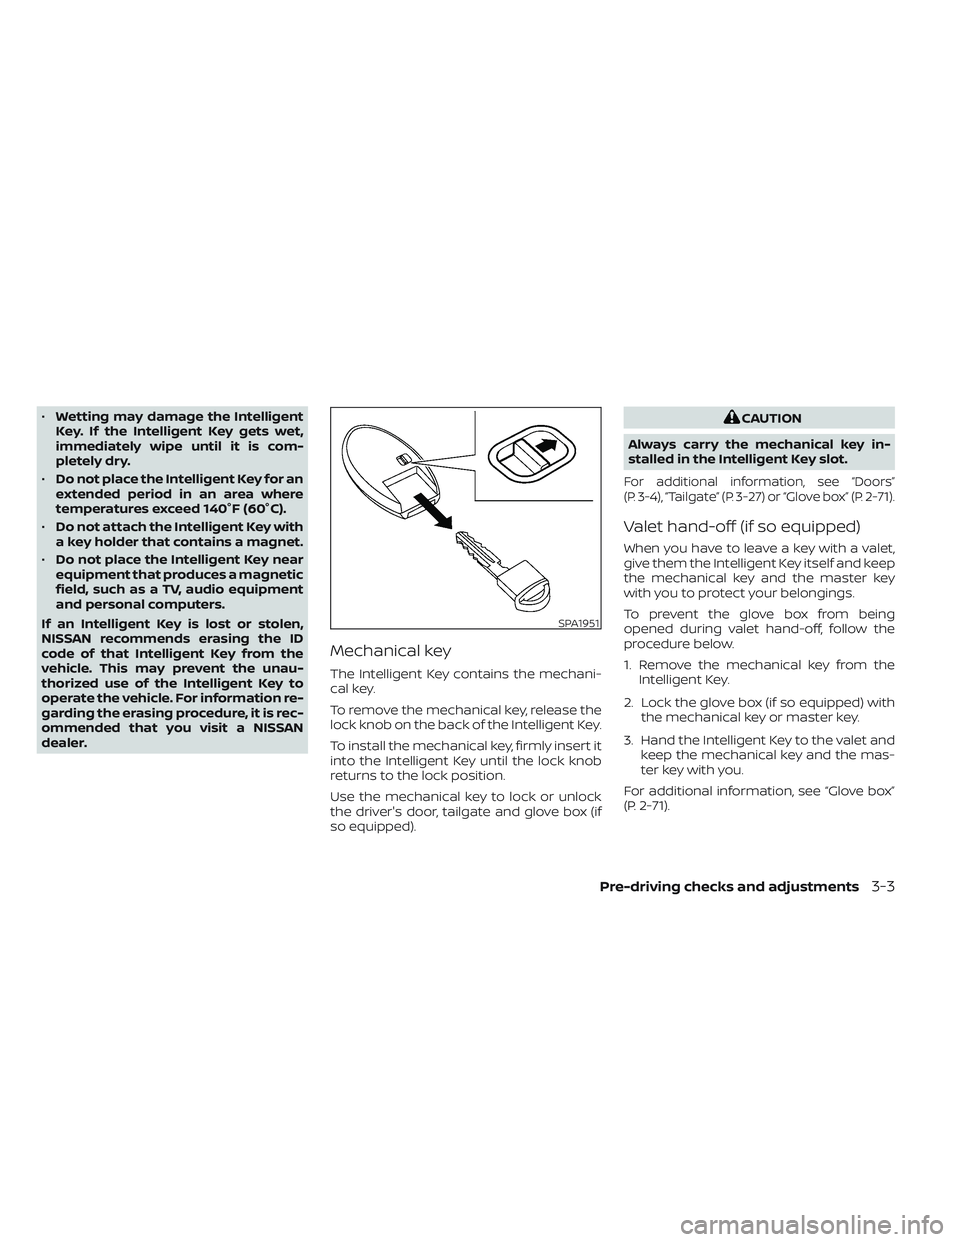
To remove the mechanical key, release the
lock knob on the back of the Intelligent Key.
To install the mechanical key, firmly insert it
into the Intelligent Key until the lock knob
returns to the lock position.
Use the mechanical key to lock or unlock
the driver's door, tailgate and glove box (if
so equipped).
CAUTION
Always carry the mechanical key in-
stalled in the Intelligent Key slot.
For additional information, see “Doors”
(P. 3-4), “Tailgate” (P. 3-27) or “Glove box” (P. 2-71).
Valet hand-off (if so equipped)
When you have to leave a key with a valet,
give them the Intelligent Key itself and keep
the mechanical key and the master key
with you to protect your belongings.
To prevent the glove box from being
opened during valet hand-off, follow the
procedure below.
1. Remove the mechanical key from the Intelligent Key.
2. Lock the glove box (if so equipped) with the mechanical key or master key.
3. Hand the Intelligent Key to the valet and keep the mechanical key and the mas-
ter key with you.
For additional information, see “Glove box”
(P. 2-71).
SPA1951
Pre-driving checks and adjustments3-3
Page 229 of 572
TAILGATE
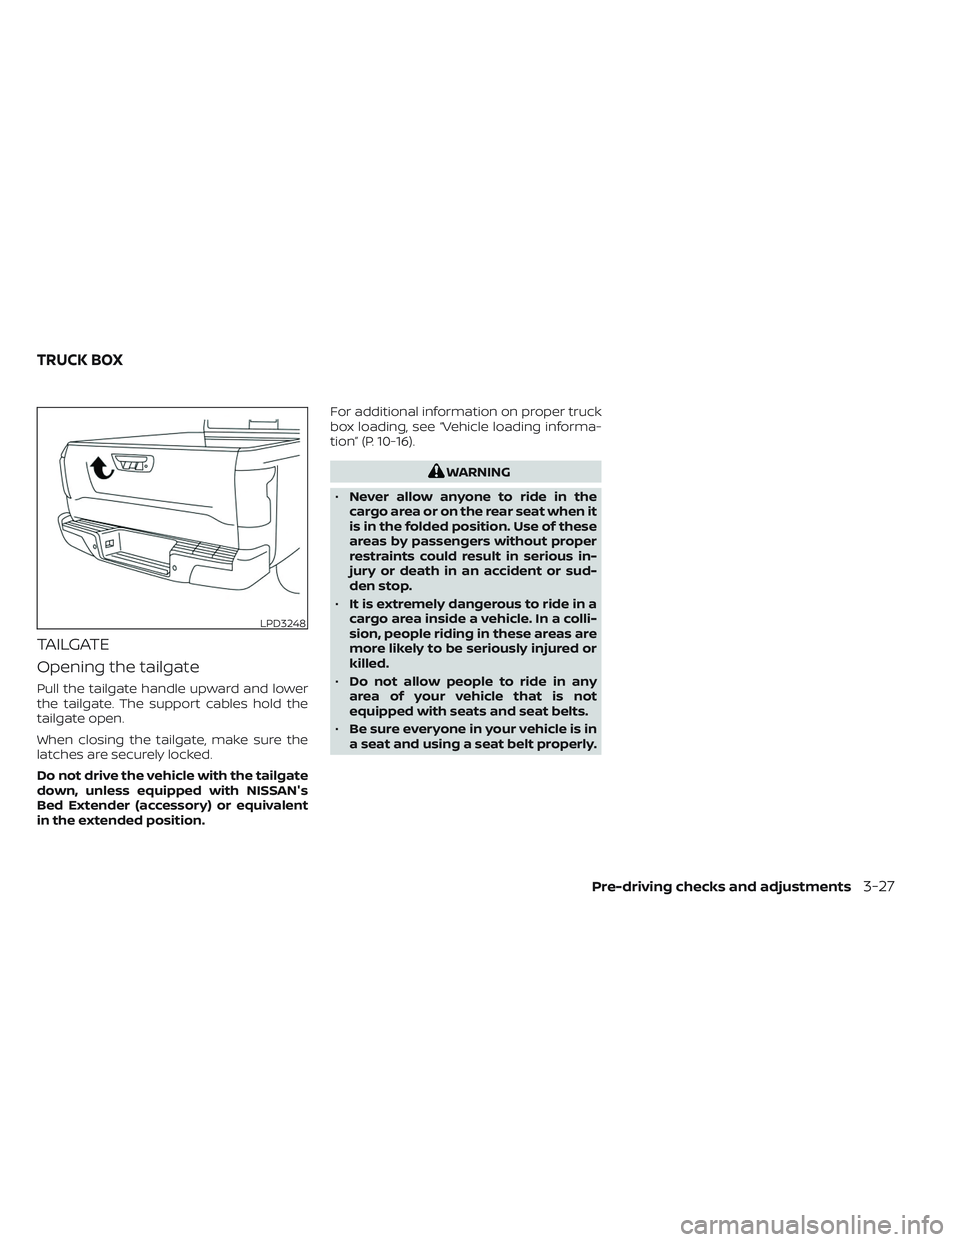
Opening the tailgate
Pull the tailgate handle upward and lower
the tailgate. The support cables hold the
tailgate open.
When closing the tailgate, make sure the
latches are securely locked.
Do not drive the vehicle with the tailgate
down, unless equipped with NISSAN's
Bed Extender (accessory) or equivalent
in the extended position.For additional information on proper truck
box loading, see “Vehicle loading informa-
tion” (P. 10-16).
WARNING
• Never allow anyone to ride in the
cargo area or on the rear seat when it
is in the folded position. Use of these
areas by passengers without proper
restraints could result in serious in-
jury or death in an accident or sud-
den stop.
• It is extremely dangerous to ride in a
cargo area inside a vehicle. In a colli-
sion, people riding in these areas are
more likely to be seriously injured or
killed.
• Do not allow people to ride in any
area of your vehicle that is not
equipped with seats and seat belts.
• Be sure everyone in your vehicle is in
a seat and using a seat belt properly.
LPD3248
TRUCK BOX
Pre-driving checks and adjustments3-27
Page 230 of 572

Disconnecting the rear camera
Before removing the tailgate disconnect
the rear camera by performing the follow-
ing:
1. Open the tailgate to access the rearcamera connector bracket
O1located
on the rear sill.
2. Remove the connector bracket
O2from
the sill by pressing the locking tab in-
ward, in the direction shown, while pull-
ing the bracket apart. 3. Disconnect the chassis wiring harness
O3by pressing inward on the locking
tab, in the direction shown, while pulling
the connectors apart. Hold the connec-
tor firmly to prevent the connector in the
chassis harness from falling into the sill.
4. Take the chassis plug and bracket from the glove box and connect them to the
chassis wiring harness to avoid con-
tamination to the terminals which will
lead to malfunction of the rear camera.
5. Insert the bracket back into the sill. 6. Take the tailgate plug from the glove box
and connect it to the tailgate wiring har-
ness to avoid contamination which will
lead to malfunction of the rear camera.
7. Remove the tailgate. For additional infor- mation, see “Removing the tailgate”
(P. 3-29).
LPD2097
3-28Pre-driving checks and adjustments
Page 231 of 572
Removing the tailgate
1. Release the tailgate support cables.
CAUTION
• The tailgate is heavy. Two people
should remove or install it. Be careful
not to drop it during removal.
• Af ter releasing the support cables,
do not let the tailgate rest on the
bumper. 2. Hold the tailgate at a 15 degree angle.
3. Pull the tailgate out from the lef t side
hinge at an angle.
4. The tailgate slides out of the right side hinge.
Installing the tailgate
1. Insert the tailgate into the right sidehinge.
2. Insert the tailgate into the lef t side hinge.
3. Continue to hold the tailgate at a 15 de- gree angle and attach the tailgate sup-
port cables.
4. Close the tailgate securely.
LPD2208
Pre-driving checks and adjustments3-29
Page 232 of 572
Connecting the rear camera
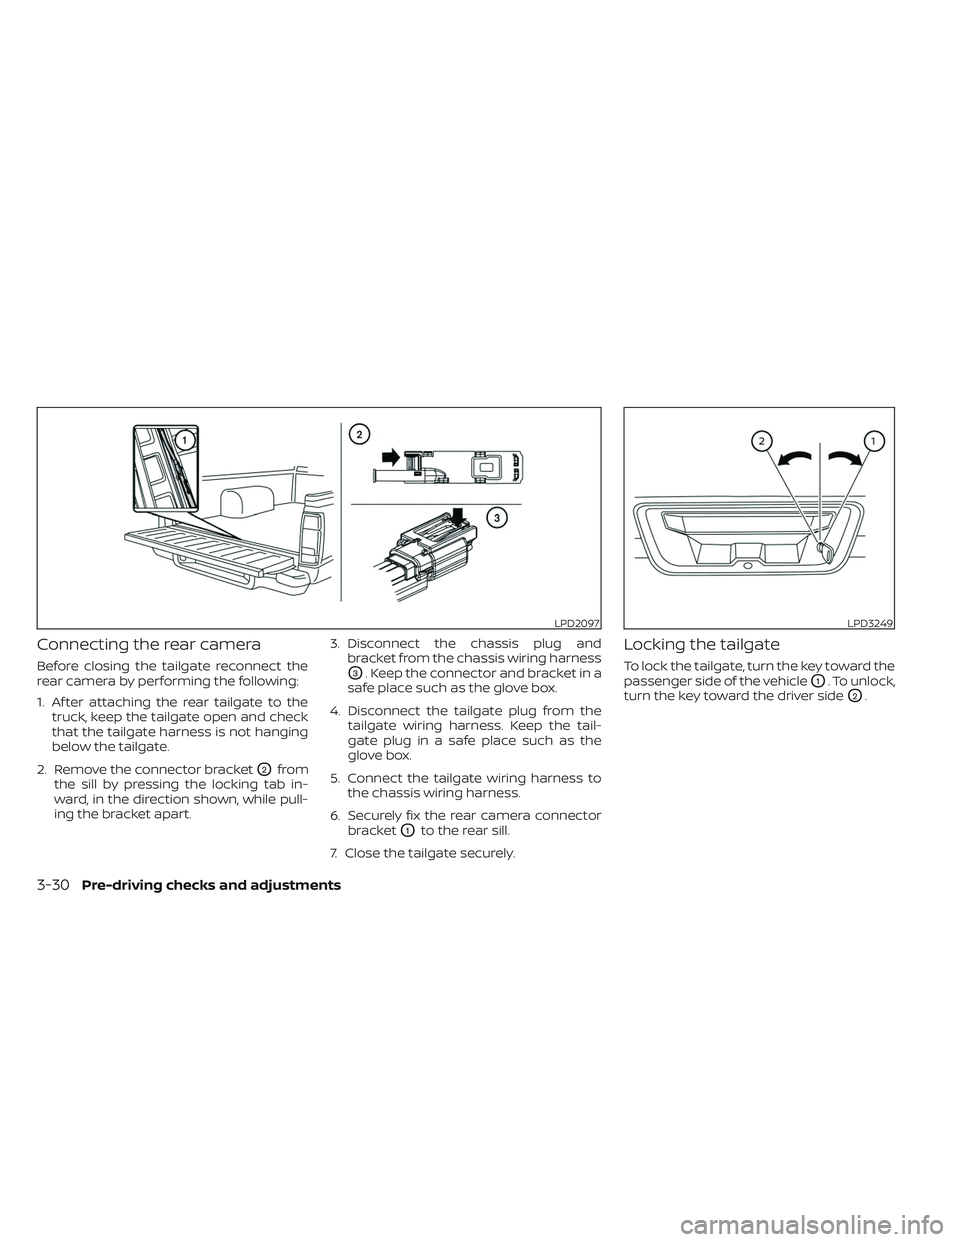
Before closing the tailgate reconnect the
rear camera by performing the following:
1. Af ter attaching the rear tailgate to thetruck, keep the tailgate open and check
that the tailgate harness is not hanging
below the tailgate.
2. Remove the connector bracket
O2from
the sill by pressing the locking tab in-
ward, in the direction shown, while pull-
ing the bracket apart. 3. Disconnect the chassis plug and
bracket from the chassis wiring harness
O3. Keep the connector and bracket in a
safe place such as the glove box.
4. Disconnect the tailgate plug from the tailgate wiring harness. Keep the tail-
gate plug in a safe place such as the
glove box.
5. Connect the tailgate wiring harness to the chassis wiring harness.
6. Securely fix the rear camera connector bracket
O1to the rear sill.
7. Close the tailgate securely.
Locking the tailgate
To lock the tailgate, turn the key toward the
passenger side of the vehicle
O1. To unlock,
turn the key toward the driver side
O2.
LPD2097LPD3249
3-30Pre-driving checks and adjustments
Page 238 of 572
•The distance guide line and the ve-
hicle width line should be used as a
reference only when the vehicle is on
a level paved surface. The distance
viewed on the monitor is for refer-
ence only and may be different than
the actual distance between the ve-
hicle and displayed objects.
CAUTION
Do not scratch the camera lens when
cleaning dirt or snow from the front of
the camera.
The RearView Monitor system automati-
cally shows a rear view of the vehicle when
the shif t lever is shif ted into the R (Reverse)
position. While in R (Reverse), pressing the
CAMERA will cycle through guideline op-
tions. The radio can still be heard while the
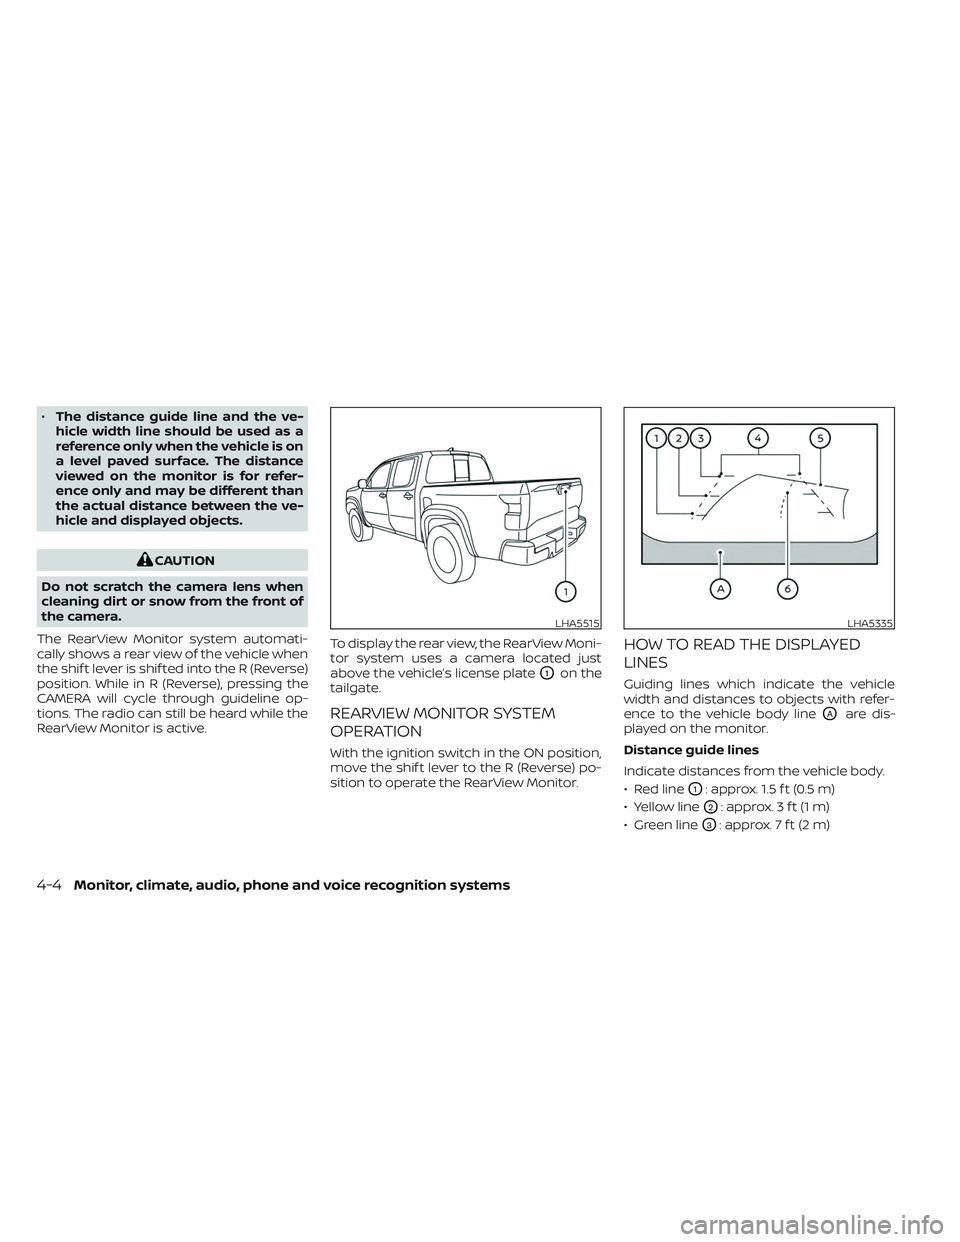
RearView Monitor is active. To display the rear view, the RearView Moni-
tor system uses a camera located just
above the vehicle’s license plate
O1on the
tailgate.
REARVIEW MONITOR SYSTEM
OPERATION
With the ignition switch in the ON position,
move the shif t lever to the R (Reverse) po-
sition to operate the RearView Monitor.
HOW TO READ THE DISPLAYED
LINES
Guiding lines which indicate the vehicle
width and distances to objects with refer-
ence to the vehicle body line
OAare dis-
played on the monitor.
Distance guide lines
Indicate distances from the vehicle body.
• Red line
O1: approx. 1.5 f t (0.5 m)
• Yellow line
O2: approx. 3 f t (1 m)
• Green line
O3: approx. 7 f t (2 m)
LHA5515LHA5335
4-4Monitor, climate, audio, phone and voice recognition systems